Installing Ubuntu 8.10 under Microsoft Virtual PC 2007

Installing Ubuntu 8.10 under Virtual PC 2007 is the easiest version to install by far, if you have all your bits in the right place. First, you’ll need Virtual PC 2007, available from the Microsoft site. After you have installed VPC 2007, you will need to download and install Virtual PC 2007 Service Pack 1 (SP1). I had problems until I installed VPC SP1.

Next you will need to setup a Virtual Machine to hold your Ubuntu. If you are not familiar with VPC, you can see either my step by step instructions or my instructional video. And finally you’ll of course need a copy of Ubuntu 8.10. You can either download an ISO from the Ubuntu website, which is what I did, or find it in some magazine.

OK, just so we’re on the same page, I created my VPC and named it “Ubuntu 8.10 Desktop”. I used that name for both the vmc and vhd files. I selected “Other” for my OS, adjusted the ram to 512 MB. Finally, I left my hard disk at the default of 16384, Launch the VPC and point your virtual CD Drive at either the ISO or the drive where your Ubuntu disk is.

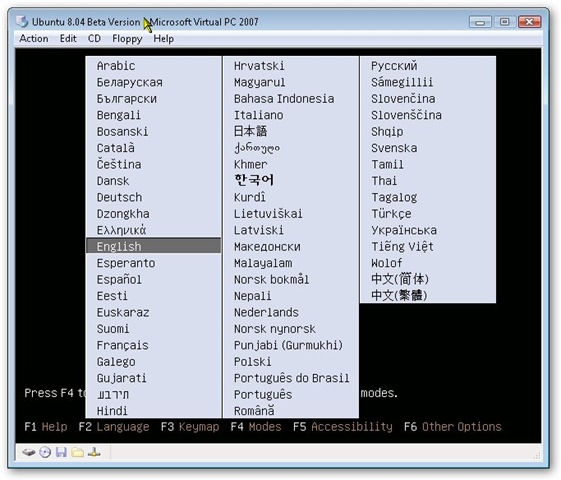
Upon launching, the first thing you see is a screen asking your to select your language. Pick yours by highlighting it and pressing enter. (Note you can get full size images for any of these by clicking on the image.)

u810_01

Now you are at the default screen.

u810_02

Now you need to press F4, for Modes, and pick “Save graphics mode” and press Enter.

u810_03

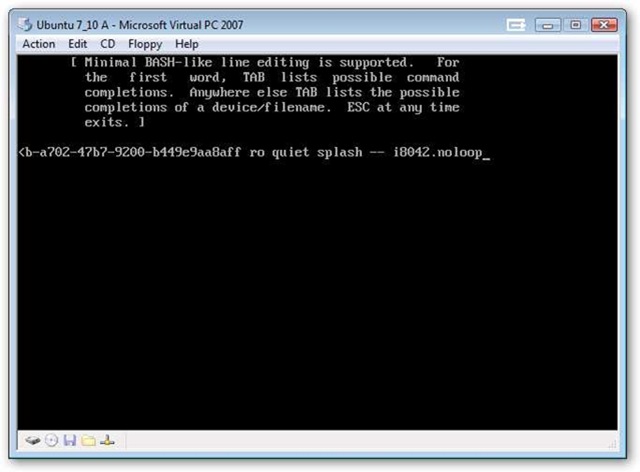
You should now see “Try Ubuntu without any changes to your computer” already highlighted (as you can see two pictures above). Press enter to begin. During the launch the screen will go black, and stay that way for several minutes (about 4 on my system). Don’t freak out, this is normal. You may also see some garbled graphics, something like:

u810_04

Again, not a big deal, wait several minutes (was about 5 on my system) then the screen turned brown, lasted a few more minutes then came up to a login prompt that offered to auto login as “user” in 10 seconds. I did nothing, and just let it automatically log me in. OK, to be honest I was distracted watching the latest Tekzilla on my Zune piped over my TV and missed the screen, but the end result was the same, I got this screen:

u810_05

If you want, you can explore the Ubuntu environment for a few minutes. One reminder / hint, when you click inside the virtual machine, your mouse becomes “trapped”. To be able to drag the mouse outside the window, press the RIGHT ALT key. (The left won’t work!) Your mouse will escape to freedom.

OK, let’s say we’ve done some playing, or perhaps are single minded and are ready to install. Just double click the install icon. Note it took about 2 minutes on my slow machine for the install dialog to appear. When it did, here’s the screen I saw:

u810_06

Since my language is already selected, all I have to do is click Forward to go onto the next screen. On this screen, it asks me to pick a city near me so the time zone can be set. Chicago IL is in my time zone, so I’m going to pick it, you should of course pick one in your time zone. You can do so by clicking the map, but this is something of a pain, so I went with the faster route of picking my town from the drop down then clicking Forward.

u810_07

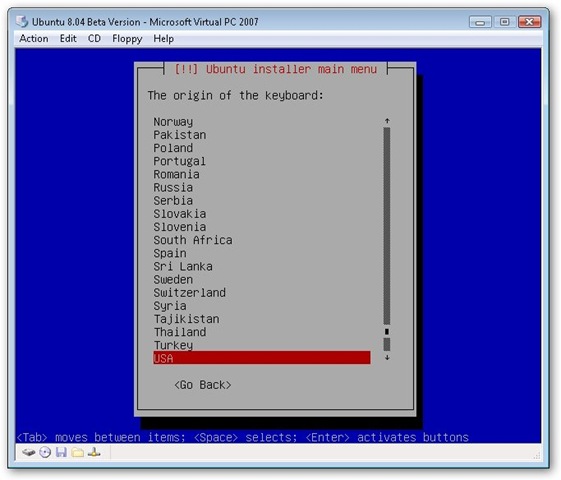
On the next screen we’re asked about keyboard layout. Select yours, or in my case it was already selected so all I had to do was hit Forward yet again.

u810_08

After hitting Forward, you’ll see a dialog appear briefly while Ubuntu looks at your disks while it determines the best way to partition them.

u810_09

You don’t have to do anything but be patient while this runs, on my system this was about 3 to 4 minutes. When it completed the step 4 appeared:

u810_10

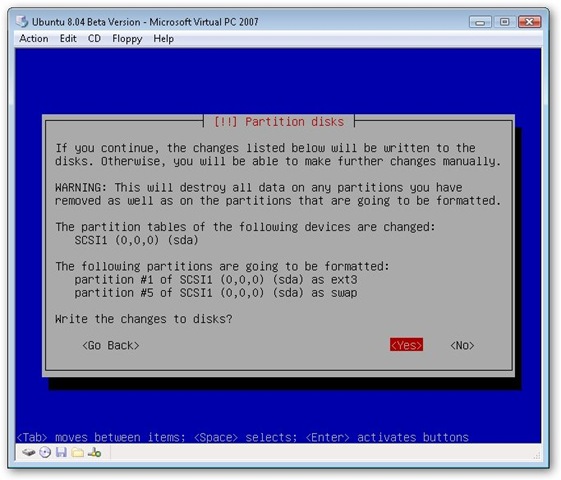
Here we can adjust how to allocate disk space. Since this is all virtual, the simple thing to do is just accept the default and click Forward, which we will do. The disk will churn for a few minutes (in my case about 5) while it sets up the partition then present me with the next screen.

u810_11

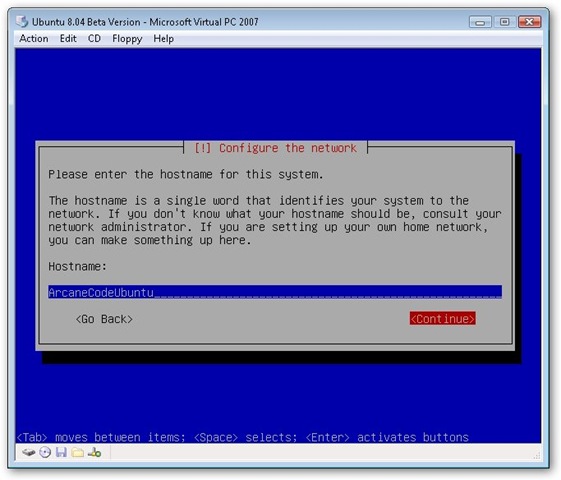
You can see here it’s prompting me for information so it can setup my login name. Here I filled it out, and let it go with the default name to login with (my first name, arcane). I created a password, remember this as it’s also your admin password. Under name of the computer it defaults to your user name with a “-desktop” after it. I added the word virtual in the middle to make it clear.

Also note the “Log in automatically” check box. If you are the only person using this VPC, and you don’t plan to store anything sensitive you may want to check this on, but if you are in doubt leave it unchecked to maintain the best security. For myself, I’ll leave this unchecked.

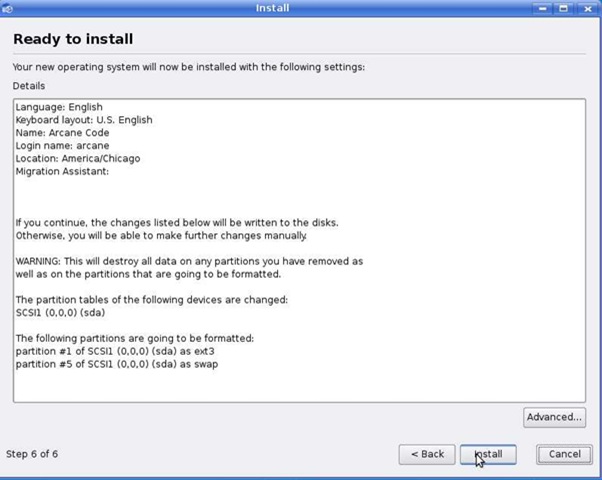
OK, this last screen says we’re almost to the finish line.

u810_12

Just click “Install” to begin the install.

u810_13 

This dialog will keep you updated as it goes through it’s install. I did notice an odd quirk, when my mouse was escaped the install seemed to pause itself. If possible you may want to leave your focus inside the VPC. Don’t be alarmed if your screen goes black during the install. Just move your mouse around or hit some key. The blank screen is the Ubuntu screen saver kicking in! You’d think the installer would disable the screen saver, but it does not.

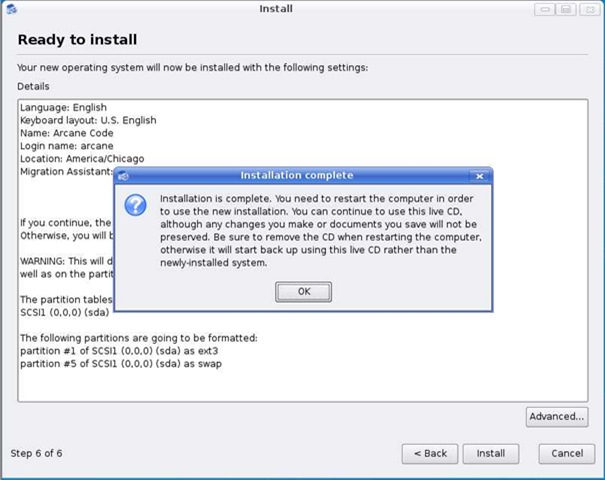
On my system, the total install time was just under an hour and a half. When it was complete, I saw this message appear:

u810_14

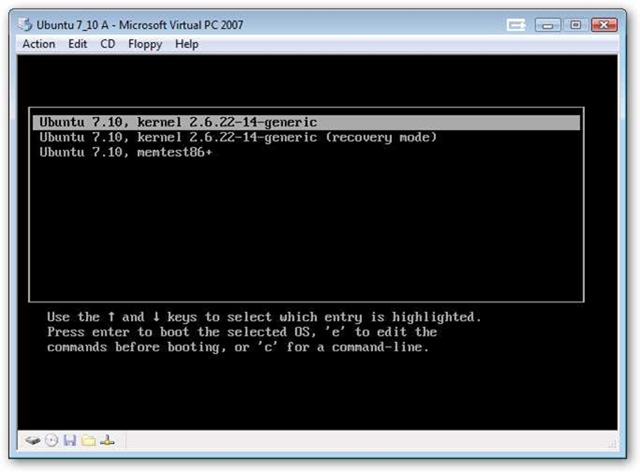
I picked Restart Now. Only it didn’t, screen went blank after a few minutes and eventually everything just stopped. I wound up doing an Action, Reset from the VPC menu. After that the boot process for my VPC was quite similar to the test environment we just did. I saw the screen go blank for about a minute and a half, then the Ubuntu logo appeared. Another delay while it churned, showed me some garbled graphics, but finally (about 4 minutes total) it fired up and worked fine. I was able to enter my login info and away I went.

u810_15

I want to stress the key to success was, I believe, in having the latest Virtual PC service pack installed, attempts to load prior to updating with the service pack all failed due to graphics errors.

The entire install process took about an hour and a half on my single core Vista computer with 2 gig of ram. I was creating the VPC on an external hard disk via firewire connection. Your install times will vary accordingly.

Installing Ubuntu 8.04 under Microsoft Virtual PC 2007

Update: Nov. 10, 2008 – New blog post on installing Ubuntu 8.10 is now out: http://tinyurl.com/vpcubuntu810

I’m pleased to say that Ubuntu 8.04 is probably the easiest install I’ve had to do with VPC yet! One quick reminder before we begin, when working inside the VPC your mouse will get “trapped” or captured by the virtual computer. You won’t be able to move outside of it. To get it released, just press the RIGHT side ALT key. Left side won’t work, has to be the RIGHT side of your keyboard.

To start with, create a new Virtual PC. For a tutorial, see either my step by step tutorial or the video tutorial if you need more instructions. Since I had the space, I was using 768 meg of ram, and left the disk space at the default of 16 gig. If you can, try and use at least 512 meg of ram for good performance. Use the CD menu option to capture the desktop ISO you downloaded from Ubuntu, or if you have a real CD put it in the drive and capture that. When it launches, you’ll see this screen. (By the way, you can click on any of the screens to see the full size graphic, these have been resized slightly to fit in with most common browser sizes).

[image - Select Language]

Pick your language, I just took the default of English.

[image - Safe graphics mode]

Now press F4 to select an alternate starting mode. When it pops up, change to Safe graphics mode, as you see above, and press Enter. Now pick “Try Ubuntu…” (should already be selected) and press enter. Do NOT pick the Install Ubuntu option, I kept getting VPC errors when trying to install directly.

Additionally, don’t be alarmed if the screen goes black for a while, then you see some garbled graphics. This is perfectly normal, it is just passing through and will be OK when Ubuntu gets done doing it’s thing. It took me about 7 minutes to get from the previous screen to the next one.

[image - live environment]

After it boots you should be in the live session trial environment. Double click the Install icon to begin the install process.

[image - Installer welcome screen]

Screen 1 is just a welcome screen, although you can change your language here if you need to. Press Forward to continue.

[image - Installer Set Time Zone]

Next it wants to know where you are, at least time zone wise. I’m in the central time zone, but set yours appropriately and click Forward.

[image - Installer Pick your Keyboard]

Next you can specify your keyboard. Since I’m using a typical USA style keyboard, I just clicked Forward.

[image - Installer Prepare Disk Space]

Next it asks how you want your disk space partitioned. Since we’re in a virtual environment, it made the most sense to just take the defaults and click Forward.

Be aware, after clicking forward my mouse went into the “I’m busy” mode, and there was a delay while the disks were prepared. Mine went about five minutes. Don’t be alarmed, just wait a few minutes and you’ll then proceed to the next screen.

[image - Installer Who Are You]

On this screen, first supply your name; this will be used in documents and the like. The next text box is the important one – it is for your Ubuntu user name. By default it uses your first name, now is your chance to change it. I rather like mine so will accept it. Next you’ll need to key in a good password and confirm, and finally name the computer. When you are happy, click Forward.

Now is where you may get confused. In the screen above, you are on step 5 of 7. When you click forward, you are suddenly on step 7 of 7. I’m not sure what happened to step 6, I even ran the installer yet one more time just to make sure it was gone. Perhaps it was kidnapped by space aliens?

[image - Installer is Ready]

Apparently even without the missing step 6, the installer has everything it needs. Just click Install to begin the install process. Kick back and wait. Don’t be alarmed if the screen goes black during the process, it’s just the screen saver kicking in. Just click in the VPC and wiggle your mouse and your display will return. I had it kick in several times during the 45 (or so) minutes it took to get everything installed.

[image - Install complete time to reboot]

Eventually Ubuntu will complete it’s install, then give you the above message. On the Virtual PC menu click CD, then release the cd. Then click on the big Restart now button inside VPC.

This was the only real snag I hit in the whole install process, I waited a while and it never did restart on its own. I gave it about five minutes, then in the Virtual PC menu I clicked Action, Reset. I figured since it’s already installed, I wouldn’t lose anything, and I was right.

The boot process does take a few minutes; you’ll see some text then a black screen for about 90 seconds. Then it comes up to the big Ubuntu logo and the orange bar as it loads. You’ll see some garbled graphics for a few seconds, then the login screen finally appeared. I gave it my user id and password, and minutes later I was in Ubuntu.

One last piece of business, fixing the networking. First make sure the network card is mapped to a real network card in your computer. For more instructions on this, see my video, Virtual PC Advanced Settings. After that, click on the network icon in the upper right side of the toolbar, as you see below.

[image - Fix Networking]

Then just pick Wired Network. Once connected you’ll be free to visit your favorite websites!

[image - Ubuntu open for business]

I haven’t had much time to check out other features, or get the sound working so if anyone has a quick fix for that by all means leave a comment below.

Virtual PC 2007 Step by Step – The Advanced Settings Video

As I promised last week, here is the second video in the Virtual PC Step by Step series. This video covers some of the advanced settings available in Virtual PC, and explains what the ramifications are for changing each setting.

If you don’t wish to watch in the flash player, or want the best video quality, I would suggest downloading the 20 megabyte WMV file from this link:
https://arcanecode.files.wordpress.com/2008/04/vpcstepbystep02.wmv

This video is the second in the VPC series, you can find the first one on this post from last week.

I would appreciate some feedback, do you like the video format? Is it useful? I’m enjoying producing the videos, but I do find it takes considerably more time than a regular blog post. Let me know your thoughts in the comments area.

BarCamp Birmingham 2 Presentations

At last Saturday’s BarCamp Birmingham, I gave three presentations. The first was on Virtual PC 2007. For more info on it just look to my previous post, which has the first video on VPC. I’m currently working on the other videos in the series and should have them up this week.

My second presentation was “The Developer’s Experience”. As promised in the session, here’s the complete PDF of my slides: The Developer Experience. This has hyperlinks to all of the tools I presented.

My final presentation was on Full Text Searching on SQL Server 2005.  First, here is a PDF of the PowerPoint slides: Full Text Search Power Points

Next, most of the demos used SQL statements. This PDF file has all of the SQL plus some associated notes. Full Text Search Demo Scripts

Finally, I didn’t get to demo this at BarCamp due to time, but I do have a WPF project that demonstrated how to call a full text search query from a WPF Windows application. Annoyingly enough WordPress (who hosts my blog) won’t let me upload ZIP files, so I renamed the extension to pdf. After you download the file to your drive, remove the .pdf and put the zip extension back on, then it should expand all the source for you correctly. (Yes, I know, I really need to get a host server for binaries, one of these days I’ll get around to it, but for today…) Source for WPF Demo

See you at the next BarCamp!

Virtual PC 2007 Step by Step – The Video

Some time back I wrote a post titled Virtual PC Step By Step, which detailed the steps to setup a new machine in Virtual PC. Since we now have a new version (VPC 2007) I decided it was time to update the post. Only now I’ve done it in video form! Yes, Arcane Code is now producing videocasts for the web. This is the first in what I plan to be a series of video content.

Without further delay, here is the video in flash player:

Or you can download the 640×480 WMV version here (about 8.5 megabytes in size):
https://arcanecode.files.wordpress.com/2008/04/vpcstepbystep01.wmv

This is my first, so let me know how this works for you. Still working out various video editing settings, as well as the many options for WordPress. Your feedback will help to improve future productions.

Installing Ubuntu 8.04 Beta under Virtual PC 2007

Update: April 24, 2008 Today Ubuntu 8.04 was released, and it’s a much easier install. Ignore the directions below, and instead jump to my post for April 24th, 2008 – Installing Ubuntu 8.04 under Microsoft Virtual PC 2008.

Like a lot of folks I was interested in working with the latest Ubuntu. However, I had some real issues getting it installed under VPC. On the good news side the pesky mouse problem is gone, apparently the kernel got updated to fix the mouse bug that plagued us with 7.10.

A quick disclaimer, the instructions below were created using BETA software. As new betas trickle out, or the final version is released, some of the things here may or may not work for you.

I do have some bad news. Attempting to install the standard desktop version, when the install got 6% into the Partitioning phase the VPC either locked up, or crashed all together with an unrecoverable error. Now for the good news, I did find a way to get Ubuntu 8.04 Beta installed, but it took some work on the post install to get the display to work. Hang with me though and I’ll show you the steps.

First, you need the right bits. Go to the http://www.ubuntu.com/testing/hardy/beta website . Scroll past the download area and find a mirror that is appropriate to your area. I chose http://mirrors.easynews.com/linux/ubuntu-releases/8.04/ as I live in North America, but all of the pages look the same.

Once on the mirror site, scroll down past the Desktop area, down past the Server section, until you find the “Alternate install CD” area. That’s the one you want! I used the one for the PC Intel platform.

OK, fire up Virtual PC 2007 and create a new machine, I’ll assume you are familiar with VPC and won’t recreate those instructions here. Only note I’ll make is to make sure and pick ‘Other’ for the OS, and for memory you need at least 256 meg of ram for Ubuntu, 512 would be better. Of course if you have more, feel free to bump it up to 768 or even 1024. Since I had the available ram I used 768.

Boot the machine, and use the CD menu to mount the Alternate Install CD ISO that you had downloaded. After it boots you’ll see this screen:

clip_image001

Just press Enter to continue to the next screen.

clip_image002

Again, all we have to do is press Enter to continue.

clip_image003

Now select your native language. Since mine is English all I had to do is press Enter.

clip_image004

After picking my language, Ubuntu further wants to narrow in on where I live by asking about my country. I picked my country and pressed Enter.

clip_image005

Next Ubuntu wants to detect my keyboard. If you want you can go through the default of Yes, and walk through a series of screens where you press a letter on your keyboard, or tell it you don’t have that key. Frankly I found it much faster just to tell it what kind of keyboard I had, and picked No and pressed Enter.

clip_image006 

Now it’s asking what the origin country of my keyboard is, since mine is USA (the default) all I had to do is press Enter.

clip_image007 

Next I’m asked what keyboard type. If you want to use something different (I know a few fans of Dvorak) you can pick those, but since I’m using a standard keyboard, I just went with the default you see above and pressed Enter. A

After doing so, the installer went through a series of screens where it was doing a lot of scanning of my (virtual) system and installing various components. It took about 10 to 15 minutes to get to the next screen.

clip_image008 

Here we are asked to give our system a name as it will be known on the network. The default name is ubuntu, but I modified it to what you see above so it would be unique. I would advise you to do the same, in case you wind up running your VPC on a network with others. Once you name your system, tab to Continue and press Enter.

clip_image009 

On this screen you are asked what time zone you live in. I live in the great state of Alabama, which is in the Central time zone, select the time zone for your state and press Enter.

clip_image010 

Next we are asked about partitioning the drive. I just took the default that you see here and pressed Enter.

clip_image011 

Now Ubuntu wants to make sure we understand that it’s about to wipe out what’s on the drive. Since it’s just a virtual drive, that’s fine we can safely press Enter to continue without risking any damage to our host ‘real’ hard disk.

clip_image012 

Ubuntu wants to make sure we really understand it’s about to wipe the drive and create two partitions. It even makes the default No. Change the answer to Yes, and press Enter. At this point a rather long process begins, on my system it was around fifteen to twenty minutes. Your time may vary depending on your system speed and hard disk speeds.

clip_image013 

Now we are asked for our full name. I just entered my nick name here, but you can put your full name if you wish. This will not be your login, but just used as the initial default in e-mails and the like. Once you enter a name, tab down to Continue and press Enter.

clip_image014 

OK, now it is asking you what name you want to use for a login / user ID. Make sure you pick something good as you may be keying this often. By default the installer takes your first name and lower cases it. That’s fine for me, so I’ll just press Enter to continue.

clip_image015 

Next you are asked for a password. Enter a good password, tab down to Continue and press Enter. On the next screen, which I won’t bother to show you as it looks almost identical to this one, it asks us to retype the password. Do so, again tab down to Continue and press Enter to proceed to the next screen.

Ubuntu will do a short install, then show you this:

clip_image016 

Ubuntu wants to find out if you need to use a proxy server. If you do, enter it here. Most people do not, so all you have to do is tab down to Continue and press Enter.

One last question from Ubuntu, asking about the system clock:

clip_image017 

While it’s true many servers are set to UTC, most home machines are not, so I took the NO option and pressed Enter. On my system it took about an hour before I got to the next screen. It didn’t hang up through most of it until the very end. It stayed at 97% – Cleaning up… for quite a bit. But eventually it moved on to the next screen.

clip_image018 

OK, you may think this is the finish line, but not quite. We still have to edit two files before we can use the system, otherwise we wind up with garbled graphics. When you press Enter on the screen above to reboot, look very carefully at the screen during the reboot. When you see the line:

Grub Loading Please Wait…

Immediately press the ESC key, and you should see this menu.

clip_image019 

Change the menu to the second option and press e to edit the line. This will bring up the next screen.

clip_image020 

Move to 2nd line and press e to edit. At the end of the line, add a space then vga=791 . Press Enter to save the change, which returns you to the above screen. Now press b to boot. The system will work, the screen may even go black for a minute, but eventually you will bring you to the following display.

clip_image021 

Change option to root – drop to root shell prompt, tab to OK and press Enter. This will drop you to a command prompt.

clip_image022 

At the command prompt, type sudo nano /etc/X11/xorg.conf and press Enter. This will bring up the nano editor, and let you edit the file that controls system settings.

Scroll down until you find the section titled Section “Screen” . At the bottom add the line DefaultDepth 16 as you see in this snapshot:

clip_image023 

I put spaces, not tabs between DefaultDepth and 16. Once done, press CTRL+O (that’s the letter O, not a zero) to writeOut the file, then CTRL+X to close the editor.

OK, one more file to edit. Now type in sudo nano /boot/grub/menu.lst as you see in this screen snippet, and press Enter.

clip_image024

Now scroll down to the very end of the file. What we are looking at is the menu that appears when you press the ESC key on the GRUB loader. We are going to modify the first item, which is the default, to boot in VGA 1024×768 16k color mode.

Find the first line that says kernel at the end of the file (see where my mouse is pointing in the screen capture below.

clip_image025

Hit the END key to go to the end of the line. The line ends with quiet nosplash. Remove those two words and replace them with vga=791 , as you see below.

clip_image026

Hit CTRL+O (that’s the letter O for writeOut) to save it, then CTRL+X to exit the nano program. When you are returned to the command prompt, type in sudo reboot and press Enter to reboot Ubuntu.

This time, don’t press anything at the grub menu, just let it load. What I found was during the boot you wind up with a black screen that lasts about one minute, but if you carefully observe you’ll notice your drive light flashing. It then returns to a text screen, and eventually you are presented with a pretty screen asking you to login.

clip_image027

Enter your user name and press Enter, then on the next screen type in your password and press Enter again. And after a minute or two of churning… TA-DA!

clip_image028

I’m still looking into things like networking and sound, but at least these instructions will get you up and running with the Beta.

As I said at the beginning, these instructions are based on BETA code. When the final version is released sometime this month things may or may not change. Feel free to post your experiences in the comments area, along with any tips you may have on getting up and going with things like networking and sound.

Differencing Disks in Virtual PC 2007

Yesterday I mentioned I was going to get SQL Server 2008 installed in a Virtual PC (VPC). Now, I could have setup a virtual machine from scratch, or copied an existing one. But there’s a better way: differencing disks. Differencing disks allow you to create a virtual machine, then use it as a base for new machines. Much like you would create a base class and then let new classes inherit from your base.

My first step was to create a brand new virtual PC. I chose Windows Server 2003, using the one from my MSDN license. I could also have gone with XP, or the advanced versions of Vista licenses you to install up to four virtual machines in addition to itself as the host. So I get my VPC setup with Windows Server 2003, and make sure all of the windows updates have been applied, service packs, etc. In addition, if there are any additional tools / utilities I’d like to have available for every machine I’ll be wanting create from it I’ll install those as well. I’m thinking of things like UltraEdit / Notepad++, IE7, AllSnap, etc. I finally conclude by shutting down the machine.

Exit Virtual PC, and go to the folder where your virtual PC’s reside. First delete the VMC file (the small one) of your Virtual PC. You won’t need it any more, as you’ll never open this VPC directly. If you did, you would break all the machines that inherit from it. Again, not unlike changing the signature of a base class.

Next, mark the VHD, the hard drive as Read Only. Again this is for your protection, to keep you from doing something accidental to the base. At this point we have our base machine created, and can now make new machines from it.

Launch Virtual PC again. Click on File, Virtual Disk Wizard. You are given a simple dialog that lets you know you’re in the Virtual Disk Wizard. Click Next to move along.

[Picture 1 - Welcome to Virtual Disk Wizard]

Next it asks if we want to create a new disk or edit an existing one. We’ll want to create a new one, so just click Next.

[Picture 2 - Create a new virtual disk]

Now it wants to know what kind of disk to create. We’re doing a hard disk, so just take the default of virtual hard disk and click next.

[Picture 3 - Disk Type]

Now it asks where you want to put your virtual hard disk. I keep mine on my D drive, and use a naming convention. I start with the OS, then the main software I am using. I then use either the word Working, to indicate it’s alright to launch and work in it, or Base, to show the vhd should only be used to inherit from and not be launched. In this case I will be using this as a working area for my SQL Server 2008 CTP6, so I used Working. You are free of course to name it whatever you want, use a name like “Hanselman is cool.vhd” if you like I just prefer something a bit more logical.

[Picture 4 - Disk Location]

OK, this is where you need to pay attention, as this is the first time you’ll need to change a default. Here you are asked what type of virtual hard drive to create. The default is dynamically expanding, and it’s what you’d want to use if you are installing an OS from scratch or are creating a second hard drive for your virtual machine. Fixed size would be used if you are creating a disk for something like a USB drive and want to make sure it won’t get too big. Again, this would be used when you need an empty drive.

In our case we want the third option, Differencing. What this does is tell the Virtual PC application to base the new hard drive on an existing one. From here on out, only the changes you make to the virtual drive will be recorded. This has a lot of benefits. First it saves you disk space, in that you can use the same base with multiple virtual machines. Second, it lets you install the base OS only once, and not have to keep recreating it over and over. Finally, you can create multiple generations of disks. For example, I could create a base of Windows 2003, then another base with Visual Studio added. I could then use that base to inherit from, and create two drives. One could be used with SQL Server 2008, the other with SQL Server 2005. In our case we’re keeping it simple, so pick Differencing and click next.

[Picture 5 - Hard Disk Options]

Next we need to pick the virtual hard drive we want to base our new machine on. In this case I am selecting my Windows Server 2003 core base, and clicking next.

[Picture 6 - Pick Base Hard Drive]

Next we are told it has all the info it needs. All we have to do is click Finish and we’ll have our new Virtual Hard Disk.

[Picture 7 - Complete Disk Creation]

Virtual PC thoughtfully tells us it was successful.

[Picture 8 - Confirmation Message]

OK, we have a new disk, but now we need to tell Virtual PC we want to use it. Back on the Virtual PC Console, Select File, New Virtual Machine Wizard OR click the New… button on the console. Virtual PC has a need to tell us what we just picked, so just click Next.

[Picture 9 - Create Machine Wizard]

This time we are creating a new virtual machine, which will be based on the virtual hard drive we just created, so take the default and click next.

[Picture 10 - Create a machine]

Next we need to give our machine a name. I usually give it the same name as the hard drive, except for the vmc extension. Name yours and click next.

[Picture 11 - Macine name and location]

Now it asks what OS we’ll be using. Note it has automatically detected that I’m using Windows Server 2003, so all I have to do is click next.

[Picture 12 - Confirm Operating System]

Now it asks what my default RAM size will be. I figure 256 MB is a bit small, since I have the ram I upped it to 768 MB. Set yours according to the free space you can spare and click next.

[Picture 13 - Select default amount of memory]

Now we’re asked if we want to use an existing disk or create a new one. Obviously we want to use the differencing one we just created, so click next.

[Picture 14 - Existing Disk or New Disk - We want existing]

Next it asks where our existing drive is, pick it out using the Browse… button or type it in.

[Picture 15 - Pick name of existing disk]

Let me call your attention to the Check Box, “Enable undo disks”. If you leave this unchecked, your virtual machine will behave like a normal computer. Any changes you make are applied and saved. If you check the undo option on, then during your session any changes are written to a temporary file. When you exit the VPC, you are asked if you want to save any changes you made. If you say yes, they will be permanently applied to the virtual machine. If you say no, they are discarded, lost forever. Undo disks are ideal for test situations where you want to run the same changes over and over but not save them. Testing software installs, for example, or in a classroom where you want the students to do labs but not save them.

While Undo Disks can be very helpful, in this situation I don’t really need them as I want to keep all my changes so I will leave this unchecked and click next.

[Picture 16 - Complete Machine Wizard]

OK, we’re at the finish line. All we have to do is click Finish to complete the creation of our new virtual machine.

Let me call your attention to the file sizes of our new machine. Take a look at them in explorer…

[Picture 17 - Explorer snapsho showing small size of vhd]

Note how tiny the vhd file is right now. That’s because it’s based on another drive, where all the OS bits are. As we open it and apply changes (such as installing SQL Server 2008) it will grow in size, but we’ll always be able to save the disk space of the OS as it’s coming from another file.

The down side to differencing disks is speed, because they are in multiple files the performance won’t be as great. Additionally you can’t update the base machine without breaking its descendants. However, differencing disks offer several advantages as well. They save you time, in that you can create a base OS once and use it over and over. As you can see above they can also save you disk space, in that the core OS only takes up space once on your drive and not over and over.

Consider Differencing Disks, and whether they might be appropriate to your development environment.

Installing Kubuntu 7.10 In Virtual PC 2007

After last weeks post on Ubuntu 7.10 (https://arcanecode.wordpress.com/2007/10/18/installing-ubuntu-710-under-virtual-pc-2007/), I had several requests for Kubuntu. Since I’m happy to please, here are the step by step instructions for Kubnutu. By the way, I’ve reduced the screen sizes a little to make them fit the flow of the blog, but you can click any of them to see them in full size should you need to make out any of the details.

If you haven’t already done so, you’ll need to download the latest image of Kubuntu, you can get it from http://www.kubuntu.com/download.php .

Kubuntu has some of the same issues as Ubuntu under Virtual PC when it comes to graphics and the mouse. When you fire up the VPC with the Kubuntu disk in the drive (or you’ve captured it’s ISO image), you’ll want to move the highlight down to “Start Kubuntu in safe graphics mode”. To fix the mouse, at least for this session, press F6 for boot options, and type in “i8042.noloop” after the –. Once your screen looks like the one below, press Enter to continue.

k710_001

Once Kubuntu boots, click the install icon on the desktop to begin the installation process.

k710_002

On the Welcome screen, just confirm your language, then press Next.

k710_003

In this step you get to play Carmen whats-her-name and do the “Where in the world are you” bit. Select a city in the time zone in which you live, then click Next.

k710_004

Now pick your keyboard, and click Next.

k710_005

On the disk space screen, just take the defaults and click next.

k710_006

OK, now we actually have to do some work, and give Kubuntu some info. Make sure to remember your password, not only will you need it to login but you’ll also need it for any commands that need super user privlidges.

k710_007

OK, Kubuntu finally knows everything it needs in order to install so just hit next.

k710_008

And wait. And wait. And wait. If you thought Ubuntu took a while to install, just wait for Kubuntu. My experience was a couple of hours, but to be fair I was also playing a couple of Quicktime videos (some of the cool shows from http://www.revision3.com) and testing an openSuse install in another VPC. And I have sloooooooooooow hard disks, so your milage (or kilometers) may vary. But it’ll still take a while.

About 84% or so into it I got this error. This is similar to the error I got with Ubuntu, just click OK to let it keep going. Oh, and wait some more.

k710_009

Yea! It finally finished the install.

k710_010

When you get to this screen, just press OK, then reboot Kubuntu. Don’t forget to eject the CD (or release the ISO) during the reboot. But before you press OK, make sure to read the next step!

OK, time for a tricky part. Pay close attention during the reboot. When you get to the screen that talks about the GRUB menu, press the ESCape key. You should see a screen like this:

k710_011

With the top line highlighted, press the e key to edit the command line.

On the next screen, press the down arrow once to highlight the line that begins in “kernel”, then press e again to edit that line. When the edit screen appears, we need to add the – i8042.noloop to the end of the line. It should look something like:

k710_012

Press Enter, then when you return to the screen with “kernel” on it, press ‘b’ (just the letter b) to boot Kubuntu. What this will do is enable the mouse for this session only! Once we get booted, we’ll fix the mouse permanently, so hang on.

When the login screen appears, enter your user name and password (the ones you entered on the “Who Are You” screen during the installation) and press enter. Now give it a minute while Kubuntu finishes loading.

OK, now it’s time to fix that pesky mouse issue once and for all. Click on the big K in the lower left (it’s like the Start button in Windows), and go to System, then bring up Konsole.

k710_013

Now in the Konsole window, type in

sudo kate /boot/grub/menu.lst

and press enter.

k710_014

Enter your password when prompted, and you should be in the kate editor. Note you may see a few errors on the terminal window. These can be ignored.

Once kate is up, scroll to the very bottom of the editor where you’ll find three sections of “title… kernel… “ etc. In the first section, which is the default, we need to edit the kernel line to add:

— i8042.noloop

to the end of the line, as you see here. Once done, save it by using File, Save on the menu or clicking the floppy disk. Then exit kate (File, Quit) and exit the terminal window (type exit and press enter, or close by just clicking the x button as you would in Windows).

k710_015

And that’s it, you should be good to go and enjoy Kubuntu 7.10 virtually.

PS If you found this useful, please give it a digg so others can find it too.

Installing Ubuntu 7.10 Under Virtual PC 2007

Update April 24, 2008 – The newest version of Ubuntu, 8.04 is out. Look for complete install instructions here.

Update April 7 2008 – If you are interested in also playing with the 8.04 BETA, you can read my post here.

Ubuntu version 7.10 was just released. In keeping up with tradition I’d like to describe step by step instructions on how to install and get it running under Virtual PC 2007.

Before I begin though, I’d like to give a word of thanks to all the folks who have commented on my previous postings. It was their findings and efforts that helped to create this work, I owe them a big thanks.

OK, first thing you need is to download the Desktop install ISO from the Ubuntu site (http://www.ubuntu.com). You can skip right to the download mirrors page at http://www.ubuntu.com/getubuntu/downloadmirrors if you want to save a few mouse clicks.

Once you get it downloaded fire up Virtual PC, and create a new machine. If you are not familiar with VPC, see my step by step instructions for creating a machine at https://arcanecode.wordpress.com/2006/09/20/virtual-pc-step-by-step/ Make sure to pick “other” as the OS type. I used 512 meg of ram because my system has 2 gig, but if you have less you can get away with 256 meg of ram for the Ubuntu Virtual machine.

Fire up your new virtual machine, and use the option in the CD menu to “Capture ISO image”. Point the image at the desktop iso you just downloaded.When it starts, immediately press the down arrow, so that “Start Ubuntu in Safe Graphics Mode” is highlighted.

When 7.04 was released, the new kernel had issues with the mouse emulated by Virtual PC. To be blunt, the mouse just didn’t work. However, several work arounds were found. The easiest was brought to my attention via comments on the blog, the i8042.noloop option. That’s what we’ll implement, so we can use the mouse during the “live mode”.

Hit the F6 key, for Options. When the line appears, at the very end type in a space (if there’s not one after the two dashes) then i8042.noloop . Your screen should look something like this:

u710_001

Press Enter to start the launch process. Be patient, it takes quite a while. Once it’s finally up though, you’ll see this screen:

u710_002

Double click on the Install icon to begin the install.

On the first screen, below, you are welcomed and asked about a language. Pick your language and hit Forward.

u710_003

Now pick your time zone, since I’m in the Central zone I picked Chicago as a city in my time zone and clicked Forward.

u710_004

No it asks about keyboard layout, pick your keyboard if yours isn’t US English, then press Forward.

u710_005

Ubuntu will crank and grind for a minute, then you’ll see this dialog asking about your disks. Just take the defaults and click Forward.

u710_006

Time for a little personal info, give your name, a login id, enter the password you want to use, and what you want to name the “computer”. When done click Forward.

u710_007

OK, you’re almost ready to start the install process. Look this over, if everything looks good just press the Install button and we’re off to the races.

u710_008

Did I say races? Well, turtle race might be more like it, the install runs pretty slow, so get some coffee, or maybe a second bowl of ice cream if you’re doing a late night install.

u710_009

I did encounter one error during the install. You may see this as well, but you can go back later and correct this through the normal updates process.

u710_010

Now Ubuntu will finish, and ask if we want to reboot. Tell it no, then reboot by shutting down by pressing the red shut down icon in the very upper right of the Ubuntu window.

OK, you’ll have to be very quick with this next step. Remember the mouse issue? We’ll still need to fix it. First, boot the new machine, after clicking on CD and releasing the ISO if it’s still held. Now when you see the words “Grub loader” hit the Escape key. If you were fast enough, you’ll see this screen.

u710_012

With the line you see selected, press the “e” to edit the line. Now a new screen will appear.

u710_013

Move the highlight down one to the Kernal line, and press “e” to edit that line. When the new screen appears, you’ll need to add two dashes, then the i8042.noloop command. Your screen should look like this:

u710_014

Press Enter, then when you are returned to the screen with “kernel…” on it, make sure the kernel line is still highlighted and press b to boot.

Once booted, login using your user id and password. When Unbuntu is up, it’s time to fix the mouse issue once and for all. Click on Applications, Accessories, Terminal. When the terminal window appears, type in:

sudo gedit /boot/grub/menu.lst

u710_015

When you press Enter you’ll be prompted for your password, enter it. An editor should appear. Scroll down to the very bottom of the text and find the line that begins with “kernel”. Add the – i8042.noloop to the end of the line, as I’ve shown below. (Note I have highlighted the line to make it easy to see, yours won’t be normally highlighted in your session.)

u710_016

Save the file and exit the editor and the terminal window. When you next reboot, you should be able to just login normally, and the mouse should work.

And there you go, Ubuntu 7.10 up and running, complete with mouse, under Virtual PC 2007.

P.S. If you found this post useful, please give it a Digg so others can find the same happiness you did.

Downloading a Virtual PC Image of Visual Studio 2008 Beta 2

During last week’s WPF class, several of my coworkers expressed an interest in using the 2008 edition to experiment with WPF. They were concerned installing the beta on their production box could damage their boxes, even though in theory part of the beauty of .Net is the ability to run multiple versions of the framework side by side.

To alleviate those fears, Microsoft has provided a Beta of 2008 already in a ready to run Virtual PC. First, you’ll need to have Microsoft Virtual PC 2007 installed on your box. If you don’t, you can grab a copy from

http://www.microsoft.com/downloads/details.aspx?familyid=04D26402-3199-48A3-AFA2-2DC0B40A73B6&displaylang=en

(Even though the instructions indicate it should work with VPC 2004 SP1 or Virtual Server, I haven’t tried it with them. Virtual Server should be fine, but I would highly suggest upgrading your VPC 2004 to 2007 if you haven’t done so already, there’s lots of nice new features that make it worth the effort.)

Now you can grab the 2008 image. You will actually need two sets of files, the base image and the 2008 Beta 2 image. You can download the 2008 Beta 2 from

http://www.microsoft.com/downloads/details.aspx?FamilyID=3b72271c-e996-4989-898d-72d684966ce6&DisplayLang=en

The download is in the form of 7 files, the first is an exe and the rest are rar files. Download all 7 to a folder and run the exe, and it will combine all 7 to create the virtual pc image.

Make sure to read all of the instructions on this page! The user ID and password to login to the virtual image, along with a link to the needed base image, are contained in the instructions!

Now you need the Orcas base image. If you read through the instructions you saw the link to the compressed file, right above the user id / password. Right click on the link and “Save As…” to the same folder where you saved the other items. Run it to uncompress the base image.

OK, in a folder you should now have OrcasBeta2_VSTS.vmc, OrcasBeta2_VSTS.vhd, Base01.vmc, and Base02.vhd. I also copied the user id and password from the above linked page and saved it in a text file called “Orcas Beta 2 user id and password.txt”, just so I could remember it easily.

When you login, it tells you that the password expries today, and asks if you wish to change it. I’ve always just said no, and it seems to work fine, but you are welcome to change it if you want.

When you shut down the Virtual PC, you will be prompted first for why you are shuting down. This is a Windows Server 2003 prompt, I just select “Other (Planned) under the option and put an ‘x’ for the comment. Once you do the OK button will be enabled.

Next, Virtual PC prompts you, to see if you want to commit your changes or abandon them. If you select “Commit changes to the virtual hard disk”, any changes you made will be saved and ready for next time. If you choose “Delete undo disk changes”, everything you did during that session will be lost forever.

Since it’s just a virtual image, I usually pick commit, but if you have really hosed things up you might want to know about the Delete option.

All of the software I’ve mentioned here is free, so there’s no reason why you can’t run this at home, even if you don’t have an MSDN subscription. Be warned, although Microsoft hasn’t specified a date I would think the image will expire not long after the release of the full Visual Studio 2008 product.

Using the virtual image will allow you to experiment with WPF, as well as the new 2008 features in a safe, risk free environment.

Note: If you want to use Visual Studio 2005 to write WPF (as well as other .Net 3.0 projects), I have documented the bits you need to download in this post:

https://arcanecode.wordpress.com/2007/08/20/installing-the-wpf-bits/

Fixing Ubuntu 7.04 Fiesty Fawn Mouse under Virtual PC 2007

Update: October 18, 2007 – Ubuntu 7.10 was released today, and I’ve now posted step by step instructions for installing it. If you haven’t yet installed Ubuntu, you may prefer to start with the instructions on 7.10, found here: https://arcanecode.wordpress.com/2007/10/18/installing-ubuntu-710-under-virtual-pc-2007/


OK, one of my readers “John” (thanks John!) shared a link to an unsupported patch that fixed the Ubuntu 7.04’s mouse under Virtual PC. Let me give you the quick summary of what I did:

  1. Fired up a new VirtualPC with the Fiesty Fawn “Live CD” in the drive. Booted up in safe graphics mode.
  2. Once up, I activated the keyboard mouse using the fix I described in my post “Ubuntu 7.04 and Virtual PC 2007 – Mouse Issue Workaround (sort of)” at http://shrinkster.com/p2u.
  3. I then installed Ubuntu, it was pretty straightforward although a bit annoying using the numeric keypad as a mouse. One hint, sometimes it didn’t recognize my mouse click until I moved the mouse off a button then back on.
  4. After the install I rebooted, then in my new install repeated step 2 to activate the keyboard mouse in my new install. Setting this in the Live CD didn’t carry over to the new install.
  5. I then opened firefox and went to the link John provided, https://bugs.launchpad.net/ubuntu/+source/linux-source-2.6.20/+bug/87262/comments/13. Since that’s a lot of typing, I shrinksterized it to make it very easy to type, http://shrinkster.com/p2t.
  6. Joe Soroka has posted a script, I downloaded it using the “shell script” link at the very top of the message and saved it to my home folder.
  7. I opened my File Browser (use Left Alt+F1 select Places, Home Folder). I moved the mouse (again using the numeric keypad) and clicked once on the sh file I’d saved.
  8. Now in the browser, with the file highlighted, hit left alt+enter or select File, Properties on the File Browser menu.
  9. In the dialog that appears, move to the Permissions tab, and check on the box that says “Allow executing file as program”. Click the close button to close the dialog.
  10. Now double click the sh file or press enter. You should see a dialog appear that asks if you want to open in a text editor or run the script. Select the “run in terminal” option. (Update, added “in terminal” based on feedback.)
  11. While the script executes it will ask for your admin password, give it.
  12. At one point it will also stop to ask if you want to skip or configure grub manually, or let it do it for you. I pressed enter to let the script do it for me.
  13. That ended the app, when the terminal window closed I rebooted (still using the numeric keypad as my mouse).
  14. When Ubuntu came back up, it flashed a quick message from the grub asking which kernel I wanted to load, I just took the default.
  15. I logged in and what do you know, my mouse worked!

Just FYI, I’m running Virutal PC 2007 under Vista, using the standard desktop version of Ubuntu 7.04.

The real hero here is Joe Soroka for posting such a simple fix. I encourage you to give it a try. If you are concerned about messing up your Ubuntu install, simply copy the VHD/VPC files to a backup location before running the fix.

A big thanks to Joe Soroka, and to “John” for posting the link. Now I can actually start playing with Ubuntu 7.04.

Arcane Software: TouchCursor – For us keyboard geeks!

I hate to sound like an advertisement, but I recently found some software that absolutely rocks and I just have to share. I have to confess that I’m a “keyboard freak”. I hate having to take my hands off the keyboard, so much so that I bought a Lenovo keyboard with the touchpoint mouse cursor to use on my desktop, just like what you’d find on an IBM Thinkpad.

Now I’ve found some software that even further reduces the number of times I have to move my hands away from the home position to reach for those awkward keys, such as the cursor keys. It’s called TouchCursor, available at http://touchcursor.com.

What they do is use your space bar like another shift / ctrl / alt key. They then combine the space bar with the letter keys to emulate the odd keys like cursor, page up, etc. For example, space bar + I moves up one line. Space bar + K moves back down, space bar + J moves left, and so on. Here’s the default mapping (graphic courtesy of their site):

This is wonderful stuff, no longer do I have to move my hands off the “home” position to move the cursor around. And even better, the software is completely configurable. I can change the key combos to anything I want, and even add new ones.  It also works perfectly with existing key combos like ctrl, shift, and alt. For example, SHIFT + SPACEBAR + L is the same as SHIFT + RIGHT ARROW.

Now, you may think “well what if I have that odd program it doesn’t work right with?” No problem, the software allows you to turn off the functionality for specific applications. For example, I found it behaving a bit oddly with Virtual PC sessions (probably had something to do with both the guest and host OS wanting to look at the keyboard), so I disabled it for Virtual PC and just run it inside the VPC guest. Or you can take the reverse tactic, and only enable it for certain apps.

It really looks like they have thought of everything, all the little tweaks you might want to do with the software are available for you to do. I’ve been testing this with both Vista and XP and it works great on both platforms.

TouchCursor is shareware, you can download a copy and try it out for 30 days with no nag screens or any other crippling feature. The cost is only 20 US Dollars though, well worth the investment (I just sent in my 20!). For your money you get tech support, lifetime upgrades and permission to run on all of your computers. Not to mention the good feeling of helping out a worthwhile product. All that for 20 bucks? Count me in.

This is a really creative solution for increasing productivity at the keyboard. Rarely do I fall in love with a piece of code, but this product has made my very short list of “must have won’t operate a computer without it” software. I highly recommend trying it out, and using it for the full 30 days. It does take a little getting used to, but once you get the hang of it you won’t want to operate a keyboard without it!

Standard disclaimer: I have no financial affiliation with Rare Pebble Software, the folks who make Touch Cursor, other than being a customer. I receive no consideration of any kind for this mention. I just think it’s some awesome software and wanted to share.

PS Sorry for no post yesterday, it was a business travel day and I got home much later than I anticipated.

Ubuntu 7.04 and Virtual PC 2007 – Mouse Issue Workaround (sort of)

Update: October 18, 2007 – Ubuntu 7.10 was released, the install for it is a bit more straight forward. If you haven’t installed 7.04 yet, I’d suggest giving 7.10 a try. Complete instructions here:
https://arcanecode.wordpress.com/2007/10/18/installing-ubuntu-710-under-virtual-pc-2007/


Update: A reader named John posted a link to a fix, see my post on May 17 (http://shrinkster.com/p2w) for full details. But keep reading this post, as you’ll need the info here to implement the fix. OK, thanks to a suggestion I saw on the Ubuntu forums, I found a workaround for the no mouse issue, of sorts. This won’t give you the mouse back, but it will let you use Ubuntu 7.04 using keyboard control.

First, let me take a second to explain what the issue is. There was a bug in the kernel code that affected many different distros of Linux. Apparently the kernel was not finding PS/2 style mice. Some work has been done and now most PS/2 style mice are now being found.

Except, sadly for the ones being emulated. Both VMWare and VirtualPC emulate a PS/2 style mouse, and are not getting found by the kernel. Remember, it doesn’t matter what type of mouse you have hooked up to the host box (I have two mice, a Logitech MediaPlay and Microsoft Travel mouse, both USB). It only matters what the virtual machine is telling the guest OS (Ubuntu), which is PS/2 style mouse.

OK, that explained let’s play with Ubuntu some. Fire up Virtual PC, then use the CD menu to either capture an ISO image or capture the CD Drive you have the Ubuntu Desktop disk in.

When the menu appears, select “Start Ubuntu in Safe Graphics Mode” by hitting the down arrow once and pressing Enter. If you fail to do this, you’ll get garbled graphics.

Once Ubuntu gets fully loaded, press the left ALT key plus F1 (Left ALT+F1, remember VPC takes over the right ALT). This should highlight the Applications menu. Press the right arrow twice to System, then down once to Preferences. Now press the right key once to get to Accessibility, then right again. Finally go down to Keyboard Accessibility and press ENTER.

[Picture of Ubuntu 7 menus]

When the Keyboard Accessibility Preferences window appears, you should already be on the “Enable keyboard accessibility features”. (You can tell you’re on it because of the little ‘dancing ants’ rectangle around it.) Just press the SPACE BAR to check this on, as you see below.

[Picture of Keyboard Accessibility window]

Now press the TAB key to get on the Basic tab. Press the RIGHT ARROW key twice to get the Mouse Keys highlighted.

[Picture of Keyboard Accessibility window]

Press TAB again to get to the “Enable Mouse Keys” and press the SPACE BAR to check it on. Now tab on down to the Close button and press ENTER.

What you just did was turn the numeric keypad into your mouse. When you press left (number 4 ), the mouse moves left, press the up arrow (number 8 ) mouse goes up, and so on. The angles work, pressing 7 (the home key on my keypad) moves up and to the left, for exampe. Finally, the number 5 key works as the mouse click.

One thing to be aware of, these only work with the numeric keys. It will not work with the standard arrow keys. Laptop owners with compact keyboards are in for a painful experience, you’ll have to hit NUMLOCK to activate the mouse, then turn Numlock off to be able to type letters again.

Well there you go, a way you can use Ubuntu 7.04 in Virtual PC 2007. Not the greatest solution, but might work for you until the kernel issue gets fixed.

I’d like to give credit where it’s due, in reading through the Ubuntu forums I saw someone suggest using keyboard accessibility to work around the no mouse issue. After playing with it some, I decided it was worth documenting and hence this post. I’d like to give credit but haven’t found the original post since then, so if someone happens to notice it in the forums please let me know so I can give credit for the idea to the original poster.

Ubuntu 7.04 and Virtual PC 2007 – No Mouse Issue

Update: October 18, 2007 – The new version of Ubuntu, 7.10 is now out. If you haven’t yet installed Ubuntu, I’d suggest using 7.10. I have step by step instructions at https://arcanecode.wordpress.com/2007/10/18/installing-ubuntu-710-under-virtual-pc-2007/


Last week the folks at Ubuntu released Fiesty Fawn, better known as version 7.04 of the Ubuntu OS. I had planned a new version of the “step by step” to detail how to install under VirtualPC 2007.

Sadly there seems to be a severe error that prevents 7.04 from running in Virtual PC. This error lies somewhere deep in the kernel, and affects the mouse. As you have discovered, Ubuntu won’t recognize the mouse when running inside VPC.

This was actually a much more serious error at first, Ubuntu and several other Linux distros had errors recognizing most PS/2 style mice, as you can see from this bug: https://bugzilla.redhat.com/bugzilla/show_bug.cgi?id=223606

They have opened a new bug specifically for Virtual PC, which you can monitor here: https://bugzilla.redhat.com/bugzilla/show_bug.cgi?id=234348. (Credit due alert: Thanks to Michael Wexler for first pointing out these links!).

I’ve spent quite a while trying various combinations, but thus far have found no easy solution or workaround to the problem. So for now, my advice is simple.

If you have an existing Ubuntu install under VPC, I recommend you NOT upgrade. You will lose your mouse for sure, and probably keyboard as well. If you want to experiment, start with a fresh virtual machine and go from there.

In the meantime, keep an eye on the second bug I listed. I’m hopeful there will be an update in the near future. At that point I’ll work up some step by step instructions, which should be pretty similar to the 6.06 instructions.

Update: (April 25th, 2007) – I found a work around (of sorts) that will let you use your numeric keypad as a mouse. Not the most pleasant experience, but it does work. See my post on the 25th ( http://shrinkster.com/ocx ) for full details.

Arcane Tricks: Cut / Copy / Paste To and From Virtual PC

As you might guess from my various posts, I like using Virtual PC. It has one annoyance, you can’t cut / copy / paste between the Virtual PC and another machine, like the host operating system.

This is actually a good thing, as it’s a security feature. It allows you to test suspicious software safely, without fear of it damaging your host. There are times though, when you know it is safe to allow the cut / copy / paste connection between your Virtual PC and your host. It would be nice to have a switch or option that turns this on and off. Sadly, it’s not there.

There is a work around though. Back in December, I talked about the combination of Virtual PC and Remote Desktop. (https://arcanecode.wordpress.com/2006/12/06/arcane-combinations-virtual-pc-and-remote-desktop/ or http://shrinkster.com/mvq) . While VPC lacks the ability to cut / copy / paste, Remote Desktop does not. Using Remote Desktop you can cut, copy, and paste data from your host (or any other remotely controlled PC) to the Virtual PC you are controlling via Remote Desktop.

All you have to do is follow the instructions in the post mentioned above, and “remote” into the virtual machine. Yes, you will be remoting to a machine running on the same box, but all the remote desktop software sees is an IP address. It can’t tell if that IP is on the same host computer or one across the planet.

This little trick has saved me several times, and was one of those “doh!” moments when it first occurred to me. Even if you have been following along and using Remote Desktop with VPC, it may not have occurred to you to use it on the same machine.

Resources