Don’t Uninstall Visual Studio 2005 Yet!

One of the great benefits of Visual Studio 2008 is the ability for it to target multiple .Net Frameworks. This means, in theory you could go ahead and begin using Visual Studio 2008 even though you still need to write apps that are 2005 / .Net 2.0 compliant. You might be tempted to go ahead and uninstall 2005. And that would be fine if you are only doing .Net development. But wait…

If you are still doing SQL Server BIDS (Business Intelligence Developer Studio) then don’t uninstall Visual Studio 2005! Currently there’s no support in VS2008 for doing SQL Server 2005 BIDS Development. If you uninstall VS2005 you won’t be able to do any more BIDS work. Trust me, I found out the hard way.

After uninstalling VS2005, I went to do a BIDS project and that’s when I got hit with the nasty surprise. The uninstall had also removed the Dev Environment that was shared with BIDS. I tried to rerun the install of my SQL Server Developer Edition, but for some reason it thought I wanted to upgrade. It kept giving me the message “You cannot upgrade a version of SQL Server from the GUI, you must use the command line.”

I finally had to reinstall VS2005, along with all it’s service packs. After that I was able to work on my BIDS projects again. So take it from me, if you are still doing SQL Server 2005 Business Intelligence projects, Visual Studio 2005 still has some life in it yet.

The Silverlight Match the Dot Net Rocks Hosts Game – Part 3 – The Javascript

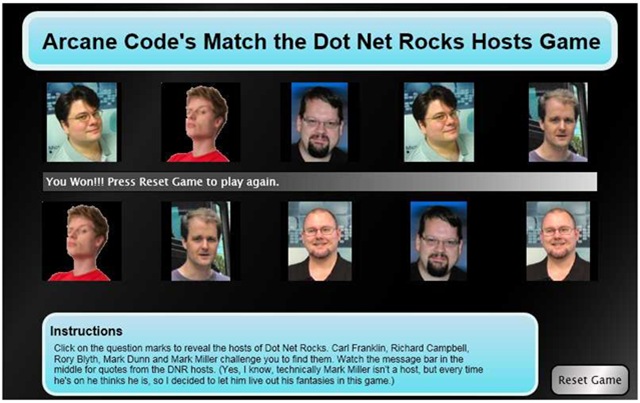
Today I’ve posted the Javascript for my DNR game (see posts from last two days). As you can see, it’s very straight forward and doesn’t require much explanation.

When the app loads, it calls a routine that uses a random number generator to randomly select a layout for the photos.

The other large routine handles mouse clicks. The really tricky part was determining which images were displayed and which were not. I finally resorted to using the Tag property of each Canvas control. In the Tag I put two numbers, each being a 0 or a 1. The first number represents a Boolean that flags whether the images is visible or not. The second position notes whether the image has already been matched. There are a number of SetCanvas… helper routines to make the setting of these flags a bit easier.

I make a lot of use of Math.Random to generate random numbers. I then use these to determine various messages that get displayed across the middle of the screen, tha way the user won’t get bored.

OK, enough talk, here’s the code. I’ve documented it pretty well, but if you have questions send me an e-mail or post a comment.


if (!window.DNRMatch)

  window.DNRMatch = {};


DNRMatch.Scene = function()

{

}


// ****************************************************************************

// * Author: Robert C. Cain, Arcane Code, http://arcanecode.com

// *

// * Notes

// *

// * The heart of the system relies on the tag property of the Canvas controls

// * used to display the pictures. It was the only mechanism I could find to

// * easily provide persistance between calls.

// *

// * The tag currently is a two character string. The first character is 0

// * or 1 and indicates if the ? is showing (a 0) or the Answer image is

// * being displayed (value is 1).

// *

// * The second position is also a 0 or 1, and indicates if the image has been

// * matched yet by the user or not. (0=no, 1=yes)

// *

// ****************************************************************************


// I store this here as it gets loaded and used in several places

var imgList = new Array(10);


DNRMatch.Scene.prototype =

{

  // Runs when app is first loaded

  handleLoad: function(plugIn, userContext, rootElement)

  {

    // Get the inital list of images into imgList array

    RandomizeImages();


    this.plugIn = plugIn;


    // Can’t use SetImages function since we don’t have a sender

    for(i=0; i<10; i++)

    {     

      plugIn.content.findName(“imgAnswer0” + i.toString()).Source=imgList[i];

    }

  }

}


//=============================================================================

// Main routine, activated when a user clicks on any image

//=============================================================================

function imgMouseLeftButtonDown(sender, mouseEventArgs)

{           

    var imgNumber = sender.Name.substr(3,2);

    var imgIndex = imgNumber.valueOf();

    var msg = sender.findName(“StatusArea”);

    var imgCurrentImage = sender.findName(“imgAnswer” + imgNumber);


    // Show the hidden image   

    if(CanvasVisible(sender, imgIndex)==“0”)

    {

      sender.findName(“img” + imgNumber + “RevealAnimation”).begin();

      sender.tag = “1” + sender.tag.substr(1,1);

    }


    var msgText=“”;

    var foundMatch=false;


    // Now check to see if another image is also visible.

    // If so, we’ll want to check for a match.     

    for(i=0; i<10; i++)

    {

      // If we’re not dealing with the same image

      if(i != imgIndex)

      {

        var imgLoopAnswer = sender.findName(“imgAnswer” + imgNumber);


        // If the image is visible

        if(CanvasVisible(sender, i.toString()) == “1”)

        {

          // See if it’s same image

          if( GetSource(sender, i)==GetSource(sender, imgIndex) )

          {

            // Congratulate user, then set the matched tags

            msg.text=GoodJobMessage(sender, i);

            SetCanvasMatchedTag(sender, i);

            SetCanvasMatchedTag(sender, imgIndex);

            foundMatch=true;

          }

        }

      }

    } 


    // See if we need to show a “no match” message

    if(foundMatch==false// If we didn’t find a match…

    {

      // If there are two items visible

      if (VisibleButUnmatchedCount(sender)==2)

      {

        // Show the bad job message

        msg.text=BadJobMessage();

      }

      else

      {

        // Only one image visible, set message to empty

        msg.text=“”;

      }

    }


    // Reset non-matches

    if (VisibleButUnmatchedCount(sender)==2)

    {

      for(i=0; i<10; i++)  // for each canvas

      {

        if(CanvasMatched(sender, i) == “0”) // if it hasn’t been matched

        {

          if(CanvasVisible(sender, i) == “1”// but it’s visible

          {

            sender.findName(“img0” + i.toString() + “HideAnimation”).begin(); // hide it

            SetCanvasInVisibleTag(sender, i);

            SetCanvasUnMatchedTag(sender, i);

          }

        }

      }     

    }


    // Check For Victory

    if(MatchCount(sender)==10)

    {

      msg.text=“You Won!!! Press Reset Game to play again.”;

    }


//    Just some debugging code, will leave it as it makes for good demo   

//    msg.text=ShowTags(sender);

//    msg.text=ShowSources(sender);

}


//=============================================================================

// Check the Tag property of the canvas to see if the image is visible

//=============================================================================

function CanvasVisible(sender, canvasNumber)

{

  var canvasNum = canvasNumber.toString();

  if(canvasNum.length > 1)

  {

    canvasNum = canvasNum.substr(canvasNum.length –  1, 1);

  }

  var currentCanvas = sender.findName(“img0” + canvasNum);

  var isCanvasVisible = currentCanvas.tag.substr(0,1);

  return isCanvasVisible;


}


//=============================================================================

// Check the Tag property of the canvas to see if the image has been matched

//=============================================================================

function CanvasMatched(sender, canvasNumber)

{

  var canvasNum = canvasNumber.toString();

  if(canvasNum.length > 1)

  {

    canvasNum = canvasNum.substr(canvasNum.length –  1, 1);

  }

  var currentCanvas = sender.findName(“img0” + canvasNum);

  var isCanvasMatched = currentCanvas.tag.substr(1,1);

  return isCanvasMatched;

}


//=============================================================================

// Set the Tag property of the canvas to indicate

// this canvas’s image is visible

//=============================================================================

function SetCanvasVisibleTag(sender, canvasNumber)

{

  var canvasNum = canvasNumber.toString();

  if(canvasNum.length > 1)

  {

    canvasNum = canvasNum.substr(canvasNum.length –  1, 1);

  }

  var currentCanvas = sender.findName(“img0” + canvasNum);

  currentCanvas.tag = “1” + currentCanvas.tag.substr(1,1);

}


//=============================================================================

// Set the Tag property of the canvas to indicate

// this canvas’s image is not visible

//=============================================================================

function SetCanvasInVisibleTag(sender, canvasNumber)

{

  var canvasNum = canvasNumber.toString();

  if(canvasNum.length > 1)

  {

    canvasNum = canvasNum.substr(canvasNum.length –  1, 1);

  }

  var currentCanvas = sender.findName(“img0” + canvasNum);

  currentCanvas.tag = “0” + currentCanvas.tag.substr(1,1);

}


//=============================================================================

// Set the Tag property of the canvas to indicate

// this canvas’s image has been matched

//=============================================================================

function SetCanvasMatchedTag(sender, canvasNumber)

{

  var canvasNum = canvasNumber.toString();

  if(canvasNum.length > 1)

  {

    canvasNum = canvasNum.substr(canvasNum.length –  1, 1);

  }

  var currentCanvas = sender.findName(“img0” + canvasNum);

  currentCanvas.tag = currentCanvas.tag.substr(0,1) + “1” ;

}


//=============================================================================

// Set the Tag property of the canvas to indicate

// this canvas’s image is not matched

//=============================================================================

function SetCanvasUnMatchedTag(sender, canvasNumber)

{

  var canvasNum = canvasNumber.toString();

  if(canvasNum.length > 1)

  {

    canvasNum = canvasNum.substr(canvasNum.length –  1, 1);

  }

  var currentCanvas = sender.findName(“img0” + canvasNum);

  currentCanvas.tag = currentCanvas.tag.substr(0,1) + “0” ;

}


//=============================================================================

// Count the number of items left that are visible, but not

// matched. In theory this should either be 0, 1 or 2.

//=============================================================================

function VisibleButUnmatchedCount(sender)

{

  var retVal=0;


  for(i=0; i<10; i++)

  {

    if(CanvasVisible(sender, i)==“1”)

    {

      if(CanvasMatched(sender, i)==“0”)

      {

        retVal++;

      }

    }

  }


  return retVal;

}


//=============================================================================

// Count the number of items that are matched.

// When it reached 10 we’ll know they won

//=============================================================================

function MatchCount(sender)

{

  var retVal=0;


  for(i=0; i<10; i++)

  {

    if(CanvasMatched(sender, i)==“1”)

    {

      retVal++;

    }

  }


  return retVal;

}


//=============================================================================

// Get the file name of the image used in the sender control

//=============================================================================

function GetSource(sender, imageNumber)

{

  var imgNum = imageNumber.toString();

  if(imgNum.length > 1)

  {

    imgNum = imgNum.substr(imgNum.length – 1, 1);

  }


  var img = sender.findName(“imgAnswer0” + imgNum );

  return img.Source; 

}


//=============================================================================

// Create a “Bad Guess” message

//=============================================================================

function BadJobMessage()

{

  // Randomly select from the list of “Try again” messages

  var possibleMsgs = new Array(5);

  possibleMsgs[0] = “Nope, try again.”;

  possibleMsgs[1] = “I don’t think so!”;

  possibleMsgs[2] = “Dude, not even close!”;

  possibleMsgs[3] = “Don’t give up yet, keep trying!”;

  possibleMsgs[4] = “Ha! Don’t make me laugh.”;

  possibleMsgs[5] = “I’ve heard of wild guesses, but gee whiz. Try again.”;


  var randomNum = Math.floor(Math.random()*6);


  return possibleMsgs[randomNum];


}


//=============================================================================

// Create a Good Job message based on the image the user

// just matched.

//=============================================================================

function GoodJobMessage(sender, imageNumber)

{

  var retMsg = “Good Job.”;

  var possibleMsgs = new Array(9);


  if(GetSource(sender, imageNumber)==“Carl02.png”)

  {

    possibleMsgs[0] = “Carl says you da man!”;

    possibleMsgs[1] = “You must be that squirt king of C#. We will make a T-shirt for you.”;

    possibleMsgs[2] = “A catheter and somebody to bring you a sandwich once in a while. That’s living man.”;

    possibleMsgs[3] = “While you shampoo your hair… Wait I guess that rules out C++ programmers.”;

    possibleMsgs[4] = “Some people go to sleep listening to DNR.”;

    possibleMsgs[5] = “”;

    possibleMsgs[6] = “”;

    possibleMsgs[7] = “”;

    possibleMsgs[8] = “”;

    retMsg = possibleMsgs[Math.floor(Math.random()*5)];

  }


  if(GetSource(sender, imageNumber)==“Richard01.png”)

  {

    possibleMsgs[0] = “It’s Richard, the Toy Boy!”;

    possibleMsgs[1] = “Now we got emotional baggage.”;

    possibleMsgs[2] = “Ballmer is always great. He seems a lot less angry these days, I think they switched him to decaf.”;

    possibleMsgs[3] = “Everytime you say Web 2.0, a startup dies.”;

    possibleMsgs[4] = “My favorite Martian is Mark Miller!”;

    possibleMsgs[5] = “Don’t play with it, just look at it!”;

    possibleMsgs[6] = “You [Mark Miller] are the Jim Carey of the podcasting world.”;

    possibleMsgs[7] = “Welcome to the dark side baby!”;

    possibleMsgs[8] = “”;

    retMsg = possibleMsgs[Math.floor(Math.random()*8)];

  }


  if(GetSource(sender, imageNumber)==“Rory.png”)

  {

    possibleMsgs[0] = “Rory rewards you by allowing you to gaze upon his magnificence.”;

    possibleMsgs[1] = “You are testing my patience Franklin!”;

    possibleMsgs[2] = “You’re like some kid from a third world country…”;

    possibleMsgs[3] = “It’s a place where you can talk about anal leakage.”;

    possibleMsgs[4] = “I was pretending to tweak Mark Dunn’s nipples like they were radio knobs.”;

    possibleMsgs[5] = “I was talking about how weird it was to see Mark Dunn in the flesh.”;

    possibleMsgs[6] = “”;

    possibleMsgs[7] = “”;

    possibleMsgs[8] = “”;

    retMsg = possibleMsgs[Math.floor(Math.random()*5)];

  }


  if(GetSource(sender, imageNumber)==“Mark.png”)

  {

    possibleMsgs[0] = “Mark Dunn says it’s always sunny in the south!”;

    possibleMsgs[1] = “I gotta clean my underwear now Carl.”;

    possibleMsgs[2] = “I am higher than a California Condor on Ecstasy, that’s how excited I am to be here.”;

    possibleMsgs[3] = “”;

    possibleMsgs[4] = “”;

    possibleMsgs[5] = “”;

    possibleMsgs[6] = “”;

    possibleMsgs[7] = “”;

    possibleMsgs[8] = “”;

    retMsg = possibleMsgs[Math.floor(Math.random()*3)];

  }


  if(GetSource(sender, imageNumber)==“Miller.png”)

  {

    possibleMsgs[0] = “I got nuthin’ man.”;

    possibleMsgs[1] = “You guys are messing with me again!”;

    possibleMsgs[2] = “My golden ticket on the candy bar said it was about a new co-host!”;

    possibleMsgs[3] = “I want one of these!”;

    possibleMsgs[4] = “What about me Carl?”;

    possibleMsgs[5] = “I’m good lookin too!”;

    possibleMsgs[6] = “”;

    possibleMsgs[7] = “”;

    possibleMsgs[8] = “”;

    retMsg = possibleMsgs[Math.floor(Math.random()*6)];

  }


  return retMsg;

}


//=============================================================================

// Reset the game for another play

//=============================================================================

function ResetGame(sender, mouseEventArgs)

{

    sender.findName(“mainHideAnimation”).begin(); // hide it


    for(i=0; i<10; i++)  // for each canvas

    {

      SetCanvasUnMatchedTag(sender, i);

      if(CanvasVisible(sender, i) == “1”// but it’s visible

      {

        sender.findName(“img0” + i.toString() + “HideAnimation”).begin(); // hide it

        SetCanvasInVisibleTag(sender, i);

      }

    }


    RandomizeImages();

    SetImages(sender);


    var msg = sender.findName(“StatusArea”);

    msg.text = “Play the game!”;


    sender.findName(“mainRevealAnimation”).begin(); // hide it


}


//=============================================================================

// Create a random number, then use it to pick and load the

// imgList array. Used to mix up the images.

//=============================================================================

function RandomizeImages()

{

    // Default set

    imgList[0] = “Carl02.png”;

    imgList[1] = “Richard01.png”;

    imgList[2] = “Rory.png”;

    imgList[3] = “Mark.png”;

    imgList[4] = “Miller.png”;

    imgList[5] = “Miller.png”;

    imgList[6] = “Mark.png”;

    imgList[7] = “Rory.png”;

    imgList[8] = “Richard01.png”;

    imgList[9] = “Carl02.png”;


    var randomNum = Math.floor(Math.random()*9);


    if(randomNum==0)

    {

      imgList[0] = “Carl02.png”;

      imgList[1] = “Richard01.png”;

      imgList[2] = “Rory.png”;

      imgList[3] = “Mark.png”;

      imgList[4] = “Miller.png”;

      imgList[5] = “Miller.png”;

      imgList[6] = “Mark.png”;

      imgList[7] = “Rory.png”;

      imgList[8] = “Richard01.png”;

      imgList[9] = “Carl02.png”;

    }


    if(randomNum==1)

    {

      imgList[0] = “Rory.png”;

      imgList[1] = “Mark.png”;

      imgList[2] = “Miller.png”;

      imgList[3] = “Richard01.png”;

      imgList[4] = “Carl02.png”;

      imgList[5] = “Rory.png”;

      imgList[6] = “Carl02.png”;

      imgList[7] = “Miller.png”;

      imgList[8] = “Richard01.png”;

      imgList[9] = “Mark.png”;

    }


    if(randomNum==2)

    {

      imgList[0] = “Rory.png”;

      imgList[1] = “Mark.png”;

      imgList[2] = “Miller.png”;

      imgList[3] = “Richard01.png”;

      imgList[4] = “Carl02.png”;

      imgList[5] = “Mark.png”;

      imgList[6] = “Rory.png”;

      imgList[7] = “Carl02.png”;

      imgList[8] = “Richard01.png”;

      imgList[9] = “Miller.png”;

    }


    if(randomNum==3)

    {

      imgList[0] = “Carl02.png”;

      imgList[1] = “Rory.png”;

      imgList[2] = “Richard01.png”;

      imgList[3] = “Carl02.png”;

      imgList[4] = “Miller.png”;

      imgList[5] = “Rory.png”;

      imgList[6] = “Miller.png”;

      imgList[7] = “Mark.png”;

      imgList[8] = “Richard01.png”;

      imgList[9] = “Mark.png”;

    }


    if(randomNum==4)

    {

      imgList[0] = “Mark.png”;

      imgList[1] = “Rory.png”;

      imgList[2] = “Rory.png”;

      imgList[3] = “Carl02.png”;

      imgList[4] = “Miller.png”;

      imgList[5] = “Carl02.png”;

      imgList[6] = “Richard01.png”;

      imgList[7] = “Mark.png”;

      imgList[8] = “Richard01.png”;

      imgList[9] = “Miller.png”;

    }


    if(randomNum==5)

    {

      imgList[0] = “Carl02.png”;

      imgList[1] = “Mark.png”;

      imgList[2] = “Richard01.png”;

      imgList[3] = “Richard01.png”;

      imgList[4] = “Rory.png”;

      imgList[5] = “Mark.png”;

      imgList[6] = “Rory.png”;

      imgList[7] = “Carl02.png”;

      imgList[8] = “Miller.png”;

      imgList[9] = “Miller.png”;

    }


    if(randomNum==6)

    {

      imgList[0] = “Mark.png”;

      imgList[1] = “Carl02.png”;

      imgList[2] = “Mark.png”;

      imgList[3] = “Richard01.png”;

      imgList[4] = “Rory.png”;

      imgList[5] = “Miller.png”;

      imgList[6] = “Rory.png”;

      imgList[7] = “Miller.png”;

      imgList[8] = “Richard01.png”;

      imgList[9] = “Carl02.png”;

    }


    if(randomNum==7)

    {

      imgList[0] = “Rory.png”;

      imgList[1] = “Carl02.png”;

      imgList[2] = “Mark.png”;

      imgList[3] = “Richard01.png”;

      imgList[4] = “Mark.png”;

      imgList[5] = “Miller.png”;

      imgList[6] = “Miller.png”;

      imgList[7] = “Richard01.png”;

      imgList[8] = “Carl02.png”;

      imgList[9] = “Rory.png”;

    }


    if(randomNum==8)

    {

      imgList[0] = “Richard01.png”;

      imgList[1] = “Rory.png”;

      imgList[2] = “Mark.png”;

      imgList[3] = “Carl02.png”;

      imgList[4] = “Miller.png”;

      imgList[5] = “Mark.png”;

      imgList[6] = “Carl02.png”;

      imgList[7] = “Richard01.png”;

      imgList[8] = “Rory.png”;

      imgList[9] = “Miller.png”;

    }

}


//=============================================================================

// Sets the image source property for all the images

// to the image name loaded in the imgList array

//=============================================================================

function SetImages(sender)

{

    for(i=0; i<10; i++)

    {     

      sender.findName(“imgAnswer0” + i.toString()).Source=imgList[i];

    }

}


//=============================================================================

// Causes the job to wait a certain number of milliseconds.

// Has a drawback in that it does not pause animations,

// so if you use it while an animation is happening you won’t

// see the animation effect but it will ‘jerk’ to the final result.

//=============================================================================

function wait(msecs)

{

  var start = new Date().getTime();

  var cur = start

  while(cur – start < msecs)

  {

    cur = new Date().getTime();

  }

}


//=============================================================================

// For debugging only – Shows all the images.

//=============================================================================

function ShowSources(sender)

{

  var retVal=“”;

  for(i=0; i<10; i++)

  {


    retVal += i.toString() + “: “ + GetSource(sender, i);

  }

  return retVal;

}


//=============================================================================

// For debugging only – Shows the tags

//=============================================================================

function ShowTags(sender)

{

  retVal = “”;

  for(i=0; i<10; i++)

  {

    var currentCanvas = sender.findName(“img0” + i.toString());

    retVal += currentCanvas.tag + ” “;

  }

  return retVal; 

}

The Silverlight Match the Dot Net Rocks Hosts Game – Part 2 – The XAML

Because it’s quite long I’ve posted the XAML at the foot of this post. It’s pretty straight forward though. In Silverlight 1.0 XAML, you’re restricted to using a Canvas for your containers.

In this case I use 10 child canvases, one for each of the photos. At the start of the XAML for each image canvas I have two Storyboards in the Canvas.Resources section. One storyboard fades the question mark out then the photo in. The other reverses it, fading out the photo and in the question mark.

Next I put a rectangle around the entire game, then display the title bar. After that I display the instructions at the bottom using colors similar to the title bar.

A series of 10 canvases come next, each one holds two image controls, one for the question mark and one for the picture of the host. When the app starts, the Javascript replaces the Source property for each of the Answer images with a photo of the host, but you’ll see that tomorrow.

The only other thing to note is how mouse clicks are captured. There is no Click even as you might be used to with WPF, instead you have to capture the MouseLeftButtonDown. I route all 10 images’ MouseLeftButtonDown events to the same Javascript method, and use the Sender parameter to differentiate which of the 10 Canvases were clicked.

The final thing to note is the Reset Game button, which really isn’t a button but a canvas, which holds a rectangle with some cool gradients and a text block. Just like with the images, the canvas’ MouseLeftButtonDown is captured and the corresponding Javascript routine is called.

OK, enough explanation for today, here’s the code:


<Canvas xmlns=http://schemas.microsoft.com/client/2007

        xmlns:x=http://schemas.microsoft.com/winfx/2006/xaml

        x:Name=mainCanvas

        Width=800 Height=500 Background=Black>


  <Canvas.Resources>

    <Storyboard x:Name=mainRevealAnimation >

      <DoubleAnimation Duration=00:00:01.5 From=0 To=1

                      Storyboard.TargetName=mainCanvas

                        Storyboard.TargetProperty=Opacity  />

    </Storyboard>

    <Storyboard x:Name=mainHideAnimation >

      <DoubleAnimation Duration=00:00:01.5 From=1 To=0

                      Storyboard.TargetName=mainCanvas

                        Storyboard.TargetProperty=Opacity  />

    </Storyboard>


    <Storyboard x:Name=img00RevealAnimation >

      <DoubleAnimation Duration=00:00:00.5 From=1 To=0

                      Storyboard.TargetName=imgQuestion00

                        Storyboard.TargetProperty=Opacity  />

      <DoubleAnimation Duration=00:00:00.5 From=0 To=1

                      Storyboard.TargetName=imgAnswer00

                        Storyboard.TargetProperty=Opacity  />

    </Storyboard>

    <Storyboard x:Name=img00HideAnimation >

      <DoubleAnimation Duration=00:00:00.5 From=1 To=0

                      Storyboard.TargetName=imgAnswer00

                        Storyboard.TargetProperty=Opacity  />

      <DoubleAnimation Duration=00:00:00.5 From=0 To=1

                      Storyboard.TargetName=imgQuestion00

                        Storyboard.TargetProperty=Opacity  />

    </Storyboard>

    <Storyboard x:Name=img01RevealAnimation >

      <DoubleAnimation Duration=00:00:00.5 From=1 To=0

                      Storyboard.TargetName=imgQuestion01

                        Storyboard.TargetProperty=Opacity  />

      <DoubleAnimation Duration=00:00:00.5 From=0 To=1

                      Storyboard.TargetName=imgAnswer01

                        Storyboard.TargetProperty=Opacity  />

    </Storyboard>

    <Storyboard x:Name=img01HideAnimation >

      <DoubleAnimation Duration=00:00:00.5 From=1 To=0

                      Storyboard.TargetName=imgAnswer01

                        Storyboard.TargetProperty=Opacity  />

      <DoubleAnimation Duration=00:00:00.5 From=0 To=1

                      Storyboard.TargetName=imgQuestion01

                        Storyboard.TargetProperty=Opacity  />

    </Storyboard>

    <Storyboard x:Name=img02RevealAnimation >

      <DoubleAnimation Duration=00:00:00.5 From=1 To=0

                      Storyboard.TargetName=imgQuestion02

                        Storyboard.TargetProperty=Opacity  />

      <DoubleAnimation Duration=00:00:00.5 From=0 To=1

                      Storyboard.TargetName=imgAnswer02

                        Storyboard.TargetProperty=Opacity  />

    </Storyboard>

    <Storyboard x:Name=img02HideAnimation >

      <DoubleAnimation Duration=00:00:00.5 From=1 To=0

                      Storyboard.TargetName=imgAnswer02

                        Storyboard.TargetProperty=Opacity  />

      <DoubleAnimation Duration=00:00:00.5 From=0 To=1

                      Storyboard.TargetName=imgQuestion02

                        Storyboard.TargetProperty=Opacity  />

    </Storyboard>

    <Storyboard x:Name=img03RevealAnimation >

      <DoubleAnimation Duration=00:00:00.5 From=1 To=0

                      Storyboard.TargetName=imgQuestion03

                        Storyboard.TargetProperty=Opacity  />

      <DoubleAnimation Duration=00:00:00.5 From=0 To=1

                      Storyboard.TargetName=imgAnswer03

                        Storyboard.TargetProperty=Opacity  />

    </Storyboard>

    <Storyboard x:Name=img03HideAnimation >

      <DoubleAnimation Duration=00:00:00.5 From=1 To=0

                      Storyboard.TargetName=imgAnswer03

                        Storyboard.TargetProperty=Opacity  />

      <DoubleAnimation Duration=00:00:00.5 From=0 To=1

                      Storyboard.TargetName=imgQuestion03

                        Storyboard.TargetProperty=Opacity  />

    </Storyboard>

    <Storyboard x:Name=img04RevealAnimation >

      <DoubleAnimation Duration=00:00:00.5 From=1 To=0

                      Storyboard.TargetName=imgQuestion04

                        Storyboard.TargetProperty=Opacity  />

      <DoubleAnimation Duration=00:00:00.5 From=0 To=1

                      Storyboard.TargetName=imgAnswer04

                        Storyboard.TargetProperty=Opacity  />

    </Storyboard>

    <Storyboard x:Name=img04HideAnimation >

      <DoubleAnimation Duration=00:00:00.5 From=1 To=0

                      Storyboard.TargetName=imgAnswer04

                        Storyboard.TargetProperty=Opacity  />

      <DoubleAnimation Duration=00:00:00.5 From=0 To=1

                      Storyboard.TargetName=imgQuestion04

                        Storyboard.TargetProperty=Opacity  />

    </Storyboard>

    <Storyboard x:Name=img05RevealAnimation >

      <DoubleAnimation Duration=00:00:00.5 From=1 To=0

                      Storyboard.TargetName=imgQuestion05

                        Storyboard.TargetProperty=Opacity  />

      <DoubleAnimation Duration=00:00:00.5 From=0 To=1

                      Storyboard.TargetName=imgAnswer05

                        Storyboard.TargetProperty=Opacity  />

    </Storyboard>

    <Storyboard x:Name=img05HideAnimation >

      <DoubleAnimation Duration=00:00:00.5 From=1 To=0

                      Storyboard.TargetName=imgAnswer05

                        Storyboard.TargetProperty=Opacity  />

      <DoubleAnimation Duration=00:00:00.5 From=0 To=1

                      Storyboard.TargetName=imgQuestion05

                        Storyboard.TargetProperty=Opacity  />

    </Storyboard>

    <Storyboard x:Name=img06RevealAnimation >

      <DoubleAnimation Duration=00:00:00.5 From=1 To=0

                      Storyboard.TargetName=imgQuestion06

                        Storyboard.TargetProperty=Opacity  />

      <DoubleAnimation Duration=00:00:00.5 From=0 To=1

                      Storyboard.TargetName=imgAnswer06

                        Storyboard.TargetProperty=Opacity  />

    </Storyboard>

    <Storyboard x:Name=img06HideAnimation >

      <DoubleAnimation Duration=00:00:00.5 From=1 To=0

                      Storyboard.TargetName=imgAnswer06

                        Storyboard.TargetProperty=Opacity  />

      <DoubleAnimation Duration=00:00:00.5 From=0 To=1

                      Storyboard.TargetName=imgQuestion06

                        Storyboard.TargetProperty=Opacity  />

    </Storyboard>

    <Storyboard x:Name=img07RevealAnimation >

      <DoubleAnimation Duration=00:00:00.5 From=1 To=0

                      Storyboard.TargetName=imgQuestion07

                        Storyboard.TargetProperty=Opacity  />

      <DoubleAnimation Duration=00:00:00.5 From=0 To=1

                      Storyboard.TargetName=imgAnswer07

                        Storyboard.TargetProperty=Opacity  />

    </Storyboard>

    <Storyboard x:Name=img07HideAnimation >

      <DoubleAnimation Duration=00:00:00.5 From=1 To=0

                      Storyboard.TargetName=imgAnswer07

                        Storyboard.TargetProperty=Opacity  />

      <DoubleAnimation Duration=00:00:00.5 From=0 To=1

                      Storyboard.TargetName=imgQuestion07

                        Storyboard.TargetProperty=Opacity  />

    </Storyboard>

    <Storyboard x:Name=img08RevealAnimation >

      <DoubleAnimation Duration=00:00:00.5 From=1 To=0

                      Storyboard.TargetName=imgQuestion08

                        Storyboard.TargetProperty=Opacity  />

      <DoubleAnimation Duration=00:00:00.5 From=0 To=1

                      Storyboard.TargetName=imgAnswer08

                        Storyboard.TargetProperty=Opacity  />

    </Storyboard>

    <Storyboard x:Name=img08HideAnimation >

      <DoubleAnimation Duration=00:00:00.5 From=1 To=0

                      Storyboard.TargetName=imgAnswer08

                        Storyboard.TargetProperty=Opacity  />

      <DoubleAnimation Duration=00:00:00.5 From=0 To=1

                      Storyboard.TargetName=imgQuestion08

                        Storyboard.TargetProperty=Opacity  />

    </Storyboard>

    <Storyboard x:Name=img09RevealAnimation >

      <DoubleAnimation Duration=00:00:00.5 From=1 To=0

                      Storyboard.TargetName=imgQuestion09

                        Storyboard.TargetProperty=Opacity  />

      <DoubleAnimation Duration=00:00:00.5 From=0 To=1

                      Storyboard.TargetName=imgAnswer09

                        Storyboard.TargetProperty=Opacity  />

    </Storyboard>

    <Storyboard x:Name=img09HideAnimation >

      <DoubleAnimation Duration=00:00:00.5 From=1 To=0

                      Storyboard.TargetName=imgAnswer09

                        Storyboard.TargetProperty=Opacity  />

      <DoubleAnimation Duration=00:00:00.5 From=0 To=1

                      Storyboard.TargetName=imgQuestion09

                        Storyboard.TargetProperty=Opacity  />

    </Storyboard>


  </Canvas.Resources>


  <Rectangle Width=800 Height=500 Canvas.Left=0 Canvas.Top=0>

    <Rectangle.Fill>

      <LinearGradientBrush>

        <GradientStop Color=#00000000 Offset=0.0 />

        <GradientStop Color=#55555555 Offset=0.25 />

        <GradientStop Color=#00000000 Offset=0.75 />

        <GradientStop Color=#88888888 Offset=1.0 />

      </LinearGradientBrush>

    </Rectangle.Fill>

  </Rectangle>


  <!– Title bar –>

  <Rectangle x:Name=TitleBar Canvas.Left=25 Canvas.Top=10

            Width=750 Height=75 RadiusX=16 RadiusY=16

            Stroke=#E0F0F0 StrokeThickness=8>

    <Rectangle.Fill>

      <LinearGradientBrush StartPoint=0.5,0 EndPoint=0.5,1 >

        <GradientStop Color=#FFC4E1F0 Offset=0/>

        <GradientStop Color=#FF64E1F0 Offset=1/>

      </LinearGradientBrush>

    </Rectangle.Fill>

  </Rectangle>


  <TextBlock Canvas.Left=50 Canvas.Top=33

            FontFamily=Arial FontSize=28 FontWeight=Bold>

    Arcane Code’s Match the Dot Net Rocks Hosts Game

  </TextBlock>


  <!– Instructions –>

  <Canvas Canvas.Left=50 Canvas.Top=390>

    <Rectangle x:Name=Instructions Canvas.Top=0 Canvas.Left=0

            Width=625 Height=105 RadiusX=16 RadiusY=16

            Stroke=#E0F0F0 StrokeThickness=4>

      <Rectangle.Fill>

        <LinearGradientBrush StartPoint=0.5,0 EndPoint=0.5,1 >

          <GradientStop Color=#FFC4E1F0 Offset=0/>

          <GradientStop Color=#FF64E1F0 Offset=1/>

        </LinearGradientBrush>

      </Rectangle.Fill>

    </Rectangle>


    <TextBlock Canvas.Left=10 Canvas.Top=15

              FontFamily=Arial FontSize=16 FontWeight=Bold>

      Instructions

    </TextBlock>


    <TextBlock Canvas.Left=15 Canvas.Top=38 Width=550

              FontFamily=Arial FontSize=12 TextWrapping=Wrap >

      Click on the question marks to reveal the hosts of Dot Net Rocks. Carl Franklin,

      Richard Campbell, Rory Blyth, Mark Dunn and Mark Miller challenge you to find them.

      Watch the message bar in the middle for quotes from the DNR hosts.

      (Yes, I know, technically Mark Miller isn’t a host, but every time he’s on he thinks he

      is, so I decided to let him live out his fantasies in this game.)

    </TextBlock>

  </Canvas>


  <!– The images –>

  <Canvas x:Name=img00 Canvas.Left=050 Canvas.Top=100 Height=100

      MouseLeftButtonDown=imgMouseLeftButtonDown Tag=00    >

    <Image x:Name=imgQuestion00 Height=100 Width=100 Source=Dunno.png />

    <Image x:Name=imgAnswer00 Height=100 Source=Carl01.png Opacity=0 />

  </Canvas>


  <Canvas x:Name=img01 Canvas.Left=200 Canvas.Top=100 Height=100

      MouseLeftButtonDown=imgMouseLeftButtonDown Tag=00    >

    <Image x:Name=imgQuestion01 Height=100 Width=100 Source=Dunno.png />

    <Image x:Name=imgAnswer01 Height=100 Source=Carl01.png Opacity=0 />

  </Canvas>


  <Canvas x:Name=img02 Canvas.Left=350 Canvas.Top=100 Height=100

      MouseLeftButtonDown=imgMouseLeftButtonDown Tag=00    >

    <Image x:Name=imgQuestion02 Height=100 Width=100 Source=Dunno.png />

    <Image x:Name=imgAnswer02 Height=100 Source=Carl01.png Opacity=0 />

  </Canvas>


  <Canvas x:Name=img03 Canvas.Left=500 Canvas.Top=100 Height=100

      MouseLeftButtonDown=imgMouseLeftButtonDown Tag=00    >

    <Image x:Name=imgQuestion03 Height=100 Width=100 Source=Dunno.png />

    <Image x:Name=imgAnswer03 Height=100 Source=Carl01.png Opacity=0 />

  </Canvas>


  <Canvas x:Name=img04 Canvas.Left=650 Canvas.Top=100 Height=100

      MouseLeftButtonDown=imgMouseLeftButtonDown Tag=00    >

    <Image x:Name=imgQuestion04 Height=100 Width=100 Source=Dunno.png />

    <Image x:Name=imgAnswer04 Height=100 Source=Carl01.png Opacity=0 />

  </Canvas>


  <Canvas x:Name=img05 Canvas.Left=050 Canvas.Top=250 Height=100

      MouseLeftButtonDown=imgMouseLeftButtonDown Tag=00    >

    <Image x:Name=imgQuestion05 Height=100 Width=100 Source=Dunno.png />

    <Image x:Name=imgAnswer05 Height=100 Source=Carl01.png Opacity=0 />

  </Canvas>


  <Canvas x:Name=img06 Canvas.Left=200 Canvas.Top=250 Height=100

      MouseLeftButtonDown=imgMouseLeftButtonDown Tag=00    >

    <Image x:Name=imgQuestion06 Height=100 Width=100 Source=Dunno.png />

    <Image x:Name=imgAnswer06 Height=100 Source=Carl01.png Opacity=0 />

  </Canvas>


  <Canvas x:Name=img07 Canvas.Left=350 Canvas.Top=250 Height=100

    MouseLeftButtonDown=imgMouseLeftButtonDown Tag=00    >

    <Image x:Name=imgQuestion07 Height=100 Width=100 Source=Dunno.png />

    <Image x:Name=imgAnswer07 Height=100 Source=Carl01.png Opacity=0 />

  </Canvas>


  <Canvas x:Name=img08 Canvas.Left=500 Canvas.Top=250 Height=100

      MouseLeftButtonDown=imgMouseLeftButtonDown Tag=00    >

    <Image x:Name=imgQuestion08 Height=100 Width=100 Source=Dunno.png />

    <Image x:Name=imgAnswer08 Height=100 Source=Carl01.png Opacity=0 />

  </Canvas>


  <Canvas x:Name=img09 Canvas.Left=650 Canvas.Top=250 Height=100

      MouseLeftButtonDown=imgMouseLeftButtonDown Tag=00    >

    <Image x:Name=imgQuestion09 Height=100 Width=100 Source=Dunno.png />

    <Image x:Name=imgAnswer09 Height=100 Source=Carl01.png Opacity=0 />

  </Canvas>


  <!– Message Bar across Middle of Screen –>

  <Rectangle Width=700 Height=26 Stroke=#FF000000 Canvas.Left=50 Canvas.Top=212>

    <Rectangle.Fill>

      <LinearGradientBrush EndPoint=1,0.5 StartPoint=0,0.5>

        <GradientStop Color=#FFDDDDDD Offset=1/>

        <GradientStop Color=#FF464646 Offset=0.393/>

        <GradientStop Color=#FE8B8B8B Offset=0.723/>

      </LinearGradientBrush>

    </Rectangle.Fill>

  </Rectangle>


  <TextBlock x:Name=StatusArea Canvas.Left=55 Canvas.Top=215

            FontSize=14 FontWeight=Medium Foreground=White >

    Match the Hosts!

  </TextBlock>


  <!– Reset Game Button–>

  <Canvas Canvas.Top=455 Canvas.Left=690 MouseLeftButtonDown=ResetGame>


    <Rectangle Stroke=Black StrokeThickness=2

        Width=100 Height=40

        RadiusX=10 RadiusY=10>

      <Rectangle.Fill>

        <LinearGradientBrush>

          <GradientStop Color=Gray Offset=0/>

          <GradientStop Color=Snow Offset=0.6/>

          <GradientStop Color=Gray Offset=1/>

        </LinearGradientBrush>

      </Rectangle.Fill>

    </Rectangle>


    <TextBlock Canvas.Top=10 Canvas.Left=10

              FontSize=14 FontWeight=Bold

              Text=Reset Game />


  </Canvas>


</Canvas>

The Silverlight Match the Dot Net Rocks Hosts Game – Part 1 – Intro

Alabama Code Camp 5 did something interesting, they sponsored a programming contest. The rules were pretty simple, you had to code a game using Silverlight 1.0. First prize would be awarded a Zune.

If I tell you I still want a Zune, you’ll be able to figure out how I did. Actually, I did come in second place, but that’s OK. I had a fun time coding the game, and it was neat to get in there roll up my sleeves and learn a new technology. Not to mention listening to all those old DNR episodes to get the quotes. (I still want a Zune though. 😉

Here’s what I came up with, the Arcane Code Match the Dot Net Rocks Hosts Game. Play is quite simple, you click on the question marks. The first click reveals a DNR host, if you match with the second click the hosts photo stays up, and you are rewarded with a witty quote across the middle of the screen. If you fail to match, you are cruelly taunted then the pictures fade back to question marks. Match all the hosts to win. Below is an example before play begins. (Click for a bigger image).

Questions

And here is a game with all the hosts revealed. Carl Franklin, Mark Dunn, Rory Blyth, Richard Campbell and Mark Miller revealed in all their glory.

dnrmatch02

Now, before I get a zillion comments and e-mails, yes I am perfectly aware that Mark Miller is not a DNR Host. However, every time he gets on Mark Miller thinks he’s a host! And frankly, if it will help him to achieve his goal of 125 refactorings inside RefactorPro, then hey I’m certainly willing to help him live out his delusions inside the game.

Each time you play, by the way, the pictures get scrambled in a different order. In a few weeks I hope to figure out a place to host the game so you can actually play for yourself and not just have to look at static screen shots. Right now though I use WordPress for my blog and it (unfortunately) doesn’t do Silverlight.

Over the next two days I’ll show you the code behind, tomorrow I’ll post the XAML and Friday the Javascript. On both days I’ll talk a little bit about the code and what I did. If anyone would like a copy of the entire project, just shoot me an e-mail: arcanecode at gmail.com and I will send you a zip file with the whole project.

WPF ToolBars

Similar to Menus, WPF also supports Toolbars for your application. They are fairly simple to use and will hold just about any control. For best usage, you will want to first place a ToolBarTray onto the container (I’m using a DockPanel). The ToolBarTray will handle things like placement and letting users move the toolbars around as needed.

Then, inside your tray place your ToolBar controls. From there simply add whatever controls you wish to place. You would programmatically respond to events on your controls like you normally would, with Click=”” type syntax or whatever is appropriate for the control. Since I’ve demonstrated that in previous lessons I’ll skip it for today.

In this example I’ve created two bars, one with 3 buttons, the other with a mixture of controls.

    <DockPanel>

      <ToolBarTray DockPanel.Dock=Top

                  Background=LightGray>

        <ToolBar Name=ButtonBar >

          <Button>One</Button>

          <Button>Two</Button>

          <Button>Three</Button>

        </ToolBar>

        <ToolBar Name=Mixed>

          <TextBlock>Hunt For it:</TextBlock>

          <TextBox Width=50></TextBox>

          <Button>GO</Button>

        </ToolBar>

      </ToolBarTray>

      <Grid>

        <Grid.ColumnDefinitions>

          <ColumnDefinition Width=3*/>

          <ColumnDefinition Width=*/>

        </Grid.ColumnDefinitions>

        <TextBlock Margin=5,5,0,0

                  VerticalAlignment=Top>

          More Stuff Here

        </TextBlock>

      </Grid>

    </DockPanel>

Note that I put a Grid in the lower half of the Dock area, don’t worry to much about it right now I just wanted to have something to fill the space.

wpf059

Run the app and grab the “Hunt For it” bar down and see what happens:

wpf060 

The ToolBars stack nicely. As you might expect, you may rearrange them as well.

wpf061 

At the end of the ToolBar is the Overflow control, the little thing that looks like a black arrow pointing down. If you resize the Window too small, or drag one ToolBar too close to it’s neighbor, it will act as a drop down with the remaining controls.

wpf062 

Here you can see it even expands outside the boundaries of the Window, in case the Window is not big enough.

wpf063 

It’s possible to lock your ToolBars down, should you not want the users to be able to move them. All you have to do is add a IsLocked=True to the tray declaration.

      <ToolBarTray DockPanel.Dock=Top

                  Background=LightGray

                  IsLocked=True >

If you look carefully, you’ll notice the moving handles are gone, and your ToolBars are locked down as if they were behind jail bars.

wpf064 

While in the above example I’ve placed my ToolBars in a ToolBarTray, it’s not required. You could place a ToolBar out on it’s own. Let’s add one to our Grid, in the column next to the “More Stuff Here” area.

  <DockPanel>

    <!–Tool Bar Tray here, same as previous sample–>

    <Grid>

      <Grid.ColumnDefinitions>

        <ColumnDefinition Width=3*/>

        <ColumnDefinition Width=*/>

      </Grid.ColumnDefinitions>

      <TextBlock Margin=5,5,0,0

                VerticalAlignment=Top>

        More Stuff Here

      </TextBlock>

      <ToolBar Grid.Column=1

              Margin=0,5,0,0

              VerticalAlignment=Top

              ToolBarTray.IsLocked=True >

        <Button>

          <Image Source=D:\Icons\Win9x\DISK06.ico

            Height=16 Width=16 />

        </Button>

        <Button>

          <Image Source=D:\Icons\WinXP\IPML.ICO

            Height=16 Width=16 />

        </Button>

      </ToolBar>

    </Grid>

  </DockPanel>

wpf065

Note something interesting in the ToolBar declaration, ToolBarTray.IsLocked. Even though we are not explicitly creating a tray, WPF takes care of it for us. You are locked in, however, and cannot move the ToolBar anywhere. That’s why I added the IsLocked, to get rid of the useless moving handle.

I could have simulated this with the two buttons placed in columns in the Grid, but this does give us the advantage of the overflow button should the Window get resized smaller than it needs to be.

ToolBars are a common user interface element that will add that professional touch to your major applications.

WPF Tab Control

Continuing the series on visual grouping controls in WPF, the Tab control is a common UI element that has been around for some time. It makes a convenient way to organize your window when there is more than could realistically fit and still be comprehensible.

In WPF, Tabs are very easy to implement. Create a new WPF Window, remove the default Grid tags, and add the following XAML:  

  <TabControl>

    <TabItem Header=Tab 1>Here’s Tab 1</TabItem>

    <TabItem Header=2nd Tab>A second Tab</TabItem>

  </TabControl>

Run the app, and you’ll see the two tabs on a window:

wpf042

The TabItem, just like most controls, can hold a container control that can hold much more, thus making the tab really useful. In this example, let’s add a third tab item, with a grid. We’ll put in a few text boxes and a button.

  <TabControl Name=tabMyTabs >

    <TabItem Header=Tab 1>Here’s Tab 1</TabItem>

    <TabItem Header=2nd Tab>A second Tab</TabItem>

    <TabItem Header=Cool Tab>

      <Grid>

        <Grid.RowDefinitions>

          <RowDefinition></RowDefinition>

          <RowDefinition></RowDefinition>

          <RowDefinition></RowDefinition>

        </Grid.RowDefinitions>

        <Grid.ColumnDefinitions>

          <ColumnDefinition Width=*></ColumnDefinition>

          <ColumnDefinition Width=2*></ColumnDefinition>

        </Grid.ColumnDefinitions>

        <Label Grid.Column=0 Grid.Row=0

              HorizontalAlignment=Right>

          First Name:

        </Label>

        <Label Grid.Column=0 Grid.Row=1

              HorizontalAlignment=Right>

          Last Name:

        </Label>

        <TextBox Name=FirstName

                Grid.Column=1

                Grid.Row=0 />

        <TextBox Name=LastName

                Grid.Column=1

                Grid.Row=1 />

        <Button  Grid.Column=1

                Grid.Row=2

                Height=23 Width=75

                HorizontalAlignment=Left

                Name=CoolTabButton

                Click=CoolTabButton_Click

                VerticalAlignment=Top>

          OK

        </Button>

      </Grid>

    </TabItem>

  </TabControl>

Using techniques already described in my post on Grids (https://arcanecode.wordpress.com/2007/08/28/grid-yourself-its-wpf/ , in case you missed it) I was able to create a tab with some useful content. Running it, you can see the results for yourself:

wpf043

It’s also possible to determine the current tab via code. Let’s wire up a click event to that OK button you see. This requires we name the tab (I called it tabMyTabs), and the button, and add a Click=”CoolTabButton_Click” to the button declaration. Now all we have to do is add a little code:

    private void CoolTabButton_Click(object sender, RoutedEventArgs e)

    {

      TabItem ti = tabMyTabs.SelectedItem as TabItem;

      MessageBox.Show(“Tab Index=” + ti.Header);

    } 


Running and clicking on the OK button will result in a message box with the words “Tab Index=Cool Tab”

Granted my design won’t win any awards, but it gives you the general idea of how to use a tab control in WPF.

WPF Expander

Last Friday I discussed the GroupBox as a way to organize and sets of controls into distinct groups. There are several controls that will allow you to group controls, so today I’d like to highlight another named the Expander.

The expander is a nifty control that will allow you to show and hide the controls you place on it. Let’s start by putting an Expander control onto a Window. Inside we’ll add a StackPanel, and in it I’ll copy a couple of the RadioButtons from last week’s examples.

<Expander>

    <StackPanel>

      <RadioButton GroupName=One IsChecked=True>Option 1</RadioButton>

      <RadioButton GroupName=One IsChecked=False>Option 2</RadioButton>

    </StackPanel>

  </Expander>

wpf049

Sort of uninspiring, just that button sitting there. But click it and the magic happens.

wpf050

The arrow is nice, but it’d be nice to know what the expander is supposed to do. To that end the Header property is provided. Let’s expand our example with a second Expander control.

  <StackPanel>

    <Expander>

      <StackPanel>

        <RadioButton GroupName=One IsChecked=True>Option 1</RadioButton>

        <RadioButton GroupName=One IsChecked=False>Option 2</RadioButton>

      </StackPanel>

    </Expander>

    <Expander Header=Expander Header>

      <StackPanel>

        <TextBlock>Here is some instructional text for your viewing pleasure.</TextBlock>

        <CheckBox>Check me out!</CheckBox>

      </StackPanel>

    </Expander>

  </StackPanel>

wpf051

Here you can see the group header named “Expander Header”. You may notice, however, that the text scrolls off the side of the screen. That’s easy enough to fix though, all we have to do is add TextWrapping=Wrap” to the TextBlock, which you’ll see in the next sample.

Speaking of which, you may decide there are times when you want to have the Expander control already open when the dialog appears. The most common scenario would be with additional instructions for the user. Perhaps your program has modes for new users and experts. In “new user” mode, you want these to appear already expanded, but in “expert” mode they should not appear. Easy enough to achieve with the IsExpanded property.

  <StackPanel>

    <Expander>

      <StackPanel Margin=15,3,1,1>

        <RadioButton GroupName=One IsChecked=True>Option 1</RadioButton>

        <RadioButton GroupName=One IsChecked=False>Option 2</RadioButton>

      </StackPanel>

    </Expander>

    <Expander Header=Expander Header>

      <StackPanel>

        <TextBlock TextWrapping=Wrap>Here is some instructional text for your viewing pleasure.</TextBlock>

        <CheckBox>Check me out!</CheckBox>

      </StackPanel>

    </Expander>

    <Expander IsExpanded=True Header=Expanded to start with>

      <TextBlock TextWrapping=Wrap>Expanded using the IsExpanded property</TextBlock>

    </Expander>

  </StackPanel>

Here is the dialog, just as it appears to the user when it’s first run.

wpf052

Play around with the other two headers as well. You’ll notice I added a Margin tag to the first group, to bump the options over a bit and make them look a little nicer. I also added the TextWrapping tags to the various TextBlocks.

Finally, you may not always want the Expander to expand down. Fear not, it’s possible to have the expansion go to the right, left, or up via the ExpandDirection tag. Getting it to look right, however, is not a straight forward task. Let’s take a look at what I want to achieve.

wpf053

As you can see, I have a button, and to the right of the button is the expander control, with the ExpandDirection set to Right. You might think you could just drop them into a Horizontally aligned StackPanel, but it won’t work. The StackPanel just expands to take up the room it needs, even if that means going off the edge of the form. The TextWrapping property then of the TextBlock is useless, since it’s container, the StackPanel, seems to be wide enough. It’s not looking at the Window.

There are a couple of ways we could solve this, such as tieing the width of the StackPanel to the Window. But the most straightforward way is to not use the StackPanel at all, but instead to use a Grid.  

  <StackPanel>

    <!–First 3 Expanders omitted for brevity–>

    <Grid>

      <Grid.ColumnDefinitions>

        <ColumnDefinition Width=47></ColumnDefinition>

        <ColumnDefinition></ColumnDefinition>

      </Grid.ColumnDefinitions>

      <Grid.RowDefinitions>

        <RowDefinition></RowDefinition>

      </Grid.RowDefinitions>

      <Button Grid.Column=0 Height=25 VerticalAlignment=Top HorizontalAlignment=Left>Button</Button>

      <Expander Grid.Column=1 ExpandDirection=Right>

        <TextBlock TextWrapping=Wrap Margin=5,3,3,3>Expanded to the right using the ExpandDirection property gives interesting possibilities</TextBlock>

      </Expander>

    </Grid>

    <TextBlock>Some text just below the Right Expander</TextBlock>

  </StackPanel>

Here you can see a grid with one row and two columns. Note in the grid, I’ve fixed the width of the first column to be a good size for the button. If that’s not done, the Grid will keep changing size as the Window changes, and thus changing the button width which gets rather disconcerting to the user, who typically expects buttons to remain a constant size.

In addition, in the Button control I set a fixed height, again to avoid the resize issue. I’ve also set the alignment to the upper left, otherwise the button will move around as the Expander is opened and closed.

Now for the heart of all this, in the Expander control I set the ExpandDirection to Right, so it will go in the direction I want.

Within the TextBlock I added a slight margin to the TextBlock, to make it appear a little nicer. Finally I put another TextBlock under the Grid in the StackPanel, just so you could see it move up and down with the Expander.

Expander controls have a lot of possibilities with WPF. I’ve already mentioned the instructions scenario for new / expert users. They could also be used to hide seldom used options. Expression Blend uses these over in the properties window. If you come up with new design possibilities for this control, feel free to post a comment and let us know what you came up with.

Tallahassee Code Camp A Blast!

I got home a little while ago from spending all day Saturday at the Tallahassee Code Camp. And I have to say, it was a blast! Despite a six hour drive, which included driving through the remains of a tropical storm, it was well worth my time.

The day opened with me actually giving a presentation on SQL Server 2005 Compact Edition. I always like giving my presentations in the first slot, as the attendees are awake (mostly) and energized (or at least heavily caffeinated). They typically ask great questions, and this group was no exception. After my presentation, I was able to spend the rest of the day relaxing and learning about all sorts of great technologies. I attended sessions on Silverlight, LINQ, Windows WorkFlow (WF), and Ajax. All great, and very informative.

The Tallahassee User Group really knows how to put on a good show. Registration was extremely fast, they had more than enough doughnuts and coffee at breakfast and great pizza at lunch. The rooms were nice, all in all quite well run.

And the swag, baby! I have to brag and say I scored some great stuff, primarily a stack of new books on various .Net 3.0 technologies. My best score though came from Joe Healy (http://www.devfish.net/) who gave me one of those cool oval Microsoft stickers which I’ve now proudly affixed to the top of my laptop, just under my Coding Horror sticker.

I also have to give and extra special thanks to my long suffering wife the Southern TinkerBelle ( http://southerntinkerbelle.com/ ), who bent over backwards to arrange things so I could attend. Thanks sweetie!

Thanks again to everyone for a great time, and I look forward to going back next year!

WPF GroupBox

In yesterday’s discussion on RadioButtons, I mentioned it would be a good idea to give a visual cue to the users that certain buttons were associated with each other. The GroupBox is one such way of doing that.

Let’s go back to the RadioButton example from yesterday. You’d think all that’s needed is to surround our sets of radio buttons with the <GroupBox> tags. Unfortunately, the GroupBox can only have one child in it’s content, hence the need to insert a StackPanel, Grid, or other container control.

  <StackPanel>

    <GroupBox>

      <StackPanel>

        <RadioButton GroupName=One IsChecked=True>Option 1</RadioButton>

        <RadioButton GroupName=One IsChecked=False>Option 2</RadioButton>

      </StackPanel>

    </GroupBox>

    <GroupBox>

      <StackPanel>

        <RadioButton GroupName=Two IsChecked=False>Option 3</RadioButton>

        <RadioButton GroupName=Two IsChecked=True>Option 4</RadioButton>

      </StackPanel>

    </GroupBox>

  </StackPanel>

Produces

wpf046

If you look carefully, you can see thin lines surrounding each set of buttons. You can go further and add headers to the GroupBox frame.

  <GroupBox Header=Group One>

Adds a header to the first box.

wpf047

You can even go further, and add true content to the header area. Here we’ll add a button.

  <StackPanel>

    <GroupBox Header=Group One>

      <StackPanel>

        <RadioButton GroupName=One IsChecked=True>Option 1</RadioButton>

        <RadioButton GroupName=One IsChecked=False>Option 2</RadioButton>

      </StackPanel>

    </GroupBox>

    <GroupBox>

      <GroupBox.Header>

        <Button>Group Two</Button>

      </GroupBox.Header>

      <StackPanel>

        <RadioButton GroupName=Two IsChecked=False>Option 3</RadioButton>

        <RadioButton GroupName=Two IsChecked=True>Option 4</RadioButton>

      </StackPanel>

    </GroupBox>

  </StackPanel>

Gives us

wpf048

Using a GroupBox can be a simple but visually appealing way to organize your visual elements.

The WPF RadioButton

Being an old VB coder, I fondly remember this control as the Option Button, but these days it’s been renamed to the RadioButton. They are used to present the user with a set of mutually exclusive options.

Adding them is simple, just use the <RadioButton> tag. For the button you wish to be the default (if any) you add the IsChecked=”true” flag.

WPF adds a huge improvement over it’s predecessor. No longer are you forced to use a container control to group your radio buttons. Instead, WPF adds a GroupName property. Take a look at this example:  

  <StackPanel>

    <RadioButton GroupName=One IsChecked=True>Option 1</RadioButton>

    <RadioButton GroupName=One IsChecked=False>Option 2</RadioButton>

    <RadioButton GroupName=Two IsChecked=False>Option 3</RadioButton>

    <RadioButton GroupName=Two IsChecked=True>Option 4</RadioButton>

  </StackPanel>

wpf045

Note the GroupName, for the first two items, I’ve set it to One, on the second two it’s Two. This means you can change Option 1 and Option 2 without affection Options 3 or 4. Go ahead and run the app, click on the options a bit and watch what happens.

In my example, I only entered two items for each, the actual number you can do is limited only by the space you have available on your Window.

The C# code for checking the value is identical to yesterday’s code for the CheckBox so I won’t reiterate it, all you have to do is look at the IsChecked property.

One last point, event though adding containers are not required to separate the option groups, it’s important to provide some sort of visual indicator so the user knows which groups do what.

The WPF CheckBox

Checkboxes in WPF are very straight forward controls, very similar to their WinForms predecessors. Adding them is a simple matter of using the <CheckBox> tag. Likely you’ll need to give each a name, so you can reference it in code.

There are also two properties that may be of use to you. First is IsChecked, this is set to true or false and as you might expect sets whether the check is in the box or not. The second is IsEnabled, and determines whether users may use the control. You can combine these in any combination, as you can see in the example below.  

    <StackPanel>

      <CheckBox Name=cbxOne IsChecked=False>Check Box One</CheckBox>

      <CheckBox Name=cbxTwo IsChecked=True>Check Box Two</CheckBox>

      <CheckBox Name=cbxThree IsChecked=False IsEnabled=False>Check Box Three</CheckBox>

      <CheckBox Name=cbxFour IsChecked=True IsEnabled=False>Check Box Four</CheckBox>

      <Button Name=btnShowMe Click=btnShowMe_Click>Show Me</Button>

    </StackPanel>

This little bit of code produces this attractive dialog:

wpf044

Note I’ve added a button, the purpose of the button is to show you a dialog that determines whether a box is checked.  

    void btnShowMe_Click(object sender, RoutedEventArgs e)

    {

      StringBuilder sb = new StringBuilder();


      if (cbxOne.IsChecked==true)

        sb.AppendLine(“Box One is Checked”);

      else

        sb.AppendLine(“Box One is Unchecked”);


      if ((bool)cbxTwo.IsChecked)

        sb.AppendLine(“Box Two is Checked”);

      else

        sb.AppendLine(“Box Two is Unchecked”);


      MessageBox.Show(sb.ToString(), “CheckBox”);


    }

Here you can see all that’s needed is to check (no pun intended) the IsChecked property. You may wonder why I had to use the bool case in the cbxTwo example. It turns out the IsChecked is actually of type bool? and not bool. A bool? is a bool that can hold a null value in addition to true/false.

In the cbxOne area, the .Net Framework can handle converting the bool? to a bool before it does the equal. In the second example, .Net needs that conversion to be made explicit.

Go ahead and run the app, check the boxes and click the Show Me to see the messages. I didn’t bother to repeat the same code for boxes three and four, since they are disabled, but they’d work the same way.

The WPF CheckBox is something you should check out! (OK, that time the pun was intended! 😉

The WPF ComboBox

The other major listing control to cover is the ComboBox. It turns out that they are almost identical to ListBoxes. This simple code will add a combo box to your container (I’m using a StackPanel) and put two items into it.

      <ComboBox>

        <ComboBoxItem>Item 1</ComboBoxItem>

        <ComboBoxItem>Item 2</ComboBoxItem>

      </ComboBox>

Running will produce the predictable window with a drop down combo box and two items. If you want the user to be able to edit or enter his own text, you will need to set the IsEditable property to true and IsReadOnly to false in the <ComboBox> header.

Also like the ListBox, the ComboBox can contain complex items.

      <ComboBox>

        <ComboBoxItem>

          <StackPanel Orientation=Horizontal>

            <TextBlock Width=100>Anna</TextBlock>

            <Image Source=D:\Presentations\100Anna.jpg Height=100 />

          </StackPanel>

        </ComboBoxItem>

        <ComboBoxItem>

          <StackPanel Orientation=Horizontal>

            <TextBlock Width=100>Raven</TextBlock>

            <Image Source=D:\Presentations\100Rave.jpg Height=100 />

          </StackPanel>

        </ComboBoxItem>

        <ComboBoxItem>

          <StackPanel Orientation=Horizontal>

            <TextBlock Width=100>Ammie</TextBlock>

            <Image Source=D:\Presentations\100Ammie.jpg Height=100 />

          </StackPanel>

        </ComboBoxItem>

        <ComboBoxItem>

          <StackPanel Orientation=Horizontal>

            <TextBlock Width=100>Kids</TextBlock>

            <Image Source=D:\Presentations\100Kids.jpg Height=100 />

          </StackPanel>

        </ComboBoxItem>


      </ComboBox>

wpf040

Note from the image above, if the contents of the drop down are too big it wil drop below the bottom of your current Window. Additionally, if you use automatic sizing the combo box will adjust itself rather oddly depending on the contents. For that reason, you may wish to set a default width rather than letting the combo box do it for you.

So how do we get data back out of the ComboBox? Well, if all we have is text, we can do just like we did with the ListBox, convert the selected item to a combo box item and get it’s Content.ToString property. But what if it’s like the above example, a mixture of text and images? Well we have to dig just a little, but it’s not that difficult if you understand the tree WPF creates.

  <StackPanel>

    <ComboBox Name=myComboBox  >

      Item Data Omitted for Brevity

    </ComboBox>

    <Button Name=myButton Content=OK Click=myButton_Click />

  </StackPanel>

Note I made two changes. First I added a name to the ComboBox, that way I can address it in code. Next I added a simple button control, we’ll use it to show what is currently selected. Just for the fun of it, I used the Content tag instead of placing it between the <Button></Button> tags, you may run across that form of syntax at some point and should be aware of it.

Now we need to add a little code to the myButton_Click event.

    public void myButton_Click(object sender, RoutedEventArgs e)

    {

      ComboBoxItem cbi = myComboBox.SelectedItem as ComboBoxItem;

      if (cbi != null)

      {

        StackPanel sp = cbi.Content as StackPanel;

        TextBlock block = sp.Children[0] as TextBlock;

        MessageBox.Show(“You picked “ + block.Text);

      }

      else

      {

        MessageBox.Show(“You haven’t picked anything yet”);

      }

    }

First, I got the current ComboBox item, and stored it in the cbi variable. I then check to see if it’s null, which it will be if the user hasn’t selected anything. If it is, we can show them the traditional “hey dummy” message, as I did in the else clause.

If you recall, the contents of the ComboBoxItem are a StackPanel control, so next I get a reference to it in the sp variable.

Next, I suppose I could iterate of the Children of the StackPanel, but since I know that the TextBlock I want is the first child, I’ll simply reference it directly as element zero and return it to the block variable.

Finally we can get to the actual text for the row the user picked. We can simply reference the TextBlock’s text property in the message box. When the app is run, you should see these results:

wpf041

The same techniques I use here would also be applicable to the ListBox we’ve seen previously, simply replace ComboBoxItem with ListBoxItem.

The WPF ComboBox can be quite useful for providing a compact way for users to select complex items.

Downloading a Virtual PC Image of Visual Studio 2008 Beta 2

During last week’s WPF class, several of my coworkers expressed an interest in using the 2008 edition to experiment with WPF. They were concerned installing the beta on their production box could damage their boxes, even though in theory part of the beauty of .Net is the ability to run multiple versions of the framework side by side.

To alleviate those fears, Microsoft has provided a Beta of 2008 already in a ready to run Virtual PC. First, you’ll need to have Microsoft Virtual PC 2007 installed on your box. If you don’t, you can grab a copy from

http://www.microsoft.com/downloads/details.aspx?familyid=04D26402-3199-48A3-AFA2-2DC0B40A73B6&displaylang=en

(Even though the instructions indicate it should work with VPC 2004 SP1 or Virtual Server, I haven’t tried it with them. Virtual Server should be fine, but I would highly suggest upgrading your VPC 2004 to 2007 if you haven’t done so already, there’s lots of nice new features that make it worth the effort.)

Now you can grab the 2008 image. You will actually need two sets of files, the base image and the 2008 Beta 2 image. You can download the 2008 Beta 2 from

http://www.microsoft.com/downloads/details.aspx?FamilyID=3b72271c-e996-4989-898d-72d684966ce6&DisplayLang=en

The download is in the form of 7 files, the first is an exe and the rest are rar files. Download all 7 to a folder and run the exe, and it will combine all 7 to create the virtual pc image.

Make sure to read all of the instructions on this page! The user ID and password to login to the virtual image, along with a link to the needed base image, are contained in the instructions!

Now you need the Orcas base image. If you read through the instructions you saw the link to the compressed file, right above the user id / password. Right click on the link and “Save As…” to the same folder where you saved the other items. Run it to uncompress the base image.

OK, in a folder you should now have OrcasBeta2_VSTS.vmc, OrcasBeta2_VSTS.vhd, Base01.vmc, and Base02.vhd. I also copied the user id and password from the above linked page and saved it in a text file called “Orcas Beta 2 user id and password.txt”, just so I could remember it easily.

When you login, it tells you that the password expries today, and asks if you wish to change it. I’ve always just said no, and it seems to work fine, but you are welcome to change it if you want.

When you shut down the Virtual PC, you will be prompted first for why you are shuting down. This is a Windows Server 2003 prompt, I just select “Other (Planned) under the option and put an ‘x’ for the comment. Once you do the OK button will be enabled.

Next, Virtual PC prompts you, to see if you want to commit your changes or abandon them. If you select “Commit changes to the virtual hard disk”, any changes you made will be saved and ready for next time. If you choose “Delete undo disk changes”, everything you did during that session will be lost forever.

Since it’s just a virtual image, I usually pick commit, but if you have really hosed things up you might want to know about the Delete option.

All of the software I’ve mentioned here is free, so there’s no reason why you can’t run this at home, even if you don’t have an MSDN subscription. Be warned, although Microsoft hasn’t specified a date I would think the image will expire not long after the release of the full Visual Studio 2008 product.

Using the virtual image will allow you to experiment with WPF, as well as the new 2008 features in a safe, risk free environment.

Note: If you want to use Visual Studio 2005 to write WPF (as well as other .Net 3.0 projects), I have documented the bits you need to download in this post:

https://arcanecode.wordpress.com/2007/08/20/installing-the-wpf-bits/

More WPF Resources

Walt Ritscher of Wintellect was in our offices this week, teaching us WPF. Great guy, really knows his stuff, and has a blog well worth checking out at

http://wpfwonderland.wordpress.com/

There’s a great training site on XAML/Silverlight called Nibbles. Be warned the site is done in Silverlight, so for now you’ll need to use IE and have Silverlight installed.

http://www.nibblestutorials.net/

Fellow southern blogger Keith Rome has a blog on WPF and Silverlight:

http://www.mindfusioncorp.com/weblog/

Tim Sneath has a lot of good info on Silverlight:

http://blogs.msdn.com/tims/default.aspx

Finally, this isn’t specifically a WPF resource, but our regional developer evangelist and all around swell guy Doug Turnure has a posting of .Net bloggers in Georgia, Alabama, and Mississippi:

http://blogs.msdn.com/dougturn/archive/2007/08/19/most-popular-bloggers-in-georgia-alabama-and-mississippi.aspx

Update: September 15, 2007 – I wanted to add one more resource. I picked up Pro WPF by Matthew MacDonald (http://www.amazon.com/Pro-WPF-Windows-Presentation-Foundation/dp/1590597826/ref=pd_bbs_3/104-6226587-5048708?ie=UTF8&s=books&qid=1189884771&sr=8-3 or http://tinyurl.com/2pw8z9) I have several of Matthew’s books and have always enjoyed his writing, and this book appears to be another winner. It’s a good companion to the Adam Nathan book, as each book goes into some areas the other doesn’t.

Pro WPF

Scrolling in WPF

I realized in my last post on WPF ListBoxes I overlooked a basic concept, how to make the ListBox scroll when there’s more items than can fit. Let’s return to the code from Monday, but resize the Window so only the top two pictures show. Running the app doesn’t change anything, the top two still show with no way to scroll down.

It turns out this is quite easy to fix, in several ways. First, many controls such as the containers (WrapPanel, for example) or listing controls (ListBox, TreeView to name two) have built in ScrollBars. The reason they did not appear in our example is because the ListBox was inside a StackPanel, and the StackPanel extended below the window edge. As such the ListBox didn’t realize it wasn’t fully displayed.

The simple way to fix then, is to remove the StackPanel and have the ListBox be the only thing on the window. As soon as we do, Vertical Scrollbars automatically appear.

wpf037

Next, if we wanted to, we could wrap the entire panel in <ScrollViewer> tags. ScrollViewer is a XAML tag that will take whatever is inside and move with scrollbars, as needed. What you need to understand though is you’re moving the entire StackPanel, not just the ListBox.

To demonstrate, let’s add a text block to stack panel, just above the list box.  

  <ScrollViewer>

    <StackPanel>

      <TextBlock Background=LightBlue>Pick A Row</TextBlock>

      <ListBox Name=lbxCool>

      <!– ListBoxItems omitted for brevity –>

      </ListBox>

    </StackPanel>

  </ScrollViewer>

Now if you run the program, you’ll see the text block scrolls up with the list box.

wpf038

Note the text block has indeed scrolled up off the screen.

The best way to solve this would be to move the contents to a Grid. The grid sizes correctly take up the space, and allows the list box to automatically display it’s scrollbars.  

  <Grid Name=myGrid >

    <Grid.RowDefinitions>

      <RowDefinition Height=20></RowDefinition>

      <RowDefinition></RowDefinition>

    </Grid.RowDefinitions>

    <TextBlock Grid.Row=0 Background=LightBlue>Pick A Row</TextBlock>

    <ListBox Name=lbxCool Grid.Row=1>

      <!– ListBoxItems omitted for brevity –>

    </ListBox>

  </Grid>

wpf039

If you need horizontal scrollbars, you can add the  ScrollViewer.HorizontalScrollBarVisibility=Visible” tag to the ListBox declaration.

And there you go, a few ways you can add scrolling to your ListBox, or to an entire container using the <ScrollViewer>.