Bug.Net meeting on SQL Server Compact Edition

A few months ago I did a presentation to the Birmingham .Net Users Group (BUG.NET). The subject was SQL Server Compact Edition, in it I discuss both the ‘traditional’ way of accessing a SSCE file as well as using LinqToSQL.

This is a recording of a live presentation, so the audio quality may not be as good as some of the previous presentations I’ve done, it was my first experiment in recording a session live. Let me know how it works for you, I did make every attempt to clean up where I could and ensure the audience was understandable as well.

The wmv is about 76 meg, you can download the wmv directly or watch streaming below.

Presenting Getting Started with SQL Server Compact Edition 3.5 at BUG.NET Meeting

Just wanted to let everyone know I’ll be doing a presentation this coming Tuesday night, August the 12th for the Birmingham .Net Users Group (BUG.NET). My topic, as you may have guessed from the title, will be using SQL Server Compact Edition.

While I will be using Visual Studio 2008, I will point out which pieces are 2005 compatible. I will also cover the use of both traditional coding techniques as well as how to use LinqToSQL to talk to the Compact Edition.

The meeting takes place at 6:30 pm at New Horizons Training Center in Homewood.

I also plan a new series of blog posts to start later this week on the subject, and will be creating a new Code Gallery site to hold my examples.

Also, don’t forget the regular BSDA meeting this coming Thursday night, the 14th. Also starting at 6:30 pm at New Horizons, Shannon Brooks-Hamilton, a software usability expert, will be there to talk about user interface design. Lots of good thought material on how we can make better UIs for our users.

Don’t Uninstall Visual Studio 2005 Yet!

One of the great benefits of Visual Studio 2008 is the ability for it to target multiple .Net Frameworks. This means, in theory you could go ahead and begin using Visual Studio 2008 even though you still need to write apps that are 2005 / .Net 2.0 compliant. You might be tempted to go ahead and uninstall 2005. And that would be fine if you are only doing .Net development. But wait…

If you are still doing SQL Server BIDS (Business Intelligence Developer Studio) then don’t uninstall Visual Studio 2005! Currently there’s no support in VS2008 for doing SQL Server 2005 BIDS Development. If you uninstall VS2005 you won’t be able to do any more BIDS work. Trust me, I found out the hard way.

After uninstalling VS2005, I went to do a BIDS project and that’s when I got hit with the nasty surprise. The uninstall had also removed the Dev Environment that was shared with BIDS. I tried to rerun the install of my SQL Server Developer Edition, but for some reason it thought I wanted to upgrade. It kept giving me the message “You cannot upgrade a version of SQL Server from the GUI, you must use the command line.”

I finally had to reinstall VS2005, along with all it’s service packs. After that I was able to work on my BIDS projects again. So take it from me, if you are still doing SQL Server 2005 Business Intelligence projects, Visual Studio 2005 still has some life in it yet.

SQL Server 2005 Reporting Services ReportViewer Control and IE7

I’ve spent the last few days pulling my hair out over an issue with my reports rendering correctly inside and ASP.Net page and IE7. Like many companies we are preparing to roll out Internet Explorer 7 to all of the desktops. As part of that we’re doing regression testing on our applications, and in doing my tests uncovered an issue with IE7 and our BI (Business Intelligence) solution. It is an ASP.Net 2.0 page that uses the Report Viewer control to display SQL Server 2005 Reporting Services reports.

In IE6, everything has been running fine, reports rendering correctly and users happy. In testing for IE7, we found the reports only drew enough to fill up the available space inside the browser, and then stopped. No scroll bars, and if you resized the browser it did not paint the interior correctly.

The solution, as it turns out was pretty obscure. A co-worker found a thread at http://www.eggheadcafe.com/software/aspnet/27965101/re-problems-setting-webf.aspx that put me on the correct track. The solution needed three minor tweaks to our code.

First, you need to remove the DOCTYPE line from your aspx page. Yes, that’s correct, the line that is automatically inserted when you create a new page. It should look like:

<!DOCTYPE html PUBLIC “~//W3C//DTD XHTML 1.0 Transitional//EN” "http://www.w3.org/TR/xhtml1/DTD/xhtml1-transitional.dtd">

Find it and delete it.

Next, on the ReportViewer control, make sure the AsyncRendering property is set to False. When you set it to true (the default) the report did render correctly, but instead of using the entire webpage to scroll it put another scroll bar onto the report viewer itself, and you had to use it to move through your report. Our testing found having two scroll bars (one for the page and one for the report) to be a bit confusing to the users. Try it both ways though and see what works best for you, as your mileage may vary. For us, we went with False as the setting.

In examining the AsyncRendering property, I found this article on MSDN which further confirmed the need to remove the DocType: http://msdn2.microsoft.com/en-us/library/ms252090(VS.80).aspx

In the final tweak, I made sure to set the width of the ReportViewer control to 100% and removed any setting of height. This allowed the page to scale automatically to the size it needed to be.

Since this was not an intuitive fix, I’m hoping getting the word out will help others and save them the two weeks of frustration I went through.

.Net University – BizTalk

Earlier this week I was privilidged to attend the first .Net University for BizTalk. It was a very informative day long session, I feel like I now have a grasp on at least the fundementals of BizTalk and can talk intelligently about it. I have a long way to go, of course, but this was a great launching point.

If you are not familiar with .Net University, you need to check out their website http://www.dotnet-u.com/ . All of the slide decks, labs, and other courseware are availble not only for you to look at, but to use in doing your own presentation. Your user group or business could put on it’s very own .Net University using the supplied materials. Don’t worry if you are not a guru, they are even publishing videos of the sessions for you to watch and see how the “pros” did it. Currently courseware is available for .Net 3.0 and BizTalk, and the video sessions for .Net 3.0 were just released. They videoed the presentations at the BizTalk session I was in, so I would expect them to be released in the near future. Coming soon will be courseware for Sharepoint and Silverlight.

.Net University was the brainchild of Microsoft Developer Evangelist Doug Tunure ( http://blogs.msdn.com/dougturn/ ). Recently he and Mark Dunn of Dunn Training (http://www.dunntraining.com/) went to TechEd in Asia and used .Net U there. Mark Dunn recorded interviews and talked about it in a recent Dot Net Rocks episode (#288: http://www.dotnetrocks.com/default.aspx?showNum=288 ). Take a listen, they do a better job of explaining it than I can. Mark, by the way, was also one of the presenters at the BizTalk session I was in.

If your user group is looking for a good opportunity to reach out to the community, consider putting on your own .Net U. You can do it in one day, or break it into two or four sessions. Looks like there will be a lot of good material to get you started, and you can even get certificates to present to your attendees.

A Developer’s Guide to Installing SQL Server 2005 – Part 2 – Installing SQL Server 2005 Express Edition with Advanced Services SP2

OK, so you read my instructions on my previous post, and downloaded the appropriate bits from http://msdn2.microsoft.com/en-us/express/bb410792.aspx If you are planning to, are have already installed the Developer Edition, you only need to download the “Microsoft SQL Server 2005 Express Edition with Advanced Services” link. If you are only planning on doing the Express Edition, you’ll also want to download the link under it, “Microsoft SQL Server 2005 Express Edition Toolkit”. My instructions below only cover the database, not the toolkit.

OK, you’ve just downloaded the bits and it’s already time for the first “gotcha”. Before installing, you’ll want to make sure you have the IIS components installed on your machine. Odds are if you are an ASP.NET developer you probably already have them, but if not it’s a good idea to check.

In Vista, go to Control Panel, pick Programs and Features, then “Turn Windows Features on or off”. In the dialog that appears, scroll to Internet Information Services and expand the tree. Make sure all the items under “Web Management Tools” are checked. Now go down to “World Wide Web Services”. Under “Application Development Features” make sure .Net Extensibility, ASP.Net, and the ISAPI items are on. In “Common Http Features” check on everything but redirection. Everything under Health and Diagnostics should be on so you can log errors. Finally, under Security all you need on is Request Filtering.

XP is a little simplier. Under the control panel, Go to Add or Remove Programs, Add or Remove Windows Components. In the dialog that pops up, scroll down to Internet Information Services and check it. Click on details, and add FrontPage 2000 Server Extensions to what’s already checked. Then click OK a few times to get the updates installed.

In either situation, you may need your Windows disk handy to install the additional components.

OK, now you’re finally ready to run the setup. Double click on your sqlexpr_adv.exe to see this screen. All you have to do is check on the “I accept..” to accept the license agreement, then click Next.

clip_image001

Now SQL Server will check to see if it has everything it needs. This is the screen where it would yell at you if you didn’t have IIS installed. Since you do, just click Next.

clip_image002

Now we get a nice welcome screen. I’m feeling all warm and fuzzy now! Click next to continue.

clip_image003

Here SQL Server is going to make sure you have everything you need installed. If there is anything missing you should fix it before you proceed. If you get all greens, you’re good to go.

clip_image004

OK, here we need to deviate from the standard “next next next” default model a lot of us are used to. Make absolutely sure you UNCHECK the box you see below, “Hide advanced configuration options” We definitely want to see those advanced options.

clip_image005

Do you have it unchecked yet? If you don’t, you won’t get Reporting Services or Full Text Searching or the other cool features installed. Go ahead and fill out your name and company. Oh, and did I mention the box should be unchecked? If it is, like the screen below, you can click next.

clip_image006

OK, here we are on that advanced options screen. As you can see, all the cool toys are set to not install. Well that’s no fun. Go through each one and set it to install.

clip_image007

You can see below I have all the items checked on. I want to mention one thing. On the box I’m installing this on, I’ve already got the developer edition installed. So I don’t really need the Client Components. I’ve checked them on so I can show you something later. For now, click Next.

clip_image008

OK, here is your chace to give your server a name. Since everyone in the world uses SQLExpress, you should definitely not use it. Pick a name that’s logical, perhaps your computer name_express or computer_sql. Whatever you pick, change it now click Next.

clip_image009

Remember a few screens back when I said I was installing SQL Express on a machine that already had the Developer version installed? This is where it lets me know. The nice thing is the installer is smart enough not to choke. It simply says “Hey, I’ve already got this piece installed so I’ll skip it.” This is handy so you don’t have to think too much about the pieces you’re installing, you can pick everything and if it’s already there the installer will let you know then go on it’s merry way. Speaking of which, it’s time to get on our merry way by clicking Next.

clip_image010

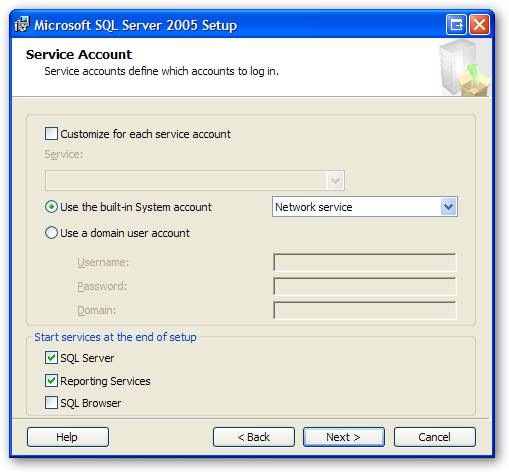
OK, now it wants to know a few things about how to run. First it wants to know what user id to run the service as. The default you see below will work just fine. Next it wants to what pieces it should run at startup. If you are going to be running this once in a blue moon, I would uncheck the SQL Server and Reporting Services options, then run them manually when you need them. On the other hand, if you are going to be in SQL Server nearly every day, like I am, it makes sense to leave these checked so they are started and ready for you. You’ll also want to leave these on if you are going to let other people connect to your box for testing reasons. Once you make your choices, pick Next.

clip_image011

OK, here SQL Server wants to know how you are logging into the server. DO NOT click next. Instead look at the next screen shot.

clip_image012

I don’t like using strictly windows authentication. Instead I much prefer using Mixed Mode. Pick it, then enter a password you can use for the sa account. I prefer this method as it gives me a little flexibility on how to use the database. Make sure you pick a password you’ll remember! Enter it and yes, you guessed it, click next.

clip_image013

Next it’s asking how you want SQL Server to sort text. I always take the default here, and click next. If you have special sorting needs you can change this, but odds are you can click next too.

clip_image014

This next screen is another one of those “Gotchas”.

clip_image015

This is really important to check on, so you can easily administer your own database. Check it on so it looks like the screen below, and hit next.

clip_image016

OK, time for another important question. You can install Reporting Services using the default config, or you can install but not configure now. The idea behind this was to allow you to install but not configure, then copy the configuration from another existing server. This is ideal for the enterprise where we are setting up one server after another and want them all to be identical. However, for our workstation we can simply install using the default configuration, and hit next.

clip_image017

Here Microsoft would like your help. Any data Microsoft can gather about SQL Server will help make it a better product. In some small way you’ll be contributing to the next version. However, I do recognize there are some people or shops that are wary of anonymous statistics gathering. I turned it on for my install, but if you have any doubts leave it off like I show below. Once your decision is made, click Next.

clip_image018

It’s finally time to begin the install. SQL Server shows you your choices one last time, and gives a big “are you sure”. You are, so just hit next.

clip_image019

OK, go get us a couple of cups of coffee, we’ll sit here and wait a bit. This screen will keep us updated on the install process.

clip_image020

As things are completed, they turn green, as you see here. When everything is installed, the Next button will become enabled. Click it to proceed.

clip_image021

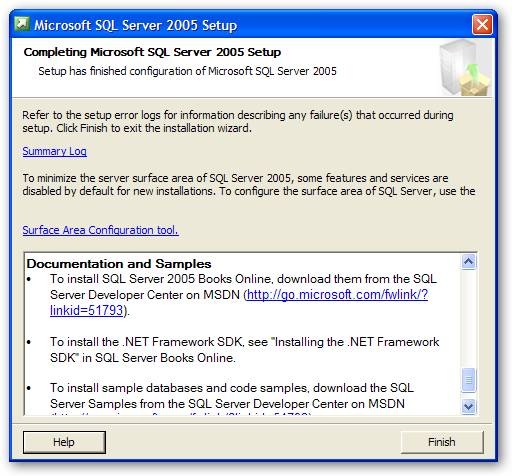
This is the last screen of the install, but don’t blow it off casually. It has some good info. Scroll the message window down to the bottom, as you see here, and you’ll find some good links. First, as you see on the screen, is a link to the Books on Line. You should download these and install them, they will become an often referenced companion and you learn SQL Server. Below that (just off the screen) are links to sample databases. If you are installing on a developer workstation and have the space, you should seriously consider installing these. Many, many authors (including myself, so you’ve been warned) will use these as material for their articles and samples. If nothing else it is very informative to see how Microsoft created a database.

clip_image022

That completes our installation of SQL Server Express with Advances Services. But the fun is just beginning…

A Developer’s Guide to Installing SQL Server 2005 – Part 1 – Selecting a version

As a developer of applications that use SQL Server in some way, it can be valuable to have a database local to your box. It can be used for development, testing, or debugging in an off line environment. While there are many versions of SQL Server 2005, there are only two versions that are really suitable for the developer’s computer: SQL Server Express With Advanced Options, and SQL Server Developers Edition.

The first, SQL Server 2005 Express, is free. There are actually two versions of Express, the standard and the one entitled SQL Server 2005 Express Edition with Advanced Services SP2. It can be a little hard to find, so here’s a handy link: http://msdn2.microsoft.com/en-us/express/bb410792.aspx The standard edition does not include Full Text Search, Reporting Services, or the SQL Server Management Studio Express. These are all features that you, as a developer will want.

The other version of SQL Server that’s geared toward developers is the SQL Server 2005 Developer Edition. This version has the same features as the Enterprise Edition, but it’s only licensed for a single developer to access. It also comes with the full blown BIDS (Business Intelligence Developer Studio) tools. It’s not free, however it’s not expensive either. At only 49.99 it’s priced so even a small one person development shop can easily afford it. This link has more info, including a link to purchase:

http://www.microsoft.com/products/info/product.aspx?view=22&pcid=f544888c-2638-48ed-9f0f-d814e8b93ca0&type=ovr

If you have an MSDN License, the SQL Server 2005 Developer Edition is included with it and can be downloaded via your subscription.

So as a developer, which version version should you install? That answer is easy. Both.

Yes, both. The Express edition will allow you to perform small scale testing, let multiple users bang away at your solution and let you perform some small measure of scalability testing. With it’s database size limited to 4 gig, it may nor may not be big enough to hold your entire database, but it’s certainly large enough for a good hunk of your data. The Developer Edition will give you all of the tools and let you emulate your Enterprise system, at least in terms of the database sizes and structures. However since it’s licensed only for the developer, you won’t be able to have multiple users access it.

So you’ve decided OK, you want to install. If you’re not a trained DBA there a few gotcha’s you should know about when installing SQL Server. By default, not all of the features are installed. In the next few posts, I’ll show step by step instructions on how to install SQL Server for your development workstation.

Arcane Talks

On Thursday July 12th I’ll be speaking at the Birmingham Software Developers Association (BSDA). You can get directions from the club’s website, http://www.bsda.info/ .

I’ll be speaking on the subject of SQL Server Compact Edition. It’s been a while since I blogged about this, so I thought I’d provide a few links for quick reference.

As promised, here is a link to the Power Point presentation (in PDF format) I used during the presentation:

 SSCE presentation for BSDA user group

My very first post was back in January 2007:

http://shrinkster.com/nsk

My next series of posts began on April 10th, and described how to create databases using the various tools available to you.

http://shrinkster.com/qtl

The complete C# and VB.Net code samples were posted April 13th, 2007:

http://shrinkster.com/qtm

And finally, the series of posts I mentioned on system Views started with this post on April 16th, 2007:

http://shrinkster.com/qtn

If you want to see all of my SSCE posts, simply click the SQL Server Compact Edition tag over in the categories area, or use this link:

 https://arcanecode.wordpress.com/tag/sql-server-compact-edition/

Please note each of these links is a starting point, be sure to read the blog for the next few days after each link in order to get the full story.

And now a question, I’m working up material for a new presentation. Debating between SQL Server 2005 Full Text Searching and SQL Server Integration Services. Any opinions?

Eventually I’ll do both, but would like to do the first one based on feedback. Even if you can’t attend please post a comment and let me know where your interests lie.

Collections in C#: NameValueCollection

In doing some reading I ran across a handy collection called the NameValueCollection. This collection, which resides in the System.Collections.Specialized namespace, allows you to use either a string or an integer index for the key. Further, it allows you to store more than one string value in a key.

Let’s start the code example by creating a simple Console application. I added using references to System.Collections and System.Collections.Specialized namespaces at the top. As a final bit of housekeeping, make sure to add a Console.ReadLine() as the last line of our code, so the console will wait on us to hit the enter key after we read the results. (If you don’t, the program will run so fast you won’t be able to appreciate your fine work.)

Now I’m going to load some data into a new collection called myCollection. For the data, I’ll use a website owner and the website or sites they own.

      System.Collections.Specialized.NameValueCollection myCollection

        = new System.Collections.Specialized.NameValueCollection();


      myCollection.Add(“Arcane”, http://arcanecode.com&#8221;);

      myCollection.Add(“PWOP”, http://dotnetrocks.com&#8221;);

      myCollection.Add(“PWOP”, http://dnrtv.com&#8221;);

      myCollection.Add(“PWOP”, http://www.hanselminutes.com&#8221;);

      myCollection.Add(“TWIT”, http://www.twit.tv&#8221;);

      myCollection.Add(“TWIT”, http://www.twit.tv/SN&#8221;);

Next, I’d like to get some data back out. I mentioned you could cycle through the collection using an integer index, so let’s see how that’s done:

      Console.WriteLine(“Key / Value Pairs by Integer Index”);

      for (int i = 0; i < myCollection.Count; i++)

      {

        Console.WriteLine(i.ToString() + ” “

          + myCollection.GetKey(i) + “: “

          + myCollection.Get(i));

      }


[Picture of Key/Value pairs by Integer Index]


In the above output you can see how I use the GetKey and Get methods to retrieve the key name and value for that key using the loop’s index. Note that when multiple values are associated with a single key, they are returned as a list of comma separated values.

You can also use foreach logic to cycle through the collection. Here I am using the AllKeys property of our collection to get the list of keys. I can then print the key, and also use the key as the indexer into my collection as you can see below.

      Console.WriteLine();

      Console.WriteLine(“Keys / Value Pairs via AllKeys Collection”);

      foreach (string myKey in myCollection.AllKeys)

      {

        Console.WriteLine(myKey + “: “ + myCollection[myKey]);

      }


[Picture of Key/Value pairs via AllKeys Collection]


Now I, what? Yes, you in the back row, what was your question? Ah, you say lists of comma separated values are OK, but you want to be able to access individual values? Fortunately some nested looping and the GetValues method will satisfy you demanding types.


      Console.WriteLine();

      Console.WriteLine(“Keys / Individual Values”);

      foreach (string myKey in myCollection.AllKeys)

      {

        foreach (string myValue in myCollection.GetValues(myKey))

        {

          Console.WriteLine(myKey + “: “ + myValue);

        }

      }


[Picture of Keys/Individual Values]


This also works great if your data has commas within it. Let’s add two lines back at the top of the program to the collection.

      myCollection.Add(“CommaTest”, “Here is a , in a string”);

      myCollection.Add(“CommaTest”, “Here is another , in a string”);

 
Now run the application again, and lets look at the results.
 
[Picture of Comma Test]

As you can see in the last area “Keys / Individual Values” the GetValues method correctly determined that the commas I had embedded were part of the data and not a delimiter between values.

Whenever you need a good string collection that has the ability to tie multiple values to a single key, the NameValueCollection would be a good class to take a look at.


Thanks for coming!

I just wanted to thank everyone who took the effort to come to the presentation I did tonight on SQL Server Compact Edition at the Birmingham Dot Net Users Group ( http://www.bugdotnet.com ). It was a small crowd but very engaged, all in all a very enjoyable evening for everyone.

As promised, here is a link to the Power Point presentation (in PDF format) I used during the presentation:

SSCE presentation for BUG.Net group

The complete C# and VB.Net code samples were posted April 13th, 2007:

https://arcanecode.wordpress.com/2007/04/13/sql-server-compact-edition-with-c-and-vbnet/

And finally, the series of posts I mentioned on system Views started with this post on April 16th, 2007:

https://arcanecode.wordpress.com/2007/04/16/system-views-in-sql-server-compact-edition-tables/

If you want to see all of my SSCE posts, simply click the SQL Server Compact Edition tag over in the categories area, or use this link:

https://arcanecode.wordpress.com/tag/sql-server-compact-edition/
Thanks again to  everyone, I had a great time and hope came away with a better understanding of SQL Server Compact Edition.

Windows Services in C#: Pulling in the Event Log for your Windows Service (part 8)

Technically this falls in line closer with the EventLog series I did in January. (For more info see my series on event logging, it started on January 16 of this year and ran to the 19th, http://shrinkster.com/p6d). However, in most cases the Event Log is tied in closely with Windows Services since it’s through the event log that services do most of their communication with the outside world. As such it can be important to read in your events back into your control app.

To read the log we’ll use two different methods, just to show multiple techniques. To start, let’s add a text box to the TLManager, under the buttons. I named mine txtEventLog. Next, in the component area of the toolbox find the EventLog component and drop it on the form. Like the timer, it goes in the tray area under the form. I named mine TimerEventLog.

In the properties for the TimeEventLog, there’s a few properties we must set. First, set the Log property to “ArcaneTimeLogger” and the Source to “ArcaneTimeLoggerService”, so it will know to read our log.

Next set EnableRaisingEvents to true. This will allow the EventLog component to raise an event whenever something gets written to our log. Since we set this to true, we must indicate what method is responsible for the event. Click on the Event button (the lightening bolt) in the properties window to switch to events view, then double click the EventWritten to generate a default named event. It will generate TimeEventLog_EntryWritten.

Now switch to code view, and add this code to the event:

    private void TimeEventLog_EntryWritten(object sender, System.Diagnostics.EntryWrittenEventArgs e)

    {

      txtEventLog.Text = e.Entry.Message

        + System.Environment.NewLine

        + txtEventLog.Text;

    }

This will take the latest event log entry, and add it to the text box. Note I put it first, then add back what was already in the text box. This way the most recent event will always be at the top.

That’s it for this part, now everytime something is written to the event log, the EventLog component will catch the event and let us know about it.

Nice, but sometimes you also want to know what’s already there in the log. Instead of using a component let’s see how to do this with code. First, add a “using System.Diagnostics” reference to the header of your class (form).

Now, I think it would look nice when the TLManager loads to already have the text box populated with the past events. The System.Diagnostics library contains an EventLog class we can use to create an object for our particular event log. Once that’s done, we can cycle through the Entries collection to read what’s there. Here’s some code I added to the TLManger_Load event to do just that.

      StringBuilder sb = new StringBuilder();

      EventLog atl = new EventLog(“ArcaneTimeLogger”);

      for (int i = atl.Entries.Count – 1; i > -1; i–)

      {

        sb.AppendLine(atl.Entries[i].Message);

      }

      txtEventLog.Text = sb.ToString();

I start by creating a string builder object to hold all of the events. Next, and the key is the EventLog atl… line. I pass in the name of our log so the atl object will know what log it belongs to.

Next you will see a for loop that cycles through the entries. Note I’m deliberately starting with the last entry, the most recent one, and counting down to the oldest one. This will ensure the most recent event appears first in the text box.

Finally, I copy the data we’ve built into the string builder into the text box. And that’s it, two ways to monitor event logs and pull their data into your application.

Windows Services in C#: Sending Commands to your Windows Service (part 7)

Yesterday we looked at starting and stopping your windows service from another application. It would also be helpful to be able to send other commands beyond the basic set of Start/Stop/Pause etc.

On the good side, there is an API through which it is possible to send a command to your windows service, fairly easily as a matter of fact. The down side is it’s a one way communication, through the built in mechanism it’s not possible to return any data. Even more limiting is the only data you are allowed to pass in is an integer, and it’s value must be between 128 and 255.

Even with those limitations, if all you need to do is execute a few simple commands the built in API can be more than enough to meet your needs.

To illustrate, we’ll expand the windows service we’ve been using as an example. We’ll add the ability to send a command that will force the event log to be updated immediately, rather than waiting on the timer to fire off its event.

First, we’ll add two items to the service. The first is a public enum. Strictly speaking we don’t have to use an enum, but it makes for more readability.

    // Must be int between 128 and 255

    public enum commands

    {

      LogIt = 255

    }

Next we’ll add a new method to the windows service called OnCustomCommand. This is an override to the base classes method. As you can see it first calls the base method, then checks the value of the integer that was passed in, in this case against our enum. If it finds a match, it calls the WriteToLog method immediately. (The WriteToLog was discussed yesterday, so I won’t reiterate here).

    protected override void OnCustomCommand(int command)

    {

      base.OnCustomCommand(command);

      if (command == (int)commands.LogIt)

      {

        WriteToLog(“Arcane LogIt:”);       

      }

    }

OK, that’s all that’s needed for the service. Let’s switch to our program, and add another button called LogIt.

[Pic of TLManager]

Now we’ll add a little code to the click event for the log it button.

    private void btnLogIt_Click(object sender, EventArgs e)

    {

      ServiceController sc = new ServiceController(“ArcaneTimeLogging”);

      sc.ExecuteCommand(255);

    }

Like in our other examples we create a reference to our service by creating a new ServiceController object and passing in the name of our service. Once we have an sc object we call the ExecuteCommand method. This allows us to send messages to a windows service.

Numbers 0-127 are reserved for windows, and are handled in the base class. 128 to 255 are there for your own use. In the example above I used 255 just to show that you could pass an integer value directly without using an enum.

One last small item, we don’t want the LogIt button to be enabled if our service isn’t running. We’ll add a little logic to the SetDisplay, Start and Stop methods to include setting the buttons enabled status properly. Here’s the updated routines.

    private void SetDisplay(ServiceController sc)

    {

      sc.Refresh();

      if (sc.Status == ServiceControllerStatus.Stopped)

      {

        btnStop.Enabled = false;

        btnStart.Enabled = true;

        btnLogIt.Enabled = false;

        lblStatus.Text = “Stopped”;

      }

      if (sc.Status == ServiceControllerStatus.Running)

      {

        btnStart.Enabled = false;

        btnStop.Enabled = true;

        btnLogIt.Enabled = true;

        lblStatus.Text = “Running”;

      }

    }


    private void btnStart_Click(object sender, EventArgs e)

    {

      ServiceController sc = new ServiceController(“ArcaneTimeLogging”);

      sc.Start();

      btnStart.Enabled = false;

      btnStop.Enabled = true;

      lblStatus.Text = “Running”;

      sc.Refresh();

    }


    private void btnStop_Click(object sender, EventArgs e)

    {

      ServiceController sc = new ServiceController(“ArcaneTimeLogging”);

      sc.Stop();

      btnStop.Enabled = false;

      btnStart.Enabled = true;

      lblStatus.Text = “Stopped”;

      sc.Refresh();

    }

And that’s all there is to it. Compile and reinstall your service, then launch your TLManager program. With the service started, click the LogIt button a few times then go into MMC and take a look at your event log. You should see a new message appear each time you click the LogIt button.

Windows Services in C#: Controlling Your Service from Another Application (part 6)

If you’ve ever used SQL Server, you know it comes with a little control program that allows you to start and stop the SQL Server service. Wouldn’t it be cool if you could write a small program to do the same with your service? Well you can, and today we’ll learn how.

Before we begin, I made a few little tweaks to the TimeLoggerService source code that will make it a bit easier to work with, and implement some of the things we’ll want to do in our control program.

    public TimeLoggerService()

    {

      InitializeComponent();

      // Set the timer to fire every twenty seconds

      // (remember the timer is in millisecond resolution,

      //  so 1000 = 1 second. )

      _timer = new Timer(20000);


      // Now tell the timer when the timer fires

      // (the Elapsed event) call the _timer_Elapsed

      // method in our code

      _timer.Elapsed += new

        System.Timers.ElapsedEventHandler(_timer_Elapsed);

    }


    private void WriteToLog(string msg)

    {

      EventLog evt = new EventLog(“ArcaneTimeLogger”);

      string message = msg + “: “

        + DateTime.Now.ToShortDateString() + ” “

        + DateTime.Now.ToLongTimeString();

      evt.Source = “ArcaneTimeLoggerService”;

      evt.WriteEntry(message, EventLogEntryType.Information);

    }


    protected override void OnStart(string[] args)

    {

      _timer.Start();

      WriteToLog(“Arcane Start”);

    }


    protected override void OnStop()

    {

      _timer.Stop();

      WriteToLog(“Arcane Stop “);

    }


    // This method is called when the timer fires

    // it’s elapsed event. It will write the time

    // to the event log.

    protected void _timer_Elapsed(object sender, ElapsedEventArgs e)

    {

      WriteToLog(“Arcane Timer”);

    }

In the class constructor, the only change I made was to change the time from 60 seconds (60000 milliseconds) down to 20 seconds (20000 milliseconds). To be honest I got tired of waiting on it to log for my tests.

Next, I created a “WriteToLog” method that handles the actual writing of a message to the event log. This code is identical to what was previously in the timer_Elapsed event, except I take a passed in message and append the current date/time to the log. Note one other change, I modified it to use the LongTimeString instead of ShortTimeString, so I could get the seconds to display.

I then modified the OnStart and OnStop to log start and stop messages for me, which is probably a good idea for your service to do too. Finally I modified the _timer_Elasped event where I’d taken the WriteToLog code from, and made a call to our new method. OK, that takes care of changes to the windows service.

Now, let’s add a new project to our solution. In the Solution Explorer, right click on the solution name and pick Add Project, then pick Windows Application. Note that we could do this with a command line app or class library as well, but for this demo we’ll use a windows form. I gave my new app the imaginative name of “TimeLoggerManager”.

I renamed the Form1 to TLManager, and allowed VS to rename all the occurances of Form1 for me. I’m now going to add a few basic controls, one label (lblStatus), and two command buttons (btnStart and btnStop). I’m also going to add a timer control, tmrRefresh. Set the timer to enabled and pick a reasonable time, maybe every 10 or 15 seconds (10000 or 15000 in the Interval property, remember it gets set in milliseconds as well).

In order to use some of the classes we’ll need, we must set a reference to the System.ServiceProcess assembly. Right click on the TimeLoggerManager and Add Reference, then on the .Net tab scroll down to System.ServiceProcess, click on it and press OK.

Now switch to code view on the form, and in the using area add a “using System.ServiceProcess” reference.

The first thing we need to do is find out what the status is of the service event. To do this we’ll first get a reference to our service by creating a ServiceController object, note in the “new” area we have to pass in the name of our service in order to get a reference to it. Once our object is created, I’ll pass it to a method that will set everything up for the form.  

      ServiceController sc = new ServiceController(“ArcaneTimeLogging”);

      SetDisplay(sc);

Set Display is a custom method I wrote, here’s it’s code:

    private void SetDisplay(ServiceController sc)

    {

      sc.Refresh();

      if (sc.Status == ServiceControllerStatus.Stopped)

      {

        btnStop.Enabled = false;

        btnStart.Enabled = true;

        lblStatus.Text = “Stopped”;

      }

      if (sc.Status == ServiceControllerStatus.Running)

      {

        btnStart.Enabled = false;

        btnStop.Enabled = true;

        lblStatus.Text = “Running”;

      }

    }

The first thing called is sc.Refresh, this will cause the ServiceController to update all of the properties in our sc object with the correct values. Next I can query the Status property of our SC object, and set my command buttons and labels appropriately.

Starting and stopping our service is just as easy, all we have to do is create an instance of a service controller object, and then call it’s Start or Stop method.

    private void btnStart_Click(object sender, EventArgs e)

    {

      ServiceController sc = new ServiceController(“ArcaneTimeLogging”);

      sc.Start();

      btnStart.Enabled = false;

      btnStop.Enabled = true;

      lblStatus.Text = “Running”;

      sc.Refresh();

    }


    private void btnStop_Click(object sender, EventArgs e)

    {

      ServiceController sc = new ServiceController(“ArcaneTimeLogging”);

      sc.Stop();

      btnStop.Enabled = false;

      btnStart.Enabled = true;

      lblStatus.Text = “Stopped”;

      sc.Refresh();

    }

Because you can also start and stop the service from other locations, like VS or the MMC, it’s important to keep the display in sync. In the event for the timer, all we have to do is create another reference and pass it to the same SetDisplay method so everything stays in sync.

    private void tmrRefresh_Tick(object sender, EventArgs e)

    {

      ServiceController sc = new ServiceController(“ArcaneTimeLogging”);

      SetDisplay(sc);

    }

Go ahead and give it all a try. Start your service, then check it in the MMC. Use MMC to stop the service, then watch the app automatically update to reflect the status.

Tomorrow we’ll look at sending commands to our windows service, then to wrap up the series we’ll look at integrating the event log into our application. Stay tuned!

Windows Services in C#: Controlling Your Service from Visual Studio (part 5)

In part 3 of this series I documented how to use the Microsoft Management Console to control your service and view the event log. But did you know you can do it right inside Visual Studio?

Inside Visual Studio, open the Server Explorer (I keep mine docked over on the left). Under any database servers you may have should be your computer, click the + symbol to expand the tree.

[Pic of Server Explorer]

Now you can see quite a few items, including Services and Event Logs. Expand the services tree, and let’s scroll down to our service, ArcaneCodeTimeLogger. Right clicking will show us the various commands available to us. Since the service is already running, you can pause or stop it.

[Pic of Services in Server Explorer]

Having this functionality right within Visual Studio makes it very easy when it’s time to debug and test your various methods such as OnStart, OnStop, OnPause, etc. But wait, there’s more!

Just as with services, you can also examine the event log. Scroll up to the event log node and expand it. If you read my earlier series on event logging (http://shrinkster.com/p6d), you know I suggest creating your own distinct event log instead of shoving everything into the Application log. Now you can see why, it makes it very easy to pick out the messages for your app. Expand the two nodes for our service and you can see the first part of the messages appearing in the tree.

[Pic of Event Log in Server Explorer]

To see the complete message, simply double click on it. It will appear, along with other associated data, in the Properties window of Visual Studio.

[Pic of Properties showing detailed EventLog Message]

One thing you should note, when you use Visual Studio to debug your Windows Service, VS “helpfully” hides a lot of your windows, including the Server Explorer. You can get it back though, simply go to the View and pick the Server Explorer to make it appear again.

Now, you may be wondering why way back in part 3 we went through the MMC (Microsoft Management Console) instead of doing it this way. There are often multiple ways to accomplish tasks, and it’s often useful to know them all. For example, let’s say you have your service installed on a users PC and need to stop it or look at its events. If you don’t have Visual Studio installed on the box, what are you going to do?

When you do have VS, using the Server Explorer from within Visual Studio can make it easy to develop and debug your Windows Services. Take a few minutes to explore it’s capabilities, so you’ll have a second way to work with your services.

Windows Services in C#: Debugging Windows Services (part 4)

In part 1 of this series I mentioned debugging a windows service was a little different than normal debugging of an application. Today we’ll look into how you can debug your windows service.

First, open Visual Studio and have your project loaded, if it’s not already there. Now go over to the MMC (as I described in part 3) and make sure it’s logging events.

Now comes the neat part. Under the Debug menu in Visual Studio, select “Attach to process…”. When the dialog below appears, you will need to check the “Show processes from all users” and “Show processes in all sessions” boxes. Now your list should update correctly.

Scroll down and look for the process with the same name as your executable, in my case it was TimeLogger.exe. Click on it, and the click the “Attach” button in the lower left.

[Picture of Attach to Service Dialog]

If all went well Visual Studio should shift to “Run” mode. Your code will be locked (sorry, no edit continue with windows services). But you can go in and create breakpoints, as I’ve done here (click on the pic to see a larger version of it):

[Pic of VS ready to debug]

Now sit back and wait a minute, when our service fires the _timer_Elapsed event it will fall into the standard debug mode you’re used to, as you can see below.

[Pic of VS stepping thru the service]

In the screen above you can see where I took one step and am now on the line of code “string message =…”. I have access to my locals, as well as the call stack and other debugging tools. From here I can do the normal debug tasks, including stepping or just hitting F5 to continue.

When you are done debugging and are ready to disconnect from the service, simply return to the Debug menu and this time pick “Stop Debugging” (or hit Shift+F5). Visual Studio disconnects you from the running service and returns you to normal code editing mode.

Resetting for another test is still a bit painful. You’ll want to stop your service, then in your Visual Studio Command Prompt window run InstallUtil, this time with the /u option to uninstall it. (instalutil /u timelogger.exe). Then you can build, then reinstall your service.

I said this yesterday, but I want to stress it again. If you are developing under Vista, it is vitally important you run VS Command Prompt as the Administrator (simply right click on the menu option and pick run as administrator). If you don’t do this, instalutil will fail every time.

And that’s how you debug an windows service. It’s not really that difficult, now that you know the steps involved.