Do You Really Have a Virus?

Introduction

I’ve had several people contact me in the last few months, all with the same issue. They are getting what appears to be pop up messages on their computer. They all tend to be variations on a theme.

One message says their McAfee (or another brand) of anti-virus is out of date, and you need to contact a company to renew as you have a virus.

Another might warn the user has a virus, needs to click a link to get help in cleaning it.

After talking to the people who contacted me, they confirm a few things.

  • The are not running the anti-virus software listed in the message.
  • They did a scan with their own installed anti-virus, and it showed no viruses found.
  • They use Google Chrome as their default browser.
  • Chrome is set to re-open the last set of web pages they were using when it launches.
  • When they reboot, they get no messages until after they’ve opened up Google Chrome.

What Happened?

Without meaning to, they went to a website that had code from scammers. They use web programming tricks to create what appears to be pop up messages on their computer. While it looks like the messages are coming from their computer, in reality they are just opening up new web pages.

There is a trick they take advantage of that lets them open up a new Google Chrome window, but it removes the title, tabs, borders, etc. This gives it the appearance of a standard message box.

Let me make one thing clear, I’m not trying to disparage Google Chrome or imply anything negative about it. All of the people who contacted me though were using Chrome, which is why the instructions here focus on it.

How to Fix

Resolving the issue isn’t hard, but does require quite a few steps. Nothing complicated, and well within the capability of even a novice user.

A word of warning first

Understand that if followed exactly, these steps will prevent Google Chrome from opening the last set of web pages you had open automatically.

If there was a page you had opened and need back, at the end I show you how to find them in Chrome’s History so you can reopen them. So the risk is very minimal, again if you follow the instructions exactly.

For my open legal protection though I have to give this warning:

Proceed at your own risk. I offer no warranty or guarantees. Just because these steps works does not guarantee you don’t have a virus as well.

OK, with my cute backside covered, let’s proceed.

First, shut down Google Chrome

If Google Chrome is currently running, follow these steps to shut it down. Alternatively you could do a "hard reset", in other words power your computer off.

If Google Chrome is not running, you should absolutely NOT start it again. Just skip this section and go right to "Prevent it from coming back".

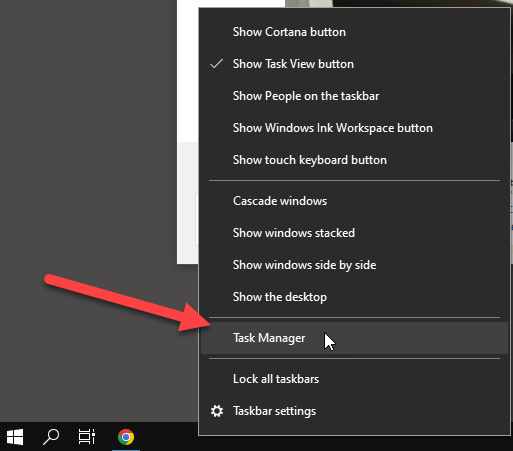
  1. Right Click in an empty area of the Windows bar at the bottom of you desktop screen.
  1. Left click once on Task Manager.
  1. Find Google Chrome in the list. Task Manager has two views, less detail and more.

3a. If you see just a list of a few apps, and nothing else, you are in Less Detail mode. Left click once on Google Chrome. Then left click once on the End Task button in the bottom right.

3b1. If you see a lot of columns displayed, you are in the More Detail view. The left most column is where the applications are listed.

3b2. If don’t see "Apps" at the top, left click the column header once, where it says Name, to sort the data by the list of names.

3b3. Find Google Chrome and left click on it once.

3b4. Left click once on "End Task" in the bottom right of the Task Manager. This should make all the annoying messages go away.

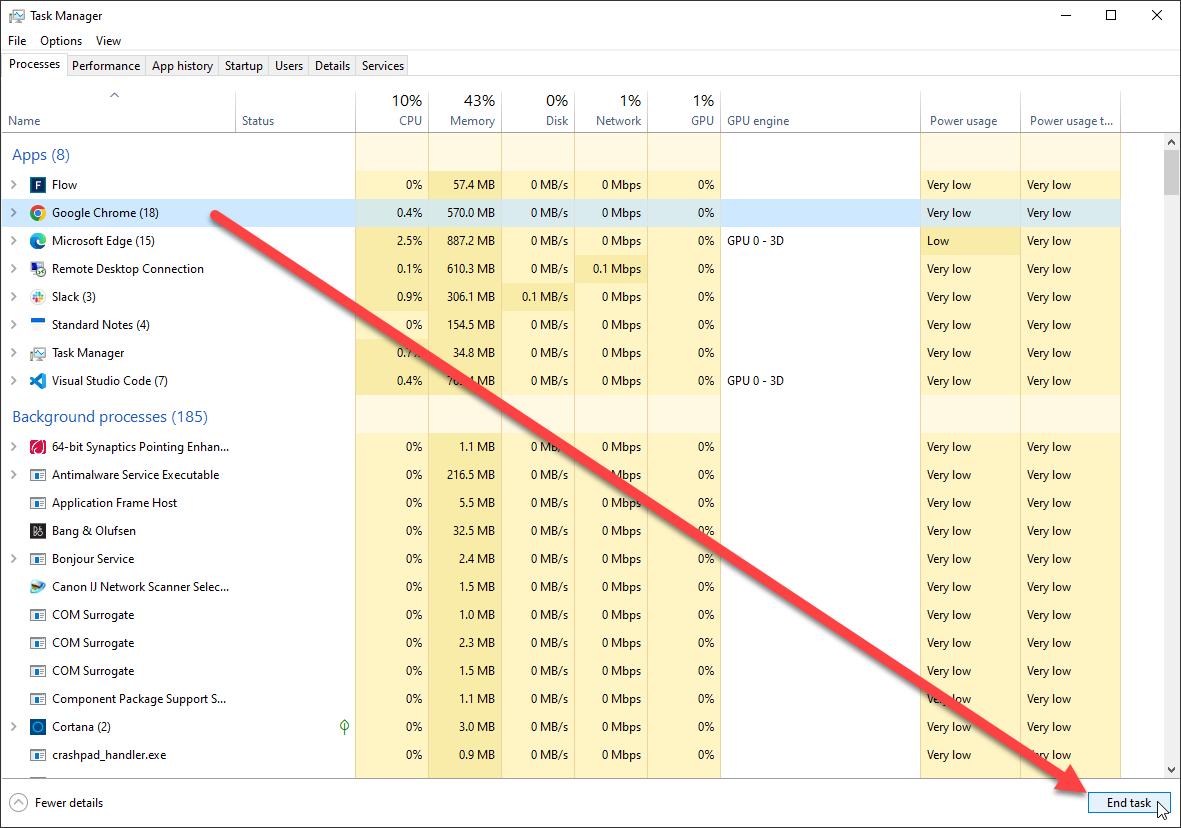
You may be tempted to restart Chrome now, DO NOT DO IT!!! If you do it’ll just start all the fake virus messages back up.

Prevent it from coming back

Preventing this requires several steps, but nothing complicated.

  1. Open the Windows File Explorer.

  2. Single Left Click once on the View menu at the top.

  1. Toward the right is the Show/hide area. Make sure the box beside "Hidden items" is checked ON.

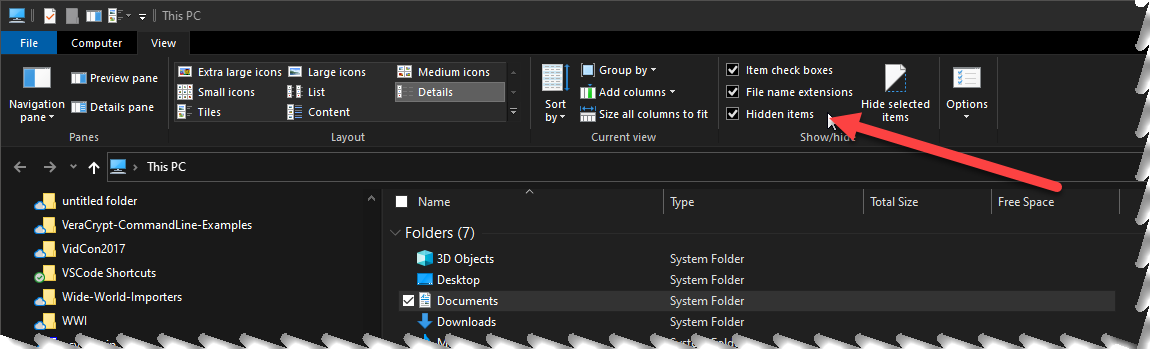
While you are here, click on the Details button so your screen will give you the most details, and match what you’ll see in the upcoming images. Note as you drill down in the following steps you may need to click Details repeatedly, it depends on how your File Explorer is configured.

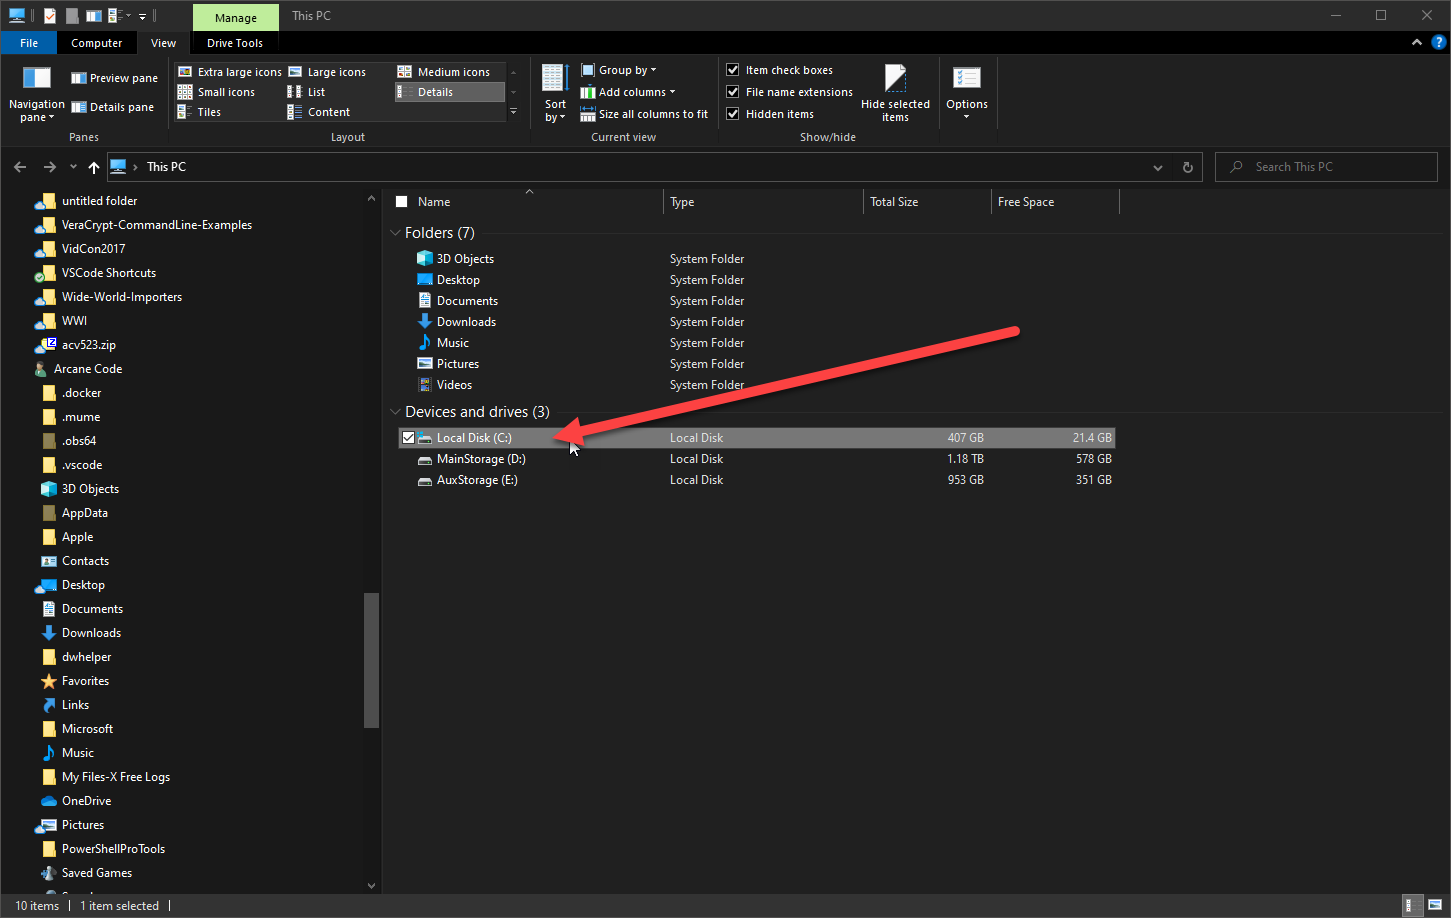
  1. Now left double click on your C:\ drive.
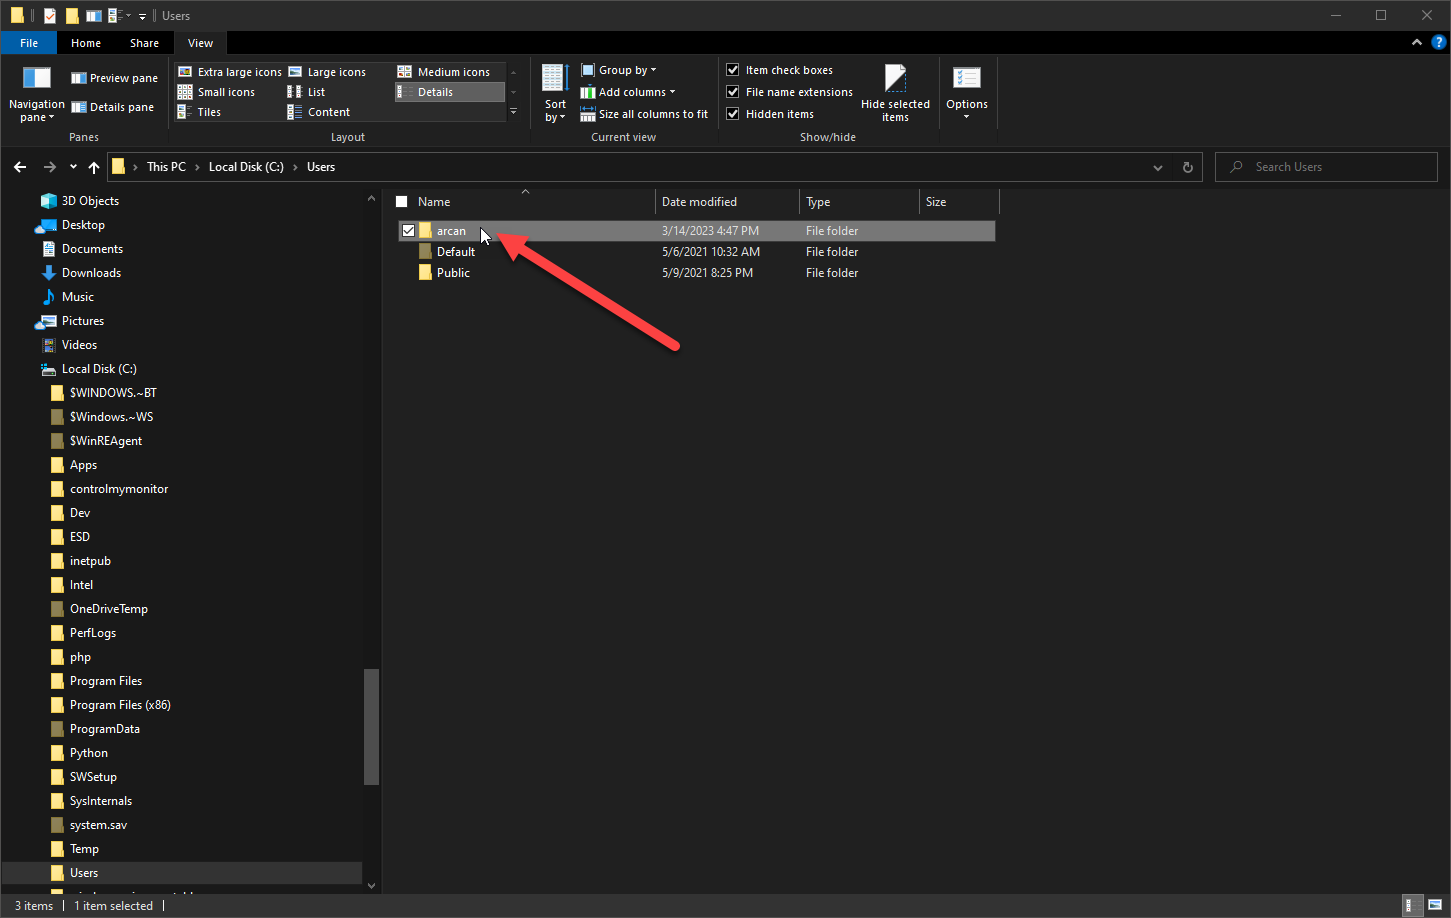
  1. Scroll down to Users, and left double click on it.

Note, ignore the pop up that has the date created for the folder. That will be different on everyone’s computer.

  1. Find your Windows user name and left double click on it. This will be the abbreviated form of your user name, mine happened to be arcan, use the right one for you.
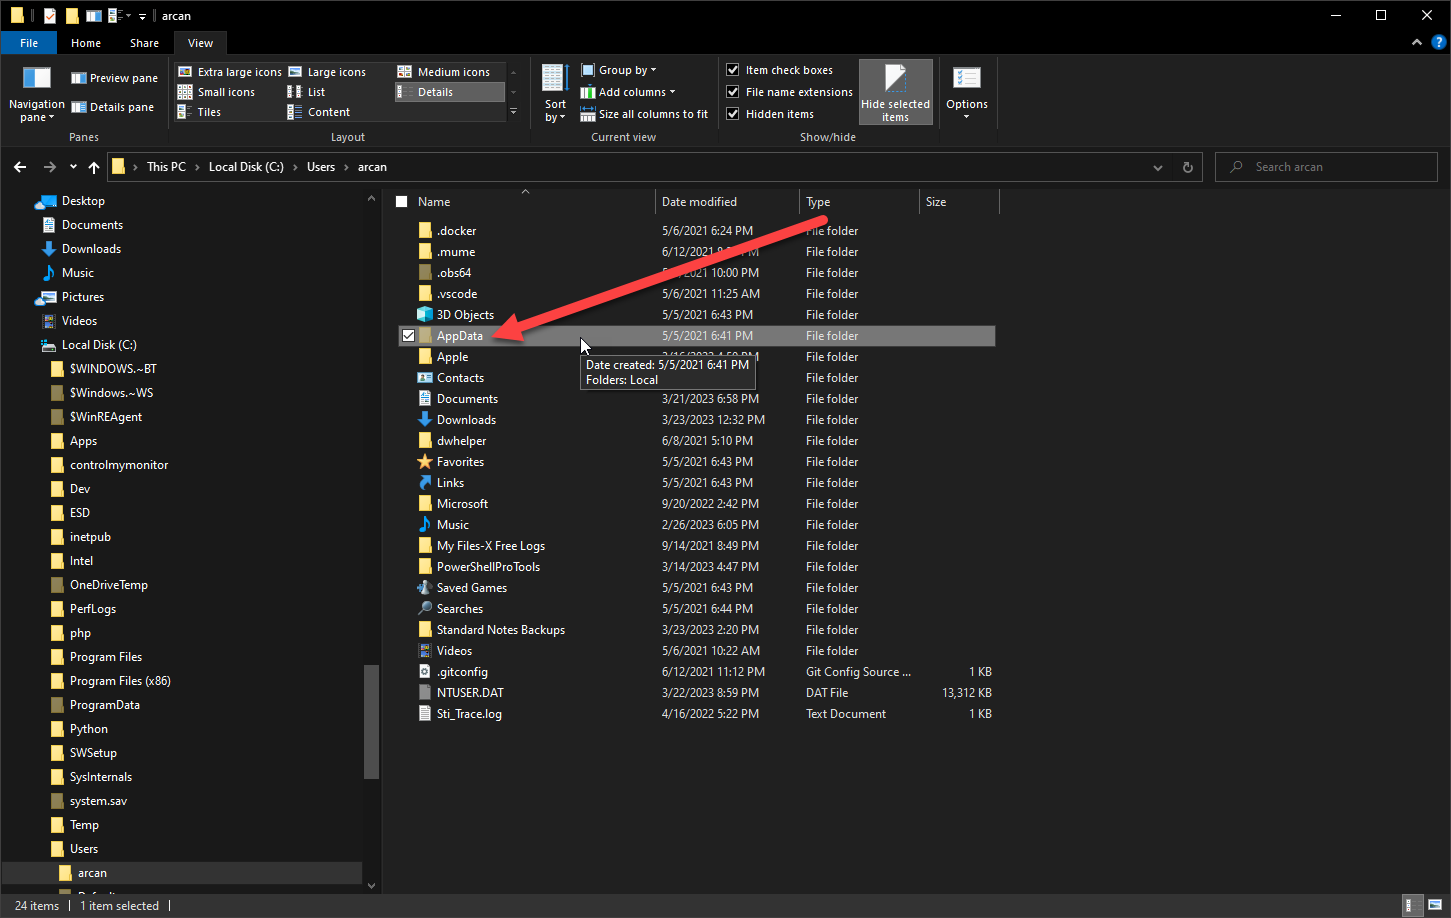
  1. Now left double click on "AppData". If you don’t see it, it means your Hidden items isn’t checked on, see the instructions in step 3 to make sure it’s checked on.
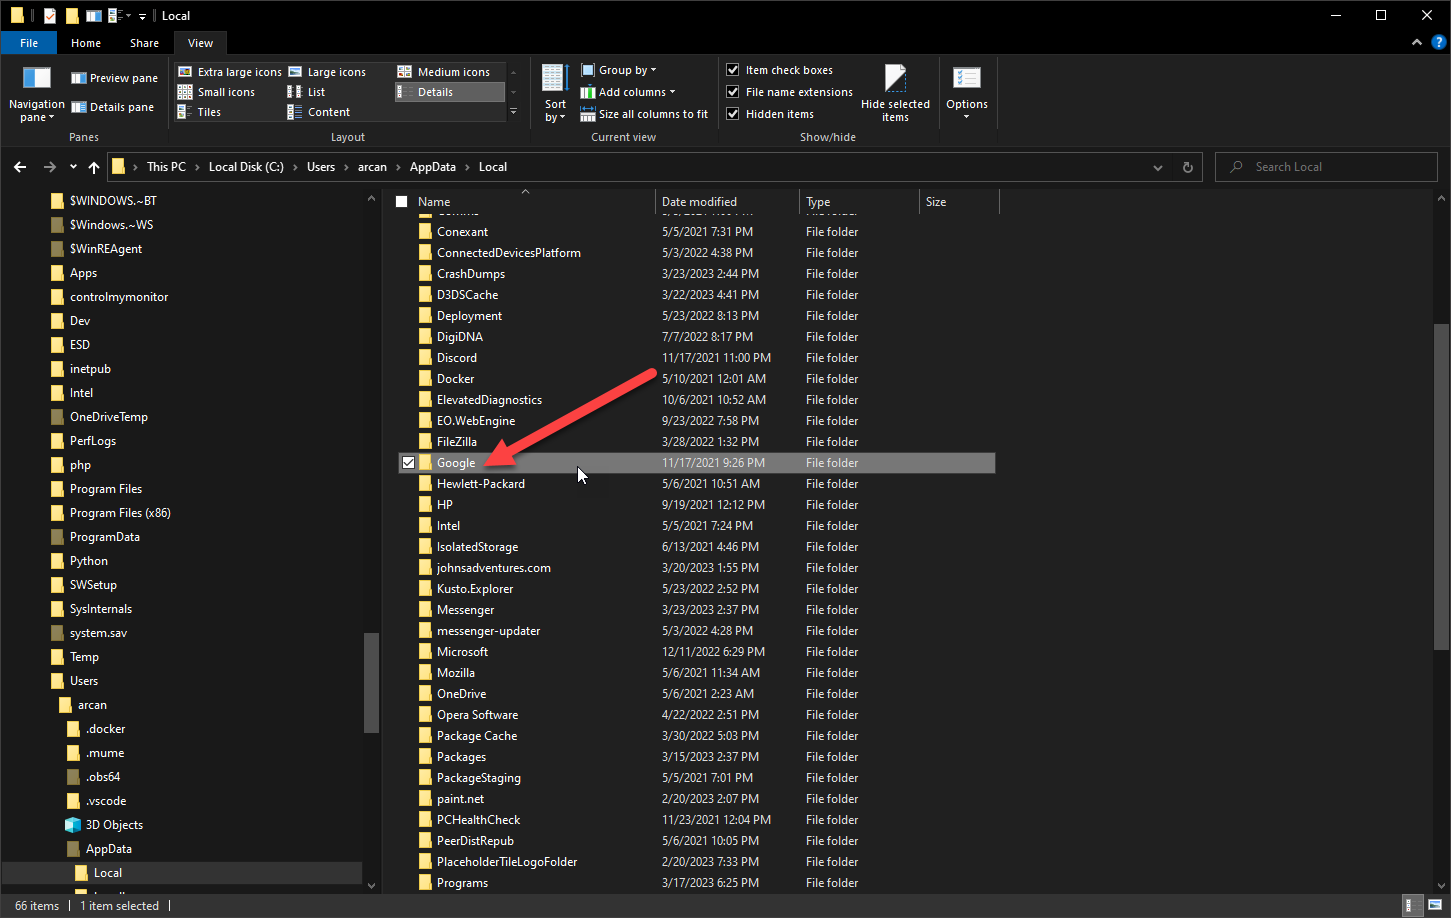
  1. Once in the AppData folder, find "Local "and left double click on it.
  1. Find the "Google" and left double click on it.
  1. Scroll down to "Chrome" left double click on it.
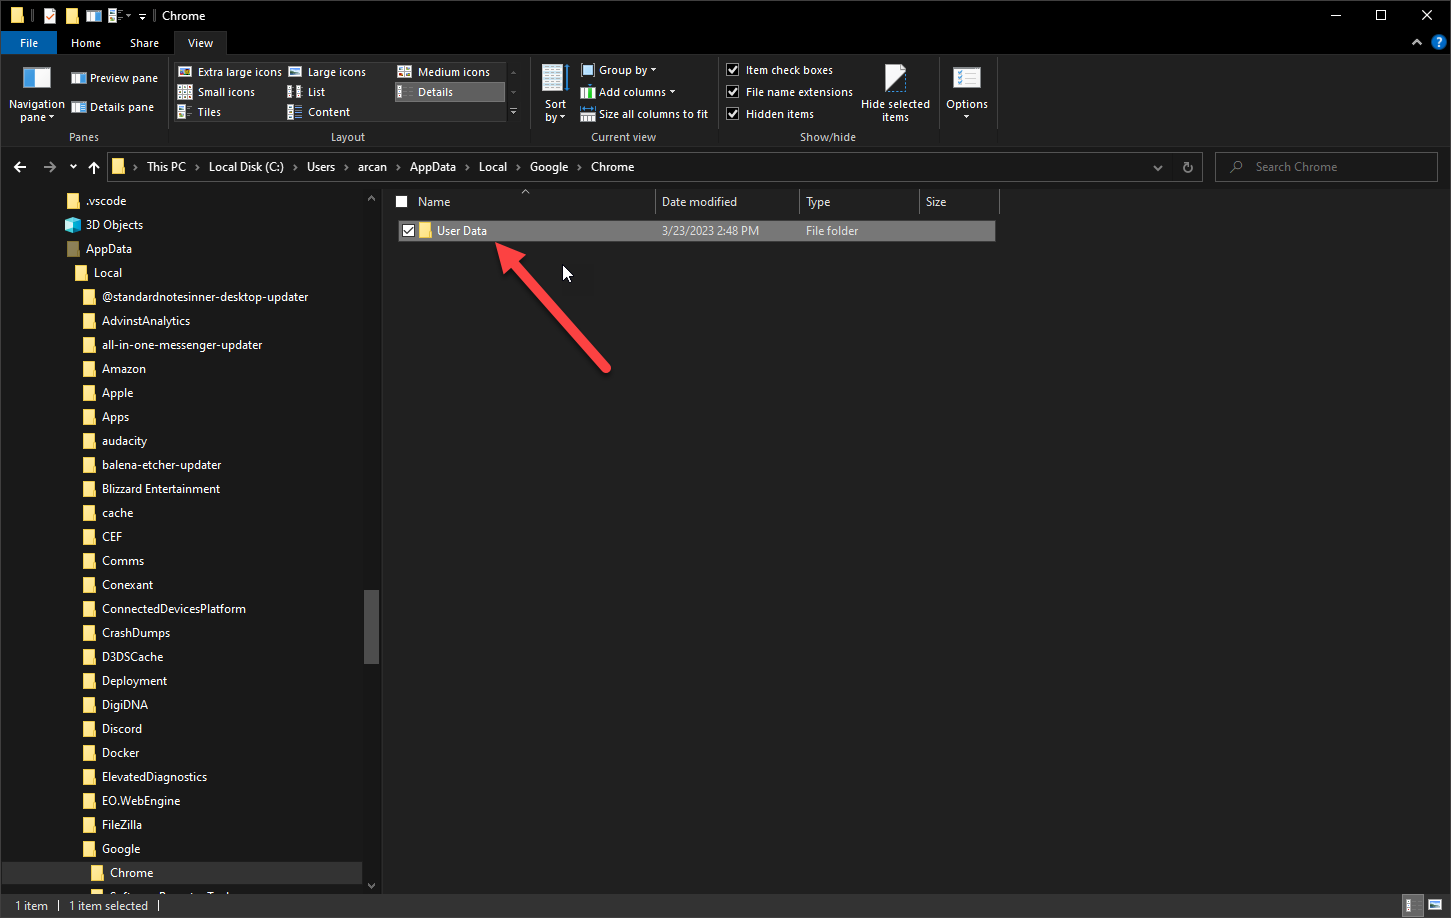
  1. Almost there! Find "User Data" and left double click on it.
  1. Find the file (not a folder, but a file) "Local State". Single right click on it and pick Delete in the menu.

You can now close the File Explorer.

  1. Now you can open Chrome as you normally would.

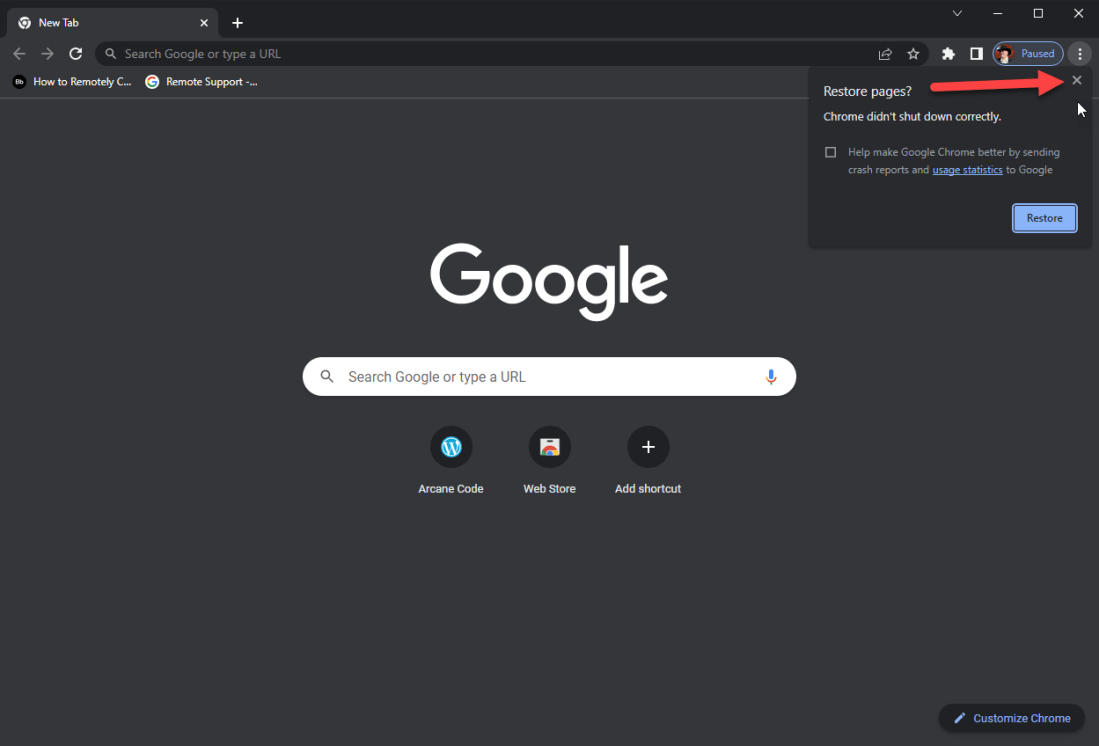
  2. When you reopen Chrome, it will display a little box in the upper right that says "Restore Pages?". Click the X in the upper right corner of the little box to make it go away. Do NOT click on the Restore button or you will be right back where you started.

  1. If there was a web page you had open before and really need back, single left click on the button in the very top right that looks like three periods on top of each other. This will display a menu.

In the menu you can click on History, which then displays tabs from previous sessions. You can navigate this to find the page you need.

BE CAREFUL you don’t open the page that caused the fake viruses before. If you do reopen it by accident you can follow these instructions again, making sure not to reopen the evil website.

I’ll also add it may not be the website itself, but one of the ads that is displayed on the website. Some scammers pay for ads that have evil rotten mean and nasty code in them which creates the fake virus messages. The owner of the actual website you visit may have no idea this is happening.

Conclusion

If you meet the criteria I listed in the introduction, namely you ran your own anti-virus, found nothing, and are using Google Chrome, there’s a good chance you are really the victim of scammers.

Scammers love to prey on people without a lot of computer experience, so I hope the steps here will resolve the issues for you.

Advertisement

Setting Up an Ubuntu VM for Developers in Hyper-V

Introduction

On occasion I will need to setup a new Ubuntu virtual machine in Hyper-V, for doing development or creating new courses for Pluralsight.

It’s not something I do every day though, so I have instructions to remind me of all the steps involved, what buttons to push, and so on.

The problem is my instructions have been scattered across multiple files in a few repositories. Today I finally decided enough was enough.

The Instructions

This is kind of an unusual blog post, in that it doesn’t contain a lot of content. The instructions were rather long, and if I’d tried to do it as a blog post I’d have had to break it into multiple posts, making it difficult to follow, or have one blog post that was 3 miles long.

Instead, I’ve created a repository on my GitHub site, https://github.com/arcanecode/Setting-Up-an-Ubuntu-VM-for-Developers-in-Hyper-V. There you will find the instructions broken down into small, easily digestible parts.

Buyer Beware

I want to make it understood, this is not meant to be an in-depth tutorial. There aren’t a lot of screen shots, nor do I take time to explain “why” (at least not often).

Instead think of it like a check list. If you are familiar with both Hyper-V and Ubuntu, you should not have any problems following the instructions.

Decisions, Decisions

Many of the configuration choices I made were the result of this being in a VM. I turn off things like screen blanking, auto locking, and the like. I figure the host machine should be the one to manage these types of things.

In addition, the software I chose to install was a result of my needs. VSCode, PowerShell, Azure Data Studio, and gcc/g++ were the core tools installed.

There are too many other options out there. Python, PHP, Ruby, Java, Rust, and on and on and on. I feel these instructions will get you to the basic platform, then you can add on your specific language and other tools from there.

Into The Future

I’ll keep this updated when new versions of Ubuntu or Hyper-V are released that may invalidate the instructions.

Also, it just screams for automation. I’d like to write some PowerShell Core to run on Windows to create and configure the VM, then a shell script to run inside Ubuntu to handle as much installation and configuration as possible.

I actually have some PowerShell Core samples for generating a Hyper-V VM, I just need to assemble them into a useable script. So that may be something I tackle in the near future.

Conslusion

Well this was a rather unusual post, as most of the info is over in my GitHub repository. Please check it out, let me know what you think.

Even if you don’t have a big need for an Ubuntu VM, I’d be curious how you find the experience of most of the info being in GitHub. Was it easy to follow, well organized?

If this works out, I may do some future work where the bulk of the information is on my GitHub site, and my blog post provides a brief overview.

VeraCrypt On The Command Line for Windows

Introduction

This is part of my ongoing series on the VeraCrypt encryption utility. If you’ve not kept up, in my first post of the series, “VeraCrypt – A Powerful Encryption Utility“, I covered the basics of VeraCrypt including how to get it, use it through the GUI, and how the series was inspired by the Grumpy Old Bens podcast.

In the second post, “Creating and Using Hidden Containers in VeraCrypt“, I covered how to create a hidden container, adding an extra level of security to your containers.

My previous post, “VeraCrypt on the Command Line for macOS“, showed how to call VeraCrypt from within a script on the macOS platform.

The commands to call VeraCrypt from the command line are very different for each platform, As such, I’ve broken them out into individual blog posts.

In this entry you’ll see how to call VeraCrypt on Windows 10.

Prerequisites

Obviously, you’ll need to have VeraCrypt installed. My first post in the series, “VeraCrypt – A Powerful Encryption Utility“, covers where to get it from.

For this post, we’ll also be using the CMD mode to execute the commands. Do note that on most installations of Windows these days, PowerShell has replaced CMD as the default terminal shell. If you open up a command window and see PowerShell, all you have to do is type in CMD and it enter, and you’ll be switched to CMD mode.

Code Samples

While I will be providing samples here, you should also check out the project I have on GitHub that goes with this post, VeraCrypt-CommandLine-Examples.

I’ll update it over time as needed, and it may be easier for you to download, or cut and paste from it.

One item I want to mention, unlike the macOS version, the Windows version of VeraCrypt lacks the ability to list containers. So for this post we’ll only be able to include creation, mounting and dismounting of containers.

OK, let’s get started!

Creating a Container

Let’s begin by looking at the full command to create a container, then we will break it down to it’s individual components. While your blog reader or webpage may wrap the line, in your script (or command line) it should all be entered as a single line of text.

"C:\Program Files\VeraCrypt\VeraCrypt Format.exe" /create "C:\temp\vctest.vc" /size "200M" /password MySuperSecurePassword1! /encryption AES /hash sha-512 /filesystem exfat /pim 0 /silent

First up is the command to call. If you installed VeraCrypt to the default folder, you’ll find it in C:\Program Files\VeraCrypt\

The command to create a new volume is actually a separate executable than the rest of VeraCrypt. It is “VeraCrypt Format.exe

Note there is indeed a space in the file name! Thus you have to enclose the entire thing in double quotes.

"C:\Program Files\VeraCrypt\VeraCrypt Format.exe"

Next is the command to create a volume, /create. You follow it with the path and file name to create. If you omit the path it will create the volume in the current directory you are running the script from.

As with all file names, if it has a space you must include double quotes. Otherwise they are optional, but it doesn’t hurt to have them.

/create "C:\temp\vctest.vc"

We now need to tell VeraCrypt how big to make the volume. VeraCrypt includes shortcuts for M (Megabytes), G (Gigabytes), T (Terabytes) and
K (Kilobytes). If you omit a letter, it assumes bytes.

For this demo we are making it small, so will use 200M to indicate 200 Megabytes.

/size "200M"

Next up is the password to use to encrypt the volume. In a “real world” situation, you should probably pass it into the script or get it using an alternate method.

To keep this demo simple, I’m just going to embed the password using the “super secure” password I’ve used throughout this series of blog posts.

As with file names, if your password has spaces you’ll need to enclose it in double quotes.

/password MySuperSecurePassword1!

Now we need to provide the encryption algorithm to use. VeraCrypt supports a vast array of algorithms, see their documentation for the supported list.

For this demo, we’ll use the popular AES.

/encryption AES

Many algorithms require you to provide an encryption hashing method. For AES, we’ll use the strong SHA-512.

/hash sha-512

In order to keep this container portable across OS’s we’ll format using exfat. Be aware though that to use exfat on a Mac, you’ll have to install macFUSE (see my previous post on macOS for more info).

/filesystem exfat

The PIM is a special number that allows you to specify the number of times the hashing algorithm executes. It’s a bit more complex than that, if you want full details see the VeraCrypt documentation at:

https://documentation.help/VeraCrypt/Personal%20Iterations%20Multiplier%20(PIM).html

For now, we can pass it the value of 0, which tells it to use the default value.

/pim 0

The final parameter is /silent. By default VeraCrypt will display dialogs notifying you of its progress, as well as when it is complete.

In a scripting situation you would normally not want this, so we add the silent switch to suppress the messages.

Note this does have one side affect, if there are any errors those too are also suppressed, so you won’t be aware of them. The most common of these would be the attempt to create a volume name that already exists.

/silent

You now have everything you need to create a VeraCrypt volume. Note that there is one more parameter that we didn’t use in the example, but you may want to know about.

/force

Normally, if you are trying to create a new volume and that file already exists, VeraCrypt will pop up a dialog (assuming you’ve not used /silent) warning you the volume you are trying to create already exists. It will then give you the choice of canceling or overwriting the existing file.

The /force parameter suppresses the message and always overwrites the file.

So hopefully you’ve now created your own volume using the commands in this section. Let’s now see how to mount it.

Mounting a VeraCrypt Volume

Mounting is very simple, here is the full command, then we’ll take a look at each part. As before, it should be all a single line.

"C:\Program Files\VeraCrypt\VeraCrypt.exe" /volume "C:\temp\vctest.vc" /letter x /password MySuperSecurePassword1! /quit /silent

We start with the command to VeraCrypt. This assumes you have installed to the default folder.

"C:\Program Files\VeraCrypt\VeraCrypt.exe"

Next we provide the /volume parameter, with the path to and the file name of the file to mount.

/volume "C:\temp\vctest.vc"

Volumes in VeraCrypt appear as a drive letter to Windows. As such we need to provide a letter to use. Note if you use a drive letter
already in use, you’ll get an error.

The letter can be provided in either or upper or lower case.

If you don’t know a drive letter, or don’t care what letter is used, then you can omit this parameter completely. When you do, VeraCrypt will use the first available drive letter it finds.

/letter x

Next up is the password to use to encrypt the volume. In a “real world” situation, you should probably pass it into the script, or get it using an alternate method.

To keep this demo simple, I’m just going to embed the password using the “super secure” password I’ve used throughout this series of blog posts.

As with file names, if your password has spaces you’ll need to enclose it in double quotes.

/password MySuperSecurePassword1!

Next we provide the quit parameter. By default, if you omit it then the VeraCrypt dialog will remain on the screen. Using quit will close the
VeraCrypt dialog, something usually desired if you are running a script.

/quit

Finally we’ll add the /silent parameter. This has the same affect as it did in the create function, suppressing any dialogs. Be aware, that for /silent to work, you must also have used the /quit parameter.

/silent

At this point hopefully all went well, and you have created a volume as well as mounted it. Once you are done with a volume, you’ll need to dismount it, the subject of the next section.

Dismounting VeraCrypt Volumes

The command to dismount a volume is the simplest of all.

"C:\Program Files\VeraCrypt\VeraCrypt.exe" /dismount H /quit /silent /force

Let’s look at the individual components of the command.

We start with the command to VeraCrypt. This assumes you have installed to the default folder.

"C:\Program Files\VeraCrypt\VeraCrypt.exe"

Next is the dismount parameter. You pass in the drive letter associated with the volume to dismount. As with mounting, the case of the drive letter does not matter.

If you omit the drive letter, VeraCrypt will dismount ALL currently mounted volumes.

/dismount X

We now provide the quit parameter. By default, if you omit it then the VeraCrypt dialog will remain on the screen. Using quit will close the
VeraCrypt dialog, something usually desired if you are running a script.

/quit

Now we append the /silent parameter, to suppress any dialogs as we did in the previous sections. As with mounting, for /silent to work we must also include /quit.

/silent

Finally we provide the force parameter. If some app is accessing the volume, for example Windows File Explorer, it will prevent VeraCrypt from dismounting.

The force parameter tells VeraCrypt to shut down, no matter what. Your inclusion of force is up to you, depending on your situation.

For the demo, we’ll include it.

/force

And that’s all there is to it. It’s a best practice to dismount all of your volumes when you are done with them, and especially before shutting down your computer.

This will ensure any operations that are copying data to your encrypted volume have completed, ensuring the data does not get corrupted.

Conclusion

This post covered how to create, mount and dismount VeraCrypt volumes in Windows 10. The technique should also be applicable to Windows 7 and 8, if you are still on those platforms.

Cut and Copy Fast and Easy with Pantherbar for Windows

Introduction

In a previous post, I showed a tool to make Cut and Copy easy on macOS. In this post we’ll look at a tool, Pantherbar, to provide similar capability on Windows.

Pantherbar

Pantherbar is available in the Microsoft Store. It has a free version, as well as a paid one at the reasonable price of $4.99 (US).

Similar to PopClip when you highlight text, it pops up a toolbar.

As you can see from the image above, Pantherbar appears with several icons. The left most is copy, next is cut. If you have anything in the clipboard the paste icon appears next.

The magnifying glass will launch a search in your default browser. By default it is Google, but through the settings you can change the search engine. Finally is the share with windows icon.

Extensions

Pantherbar has a rich set of extensions you can add to it. You can view the full list at http://pantherbar-app.com/extensions

In the free version you can have two extensions active. In the paid version, you can have as many as you want.

In this next example, I’ve loaded three extensions. In the image below I’ve highlighted some text in notepad.

The three new ones on the right are character count (handy for composing a tweet), reverse the text, and remove spaces. In the image below I’ve clicked the reverse text option.

As you can see, the text is reversed immediately, replacing what had been selected.

Note this is a little different than the behavior of PopClip on macOS. PopClip copies the modified text to the clipboard. Pantherbar immediately pastes the new text in.

To be honest, I prefer this behavior. The majority of the time I’m going to put the corrected text where I had selected, so this saves a few steps.

Conclusion

Pantherbar is a useful addition to your Windows toolkit. With its rich set of extensions, you can save a lot of time performing common tasks. You can try it for free, and if you decide to buy the price is very reasonable.

Do note that this, nor the PopClip blog post, are paid posts in anyway. I just like the tools and was happy to pay for them.

To my knowledge there is no similar extension on the Linux platform, at least for the Ubuntu based distros I tend to use. As I understand it, the current graphics engine makes this kind of extension difficult. It’s hoped though that once the Wayland engine gets into wide spread use tools similar to Pantherbar or PopClip will become available on Linux.

If you know of one that exists, by all means leave a comment. I’d love to check it out!

Stop Discord from Automatically Running When Windows Starts

Introduction

I use Discord as part of the weekly YouTube Minecraft stream I participate in, Adults Only Minecraft (which is actually family friendly), run by my friend Marc.

Of late though, Discord has been misbehaving. Even though I have it set not to auto load when Windows launches, it ignores the setting and still runs.

While I like Discord, I only use it once a week or so, and don’t want it running in the background all the time.

In this bonus post, let’s see how to fix this problem.

Check Your Discord Settings

First, let me state that not everyone is experiencing this issue, or needs the solution I’ll outline here. Let’s start with the simple solution first.

Open Discord, then your settings. Scroll down to Windows Settings, as you see below.

The toggle, pointed at by the arrow, indicates whether Discord should launch with Windows. If yours is on, and you don’t want it to auto launch, just click on it to turn it off as seen in this image.

Exit Discord, reboot, and if Discord does NOT launch, you’re done!

In my case however, that did not correct the issue. If that was the case for you too, proceed to the next section.

Disabling Discord Autorun in Windows

In the past, people have written instructions to go into Task Manager, expand into the detailed display, go to the Startup tab, and disable Discord.

Over time though, Discord changed things so their application no longer appears here. To fix, we’ll need to go download another tool called Autoruns.

Go to https://sysinternals.com, this will redirect you to a Microsoft web page (Microsoft bought SysInternals quite a few years back).

Once there, click the Downloads link on the left. SysInternals is a rich suite of tools, and you can certainly download all of them, but the only one you need for this task is Autoruns. Simply scroll down until you see it appear.

Click on the link to take you to the Autoruns info page, the download link is at the very top. Click on it to download the Autoruns.zip file to a folder on your hard drive.

Unzip the contents and it will expand several files. No installation is needed, these will simply run from wherever you put them. If you are on a 64 bit operating system, and pretty much anyone with a modern computer is, the file to double click on is Autoruns64.exe. If you are on an older 32 bit computer, you can run Autoruns.exe.

A little side note, after running the application the listing area uses an incredibly small 4 point font. Easy to fix, in the menu click Options, Font, and pick a bigger font size. For this image I went with a 12 point font.

At the top is a filter box, pointed at by the green arrow in the image below.

Enter the word Discord into it. Autoruns should then filter the list to just the entry for Discord.

Now simply uncheck the box, pointed at by the orange arrow in the image above.

That’s it!

OK, you are done. Close Autoruns, and reboot your computer. When you do, Discord should no longer start up automatically.

Discord Updates

Note, it is always possible after an update from Discord, they will reset this to turn it back on. If you suddenly find Discord starting up again when Windows boots, then just follow the instructions again to disable Discord in the Autoruns app.

It’s also possible at some point in the future Discord may correct this issue. Occasionally, perhaps once a month, check this back on then reboot to see if Discord still launches or not.

Conclusion

Don’t get me wrong, I like Discord a lot, and use it weekly. It’s a great tool for gaming. However, when I’m not playing Minecraft I don’t want it running in the background all the time, taking up resources.

If that’s the case for you then hopefully this post will aid you in correcting the issue.

What is My COM Port?

Introduction

I’m a ham radio operator, and I recently gave a presentation to my local club on how to program your radio using software. To do this, we need to connect our radios using a USB cable.

Most of the radios use a concept called a VCP or Virtual COM Port. You install the VCP driver, then can connect your USB cable to your computer, plug the other end into the radio, and launch the software.

The software will want to know, what is the COM port number you are using. I have a variety of radios, and it seems each cable wants to use a different COM port, and every so often the cable will wind up using a different COM port than it did last time.

So how do you find out your COM port? Well it’s pretty easy if you know where to look.

Finding Your COM Port

The best place to find this is in the Windows Device Manager. Click on the magnifying glass next to the Start menu icon.

I have my Windows toolbar set to hide the search entry box, but some systems will have a text box right next to the search. Which ever way yours is configured, start to type “device manager” into the search.

You should see a pop up like you do in the image above when it finds the Device Manager application. Just click on it to run it.

Scroll down in Device Manager until you find the entry for “Ports (COM & LPT)“. Click the arrow beside it in order to expand the list, and you should now see the COM port for your cable, in this case COM10.

Note that your cable will need to be plugged in for the entry to appear.

Conclusion

There you go, I told you it was easy, the trick is knowing where to look.

While I did write this with my fellow amateur radio operators in mind, there are all kinds of devices that need to use a COM port to access them from your PC. Using this quick guide you can easily find where to look to get the right COM port number for your situation.

Expanding The Size of a Hyper-V Virtual Disk

Introduction

There are tasks that we all do, but rarely. It’s helpful to have a reference to go back to.

Expanding the size of a Virtual Hard Disk, or VHDX file, is one of those. I use Hyper-V quite a bit to create virtual machines for testing, development, and the like. Every so often though I’ll underestimate the amount of space I’ll need for a machine.

As it turns out expanding the drive size isn’t terribly difficult, but there’s quite a few steps involved. This post will server as a reminder to myself, and hopefully guide others, in expanding the size of a VM drive.

I’ll break this into two parts. In the first half, we’ll see how to expand the drive within Hyper-V. This will expand the VHDX file to a new larger size.

In the second half, we’ll go into the Windows running in the VM to tell it to use the newly expanded space.

Expanding the Drive in Hyper-V

Begin by opening Hyper-V. In the Hyper-V manager, click on Edit Disk in the Actions.

This will open the Edit Virtual Hard Disk Wizard.

If this is the first time you’ve run the wizard, you’ll see a welcoming screen. If you see this, I’d suggest clicking on “Do not show this page again” and clicking Next.

Now use the Browse… button to locate the VHDX file you wish to modify. Once you’ve done that, click Next.

Now we’ll select the action, in this case we’ll pick the Expand option and click Next.

Now we’ll enter a new size for the drive. It shows the current size as 250 GB, so I’ve entered 500 so I can double the size. Obviously you’ll enter a size appropriate to your needs.

Once done, click Next.

On the final page of the wizard it shows what is about to happen. It lists the name of the VHDX file we’re working on, what the action is (Expand), and what the size will be of the new drive.

Just click Finish and the VHDX file will be updated.

Accessing The Expanded Space in Windows

In this example we’ll be using Windows 10 inside our Virtual Machine. Go ahead and start, then connect to your Windows 10 Virtual Machine.

If you go into File Explorer you’ll see something interesting.

Even though we expanded the VHDX to 500 GB, our virtual machine still thinks the C drive is 249 GB.

What we need to do is expand the already existing drive into the newly allocated space.

In the Windows 10 menu, go down to Windows Administrative Tools, then pick Computer Management.

The Computer Management window has a tree on the left. If the Storage tree is not expanded, do so and click on the Disk Management branch.

In the screen capture above, you can see the orange arrow is pointing to the existing C drive area. To the right of that a green arrow points to the newly added but still unallocated space.

Right click in the C: drive area, and in the menu that appears select Extend Volume…

The Extend Volume Wizard now appears, just click Next to proceed past the welcome screen.

By default the wizard will put the only unallocated partition in the selected area, but if you have more than one unallocated partition you can select a different one.

At the bottom, the “Total volume size will” show the total amount of space on the new drive, once the unallocated space has been added.

The next line shows the maximum space in the unallocated partition.

The final line allows you to select the total amount of space to pull from the unallocated area. By default it is set to the max space in the unallocated area, but if for some reason you want to save some of that you can lower the amount.

In this case I’ll take the default options and click Next.

You’ve now reached the final screen of the wizard, just click Finish to have it do its work.

The Computer Management window now shows the expanded C drive. You can now close the Computer Management window.

If you go back to the File Explorer and refresh it, your C drive will now show the new size.

Conclusion

In this article, we expanded the size of a Hyper-V virtual hard disk (VHDX) that hosted a Windows 10 installation. As you saw, it was pretty simple to do, but did require a few steps.

Hopefully you’ll find this useful in working with your Hyper-V machines.

Formatting A Drive as exFAT on Windows, macOS and Linux

Introduction

In my previous blog post, Sharing a Drive Between Windows, macOS and Linux, I described how to setup the three operating systems to read a drive that had been formatted as exFAT. The exFAT format is readable by all three, and making it easy to share files between different operating systems.

A natural question that follows is, “how do I format a drive as exFAT?”

In this article I’ll show how to format an external drive as exFAT. I’ll be using an 8gb thumb drive, but I’ve used this technique with both thumb drives as well as the larger external multi-terabyte hard drives.

Windows

Windows is the easiest of the three to format a drive for exFAT. First, insert the drive into a USB port. This will typically open the Windows File Explorer, but if not, open it.

Now right click on the drive letter for the USB drive, and click on Format. The format dialog will appear.

In the second drop down you can pick the file system. Use it to select exFAT. You can also enter a new volume label if you want. Simply click the Start button to kick off the format process.

You will of course get a warning that all the data on the drive will be lost, simply click on OK to proceed.

Once done Windows will let you know. Just click OK and your drive is ready to use.

Apple macOS

There’s a few more steps to formatting a drive to exFAT in macOS, but it’s still pretty simple. Start by opening Finder, then go to the Applications. In Applications, open the Utilities folder.

Inside the Utilities, launch the Disk Utility. If you’ve not done so, connect the USB drive you want to format as exFAT.

On the left side of the Disk Utility is a list of drives, click on the USB drive in the list.

Above the drive info area are a series of command buttons. Click on the Erase button. Note you need to click on the icon, not the Erase label.

In the dialog that appears, you can change the label if you wish. The important box is the Format one. You can use the blue arrow to bring up the list, and change it to exFAT.

Once exFAT is selected, you can click the Erase button on the lower right.

Once done, macOS will let you know. Just click Done, and the drive will be ready for you to use.

I’ve used this technique with macOS versions from High Sierra onward.

Linux

For this section, I’m using screen shots from my Kubuntu 20.10 computer. The techniques will work with most Ubuntu/Debian based installs. To make it more portable to other versions, we’ll do most of it using the command line.

Note, these instructions assume you’ve already followed the instructions in my previous blog post, and installed the exFAT utilities.

Start by opening up a terminal window, and entering the following command:

df

Your output will look something like this:

Filesystem     1K-blocks     Used Available Use% Mounted on
tmpfs             805596     1752    803844   1% /run
/dev/sda2      244568380 18388480 213686844   8% /
tmpfs            4027972      128   4027844   1% /dev/shm
tmpfs               5120        4      5116   1% /run/lock
tmpfs               4096        0      4096   0% /sys/fs/cgroup
/dev/sda1         523248     7984    515264   2% /boot/efi
tmpfs             805592      108    805484   1% /run/user/1000
/dev/sdb1        7815648       96   7815552   1% /media/arcanecode/4ECB-E340

For this exercise, I’ll be using the /dev/sdb1 drive which is my 8gb thumb drive.

Before we can proceed, we’ll have to unmount the drive. The command is simple.

sudo umount /dev/sdb1

Now that the drive has been unmounted, we can format it using the mkfs utility.

sudo mkfs.exfat /dev/sdb1

Once formatting is complete, we can check its status using the fsck command.

sudo fsck /dev/sdb1

Your output will vary depending on the drive you formatted, but it will resemble something like this:

fsck from util-linux 2.36
exfatfsck 1.3.0
Checking file system on /dev/sdb1.
File system version           1.0
Sector size                 512 bytes
Cluster size                 32 KB
Volume size                7633 MB
Used space                 3041 KB
Available space            7631 MB
Totally 1 directories and 3 files.
File system checking finished. No errors found.

A benefit of using fsck is that will also remount the drive for you, making it ready to use.

You can verify it again using your systems file explorer. Here I’m using Dolphin, the explorer built into Kubuntu.

Navigate to the drive, right click on it, and pick Properties.

In the properties window it will show you the file system. As you can see, it has been formatted to exFAT.

Conclusion

In this post we saw how to format a drive for exFAT on three operating systems. You can now format a drive using any of the OS’s, and be able to use it across all of them.

Sharing a Drive Between Windows, macOS and Linux

I have a lot of computers, on which I use a variety of operating systems. Some run Windows 10, my Apple macBooks all run macOS, and on others I have a variety of Linux distros, primarily Ubuntu based.

I would like the ability to share external drives, such as thumb drives or external SSD drives, between them. To get that compatibility across OS’s, I need to format those drives in a file format called exFAT.

exFAT is a replacement for the older FAT32, but has the benefits of other file systems such as NTFS. I can have long file names, and store files bigger than four gigabytes in size to name a few.

Windows and macOS both support exFAT out of the box. I can just plug in an exFAT drive into them, and both will let me read and write to them. (Note that not all drives come formatted as exFAT, you may need to reformat them to the exFAT system). Linux, however is another story.

To allow Linux to read an exFAT drive you need to install the exfat-utils utility. On Ubuntu based distros it’s pretty easy, just open up a terminal and enter the following command, all on one line.

sudo apt-get install exfat-fuse exfat-utils

For other distros you can use their native installer, such as yum, to install the exfat-utils. After that you can simply plug an exFAT thumb drive or SSD into your Linux box and it will know how to read and write to the drive.

Having Multiple Entries for the Same PC in Microsoft Remote Desktop Application on Apple macOS

Introduction

In a previous blog post, Using the Microsoft Remote Desktop Application on Apple macOS, I showed how easy it was to remote control a Windows computer from your Mac.

One question I get asked is “Can I have multiple entries for the same computer?” The answer is yes!

This, of course, leads to another question, “Why would you want to?”

Reasons for Multiple Entries

There are a number of valid reasons for wanting multiple entries in Remote Desktop to the same computer. Let’s cover a couple by using examples.

First, let’s say you have a Windows 10 computer in the family room where your child plays games and does school work. Wisely you have setup their account as a “standard user”.

You have an account as well, as an administrator, to handle administrative tasks such as installing software, making sure updates are being processed and the like.

You could setup entries in Microsoft Remote Desktop, one for each user that logs into the computer. This allows you to have one entry to login as yourself, and a second to login using your offspring’s ID.

Now when your child comes to ask you to install the latest updates to Minecraft on the family computer, you can simply remote to it from your Mac using their ID, and install the updates providing your admin user ID and password. You’ll also have the entry to login as yourself, so you can apply updates and do maintenance.

For the second reason, you may wish to access your remote PC with different sets of option. In the blog post I mentioned earlier, I set it up to use all the monitors on my Mac.

Every so often though, I want to have my remote Windows computer running in a window. This allows me to see something on my remote machine, while still having my macOS desktop available.

One example, in my previous post I showed how to configure Windows to allow for remote access. I did so by having the Windows machine in a window on my Mac on one monitor, while creating the post in Safari on my macBook on a second monitor. This let me have them side by side, making it easy to create the instructions.

Rather than having to change the settings each time, I have two entries for my main Windows computer. The first, which you saw created in the first blog post in this series, opens the Windows machine using all monitors. The second opens it up in just a window.

Those are just two reasons, I’m sure you’ll be able to come up with many more.

Adding a Second Entry for the Windows PC

First, I’m going to assume you’ve already read my first article, Using the Microsoft Remote Desktop Application on Apple macOS. If you haven’t, please take a moment now to do so.

With Microsoft Remote Desktop open on your Mac, click the + button at the top, then pick Add PC in the drop down.

Note that for security reasons, in the screen shots I’ve replaced with the actual name of my computer with <name>.

Start with the name of the computer in the PC name, and pick the user account to login in as, or leave it as “Ask when required“.

Now we want to use the Friendly name to indicate not just the computer name, but also how this is used. For this example I’m going to have my remote machine display in a window, so I’ve entered <name> in a Window.

Next we’ll need to configure it to show up in a window, so click on the Display tab.

Here I will uncheck the default of Start session in a full screen, then check on Fit session to window.

Then, at the bottom I checked on Update the session resolution on resize. This way when I resize the window on my Mac, it will resize the computer I’m remoting into so the desktop will fit the window.

You can change the Devices & Audio and Folders if you wish. Since I’ve already covered those in the first article I’ll just click on the Add button.

Update the Existing Connection

Before we open the new connection, we should update the friendly name of the existing one to make it clear what the difference is. To do so, click on the pencil icon in the upper right of the connection created in the first article.

Go to the Friendly name field, and enter the name of the computer followed by (for this situation) All Monitors, then click Save.

Below you can see it now reads <name> All Monitors, and beside it the new entry we just added for <name> in a Window.

It’s now very easy to tell the difference in the two connections.

Launching the New Connection

Let’s now launch the new connection by double clicking on it.

Here you can see a new window appears on my Mac, showing my Windows desktop. (Note that you can see a bigger version of any of the images in my blog posts by double clicking on it).

You can see the window with the full Windows 10 desktop, including the Windows task bar. You can also see the macOS toolbar across the bottom, as well as the Mac menu bar at the top.

You can also resize the window. If you checked the Update the session resolution on resize option, the resizing the window will also resize the Windows desktop as you see below.

You can see my Windows 10 desktop now fits nicely into my resized window.

Please note you can only have one connection to a computer active at a time. If I am in the windowed version of my connection, then go back to the Microsoft Remote Desktop connection window and double click on the <name> All Monitors, it will disconnect the <name> in a Window session then launch the all monitors version.

Any time you launch a connection, it will disconnect any existing connection, if there is one, in favor of the newly launched one.

Conclusion

In this article we showed how to create multiple connections to the same computer in the Microsoft Remote Desktop application on macOS. This works with Big Sur as well as previous versions of macOS.

We also covered various reasons why you might wish to create multiple connections within Remote Desktop.

Armed with this information you can now create multiple connections to the same computer to fit the ways in which you want to use the remote computer.

Supressing “The certificate Couldn’t Be Verified” message Using the Microsoft Remote Desktop Application on Apple macOS

Introduction

In my previous blog post, Using the Microsoft Remote Desktop Application on Apple MacOS, I showed how easy it is to connect to one of your Windows computers from your Mac.

I frequently use the Microsoft Remote Desktop application on my Apple MacBook Pro to connect to one of my Windows computers. It presents a nice interface that’s easy to use and setup.

Once you’ve added your computer to the Microsoft Remote Desktop application (you’ll find the instructions in my previous post), all you have to do is double click on it to access your remote computer.

Here is the launching point, note that for security reasons in all of the images in this article I’ve blurred out the name of my computer and replaced it with <name>.

There is one irritating behavior. When connecting to a computer it frequently displays the following message: “You are connecting to the RDP host <name>. The certificate couldn’t be verified back to a root certificate. Your connection may not be secure. Do you want to continue?

Having to stop every time and click Continue is really annoying. Especially if you are on your home network, connecting to a computer you own and trust. There’s an easy fix though!

Suppressing the Warning Message

Simply click the Show Certificate button to display the certificate information.

Once you review, simply put a check mark in the “Always trust...” checkbox (pointed to by the arrow) then click Continue.

Since you are changing the trust certificates for your MacBook (or other Apple Mac computer, like the Mac Mini), macOS will prompt you to enter your admin password. Do so, then continue.

From here on out, all you need to do to connect to your remote computer is double click on it, and (if you’ve not saved it within the remote desktop program) enter your credentials. No more having to click to continue past the “certificate couldn’t be verified” message.

Conclusion

I’ll wrap this up with two quick notes. First, this works on the last several versions of macOS including Big Sur.

Second, while I’ve used Windows as the example, this will work with any OS (such as various Linux distros) that support RDP (Remote Desktop Protocol). Sadly, macOS does not support RDP so you cannot connect to another Mac from the Microsoft Remote Desktop application.

Using the Microsoft Remote Desktop Application on Apple macOS

Introduction

I use many computers in my daily life, including Windows, Apple Mac’s, and Linux computers running a variety of distros. It’s very convenient for me to be able to remote into another computer from whichever computer I happen to be on.

On my MacBook (although this would work on any Apple machine running macOS, such as a Mac Mini), the Microsoft Remote Desktop application is a fantastic program for remoting to another computer.

While primarily designed for accessing a Windows machine, it will work with most computers that support the RDP (Remote Desktop Protocol) such as many Linux distros.

Note that it will not let you connect to another Apple Mac, as macOS does not support the Remote Desktop Protocol. You can go from a Mac to Windows (or some Linux) computers using the Remote Desktop application, but not to another Mac.

Microsoft Remote Desktop is free, and in the Apple App Store. Just do a search for Microsoft Remote Desktop, get and install it. But don’t open it quite yet, as we have to configure the computer you are going to connect to.

Configure Your Windows Computer

I’m going to assume you are connecting to a Windows 10 Pro computer. Click on the Start button, the pick Settings. In the Windows Settings, pick System.

On the System page, scroll down in the menu on the left and click on Remote Desktop. (You can click on the image below, or any of the ones in this article, to see them in their full resolution).

You’ll first need to toggle on the Enable Remote Desktop setting, as I’ve done here.

Next, look under “How to connect to this PC”. This has the name you need to enter into the Microsoft Remote Desktop app. In this image it shows <name>, but for you it will show the name of the computer. Note that for security reasons, I’ve replaced the actual name of my computers with simply <name> in the screen captures.

Finally, at the bottom look at the User accounts section. By default, if you are an administer on the computer, you are automatically able to remote to the computer.

If you want a standard user, in other words a non-admin user, to be able to remote in you’ll need to add them using the “Select users that can remotely access this PC” link.

At this point you’ve now setup your Windows computer to be remoted into. Note you only have to do this once on this computer, after that it can be remoted to from other computers.

Adding a PC to Microsoft Remote Desktop on your Mac

Now return to your Mac. Assuming you’ve installed the Microsoft Remote Desktop application, open it.

The first time in, you’ll see the big “Add PC” button right in the middle. After you’ve added the first machine, using the instructions here, you can add more computers using the plus button (pointed at by the big red arrow) and pick “Add PC” in the menu.

You’ll then be shown the Add PC window. Start by entering the name of the computer you want to connect to.

After entering the computers name, you’ll see the User account line, which by default is set to Ask when required. In this mode you will be prompted for your login credentials every time.

As an alternative, you can save your credentials by picking Add User Account… in the User account drop down. You’ll then be prompted for your Username and Password. You can also create a “friendly name” for the account.

For example, if you were setting up a connection to your wife’s computer, you’d have to give her full user name, perhaps it’s her e-mail address. In the friendly name could just enter “She who must be obeyed’s computer”.

One nice thing Microsoft Remote Desktop does is save your credentials. Then when you add more computers that use these same credentials you can just pick it from the User account drop down and not have to recreate them every time. This is especially nice for when you use your same Microsoft credential to login to multiple Windows computer.

Once you add the user account, or leave it at the default to ask each time, you’re ready to look at some of the options in Remote Desktop. It’s worth your time to understand these, as it will affect your experience when working with remote computers.

Friendly name can be helpful if the computer has a cryptic name. Often when a PC is purchased the default name is something like WINRPXM457JB. Most home users don’t realize they can rename their computer and leave it at the default. Using the friendly name you can enter “She who must be obeyed’s computer” and know what machine it is.

I find this even more helpful in work environments where they use naming conventions like “HR-PC-001”, “HR-PC-002”, etc. You could instead use meaningful names like “Anna’s computer”, “Jack’s computer”, or “The nice lady who brings us donuts computer”.

If you have a lot of computers you connect to, you may want to group them. By default, there’s one group “Saved PCs”. You may want to create groups such as “My computers”, “Wife’s computers”, “Kid’s computers” and so on. This is totally optional, but the more computers you need to work with the more useful it will become.

The Gateway option is used in corporate environments that have setup Remote Desktop Gateway servers. Since this article is geared toward home users, it shouldn’t affect you. If you are in a corporate environment and need to remote in, your friendly neighborhood system administrator will be able to tell you if you need a gateway, and if so what do you need to enter here.

The other options are pretty straight forward, so let’s click on the Display tab.

Display Options

Here you have some choices on how the remote machine is displayed on your Mac. One notable one is “Use all monitors“. If your Mac has multiple monitors connected to it, you may want to have the remote computer displayed on all of them. To do so, check this box. If you do some of the other options become disabled.

Alternatively, you may want the remote computer only on one monitor so you can still access your Apple computer on the other monitors. Leaving this unchecked allows this.

If you don’t select Use all monitors, you then have the choice to start the remote session in full screen, or show it in a window.

Next up are quality settings, such as the color depth or optimizing for Retina displays. Note that the higher settings you pick, the more bandwidth and processing power it will take.

In my selection, shown above, I chose to use all monitors at a high quality. Make your own selections then click on the Devices & Audio tab.

Devices & Audio Options

This tab controls what gets shared between the host computer, your Mac, and the remote computer (typically a Windows computer).

If, for example, you started a video playing on your remote computer, the “Play sound” option controls where you hear the audio. The default, On this computer simply means the Mac running Microsoft Remote Desktop.

I generally go with the default options, shown here, then go to the Folders tab.

Folder Options

Using the folders tab, you gain the ability to transfer files between your Mac and the computer you are remote controlling.

Start by checking the “Redirect folders” option. Then in the lower left click the + button. In the dialog that pops up, select one of the folders on your Mac. After you’ve connected to your remote computer, this will show up as a folder in your remote computer. Here’s what it looks like on Windows, after you have remoted in.

You’ll see the name of the folder you picked, in this example the Documents folder, the text on my, then the name of your Mac, in this case represented by <my mac>.

From here you can double click to open the Mac’s folder in File Explorer, and begin copying files back and forth. Do note there is a “Read Only” checkbox in the Add PC dialog’s folder options. If you check it, on the Windows computer you connect to will be able to read and copy files from the Mac, but will not be able to copy files to the Mac.

Using redirect folders is optional, and only needed if you wish to move files between the two computers. To be honest, I seldom use this option as I’m a heavy user of Microsoft OneDrive.

If I need something, I simply save it into my OneDrive on the remote computer, then I can open it in my OneDrive folder on my Mac, and vice versa. If you aren’t a user of OneDrive or a similar service then this will be a useful tool for you, should you need to share files.

OK, you’re all done, just click the Add button. This computer will now be added to your Microsoft Remote Desktop window.

Connect To a Remote PC

You can connect by simply double clicking on the block with the computer’s name (in this example represented by <name>).

Note the two icons in the upper right of the computer box. The pencil icon can be used to edit the settings we just saw. The trashcan can be used to remove this computer from your remote desktop application.

When you double click on the computer, you may be shown a message “You are connecting to the RDP host <name>. The certificate couldn’t be verified back to a root certificate. Your connection may not be secure. Do you want to continue?

If you are connecting to your own computer, that you trust, likely on your home network, then you can click the Continue button. In a future post we’ll show you how to resolve this so it will skip this dialog.

Once you have connected, you’ll see the remote computer, probably full screen (unless you changed the property back in the Display options).

Exiting a Remote Desktop Session

I will say, it’s not at all intuitive how to switch back to your Apple macOS desktop, or how to exit a remote desktop session once you are in it. Since I’ve shown you how to get into a remote desktop session, I should take a moment and show you how to get out of it.

To switch back to your macOS machine, simply use the CTRL key, plus the left arrow to swap to the previous desktop. Using CTRL plus right arrow will go back to the Remote Desktop session.

If you are using the virtual desktops feature in macOS, you can use CTRL and the left or right arrows to move past the remote desktop session to other macOS virtual desktops, then go back to the remote desktop.

To exit a remote desktop session, while you are looking at your remote computer simply drag your cursor to the very top of the screen and let it sit there a few seconds.

The Apple menu bar will pop up. You can then use the Window menu, and click Close. Alternatively you can click the Red X button in the Remote Desktop window to close the session.

Also note it’s possible to connect to multiple computers at the same time. You can use either the CTRL and left/right arrow to swap between them, or in the Window menu pick a different remote desktop to connect to.

Network Connectivity

Please note that both the Apple Mac and the computer you are remoting to must be on the same network. Typically this will be your home network, or perhaps a work network.

By default, Remote Desktop won’t work if, for example, you go to a coffee shop with your Mac and your Windows computer is still at home.

It is possible to work around this by setting up a VPN connection back to your home network. Setting that up, however, is beyond the scope of this already long blog post.

Summary

In this post, you saw how to install and configure Microsoft Remote Desktop on Apple’s macOS and connect to a Windows Computer. The screen captures were from macOS Big Sur and Windows 10, but I’ve also tested it with Catalina and Mojave.

Opening Port 80 in Windows Firewall to Support Calling SSRS From Another Computer

Recently I was working on another article for RedGate’s SimpleTalk site. As part of it, I had SSRS installed on a Windows 10 computer, and needed to connect to it from another computer. I was having a lot of issues connecting, until I remembered SSRS connects using Port 80, and by default Windows 10 (and previous versions) block Port 80 for incoming traffic.

The solution was to, obviously, open Port 80 on the Windows 10 computer. Doing so was not difficult, but did require quite a few steps, and of course administrator rights on the computer.

First, open the Windows 10 Settings. Then, click on Network & Internet.

image

On the Status window, click on Windows Firewall.

image

From here, click on Advanced settings.

image

If prompted confirm you do wish to make changes. When the Windows Defender Firewall dialog appears, click on Inbound Rules.

SNAGHTMLef395d1

Now click on New Rule

image

In the New Inbound Rule Wizard window, change the type of rule to be Port. Then click next.

image

On the next window, leave the rule applying to the default of TCP. For the port, assuming you are using the default setup, enter 80 for the port number. If you setup SSRS on a different port then obviously use that port number instead.

image

On the action page we tell Windows what we want to do if it finds incoming traffic on this port. For this development environment we will take the default of Allow the connection. If you had setup https service on your report server, then you could take the second option of allow if secure.

image

Next, we need to specify what network type the rule should apply to. For the scenario, I am on a small network, such as you might have at home, and that network was setup as private. Thus I am leaving Private checked on, and unchecking Domain and Public.

Unchecking public is especially important if you plan to take your laptop out to a coffee shop, you don’t want someone trying to hack into your machine via port 80. When done just click next.

image

On the last screen we’ll give the firewall rule a name, and a description. When done, click finish.

image

As you can see, the new rule now appears in our Inbound Rules area.

SNAGHTMLf01e748

Once you have completed working with your SSRS server, I’d suggest you return here, right click on the rule, and either disable it, or if you know it will no longer be needed, delete it.

And with that you should now be able to connect to the computer running SSRS from another computer on your network.

Windows 10 Icons Not Showing, Preview Not Working

I had a weird issue with Windows 10 today. All of a sudden, my icons weren’t displaying correctly. When I had the Preview Pane on, nothing was displayed. Even more bizarre, The Layout area of the View pane in Windows Explorer, had all the icons disabled.

Turned out I had a corrupted icon cache. To fix this for yourself, first open up a copy of Windows Explorer (or My Computer or whatever you wish to call it).

Go to the View tab, and make sure the Hidden Items is checked on.

SNAGHTML17f6c4

Now navigate to C:\Users\(User Name)\AppData\Local, where of course (User Name) is replaced with your user name.

Find the file IconCache.db, right click and delete it. Yes, that’s right, delete it. It’s OK, it won’t hurt.

To be really thorough, you could now head to the Recycle Bin, and clean it out, or at least open the Recycle Bin and remove the IconCache.db file. However you could skip this step if your the nervous type.

OK, that done, restart your computer.

When you return to the folder, such as your Pictures folder, Windows will start rebuilding the icon cache automatically, and you should now see your icons working again, and the preview pane should also now be functional.

Standard disclaimer, no warranty or guarantees provided, this is what worked to me (and to be honest I’m making it a blog post to remind me should it happen again). This may or may not work for you, but as the icon cache will automatically build itself it’s pretty safe to try.  Good luck!

SQL Server Data Tools in Visual Studio 2012–Publish Database Profile

One of the new features in SSDT, and what I consider to be my favorite, is the Publish Database Profiles. With database projects you could set a multitude of settings, everything from ANSI NULLS to whether to drop and create the database with each build. The only issue was these settings applied to the entire project; you had to change them each time you wanted to deploy to a different server, or to change the rules (overwrite vs. incremental for example).

New with SSDT are Publish profiles. They allow you to establish a set of rules and save them for reuse. To start with, right click on the project name and pick Publish from the menu.

image

You’ll now see a blank publish page.

SNAGHTML360f9789

Let’s start by tweaking some database settings. Click the Advanced button on the lower right.

SNAGHTML36114075

Here you can get to all of the options you can use to fine tune your database deployment. The most common appear at the top, the less changed ones appear in the list below. In this image I’ve checked on the option to Always re-create the database. This option will wipe out the existing database and recreate it from scratch.

Use this particular option with caution, especially if you are doing it to a database you are sharing with your co-workers (or even worse, production!). When your rebuild the database you’ll also lose any data and have to reload. Sometimes this is a good option, especially in the early stages of development when you’ve made massive changes to the database, or perhaps have gone into the database and made a lot of changes outside the scope of SSDT.

There may be other options you need to change, based on your environment or DBA requirements. Once you’ve changed your options click OK to return to the previous screen.

Back on the Publish Database settings dialog I’ll set the target database connection, and the name I want to use for the database. I can also set the output script name if I wish.


SNAGHTML36153d0b

Next, I want to be able to save this profile so I can reuse it later. Check on the “Add profile to project” option in the lower left, then click the Save Profile As… button.

SNAGHTML36195ad8

I gave it a good name, and made sure to include the most important options such as RecreateDB to indicate a database recreate was one of the options.

As I write this however, there is a bug with SSDT. When you click the “Add Profile to project” button it immediately adds a profile with the original default name. Then when you click the Save button in the dialog above, it adds the profile again, totally ignoring the name you give it. Instead it uses the default name again, only this time with an _1.

I’ve been assured that this bug is already known and has been fixed, and will be released with the next update to SSDT in VS2012. So depending on when you read this, it may or may not be an issue. Regardless, the fix is very easy, just rename the new .publish.xml file to reflect what you wanted it to be.

Once saved come back and hit Publish. The database will now be deployed to the server and the profile will be added to the solution. Here it is, after I’ve renamed the publish profile.

image

Note that I’ve given it a naming convention that specifies the database name, the target server, and any critical options. Here I’ve added “Overwrite” to indicate what will happen when I run it.

To run it, just double click on it. First, Visual Studio will do a build of the SSDT project. If there are any errors the process will be halted and you’ll need to fix them. If not, you’ll be presented with the publish dialog, this time with everything filled out.

SNAGHTML98453db

All you have to do is click Publish and the database will be created/updated using the options you’d picked previously, to the server which you had previously indicated.

Now for the real fun. Repeat the above steps only this time do NOT check the overwrite database option. Now, (after renaming the new profile) you have two publish profiles to pick from.

image

Take this even further. In my current project I have 8 profiles. An incremental and overwrite option for my local computer, the development server, the user acceptance testing server, and the production server. (In my case it’s a one man project, I’m the developer and the DBA all in one.) No longer do I have to juggle the server name, or even worse do a publish but forget to change the server from production back to local.

By far I think this is my favorite feature in SSDT.