Introduction
I’m a huge podcast junkie. I’m subscribed to almost 200 podcasts on a variety of subjects, the majority of which are tech related.
One podcast I listen to is Grumpy Old Bens. The hosts discuss technology in relation to current news events. In an episode earlier this year they were discussing how to protect the data on your computer should, for example, you need to bring your laptop to a computer repair shop, forget it is there, and the owner decide to look through your drive.
One of the tools they mentioned is VeraCrypt. I’ve used VeraCrypt for years, and before that its predecessor, TrueCrypt.
Multi Platform
As with the other tools I’ve described in this series, VeraCrypt is multi platform with versions for Windows, macOS, and a wide variety of Linux distros.
Sadly there are no versions for portable devices such as iOS or Android.
Be aware what you encrypt is portable between platforms. If I encrypt something using VeraCrypt on macOS, I can later open it on Linux for example, or Windows.
Open Source
VeraCrypt is an open source application. Their website allows you to download all the source code. This allows you to inspect the source code and even build your own version of VeraCrypt from it.
How VeraCrypt Works
VeraCrypt has two modes of operation. First, it can encrypt an entire drive. This can be your main hard drive, a secondary drive, or one you plug in such as an external USB hard drive, USB thumb drive, or even an SD or MicroSD card you’ve placed in your computers card reader.
It uses industry standard encryption methods, and there are a wide variety you can select from, to scramble the contents of the drive to make it unreadable.
As a matter of fact, if you plug in an encrypted USB drive Windows will pop up an error message that you must format the drive for it to be used. Naturally you will want to cancel out of it, but this makes the drive more secure. An unknowing person will pop it in, and just assume the drive is bad. They’ll either throw it away or just reformat it, either way your data is kept out of their hands.
To use the encrypted drive, you’ll need to open the VeraCrypt software and select the drive to mount. Provide your password, and it will make it available. We’ll cover the steps more closely in a moment.
The second mode will let you create an encrypted file container. This is a single, encrypted file on your hard drive. Once you mount it, VeraCrypt will add a new drive letter to your system (on Windows) or mount point on other platforms.
You can move files in and out of this “drive”, create folders, or use it like any other drive. When you Unmount it, the files are no longer accessible.
How to Encrypt a Drive – Step 1
I’ll assume you’ve gone to the VeraCrypt Downloads page, and have downloaded VeraCrypt for your operating system. For this demo, I’ll be using Windows.
Begin by opening VeraCrypt. (As with all my posts, you can open the image to see the full sized view).
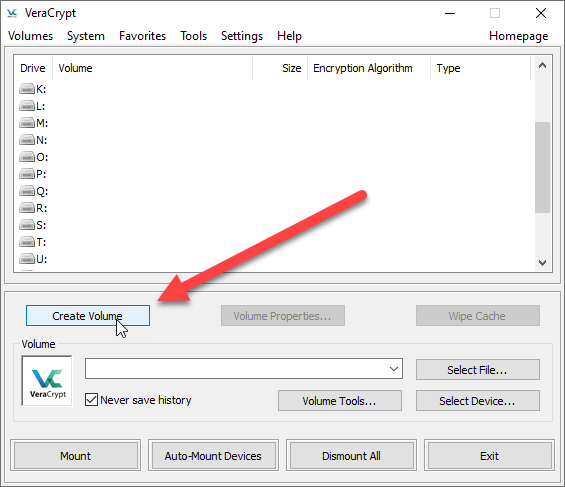
Begin the process by clicking on Create Volume. This will launch the VeraCrypt Volume Creation Wizard.
Step 2 – Pick the item to encrypt
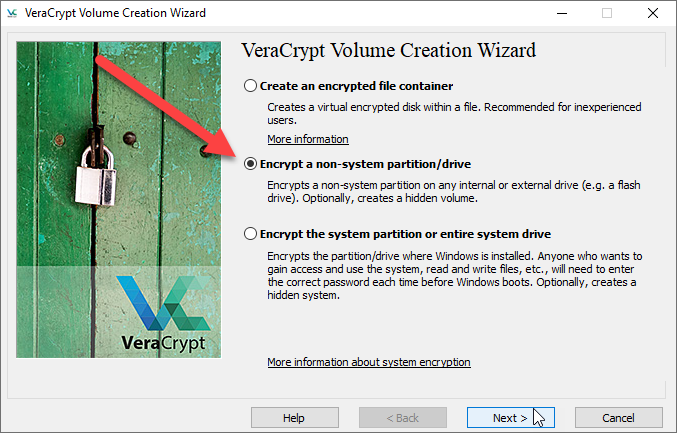
For this demo, I want to encrypt an entire drive, specifically an 8 GB thumb drive I’ve plugged into a USB port. As such, I need to pick the second option, Encrypt a non-system partition/drive, then click Next.
Step 3 – Volume Type

We’re now asked if we want a standard volume or a hidden one. I’ll take about hidden volumes later in this post, so for now we’ll go with a Standard VeraCrypt volume and click Next.
Step 4 – Volume Location
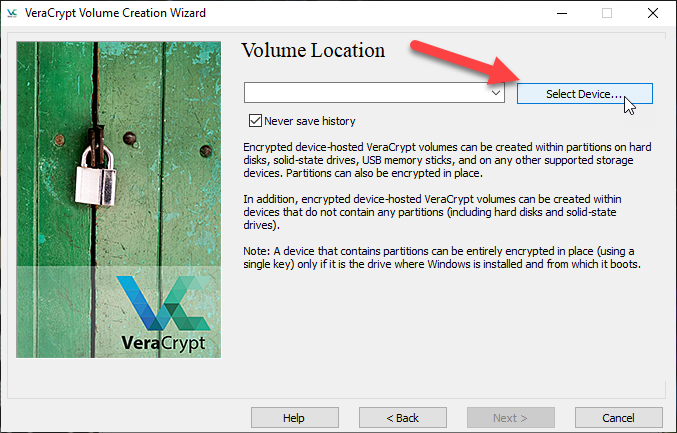
Now we need to select the drive to encrypt, in this case our thumb drive. Click on the Select Device button so we can get its exact ID.

The laptop I’m writing this post on is configured to dual boot between Windows 10 and Kubuntu 21.04. It has two physical drives. The first one listed is a second 1 TB drive I use for storing VMs.
The second drive, listed as Hard Disk 1, is the 2 TB drive with its various partitions. I have one partition for Windows (C:), one for Kubuntu (listed as Partition 5). The remaining 1.2 TB partition is shared between Kubuntu and Windows. There’s a few other partitions for the GRUB booter and other recovery items.
Now here’s where we need to be careful. There is a listing for Harddisk 2, of 8 GB, and as your recall my thumb drive that I want to encrypt is 8 GB. This partition though is actually a recovery partition.
Any external drives I want to encrypt will be listed as a Removeable Disks. In the image above (surrounded by the red square) is my 8 GB thumb drive. I’d previously formatted for NTFS it and it is empty.
MAKE SURE YOU PICK THE RIGHT DRIVE!
You take full responsibility for picking the right drive, if you pick the wrong one I take no responsibility.
So with the thumb drive now picked, I’ll click on OK. Then back on the Volume Location screen I’ll click Next.
Step 5 – Volume Creation Mode

Next you are given a choice. In the first option, it will delete the contents of the drive and create an encrypted drive. If your drive is empty this is by far the fastest method.
If there is data on the drive you want to keep, then you should pick the second option. It will retain the files and put them into the drive once it is encrypted.
Because this option is slow, I would suggest moving any files to another drive, encrypting it, then moving them back when done. Even if you choose this option, I would highly suggest you backup everything just in case something catastrophic occurs such as a power outage or blue screen during the process.
Because my drive is empty, I’ll take the default and click Next.
Step 6 – Encryption Option

In this step you are asked what encryption algorithm you want to use. I’ve clicked the drop down so you can see the long list. For most instances, the default of AES using the SHA-512 is sufficient, but I have encountered clients who require a specific encryption algorithm be used.
The good part is that all of these are industry standards that have been vetted by security experts. For this demo I will use the default of AES and click Next.
Step 7 – Volume Size
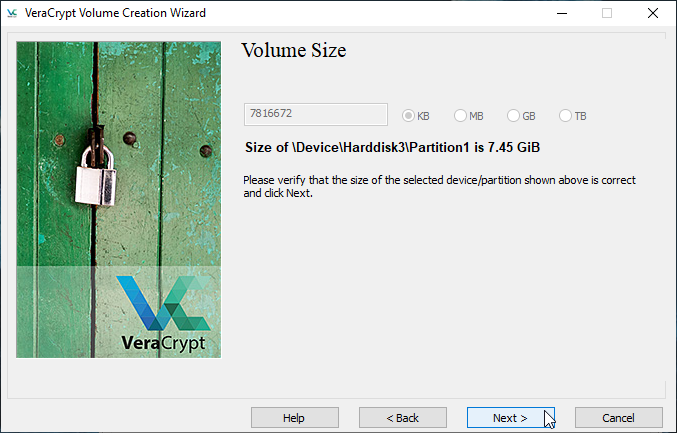
If we were creating a container we would have the opportunity to select a size for it. In this case we are doing an entire drive, so VeraCrypt just informs us of the device name and the size of it as a confirmation we’ve picked the drive we wanted.
This is correct for this demo, so we’ll just click Next.
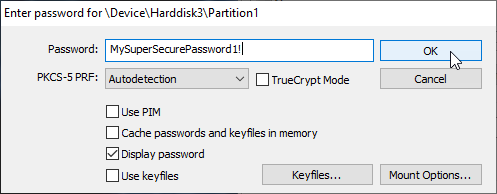
Step 8 – Volume Password
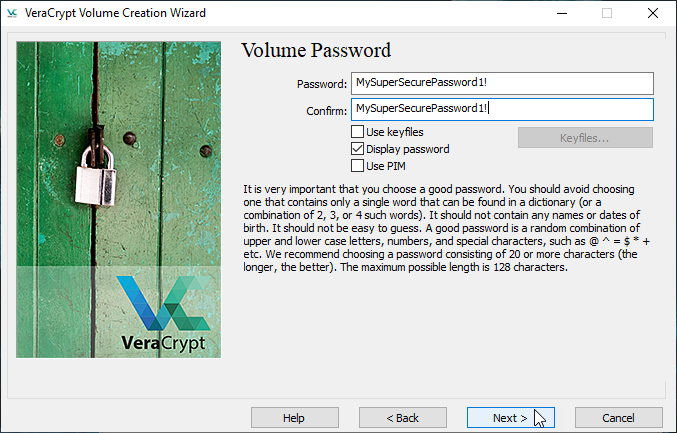
In the next screen you’ll enter the password that will be used to decrypt the drive. You can also check the Display password box so you can see what you are typing, which I highly recommend.
Because this is a demo, I’ve used a trivial password of MySuperSecurePassword1! but obviously you will want to use something much stronger.
I’d also suggest storing the password in your password manager. I use LastPass (which I’ll blog about in the near future). It has a Secure Note feature which I store my drive passwords in. You could also put them in Standard Notes, the subject of my previous blog post.
Once you have entered your super secure password, click Next.
Step 9 – Large Files

If the drive or container you are creating is larger that 4 GB then you will be asked if you want to store files bigger than 4 GB on it. (If the container or drive is 4 GB or smaller this step is skipped.)
This will determine how VeraCrypt formats the drive. The default is No, but I almost always change it to Yes, just in case.
After changing it to Yes, I clicked Next.
Step 10 – Format it!

Without getting too technical, one of the key factors for good encryption is having a random pool of data that can be used in generating the encryption key.
VeraCrypt gets this from the movement of your mouse around the window. As you jiggle your mouse around randomly, the bar at the bottom will change color from red, to yellow, then green. For best results, keep moving your mouse around until the bar is solid green all the way across the bottom.
Once it is solid green you can click on Format to begin the process.
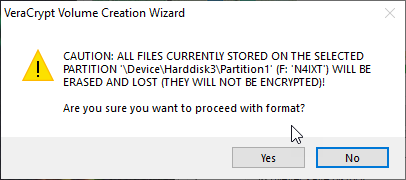
After clicking format, you are given the warning that any data on the drive will be lost, are we sure we want to proceed?
If you are sure, take a deep breath then click on Yes.
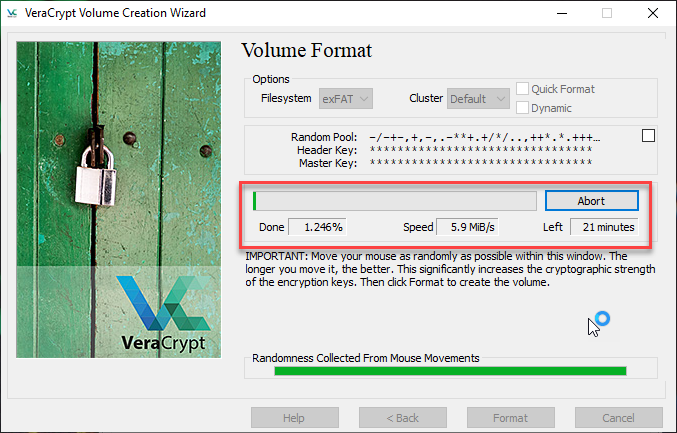
The Volume Format screen now updates to show the progress. You’ll find it in the center, highlighted by the red rectangle in the above image.
The green is a progress bar, and you can see the exact percentage and speed below. To the very right is the time left, 21 minutes when I took this screen shot.
Be aware even on a fast computer this type of encryption can be a slow process. This small 8 GB drive takes about 20 minutes. A multi-terabyte drive can spend several hours encrypting. For that reason, on large drives, I’d suggest kicking off the process then going to bed.
When formatting is done, you will be provided this informational message:

My thumb drive was assigned drive F when it was plugged in, this message just says be sure to pick a drive letter other than F (or another used one) when you go to mount it. Just click OK to dismiss the message.
When you do, VeraCrypt will let you know the volume was created successfully.

You’re then returned to the wizard, where you can create another drive or exit. In our case we’ll click Exit.
All done, let’s use it!
Now that formatting is complete, let’s see how to mount our new drive.
As I mentioned before, when you plug in the VeraCrypt encrypted drive, Windows and other operating systems will complain the device needs to be formatted before it can be used.
Be sure to cancel out of it!
Once you’ve told your operating system to go away and that you know what you are doing, bring up VeraCrypt.

Because we’ll be mounting a thumb drive, we’ll need to click on the Select Device button.

We will need to scroll down to our list of removable disks, and pick our thumb drive then click OK.
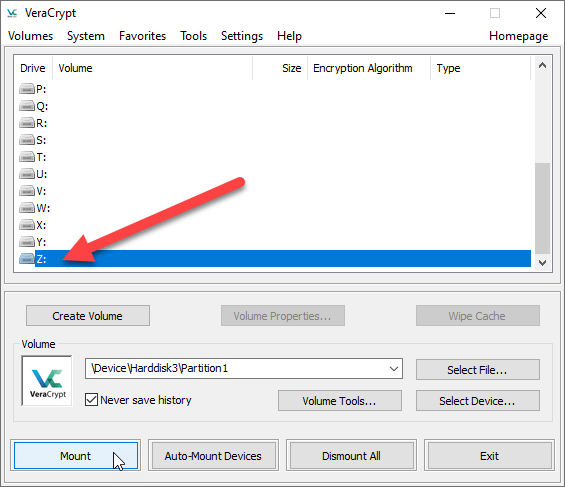
With the device filled out, next go to the list of drive letters above and pick out a drive letter that is unused. for this demo I’ve picked the Z: drive. (Note this will differ for other operating systems.)
Now just click on Mount.
Note I check on the Display password box so we can see what we’re typing, and I’ve entered our super secure password. Before we click OK, I just want to call your attention to the Mount Options button.
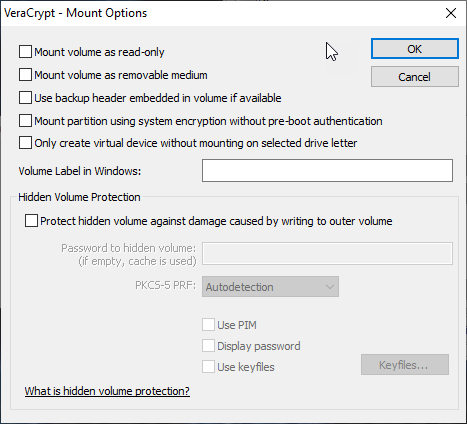
One option that may be useful is the mount as read only. This is also where you can setup hidden volume protection, which we’ll talk about later. For now we can cancel, then back on the password entry window click OK to mount our drive.

As you can see VeraCrypt now updates to show our Z drive is now mapped to our thumb drive! It shows up as the Z drive in explorer and we can begin to use it like any other drive.
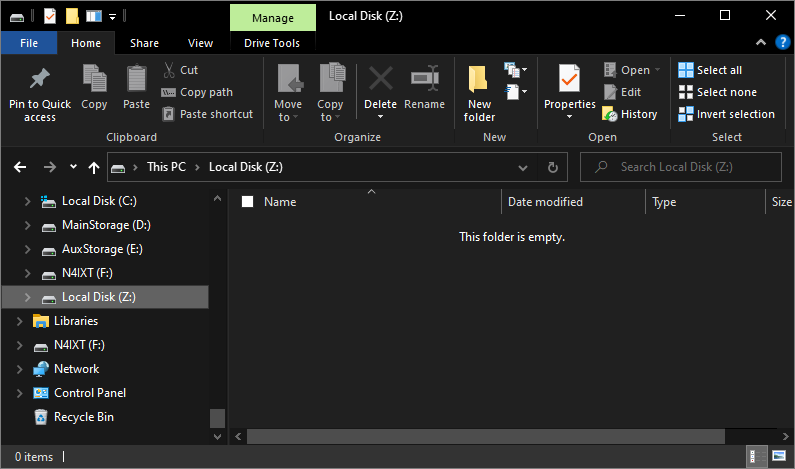
We can now copy files into our encrypted drive using your operating systems file explorer.
Creating an Encrypted Container
As previously described, an encrypted container is a single file which can be used to store data securely. As the steps to create one are almost identical to encrypting a drive, we’ll only highlight the differences here.
We’ll start on the main screen by clicking Create Volume.
On the VeraCrypt Volume Creation Wizard this time take the Create an encrypted file container option and click Next.
In the Volume Type screen, pick Standard VeraCrypt volume and click Next.
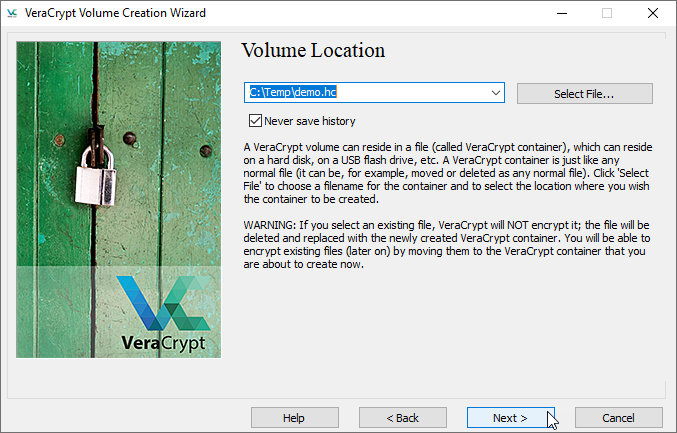
On the Volume Location screen, I’ve entered C:\Temp\demo.hc for the file to store my encrypted data in. VeraCrypt uses hc for its default extension, although if you wanted added protection you could give it a different extension. Once that was entered I clicked Next.
The next step is the Encryption Options, I’ll take the default of AES and click Next.

Next up is the volume size, how big do we want our container. You can size it in terms of kilobytes, megabytes, gigabytes, or terabytes.
For this demo, I am making it 100 MB in size. I’ve created containers of several hundred gigabytes for storing client data. I’ve also created some as small as 10 MB because I wanted to securely email information to someone (who I’d given the password to over the phone).
For now, we’ll go with the 100 MB and click Next.
Next up is the Volume Password screen, I’ll be using the same MySuperSecurePassword1! that I used in the previous demo and clicking next.
The final step is the Volume Format, where I’ll jiggle the mouse around a while to create a random data pool to be used in encryption. Once it is green I’ll click Format and let it format my encrypted file.
Because this is so small formatting goes very fast. When done I’ll just click Exit to end the wizard.
Mounting a File
Start with the main VeraCrypt dialog. Then click Select File to locate the C:\Temp\demo.hc file (or whatever your file name is).

I’ll then pick an unused drive letter, in this case the Y drive, and click Mount.
I’ll enter my super secure password and click OK and my encrypted file container will now be mounted as a drive!
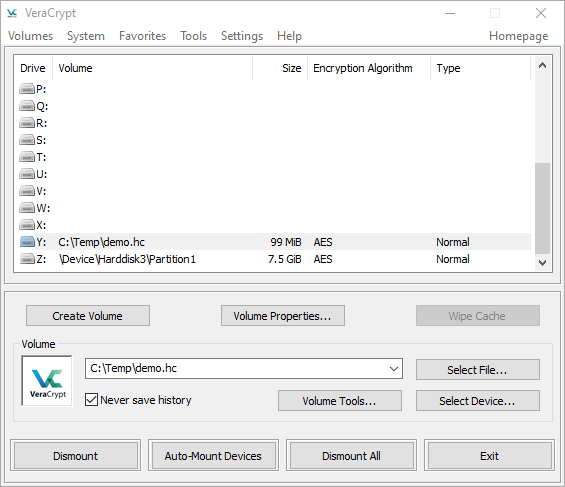
Your Y drive will now appear in your file explorer, ready to use.

Dismount Your Drives
When you are done using your encrypted drive or container, be sure to dismount it when you are done. This will ensure the container is safely shut down and you won’t lose any data.
Hidden Containers
Hidden VeraCrypt containers is an advanced subject I’ll save for a future blog post as this has already gotten very long.
In short though, VeraCrypt lets you embed one container in another. Let’s take our 8 gig thumb drive as an example.
In the wizard, when you select the hidden container option, it will first walk you through the creation of a regular container. In this case our 8 gig thumb drive.
You could then copy some files into it that look like something sensitive. Perhaps some spread sheets with your family budget, or images of receipts. Stuff you might want to plausibly remain hidden, but if it got out wouldn’t be overly damaging.
It would then walk you through creating a hidden container. You could specify you wanted 5 of the 8 gig devoted to the hidden partition. Into it you could place your important data such as copies of birth certificates, marriage licenses, that kind of thing.
The idea is if a bad guy forces you to give up your password, you give them the password to the “outer” or regular drive. All they see is the spreadsheets and receipts you placed there.
The bad guys think they have the info, and have no way of telling you have a hidden partition setup.
When you want to use the hidden partition, you simply supply the password to the hidden area instead of the regular one.
As I said this is a bit of an advanced topic, so we’ll cover it more in the near future.
VeraCrypt Version
Please note the information in this post is valid as of the date I wrote the post. For it I used VeraCrypt Version 1.24-Update 7.
The interface and functionality of VeraCrypt has remained steady over the years so I don’t expect any significant changes, but things on the internet stay forever. If you are reading this five years into the future expect some minor differences between the post and what you see in your version of VeraCrypt.
Conclusion
With the proliferation of hackers and other bad guys, keeping data secure is more important than ever. I create containers for each of my clients to keep their data secure, and separate from other clients.
Additionally I have containers for my family documents such as copies of birth certificates, social security cards, and the like. Made small enough these can be easily stored in places like OneDrive or DropBox for easy retrieval.
As stated, in upcoming posts I’ll cover hidden containers, as well as how to script the mounting and unmounting of your containers.

3 thoughts on “Veracrypt – A Powerful Encryption Utility”