Update: April 10, 2008 – While the instructions below are still valid, I’ve created a new version of this post for Virtual PC 2007. And it’s in Video! Take a look at my post for
April 10, 2008 – Virtual PC 2007 Step by Step – The Video!
Update: April 22, 2008 – There’s a second video now showing the advanced settings. Some good info that adds to the scope of what’s here. Check out my post for
April 21, 2008 – Virtual PC 2007 Step by Step – The Advanced Settings Video!
OK, you’ve downloaded Microsoft Virtual PC (here after referred to as VPC) and installed it. The first time you run it, you see the display below. Now what? Let’s walk through it step by step.

Step 1: Create a new virtual computer
Start by clicking on the New button, and you’ll see this dialog:

Creating a virtual machine seems like the way to go, but let me mention the other two options briefly. Use default settings to create a virtual machine isn’t that useful, it creates a VPC but with minimal memory. I wouldn’t ever use this if I were you. Add an existing virtual machine on the other hand can be quite useful.
Virtual PC stores it’s data in two files, a VMC file that saves the various settings for your virtual computer, and a VHD which is your virtual hard drive. Copying these two files to another computer, launch VPC and pick this Add option, and you will open the VMC file. Away you go, you’re working in your VPC.
But let’s get back to the task at hand and create a brand new machine. Click Next to see this dialog:

It’s asking you what you wish to name your computer. You should make sure to read this carefully, if you don’t give a path then by default the vmc file will be placed in your My Documents\My Virtual Machines directory. The problem is this is your C drive, and if you are following directions you really want to run your VPCs off a different drive other than C.
I created a VPC directory on my D drive, I’d suggest you do something similar. That way you can store your VMC and VHD files in the same location. For a new machine name then, type in D:\VPC\My New Machine and click next. (By the way, in time you’ll want to use a better name, such as MyXP or MyUbuntu, but for now this will do.)
Step 2: Select your Operating System

On this screen it will ask you what operating system you’d like to install. As you can see, there’s lots of built in support for past Microsoft OS’s (and oddly OS/2). If you are installing anything else, such as a Linux distro (short for distribution), select Other, otherwise select the OS you will be installing and click Next.
On the next display you will be asked about the amount of RAM to use.
Step 3: Adjust your RAM

By default, VPC selects Using the recommended RAM, which is a measly 128 meg. Unless you are running DOS or some older OS, I would suggest bumping this up to at least 256 meg. You may want more, depending on what you’ll be doing. For doing Visual Studio development, I’d go 512 to 1024.
Click the Adjusting the Ram option and the slider bar will appear. Use it to move the RAM up or simply type a new value in the text box and click Next.
Step 4: Select or create your hard disk
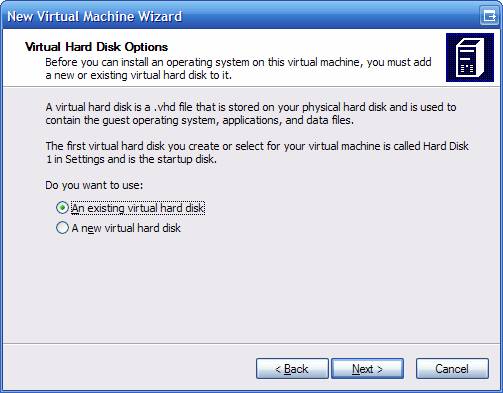
On the screen above you are asked about the Virtual Hard Disk, or your VHD file. This is another of the screens that baffles me. I wonder what bizarre logic was being used that assumed you usually had an existing VHD when you were creating a brand new virtual computer? Unless for some reason you have to rebuild the VMC file, select the A new virtual hard disk option and click next.

On this screen you are asked what you want to name the VHD file. Be default, it uses the name you gave the VMC file and adds “ Hard Disk” to it. I usually just take this default and click next.
Step 5: Confirm your choices

We’re finally at the last screen in the Wizard. Here all you have to do is confirm your choices, and click finish. So what happens next?
Well, nothing spectacular. Your Virtual PC Console will now look like this:

Now it’s time to install an operating system.
Step 6: Install an operating sytem
First, make sure your OS boot / install disk is in your CD/DVD drive. Now make sure your machine is highlighted and click Start.
A window pops up, and looks just like a computer booting up. All of a sudden you’ll see the words “Reboot and Select proper Boot device or Insert Boot Media in selected Boot device”. Now what?
Well, all it’s telling you is that it can’t find anything to boot from. By default, Virtual PC will protect you by not automatically giving access to any of the devices (hard disks or CD/DVDs) on your host system. To fix this, simply click on the CD menu, then pick Use Physical Drive E: (or what ever drive letter your CD is). Now click in the window and hit ENTER.
If all is well, your CD should start up and you will begin the process of installing whatever operating system you’ve placed in your drive. Walk through all of the steps like you normally would, formatting your hard disk, setting up partitions, etc. Don’t be worried, you won’t be hosing your real drive, but installing to your virtual drive (your VHD file).
Step 7: Configure and protect your VPC
OK, your new machine is up, now what? Well, if you are running a Windows OS I would highly suggest the very first thing you do is install AntiVirus software and a decent firewall. I know, you’re thinking “Why? My host system has these installed, won’t they protect it?” To which my answer is, NO.
You see, to the network the VPC is a real computer, with it’s own IP address and everything. It’s just as vulnerable to attacks as any other computer. If not, you couldn’t use it for a Honeypot (see my previous posting). So protect your VPC!
You’ll then want to install any system updates, to patch any security holes. It doesn’t matter if you run Linux or Windows, there’s bound to be some patches for your system out there.
Some tips for running a virtual PC
Now that you are safe and secure, you can use your OS as you would any other OS. A few tips:
- If you want to move your mouse out of the VPC window, hit the Right ALT key. (Note the left one won’t work, has to be the right one). This will let your mouse exit the VPC window.
- Use Right ALT + ENTER to toggle between window and full screen mode.
- Use Right ALT + Delete in place of CTRL+ALT+DELETE for your VPC.
Finally, when you are done you have several options to exit your VPC. First, you can shut down normally from within the OS. This is the least troublesome method, but as you are doing a shut down (then later a start up) it’s more time consuming.
You can also click the Red X (cancel button) on the window, or select Action, Close on the menu. A dialog appears asking if you want to Turn Off or Save State. Save State is similar to putting your system in to hibernate mode. It writes the system state to a file with a VSV extension (and the same file name as your VMC file). Later when you restart it restores your PC just like it was.
Well, usually. I’ve found that sometimes the network doesn’t always reconnect correctly after going into Save State mode, and sometimes I’ve had issues with Linux recovering. You’ll just have to experiment to see how it works for you.
Turn off dumps the PC, sort of like yanking the plug out of the wall. For this reason I suggest you only use this when the virtual environment is totally locked up and you have no other choice.
Wrap up
Well there you go, you’ve now got a spiffy new Virtual PC you can use and abuse. In the next post we’ll talk about tweaking your Virtual PC, and the various menu options for VPC.


