Introduction
This post will conclude our look at the Kusto Query Language with the row_window_session function. It can be used to group rows of data in a time range, and will return the starting time for that range of data in each row.
If you’ve not read my introductory post on Windowing Functions, Fun With KQL Windowing Functions – Serialize and Row_Number yet, you should do so now as it introduced several important concepts needed to understand how these Windowing Functions work.
The samples in this post will be run inside the LogAnalytics demo site found at https://aka.ms/LADemo. This demo site has been provided by Microsoft and can be used to learn the Kusto Query Language at no cost to you.
If you’ve not read my introductory post in this series, I’d advise you to do so now. It describes the user interface in detail. You’ll find it at https://arcanecode.com/2022/04/11/fun-with-kql-the-kusto-query-language/.
Note that my output may not look exactly like yours when you run the sample queries for several reasons. First, Microsoft only keeps a few days of demo data, which are constantly updated, so the dates and sample data won’t match the screen shots.
Second, I’ll be using the column tool (discussed in the introductory post) to limit the output to just the columns needed to demonstrate the query. Finally, Microsoft may make changes to both the user interface and the data structures between the time I write this and when you read it.
Row_Window_Session Basics
The row_window_session function allows you to group data into time based groups. It will find the beginning of a time group, which KQL calls a session, then will return the beginning time of the session (along with other data) until the conditions are met to cause a new session to start.
Let’s look at an example query, then we’ll break down the various parts.
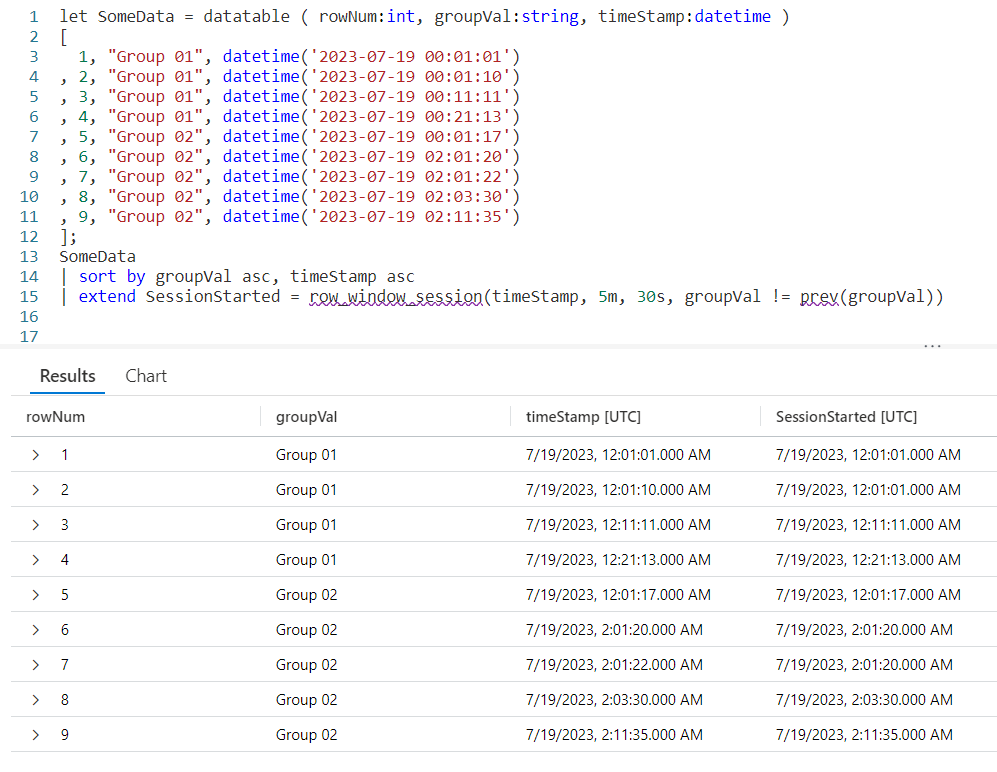
We begin by declaring a datatable to hold our sample data. It has three columns. The rowNum is included to make it easier to discuss the logic of row_window_session in a moment, otherwise it’s just an extra piece of data.
I then include a groupVal column. It will be used to trigger the beginning of a new time group (aka session). Working with real world data, you may use something like the name of a computer for the group.
Finally we have a column of datatype datetime. When working with log data from, for example, the Perf table this would typically be the TimeGenerated column but it doesn’t have to be. Any datetime datatype column can be used. I’ve crafted the data to make it easier to explain how row_window_session works.
Next, I take our SomeData dataset and pipe it into a sort, sorting by the group and time in ascending order. The sort has the added benefit of creating a dataset that is serializable. See my previous post on serialization, mentioned in the introduction, for more on why this is important.
Finally we fall into an extend where we create a new column I named SessionStarted. We then assign it the output of the row_session_started function, which requires four parameters.
The first parameter is the datetime column to be used for determining the session window. Here it is timeStamp. The next three parameters are all conditions which will trigger the beginning of a new “session” or grouping.
The second parameter is a timespan, here I used a value of 5m, or five minutes. If more than five minutes have elapsed since the current row and the first row in this group, it will trigger the creation of a new window session (group).
The third parameter is also a timespan, and indicates the maximum amount of time that can elapse between the current row and the previous row before a new window session is started. Here we used 30s, or thirty seconds. Even if the current row is still within a five minute window from the first row in the group, if the current row is more than thirty seconds in the future from the previous row a new session is created.
The final parameter is a way to trigger a change when the group changes. Here we use the groupVal column, but it’s more likely you’d use a computer name or performance counter here.
Breaking it Down
Since this can get a bit confusing, let’s step through the logic on a row by row basis. You can use the rowNum column for the row numbers.
Row 1 is the first row in our dataset, with a timeStamp of 12:01:01. Since it is first, KQL will use the same value in the SessionStarted column.
In row 2, we have a timeStamp of 12:01:10. Since this is less than five minutes from our first record, no new session is created.
Next, it compares the timeStamp from this row with the previous row, row 1. Less than 30 seconds have elapsed, so we are still in the same window session.
Finally it compares the groupVal with the one from row 1. Since the group is the same, no new session window is triggered and the SessionStarted time of 12:01:01, the time from row 1 is used.
Now let’s move to row 3. It has a time stamp of 12:11:11. This is more than five minutes since the time in row 1, which is the beginning of the session, so it then begins a new window session. It’s time of 12:11:11 is now used for the SessionStarted.
Row 4 comes next. It’s time of 12:21:13 also exceeds the five minute window since the start of the session created in row 3, so it begins a new session.
Now we move into row 5. Because the groupVal changed, we begin a new session with a new session start time of 12:01:17.
In row 6 we have a time of 02:01:20. Well a two am time is definitely more than five minutes from the row 5’s time, so a new session is started.
The time in row 7 is 02:01:22. That’s less than five minutes from row 6, and it’s also less than 30 seconds. Since it is in the same group, no new session occurs and it returns 02:01:20 for the SessionStarted.
Now we get to row 8. The time for this row is 02:03:30, so we are still in our five minute window that began in row 6. However, it is more than 30 seconds from row 7’s time of 02:01:22 so a new window session begins using row 8’s time of 02:03:30.
Finally we get to row 9. By now I’m sure you can figure out the logic. Its time of 02:11:35 is more than five minutes from the session start (begun in row 8), so it triggers a new session window.
Remember the Logic
While this seems a bit complex at times, if you just remember the logic it can be pretty easy to map out what you want.
Did the group change as defined in the fourth parameter? If yes, then start a new window session.
Compared to the session start row, is the time for the current row greater in the future by the value specified in parameter 2? Then start a new window session.
Compared to the previous row, is the time for the current row farther in the future then the amount of time in parameter 3? If so, start a new window session.
TimeSpans
In this example I used small values for the timespans, 5m and 30s. You can use any valid timespan though, including days and hours.
For a complete discussion on the concept of timespans, see my blog post Fun With KQL – Format_TimeSpan.
Let’s Use Real Data
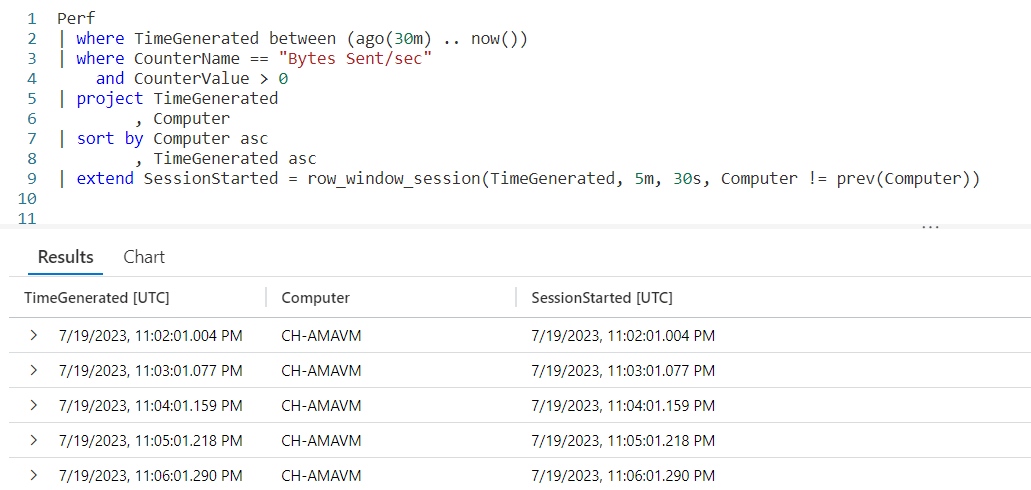
For completeness I wanted to include a final example that uses the Perf table from the LogAnalytics demo website.

The logic is similar to the previous example. Since you now have an understanding of the way row_window_session works, I’ll leave it up to you to step through the data and identify the new window sessions.
See Also
The following operators, functions, and/or plugins were used or mentioned in this article’s demos. You can learn more about them in some of my previous posts, linked below.
Fun With KQL – Format_TimeSpan
Fun With KQL Windowing Functions – Prev and Next
Conclusion
With this post on row_window_session, we complete our coverage of Kusto’s Windowing Functions. You saw how to use it to group data into timespans based on a beginning date, with the ability to group on total elapsed time since the start of a window or since the previous row of data.
The demos in this series of blog posts were inspired by my Pluralsight courses on the Kusto Query Language, part of their Kusto Learning Path.
There are three courses in this series so far:
I have two previous Kusto courses on Pluralsight as well. They are older courses but still valid.
These are a few of the many courses I have on Pluralsight. All of my courses are linked on my About Me page.
If you don’t have a Pluralsight subscription, just go to my list of courses on Pluralsight. On the page is a Try For Free button you can use to get a free 10 day subscription to Pluralsight, with which you can watch my courses, or any other course on the site.