Introduction
In this post we’ll continue our series on Kusto’s Windowing Functions by covering prev and next. If you’ve not read the introductory post, Fun With KQL Windowing Functions – Serialize and Row_Number, you should do so now as it introduced several important concepts needed to understand how these functions are used.
So what do prev and next do? They allow you to retrieve a value in a column from a previous row, or the next (or upcoming) row. This can be very useful in many situations. For instance, calculating the time between two rows based on a datetime column, or the change in a value from one row to the next.
The samples in this post will be run inside the LogAnalytics demo site found at https://aka.ms/LADemo. This demo site has been provided by Microsoft and can be used to learn the Kusto Query Language at no cost to you.
If you’ve not read my introductory post in this series, I’d advise you to do so now. It describes the user interface in detail. You’ll find it at https://arcanecode.com/2022/04/11/fun-with-kql-the-kusto-query-language/.
Note that my output may not look exactly like yours when you run the sample queries for several reasons. First, Microsoft only keeps a few days of demo data, which are constantly updated, so the dates and sample data won’t match the screen shots.
Second, I’ll be using the column tool (discussed in the introductory post) to limit the output to just the columns needed to demonstrate the query. Finally, Microsoft may make changes to both the user interface and the data structures between the time I write this and when you read it.
Prev Basics
To make these examples simple, I’m going to use the datatable operator to generate a very simple dataset. For more on how datatable works, please see my post Fun With KQL – Datatable.
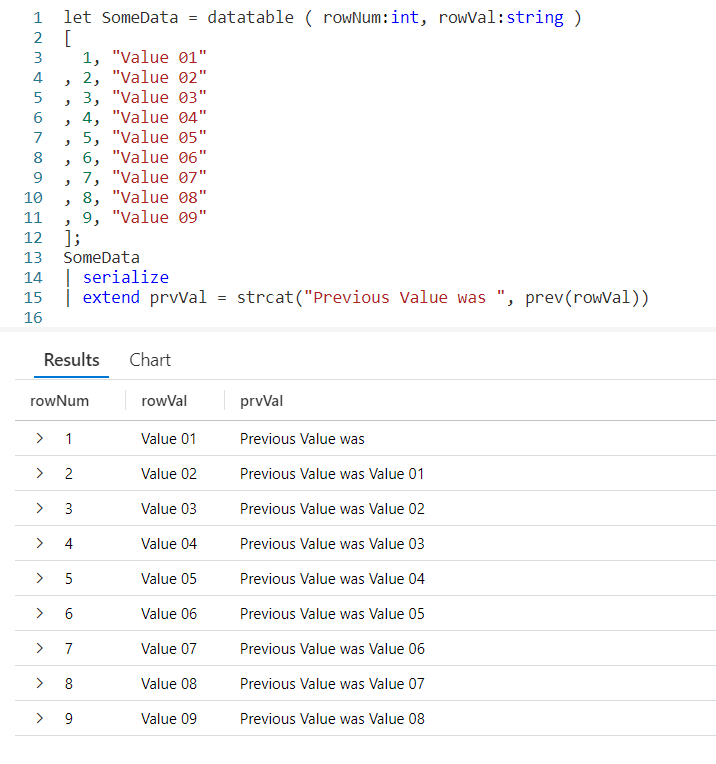
Using a let, I’ve created a dataset named SomeData. It has nine rows and two columns: rowNum and rowVal.
After my let, I take the SomeData dataset and pipe it into a serialize so it can be used with Windowing Functions like prev. Refer back to my previous post on serialize for more information on how serializing a dataset lets you use Windowing Functions.
Now the data pipes into an extend, where we add a new column I named prvVal (short for previous value). We then use strcat to combine a text string, Previous Value was with the output of our prev Windowing Function.
Into prev we pass one parameter, the name of the column from the previous row we want the data for. Here we want to pull data from the column rowVal.
As you can see in the output, the right most column displays our Previous Value was text string, plus the value from the rowVal column in the previous row.
Even More Previous
We can go back more than just one row. The prev function supports a second parameter that indicates the number of rows to go back.

First, I decided to use two extends. The first will copy the previous value into a variable, prvVal2. Into the prev function I pass two values, the first is the column name we want the data from. Here we’ll use rowVal again. The second parameter is the number of rows we want to go back, in this case we just used the value of 2.
In the next extend I user strcat to combine the prvVal2 variable with a text string and put it into the new column prvValOutput. I did this just to demonstrate you could pull a value from a previous row and use it in the query. I could have done other things with prvVal2, such as use it in a calculation.
Previous Value? What Previous Value?
You probably noticed that when we are on the first row, there is no previous value. Likewise, when on the first or second rows, and going back two there was no data. In this case the prev just returned a null value.
In the past I’ve written about functions like iif and isnull to help handle null values. Fortunately, prev eliminates the need for these as it supports and optional third parameter. Into it you can supply a value to use when the value returned by prev would otherwise be null.

In our prev we first pass the column from the previous row we want the data from, rowVal. In this example we are only going to go back one row, but since we want to use the third parameter we have to supply a value in the second parameter position. In this example we’ll use the number 1.
Finally in our third parameter we supply a value to be returned when the result of a prev would be null. Here we used the text not valid for this row, although we could have used a different datatype such as a numeric value or a datetime if that would have been more appropriate to our query.
Next
Next, let’s look at next. The next function behaves just like prev, except it will get data from the next row in our serialized dataset instead of a previous row.
Just like with prev, as the parameter to next we pass in the name of the column to get the data from.

The next function also supports the optional second and third parameters. The second being a number indicating how many rows to go forward, the third being a value to use when next would otherwise return a null value.
Since you’ve already seen these in play I won’t create samples here, but you should be able to easily create them for yourself following the examples from prev.
Calculating a Moving Average
So it’s time for a more realistic example. Here I want to get the % Processor Time from the Perf table for a particular computer. I’m going to summarize it by hour. Then I want to create a moving average for the last three hours.
Most of the query will be pretty straightforward if you’ve been following my KQL series. I capture a start and end time using let. I then use the Perf table, followed by several where statements to limit the data.
Next I use summarize to create an average, bucketed by hour. In essence I’ll have an average of all the processor times for the 1 am hour, then 2 am, and so on.
After that we’ll sort them by the time of the day. Not only will the sort put the data in the order we want, it will also mark them as serialized. This means we can use them with our Window Function prev.
The last line is where the exciting things happen, so take a look and we’ll break it down.
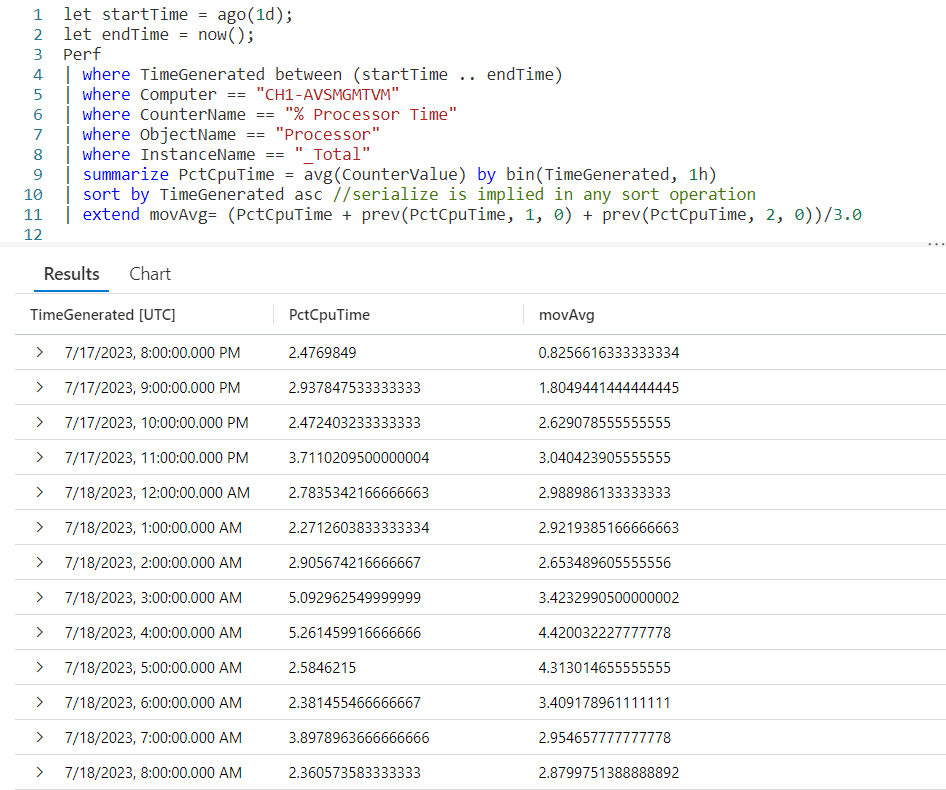
We begin with extend in order to create a new column, movAvg. We are then going to add three values. The first value is the PctCpuTime from the current row, which was calculated during the summarize.
Next, I want to add in the PctCpuTime from the previous row. To do that we’ll use the prev function, pass in the PctCpuTime as the column to get, 1 to indicate we want to go back one row, then tell it to return a 0 (zero) when the previous row would return null.
This is then repeated only we pass in a value of 2, indicating we should go back two rows.
After the closing parentheses we divide by 3.0. Note its important to include the .0 otherwise it would try to create an integer output and we want a full decimal value.
And there you go, we now have an average for the last three rows of data.
Let me acknowledge, by returning a 0 for missing (null) values from the prev, the averages for the first two rows will be off. In a real world situation you’d want to make sure to take this into account, creating a solution appropriate to your situation. For this example I used zero in order to keep things simple.
See Also
The following operators, functions, and/or plugins were used or mentioned in this article’s demos. You can learn more about them in some of my previous posts, linked below.
Fun With KQL – IsNull and IsEmpty
Fun With KQL Windowing Functions – Serialize and Row_Number
Conclusion
This post continued our journey with KQL Windowing Functions, seeing how the useful prev and next functions could get data from adjacent rows of a serialized dataset. In our next post we’ll be looking at a Windowing Function to let us get cumulative sums.
The demos in this series of blog posts were inspired by my Pluralsight courses on the Kusto Query Language, part of their Kusto Learning Path.
There are three courses in this series so far:
I have two previous Kusto courses on Pluralsight as well. They are older courses but still valid.
These are a few of the many courses I have on Pluralsight. All of my courses are linked on my About Me page.
If you don’t have a Pluralsight subscription, just go to my list of courses on Pluralsight. On the page is a Try For Free button you can use to get a free 10 day subscription to Pluralsight, with which you can watch my courses, or any other course on the site.
