In the previous post, Fun With KQL – Format_TimeSpan, we saw how to extract pieces of a timespan datatype. In this post, we’ll see how to extract parts of a datetime datatype using the datetime_part function.
A timely reminder, the samples in this post will be run inside the LogAnalytics demo site found at https://aka.ms/LADemo. This demo site has been provided by Microsoft and can be used to learn the Kusto Query Language at no cost to you.
Note that my output may not look exactly like yours when you run the sample queries for several reasons. First, Microsoft only keeps a few days of demo data, which are constantly updated, so the dates and sample data won’t match the screen shots.
Second, I’ll be using the column tool (discussed in the introductory post) to limit the output to just the columns needed to demonstrate the query. Finally, Microsoft may make changes to both the user interface and the data structures between the time I write this and when you read it.
DateTime_Part Basics
The datetime_part function is quite easy to use. The first parameter is a value that indicates which part of the date to extract. The second parameter is a datetime column you want a part of.
In this example I grabbed the Perf table and used take to get 100 random rows, in order to keep this sample small. I then use project to create new columns using datetime_part to get each part of a date.
In the output I expanded the second row so you could see all of the different parts.
These are the valid values for the first parameter to datetime_part.
Valid Values
year
quarter
month
weekofyear (or week_of_year)
day
dayofyear
hour
minute
second
millisecond
microsecond
nanosecond
Summarizing on a DateTime Part
One of the more useful things you can do with datetime_part is create summaries based on some common time factor. In this example, we’ll get the hour of the day for the TimeGenerated column, then see how many items appear for each hour of the day.
Here we get the Perf table for all rows in the last 7 days via the where operator.
Next, the extend operator is used to create a new column, HourOfDay. The datetime_part function is used to get the hour of the day from the TimeGenerated column.
We now pipe into a project and only pass on the new HourOfDay column.
From here we move into the summarize operator, we get a count which we name PerfCount, based on the new HourOfDay column. Finally we sort the output.
We now have counts for the number of entries into the Perf table broken down by the hour of the day.
This kind of query allows you to spot for time of day issues. Perhaps there is a big upsurge in entires in the 5 o’clock hour, you can look for causes and try to mitigate them.
In this case, the distribution of values seems pretty equivalent across the 24 hours (the rest of the hours are towards the bottom just off screen) so you can be assured the load is even throughout the day.
See Also
The following operators, functions, and/or plugins were used or mentioned in this article’s demos. You can learn more about them in some of my previous posts, linked below.
In this article we saw how the datetime_part function can be used to extract portions of a column that is of a datetime datatype. We then saw how to summarize based on the date part we extracted, in this case the hour of the day.
If you don’t have a Pluralsight subscription, just go to my list of courses on Pluralsight . At the top is a Try For Free button you can use to get a free 10 day subscription to Pluralsight, with which you can watch my courses, or any other course on the site.
In my previous post, Fun With KQL – Format_DateTime, we showed how to use the format_datetime function to reformat a date to your liking.
If you refer back to my post Fun With KQL – DateTime Arithmetic, you may recall that when you perform any math with datetime data types, such as subtracting one date from another to get the amount of elapsed time, the resulting data type is a timespan.
In this post, we’ll see how to format timespan data types using the format_timespan function.
A timely reminder, be aware that the samples in this post will be run inside the LogAnalytics demo site found at https://aka.ms/LADemo. This demo site has been provided by Microsoft and can be used to learn the Kusto Query Language at no cost to you.
Note that my output may not look exactly like yours when you run the sample queries for several reasons. First, Microsoft only keeps a few days of demo data, which are constantly updated, so the dates and sample data won’t match the screen shots.
Second, I’ll be using the column tool (discussed in the introductory post) to limit the output to just the columns needed to demonstrate the query. Finally, Microsoft may make changes to both the user interface and the data structures between the time I write this and when you read it.
Format_TimeSpan Basics
In this first example, we’ll look at some of the simple, basic ways to format a timespan using the format_timespan function.
First, we take the Perf table and get the last three days of data. Then we use a take to grab just a few rows for this sample.
Next we use the extend operator to do some datetime arithmetic, to see how far in the past the TimeGenerated column was from the time right now. This results in the TimeGen column, which is a timespan datatype.
We use the project operator to grab a few relevant columns, then we have four entires to demonstrate the format_timespan function.
The d character is the place holder for the number of days. For each d provided it will display the days. If there are more ds than there were days, it will pad the day value with leading zeros. For example, if the timespan held 33 days, and you used dddd in the function, the result would be 0033.
Next come the placeholders for hours, minutes, seconds, and sub-seconds. These behave just like they do with format_datetime. Below is a chart with the list of allowed formatting characters.
Time Placeholder
Result
d
Days, number of d’s indicates how many 0s to use
H
Hour, 1 to 23 (24 hour clock)
HH
Hour, 01 to 23 (24 hour clock)
m
Minute, 0 to 59
mm
Minute, 00 to 59
s
Second, 0 to 59
ss
Second, 00 to 59
f
Sub-second
F
Sub-second for non-zero vales
Note that the 12 hour clock format of h (lowercase h’s) is not valid. This function measures the number of elapsed hours, not the time of the day.
There’s also an assortment of separator characters we can use to separate the individual parts of our timespan, namely the days, hours, minutes and so on.
Separator
Character
/
Forward Slash
–
Dash
:
Colon
,
Comma
.
Period
_
Underscore
[
Left square bracket
]
Right square bracket
Space
Format TimeSpan Examples
Below is a screen shot with a query where I created many variations using format_timespan.
You may wish to open up this image in a new browser tab so you can easily read it. Because there were so many columns I expanded the second row so you could easily reference all the different formats.
Note that these are not set in stone. I randomly picked a variety of formats, using different characters and separators. You can adapt these to any format you need.
In the extend I used the endofweek function to get the difference between the TimeGenerated and the end of the current week. Honestly, for this example, I did this just so we could get some non zero values in the day position of our output. You could use this method though with any of the startof... or endof... functions.
Composing a Sentence using Format_TimeSpan and StrCat
In a future post I’ll go more into the strcat function, but for now just understand that strcat takes all of the values passed in as parameters, and composes them into a single string.
See Also
The following operators, functions, and/or plugins were used or mentioned in this article’s demos. You can learn more about them in some of my previous posts, linked below.
In this article we saw how to use the format_timespan function to create custom formats for the timespan datatype, typically the result of datetime arithmetic.
Our next post will continue the discussion of datetime functions within the Kusto world.
If you don’t have a Pluralsight subscription, just go to my list of courses on Pluralsight . At the top is a Try For Free button you can use to get a free 10 day subscription to Pluralsight, with which you can watch my courses, or any other course on the site.
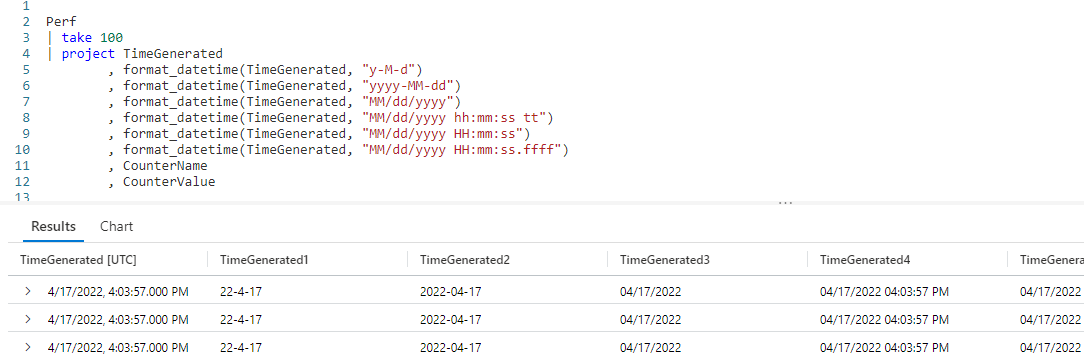
Reformatting dates is very common when querying data. You may, for example, wish to come up with a more compact date than the default KQL returns. Perhaps you work for an international company. In some countries you may want the date in month/day/year format, while other countries would prefer day/month/year.
Fortunately Kusto provides the format_datetime function that allows you to do just this. We’ll take a look at it in this article.
Be aware that the samples in this post will be run inside the LogAnalytics demo site found at https://aka.ms/LADemo. This demo site has been provided by Microsoft and can be used to learn the Kusto Query Language at no cost to you.
Note that my output may not look exactly like yours when you run the sample queries for several reasons. First, Microsoft only keeps a few days of demo data, which are constantly updated, so the dates and sample data won’t match the screen shots.
Second, I’ll be using the column tool (discussed in the introductory post) to limit the output to just the columns needed to demonstrate the query. Finally, Microsoft may make changes to both the user interface and the data structures between the time I write this and when you read it.
Format_DateTime
The format_datetime function is very simple to use.
The function requires two parameters. The first is the column to be formatted, which must be of a datetime datatype.
The second is a string, holding the format using placeholders, which I’ll cover more momentarily. In the above output I formatted the TimeGenrated column using a variety of formats.
Since it is a bit hard to read, here it is with one of the rows expanded.
Format_DateTime Placeholders
There are many placeholders, as shown in the tables below.
Date Placeholder
Result
d
Day, 1 to 31
dd
Day, 01 to 31
M
Month, 1 to 12
MM
Month, 01 to 12
y
Year, 0 to 9999
yy
Year, 00 to 9999
yyyy
Year, 0000 to 9999
Time Placeholder
Result
h
Hour, 1 to 12 (used with AM/PM)
hh
Hour, 01 to 12 (used with AM/PM)
H
Hour, 1 to 23 (24 hour clock)
HH
Hour, 01 to 23 (24 hour clock)
m
Minute, 0 to 59
mm
Minute, 00 to 59
s
Second, 0 to 59
ss
Second, 00 to 59
f
Sub-second
F
Sub-second for non-zero vales
tt
am/pm
With the above placeholder syntax, a single letter will result in a single digit. Two characters results in a two digit value.
For example, with one d, the first day of the month is returned as 1. On the other hand, with two dd, the first day of the month is returned as 01.
Note that the lower case h for hours should be used with tt, to get 12 hour dates in AM/PM format. Using upper case H will return the time in 24 hour format.
The f for sub-seconds will return the amount of sub-seconds for the number of fs you supply. Here’s an example:
Value
Format
Result
22.016
f
22.0
22.016
ff
22.02
22.016
fff
22.016
22.016
F
22
22.016
FF
22.02
22.016
FFF
22.016
If you use a lower case f, it will place a 0 if the value is zero. With an uppercase F, it will suppress the character if it is zero.
Separators
There are several characters you can use as separators when formatting your datetime data.
Separator
Character
/
Forward Slash
–
Dash
:
Colon
,
Comma
.
Period
_
Underscore
[
Left square bracket
]
Right square bracket
Space
Separating Date and Time
Another use for format_datetime is separating a datetime column into two parts, a date column and a time column.
Here I created a new column using project, TheDate, and used format_datetime to set it to "yyyy-MM-dd" format. I also created another column, TheTime, and formatted it.
As you can see in the output, we now have the TimeGenerated column broken into two columns, one for the date part and the second for the time.
If I really needed to, I could have broken this down further. A column for year, another for month, and so on.
In this example I created the calculated column using project, I could have opted to do the same thing using an extend if that made more sense for my query.
See Also
The following operators, functions, and/or plugins were used or mentioned in this article’s demos. You can learn more about them in some of my previous posts, linked below.
The format_datetime function isn’t very complicated, but it is very flexible and useful. You can adapt the dates and times in your results to any format you want. Additionally it can be used to break a datetime column into its distinct parts.
If you don’t have a Pluralsight subscription, just go to my list of courses on Pluralsight . At the top is a Try For Free button you can use to get a free 10 day subscription to Pluralsight, with which you can watch my courses, or any other course on the site.
In order to compact data, JSON is often used to store information within columns in databases. JSON is also useful when you want to store data, but the exact data is different on a row by row basis. Using JSON prevents the need to have a lot of extra columns that will be blank for many of the rows.
It becomes important then that a query language provides a simple method for unpacking that JSON data into useful columns. The Kusto Query Language provides that ability through the use of the parse_json scalar function. In this post we’ll look at examples of how to use it to expand data stored in JSON format.
Originally, parse_json was called todynamic, and the older todynamic function name still works. Both functions work and behave identically. In this post we’ll use the newer parse_json name, but be aware that for any example you could use the older todynamic name and get identical results.
The parse_json samples in this post will be run inside the LogAnalytics demo site found at https://aka.ms/LADemo. This demo site has been provided by Microsoft and can be used to learn the Kusto Query Language at no cost to you.
Note that my output may not look exactly like yours when you run the sample queries for several reasons. First, Microsoft only keeps a few days of demo data, which are constantly updated, so the dates and sample data won’t match the screen shots.
Second, I’ll be using the column tool (discussed in the introductory post) to limit the output to just the columns needed to demonstrate the query. Finally, Microsoft may make changes to both the user interface and the data structures between the time I write this and when you read it.
Parse_JSON Basics
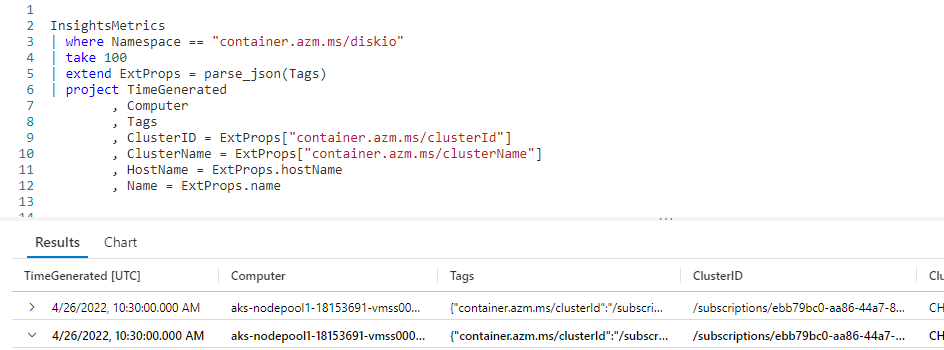
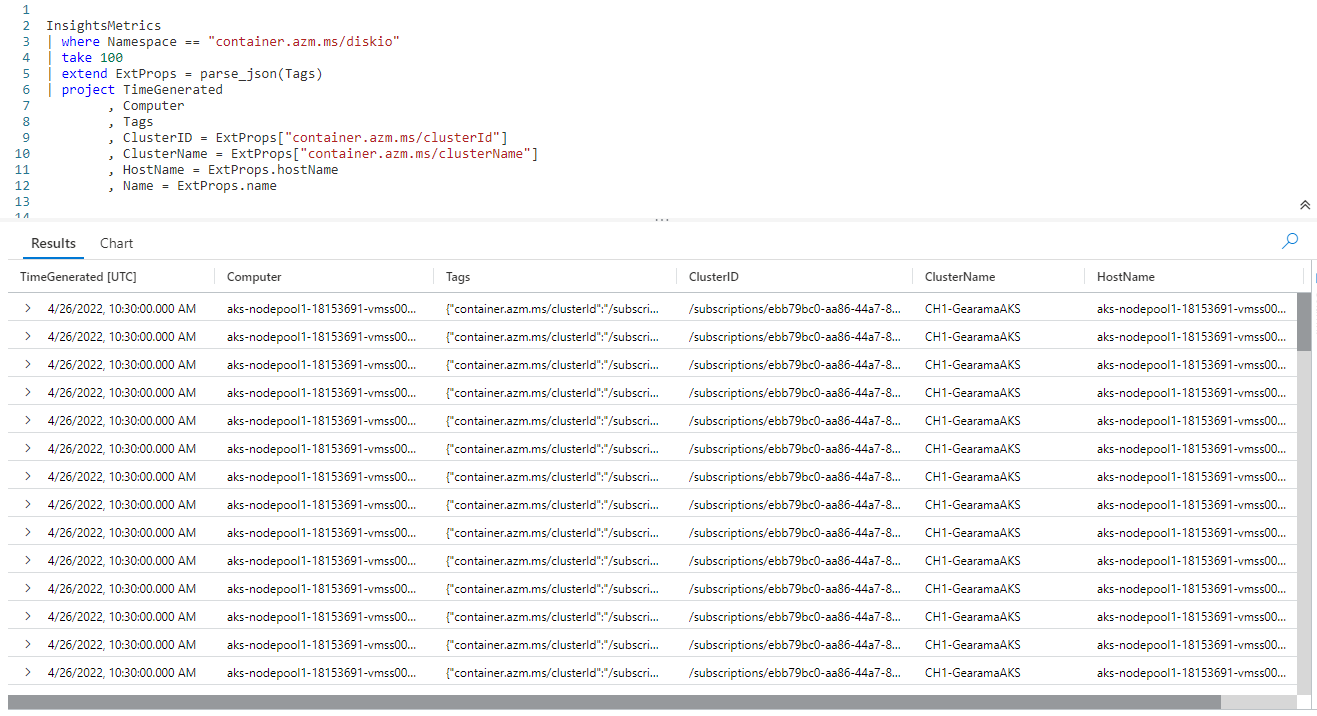
In order to use this function, we’ll need a table that has a column with JSON formatted data. For that we’ll be using the InsightMetrics table, which has a column named Tags.
Here is a sample piece of data stored in the column. Be aware that not every row in this table has the same format for its JSON data. In addition the samples in the code below may not match the screen shots exactly.
For this example I’ve broken the JSON code into multiple lines to make it easier to read. If you look at the JSON columns inside the results pane you’ll just see one long string of text.
Now let’s see how to use parse_json in our Kusto query.
In order to properly use parse_json, each row in the dataset must have a consistent format for its JSON formatted column. So for this example we’ll take the InsightMetrics table, then use where to restrict the rows where the Name column is FreeSpaceMB. The Tags column for FreeSpaceMB rows have the required consistent JSON formatting.
From here we use take to get a small sample for our demo (no sense in taking time to sift through 30,000 rows, the default maximum number of rows KQL will return in the user interface, for a simple demo). Next we flow into a project to just get the few columns we need.
Now we use the extend operator to create a new column, ExtProps. We use the parse_json function, and pass the Tags column into it. This will decompose the JSON data into the new ExtProps column.
In Kusto terms, they specify the new column as a datatype of dynamic. If you are familiar with PowerShell, this is actually created as a hash table, a list of key/value pairs. (If you aren’t familiar with PowerShell, you may want to take a look at my Fun With PowerShell) series.
Once we’ve unpacked the JSON into the ExtProps column, we flow into another project. The first three columns are a repeat of our original three.
Then we have our ExtProps column. In the first one, inside the square brackets [] we pass in the key we want, here vm.azm.ms/mountID. This will return the value associated with this key. If you refer to the JSON example above, this would be C:.
In the next ExtProps entry, we use the second key, vm.azm.ms/diskSizeMB. If you refer to the example above, this will return 129545.99609375.
In the image above, the last two columns are the unpacked JSON data.
More JSON columns
What if our JSON data was more than just two columns? Let’s take a look at an example with four key/values. As before I’ve expanded this to multiple lines to make it easier to read here, in the database it is all one long string.
We use a where to limit the Namespace to container.azm.ms/diskio, the data associated with this Namespace has a JSON format that is consistent and resembles the four key/value pairs shown above.
We again use the same parse_json, passing in the Tags column.
In the project I simply reference the ExtProps column four times, passing in the keys for each one. I also used the project ability to rename these columns into something more human friendly.
Note, there is nothing special about the name ExtProps. I could have used any name I wanted, like TagProps, MyKeyValues, or even ArcaneCodeIsAwesome.
Case is Important!
Be aware, KQL is case sensitive when it comes to the JSON keys. When I was first developing these samples, I accidentally keyed in HostName = ExtProps["hostname"] then spent a few minutes scratching my head wondering why I wasn’t getting back any data for the HostName.
I finally realized I should have used hostName, and not hostname for the key (the N in Name is upper cased in the JSON). Once I got the casing correct, the query worked like it should have.
Property Notation
If, and only if, your JSON key has no spaces or special characters such as /, \, and so on, you can use what is called property notation.
On the last two lines of the query, I was able to use ExtProps.hostName and ExtProps.name instead of needing to use the square brackets. This makes for a bit less typing and better readability. Note the case rules still apply with property notation, I needed to use hostName just as it was in the JSON.
For the ClusterID and ClusterName I still needed to pass the JSON keys within square brackets as they had special characters in the name.
Expanding Rows
This is a good time to point out a feature of the user interface. In the results pane at the bottom, to the very left of each row you’ll see a sideways triangle. If you click it, it will expand the row to display the columns under it vertically.
In this screen shot I clicked on the triangle on the second row (highlighted by the little red box in the image). This then expanded the row to display each column of data in a row under it. For results where many columns are returned, this can make it much easier to read the result for a specific row.
But wait, there’s more!
In the above screen shot, you may have noticed there is another arrow beside the Tags column. The interface figured out that the data contained in Tags is a dynamic datatype with JSON data.
Behind the scenes it used parse_json to unpack it, and break it into the individual columns (shown on rows under the Tags).
This is a useful tool for development. With this you can easily verify you are using the correct keys for writing your KQL code.
See Also
The following articles, operators, functions, and/or plugins were used or mentioned in this article’s demos. You can learn more about them in some of my previous posts, linked below.
Finding JSON data stored in a database column is becoming more and more common today. It is fortunate that Kusto provides an easy to use way of extracting that data using the parse_json function. Remember for this to work in a query, each row must have a consistent format for its JSON.
I also want to add a final reminder, there is a version of parse_json named todynamic. Both functions work and behave identically, and can be used interchangeably. It’s important to remember this as you’ll find queries written both ways. When writing your queries though, you should prefer the use of the newer parse_json name.
If you don’t have a Pluralsight subscription, just go to my list of courses on Pluralsight . At the top is a Try For Free button you can use to get a free 10 day subscription to Pluralsight, with which you can watch my courses, or any other course on the site.