Fun With KQL – Print

Introduction

In this post we’ll cover the print operator. This Kusto operator is primarly used as a development tool, to test calculations.

The samples in this post will be run inside the LogAnalytics demo site found at https://aka.ms/LADemo. This demo site has been provided by Microsoft and can be used to learn the Kusto Query Language at no cost to you.

If you’ve not read my introductory post in this series, I’d advise you to do so now. It describes the user interface in detail. You’ll find it at https://arcanecode.com/2022/04/11/fun-with-kql-the-kusto-query-language/.

Note that my output may not look exactly like yours when you run the sample queries for several reasons. First, Microsoft only keeps a few days of demo data, which are constantly updated, so the dates and sample data won’t match the screen shots.

Second, I’ll be using the column tool (discussed in the introductory post) to limit the output to just the columns needed to demonstrate the query. Finally, Microsoft may make changes to both the user interface and the data structures between the time I write this and when you read it.

Print Basics

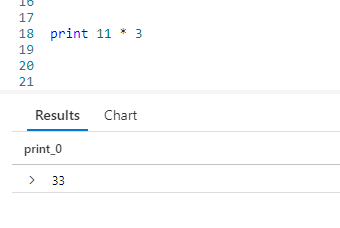
The print operator is very simple. It simply takes the expression after the print operator and returns it to the results pane at the bottom.

We passed in a static string of "Hello World" and it was displayed at the bottom.

A bit more useful job for print is to verify the formatting of a calculated string using strcat. Perhaps it is one that involved multiple column names. You could create and test a rough draft using print.

For this example, I want to take four columns and create an output that reads like a normal sentence. Getting the formatting just right can often be a bit of trial and error. Even more, you don’t want to keep running long queries just to test your output string formatting.

This is where the print operator comes in handy. Here you can see I used placeholders for the column names, surrounding them in double asterisks (although that’s not necessary), then included the static strings I’d be using in the final query. This lets me verify I have the spacing right, decide if I like the look of the output, and so forth.

Print and Calculations

More commonly, you might use print to verify a calculation.

Normally your calculations would be more complex, but it would give a way to enter and test it before you apply it to a column of data in a later query.

If you want, you can even give your calculated column a name.

Simply assign a column name prior to the calculation. In the output grid at the bottom you can see it now used the name for the column.

Print and Dates

A frequent use for print is to verify dates. In an upcoming post I’ll cover the ago function in depth, but briefly you can pass in a value to see what the date would be a certain number of days in the past.

Perhaps you have a query that relies on using ago to get the date for one year ago, but it doesn’t seem to be working right. You can use print to see what date Kusto is calculating.

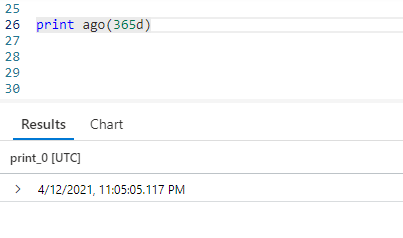
This lets you verify if the date you think is being used is, in fact, the date Kusto is using.

Conclusion

In this post we covered the use of the simple print operator and some of its uses. Hopefully you’ll find creative ways to use it as you develop your Kusto queries.

The demos in this series of blog posts were inspired by my Pluralsight courses Kusto Query Language (KQL) from Scratch and Introduction to the Azure Data Migration Service, two of the many courses I have on Pluralsight. All of my courses are linked on my About Me page.

If you don’t have a Pluralsight subscription, just go to my list of courses on Pluralsight . At the top is a Try For Free button you can use to get a free 10 day subscription to Pluralsight, with which you can watch my courses, or any other course on the site.

Fun With KQL – Top

Introduction

Top 10 lists are all the rage on the internet. Everywhere you look you see "Top 10 Cute Kitten Videos" or "Top 10 Pluralsight Videos by ArcaneCode".

KQL includes a top operator so you can generate your own top lists. Even better, you are not limited to just ten items either.

The samples in this post will be run inside the LogAnalytics demo site found at https://aka.ms/LADemo. This demo site has been provided by Microsoft and can be used to learn the Kusto Query Language at no cost to you.

If you’ve not read my introductory post in this series, I’d advise you to do so now. It describes the user interface in detail. You’ll find it at https://arcanecode.com/2022/04/11/fun-with-kql-the-kusto-query-language/.

Note that my output may not look exactly like yours when you run the sample queries for several reasons. First, Microsoft only keeps a few days of demo data, which are constantly updated, so the dates and sample data won’t match the screen shots.

Second, I’ll be using the column tool (discussed in the introductory post) to limit the output to just the columns needed to demonstrate the query. Finally, Microsoft may make changes to both the user interface and the data structures between the time I write this and when you read it.

Top Basics

Using top is straightforward. Simply pipe a dataset into the top operator, indicate how many items you want, then what you want to use to measure the top with.

By using top with the TimeGenerated datetime column, and adding desc to get descending order, we get the most recent 20 rows that are in the Perf table.

Top Troubleshooting

The top operator has many potential uses. In a financial system it could be used to retrieve the top 10 transactions by monetary amount. Beyond such obvious uses, top can also be useful as a troubleshooting tool.

For example, lets say we want to get a list of computers with low disk space as recorded in the Perf table.

Since we don’t want to look at every single row, as the same value may have many entires, lets reduce the dataset by using the distinct operator to just the computer, counter name, and counter value.

Finally, we use top to get the top results sorted in ascending order (least free space to largest) by the CounterValue, which in this case is the amount of free disk space in megabytes.

Now we have a list of computers reporting a low disk space. In this case they all have 34 megabytes free, but that is due to this being a sample database.

Conclusion

In today’s post, we covered the top operator, and saw several ways it could be used. Hopefully you’ll be able to use this operator to get your queries in "top" shape!

The demos in this series of blog posts were inspired by my Pluralsight courses Kusto Query Language (KQL) from Scratch and Introduction to the Azure Data Migration Service, two of the many courses I have on Pluralsight. All of my courses are linked on my About Me page.

If you don’t have a Pluralsight subscription, just go to my list of courses on Pluralsight . At the top is a Try For Free button you can use to get a free 10 day subscription to Pluralsight, with which you can watch my courses, or any other course on the site.

Changing MacOS Desktop Background Colors With Keyboard Maestro

Introduction

On my Apple MacOS, I prefer to use solid colors for my desktop backgrounds instead of pictures. There’s a few reasons for this.

First, and primarily, I record training videos for Pluralsight. Having a solid color for a background eliminates any visual distractions for the viewers.

Second, using a solid color provides a visual queue to which desktop space I’m working in. My previous post Moving Between Multiple MacOS Desktop Spaces With Keyboard Maestro, I documented how I like to have multiple spaces across my three external monitors. The first space for business apps, second for coding, and final space for video recording or other tasks.

I’ve noticed that when I first boot my MacBook, it doesn’t always restore the same colors I had when I shut down. One monitor might have a blue background, another might be dark gray. This happens often enough to be annoying, and something I want to easily correct.

There are also times when I’m working under different lighting conditions than normal, and a darker black background, or a very light gray may work better. Having the ability to change this easily was important to me.

If you read my last few posts, you saw how powerful Keyboard Maestro | @KeyboardMaestro is. So I turned to it and was happy to say I found a solution, although I admit it’s a bit of a workaround.

Before we get started, be aware Keyboard Maestro is a paid app. However it’s a one time purchase of only $36 (US). Well worth the investment for everything it does.

Additionally, this won’t be a step by step tutorial on how to use Keyboard Maestro. The Keyboard Maestro website, YouTube, and the internet have a plethora of those on the basic use of the Keyboard Maestro application. This post will focus on the solution I came up with.

OK, let’s go see how to add some color to our lives!

Setting The Background

Before you can proceed, you will first need a transparent PNG file. You can create your own, or grab one from the web. I found one at Wikimedia Commons. You can download the smallest size, then save it to your Documents folder (or some other common location, I went with Documents).

Next, start a new macro. I chose to bind this first one to Ctrl+Option+Shift+G, as I’ll be using it for a Gray background.

Next, add an action of Set Desktop Image. For the image file, select the transparent PNG file you created (or downloaded).

Set it to Fit to screen, then set the background to the color you want. In the image below, I chose a dark gray color.

Now you can repeat this, adding additional macros for each color you want to add. I have macros for dark gray, green, dark red, blue, and a light gray almost white in color. Normally I use dark gray for my "business" spaces, blue for my development spaces, and dark red or dark green for the third desktop space, depending on my mood. I can also change easily if lighting conditions would make a certain color easier to on my eyes.

As you can see, the workaround is to use a transparent image and set a background color. True, I could manually go set a background color each time directly through the MacOS Change Desktop Background interface, but that’s time consuming compared to a simple key combination.

Using with Pictures Too!

Here I chose a transparent image, but you could if you wished use this with normal pictures. When working from home, you may want a background of your family. At a company meeting, you may want to quickly change this to your company logo. If you are about to do some screen sharing, you may want just a solid background color, like I showed in this post.

Conclusion

This becomes a very handy tool for situations when, upon booting, MacOS doesn’t restore my colors correctly, or for changing them to meet my needs at the moment.

I hope you found this Keyboard Maestro macro to change your desktop background colors as useful as I do. If so, please share this post with your friends, family, and anyone else who uses an Apple Mac product.

Disclaimer, this was in no way a paid advertisement for Keyboard Maestro. I received no compensation for doing this post. In fact I purchased Keyboard Maestro with my own hard earned money. I just think its a great tool and wanted to share this technique to change multiple desktop spaces simultaneously with you.

I record video training courses for Pluralsight, including several on the Apple MacOS platform. You’ll find a list of my courses with links on my About Me page.

If you don’t have a Pluralsight subscription, just go to my list of courses on Pluralsight . At the top is a Try For Free button you can use to get a free 10 day subscription to Pluralsight, with which you can watch my courses, or any other course on the site.

Fun With KQL – Distinct

Introduction

As with other languages such as SQL, KQL has an operator for returning a unique list of values in a column: distinct. Using this you can return the values in a column, but only once, removing any duplicate values from the result set.

The samples in this post will be run inside the LogAnalytics demo site found at https://aka.ms/LADemo. This demo site has been provided by Microsoft and can be used to learn the Kusto Query Language at no cost to you.

If you’ve not read my introductory post in this series, I’d advise you to do so now. It describes the user interface in detail. You’ll find it at https://arcanecode.com/2022/04/11/fun-with-kql-the-kusto-query-language/.

Note that my output may not look exactly like yours when you run the sample queries for several reasons. First, Microsoft only keeps a few days of demo data, which are constantly updated, so the dates and sample data won’t match the screen shots.

Second, I’ll be using the column tool (discussed in the introductory post) to limit the output to just the columns needed to demonstrate the query. Finally, Microsoft may make changes to both the user interface and the data structures between the time I write this and when you read it.

Distinct Basics

Using distinct we can get a list of unique values in a column. Let’s say we want to get a list of distinct values in the Perf tables ObjectName column.

All we had to do was take our Perf table and pipe it into the distinct operator. We then specify the column name to get the unique values for.

In the output, you can see the list of values. You could use these to build a lookup table, or as input to another query.

Distinct Combinations of Columns

When using the distinct operator you are not limited to a single column. You can get distinct values for a combination of columns.

After distinct we simply list all of the columns to find unique combinations for. In this example, you can see the LogicalDisk object has several counter names associated with it. It was too long for a screen capture, but in total the query returned 43 unique combinations. (As of this writing, be aware the value may be different for you due to the constant updates to the Perf tables sample data.)

Distinct As A Troubleshooting Tool

One way you can use distinct is as a trouble shooting tool. There is another table in the LogManagement solution named Alert. In here certain conditions which may become issues are logged. You can use the distinct operator to get a list of those conditions.

When I ran this query, it only returned one alert condition, but there could be more. We can now use this information to get a list of the computers that raised this specific issue.

With the list of computers narrowed down, we can start investigating each one to see what raised this issue.

Conclusion

It was my "distinct" pleasure to bring you this article on distinct!

OK, sorry for the bad pun, but hopefully you learned some ways the distinct operator can help you in your work.

The demos in this series of blog posts were inspired by my Pluralsight courses Kusto Query Language (KQL) from Scratch and Introduction to the Azure Data Migration Service, two of the many courses I have on Pluralsight. All of my courses are linked on my About Me page.

If you don’t have a Pluralsight subscription, just go to my list of courses on Pluralsight . At the top is a Try For Free button you can use to get a free 10 day subscription to Pluralsight, with which you can watch my courses, or any other course on the site.

Moving Between Multiple MacOS Desktop Spaces With Keyboard Maestro

Introduction

Like many people, I use Apple’s multiple desktop spaces feature on MacOS. I use the first space for "business". My email reader, to do task list, social media, notes app, and the like goes here.

My second space is used for development. VSCode and related apps go into this spot. My third spot is either used for video recording, or other tasks as needed.

The MacOS spaces feature works in one of two ways. In the older method all desktop spaces were tied together. You used CTRL+Left Arrow or CTRL+Right Arrow to move between them, and the spaces on all monitors changed together. You got one menu bar across the top of the primary monitor.

You can actually change MacOS to revert back to this behavior, but I like having a menu bar on each display so don’t like to use it.

In the current, default mode each monitor has a space that is independent of the others. I can change the current space on one monitor, but the others remain as they were. Each monitor has its own menu bar across the top.

I have three monitors connected to my MacBook, and it can be annoying to have to change the space on each monitor individually, when the majority of the time I want to change them all together. Sadly there is no method built into MacOS to do this.

I finally found a way to accomplish this using Keyboard Maestro | @KeyboardMaestro. Be aware Keyboard Maestro is a paid app, but a one time purchase of only $36 (US). Well worth the investment for everything it does.

Just a preface first, this won’t be a step by step tutorial on how to use Keyboard Maestro. The Keyboard Maestro website, YouTube, and the internet contain a vast collection on the basic use of the Keyboard Maestro application. This post will focus on the solution I came up with.

OK, with that out of the way let’s see how to change desktop spaces simultaneously.

Changing Spaces On All Monitors

Changing the desktop space requires a few steps, as you’ll see in the image below.

In the first action I used Move or Click Mouse and changed it to Move Only, to relocate the mouse to an absolute position on my first monitor. I started with the leftmost monitor in my setup.

You can use the Get button found in the move mouse action to easily capture the coordinates. I just moved the mouse over to the middle of the monitor to grab the position.

Next, I have a Type a Keystroke action, and have it press CTRL+Right Arrow. I then have a Pause action, to make the macro wait one second before proceeding.

I found without the pause, my Mac was running so fast it didn’t have time to figure out where the cursor was before processing the CTRL+Right Arrow keystroke, so it wasn’t always changing the correct monitors desktop space. Adding the Pause fixed this.

For the second monitor I have another Mouse Move (but no click) that just moves the cursor 2000 pixels over from the last mouse position, which was on monitor 1. This is enough to move the mouse over to monitor 2.

I then have another keystroke action to press CTRL+Right Arrow, then another pause. I repeat these steps for the remaining monitors.

I suppose I could have positioned the mouse in an absolute position for all my monitors, but to me this will make the macro easier to reuse in other setups.

At the very end I added a final Mouse Move action to reposition the mouse over the center of my primary monitor. This way I’ll know where it is each time and won’t have to hunt it down.

I tied this macro to CTRL+F12. Now I can move the spaces for all my monitors one screen to the right with one key press.

Moving Left

To move everything back to the left, I duplicated the macro. Then I simply changed all of the keystroke actions to press CTRL+Left Arrow. Finally I bound the macro to CTRL+F11.

Disabling Changing On Some Spaces

If you are familiar with Keyboard Maestro, you may have noticed three actions toward the bottom that are disabled. Originally I had all three external monitors, plus the internal monitor on my MacBook, changing together.

As my MacBook tends to sit off to the side, I primarily use the internal monitor to hold the Apple Messages app in case my wife (aka she-who-must-be-obeyed) sends me a text. It lets me notice and respond quickly.

I also leave the Apple Home app on this monitor so I can turn the lights and fans in my house on and off easily. When I play music the Apple Music app sits here too. I opted to disable desktop space changing on this monitor, although I left the actions in the macro but disabled in case I should ever want to turn them back on.

It also serves as an example that you can opt to change some, but not all, desktop spaces at the same time.

Don’t Go Too Fast

Be aware you need to give Keyboard Maestro time to process the macro. You cannot rapidly press CTRL+F12 CTRL+F12 CTRL+F12… quickly and have the macro work right.

It’s best to press the activation keystroke (CTRL+F12 in my case), let go of the keyboard until all the spaces have changed, then press it again.

Even with that slight limitation, it is still far faster than having to move your mouse to each monitor and use the built in CTRL+Left/Right arrow keystrokes.

Also be aware I chose CTRL+F12 and CTRL+F11 for my activation keystrokes. You are free to pick any key combination that is not currently in use on your Mac.

Conclusion

I hope you’ll find this Keyboard Maestro macro as useful as I do. If so, please share this post with your friends, family, and anyone else who uses an Apple Mac product.

Disclaimer, this was in no way a paid advertisement for Keyboard Maestro. I received no compensation for doing this post. In fact I purchased Keyboard Maestro with my own hard earned money. I just think its a great tool and wanted to share this technique to change multiple desktop spaces simultaneously with you.

I record video training courses for Pluralsight, including several on the Apple MacOS platform. You’ll find a list of my courses with links on my About Me page.

If you don’t have a Pluralsight subscription, just go to my list of courses on Pluralsight . At the top is a Try For Free button you can use to get a free 10 day subscription to Pluralsight, with which you can watch my courses, or any other course on the site.

Fun With KQL – Variants Of Project

Introduction

In the previous post, Fun With KQL – Project, we took a dive into the project operator and the ways it could be used. The project operator has several variants: project-away, project-rename, project-keep, and project-reorder. This post will take a quick look at each.

For most of the examples we’ll build on the examples from the Fun With KQL – Project blog article, so if you’ve not read it you should do so now.

You should be aware that the samples in this post will be run inside the LogAnalytics demo site found at https://aka.ms/LADemo. This demo site has been provided by Microsoft and can be used to learn the Kusto Query Language at no cost to you.

If you’ve not read my introductory post in this series, I’d advise you to do so now. It describes the user interface in detail. You’ll find it at https://arcanecode.com/2022/04/11/fun-with-kql-the-kusto-query-language/.

Note that my output may not look exactly like yours when you run the sample queries for several reasons. First, Microsoft only keeps a few days of demo data, which are constantly updated, so the dates and sample data won’t match the screen shots.

Second, I’ll be using the column tool (discussed in the introductory post) to limit the output to just the columns needed to demonstrate the query. Finally, Microsoft may make changes to both the user interface and the data structures between the time I write this and when you read it.

Project-Away

There are several variants to the project operator. The first I wanted to mention is project-away.

The project-away operator is the reverse of project. It will return all columns except the ones you indicate. This can be a way of future proofing your queries. With project, if someone adds a new column to the table it won’t appear in the results. With project-away, these new columns will now appear in the results.

To be honest, the project-away operator isn’t something I’ve used a great deal, but wanted to include it for completeness.

Project-Rename

Another variant to the project operator is project-rename. You can use it to rename a column. As this example shows, that renamed column can also be used in calculations done with extend.

In this example, after performing the project we use project-rename to change the name of the CounterName column to FreeMB. Since CounterName is no longer in our dataset, we need to use the new name in the extend calculations. It also eliminates the need to use extend to copy the column into the FreeMB column, making the query more efficient.

The project-rename operator, while not something I use daily, is quite useful and one I employ regularly.

Project-Keep

The next variant of project to discuss is project-keep. At first glance it seems identical to project.

If you look closely though, you’ll notice a subtle but important difference. In the query we listed the two counter columns together. In the output though, you can see the CounterName column is followed by the InstanceName column, then the CounterValue column appears.

The project-keep operator preserves the order of the columns as they appeared in the input dataset, and ignores the order they were listed in your query.

There is another useful feature to project-keep, it allows you to use wildcards for the column names. Simply enter the first part of a column name, then use an asterisk.

In the query, I specified Counter* for one of the columns. In the output, Kusto found three matches and included the CounterName, CounterValue, and CounterPath columns in the output.

The project-keep can be useful when you are writing quick queries to examine your data. For any query I would be keeping to run in production though, I would always specify the column names. This will improve readability plus make your intent clear to KQL developers who may come behind you.

Project-Reorder

The final variant we’ll look at is project-reorder. This operator is a bit counterintuitive, as it doesn’t behave quite like you expect.

The project-reorder operator returns all columns in the input dataset. However, it will take the columns you pass in to the operator and list them first, in the order you specify, then the rest of the columns in the order they occur in the incoming dataset.

As you can see in the output, the five columns we listed come first in the output, followed by the remaining columns (you can scroll to the right in the output pane to see the rest). The project-reorder can be handy when you want to see all of the columns, but you want to see certain columns first in the output.

Like the project-keep, the project-reorder operator can use wildcards.

As you can see, it listed the three columns that began with the word Counter, in the same order they appeared in the input dataset.

You can also reorder the columns in alphabetical order easily by appending asc after the wildcard.

Now the three columns with the word Counter appear in ascending alphabetical order. As you might guess, there is also a desc that will list the columns in descending order alphabetically.

This leads to a neat trick you can do, if you want to list all the columns in alphabetical order.

After the project-reorder operator, simply use an asterisk followed by the asc keyword. This will list all of the columns in the incoming dataset in alphabetical order, which can be quite useful especially in a dataset with many columns. The exception is that pesky TimeGenerated column, which Kusto will always list first in the output.

On occasion you may encounter a table that has columns with numbers embedded in the names. For example, you may have col100, col20. When sorted in ascending order alphabetically, col20 will appear before col100.

To fix this, you can use granny-asc and granny-desc which will take into account these odd column names and force a100 to appear prior to (when used with granny-asc) to a20.

Conclusion

This post covered the variants to the project operator. While not used frequently, they can be useful when developing your Kusto queries.

The demos in this series of blog posts were inspired by my Pluralsight courses Kusto Query Language (KQL) from Scratch and Introduction to the Azure Data Migration Service, two of the many courses I have on Pluralsight. All of my courses are linked on my About Me page.

If you don’t have a Pluralsight subscription, just go to my list of courses on Pluralsight . At the top is a Try For Free button you can use to get a free 10 day subscription to Pluralsight, with which you can watch my courses, or any other course on the site.

Opening Multiple Apps on MacOS With Keyboard Maestro

Introduction

When I sit down at my Apple MacBook to begin my workday, there are a variety of apps I open and use daily. I also use multiple monitors, so I can spread my work out. When done manually, this required me to open each app, move it to the monitor I wanted, then repeat. Very time consuming.

I wanted a way to automate this, and found Keyboard Maestro | @KeyboardMaestro to be the best solution. It was easy to setup, and I could trigger things off a simple keyboard combination.

Be aware Keyboard Maestro is a paid app, but a one time purchase of only $36 (US). Well worth the investment for everything it does.

Just a preface, this won’t be a step by step tutorial on how to use Keyboard Maestro. The Keyboard Maestro website, YouTube, and the internet have a plethora of those on the basic use of the Keyboard Maestro application. This post will focus on the solution I came up with.

OK, that said let’s see how to open multiple apps.

Opening and Positioning an App

Opening an app in Keyboard Maestro requires three basic steps. First, use the Activate Application action. This will open the app if it’s not already open, or bring it to the foreground if it’s open already. If you’ve already got the app open when you create the action, you can easily pick it in the Activate action’s app picker list inside the Keyboard Maestro editor.

Next, you need a Pause action. This is needed to give the app time to fully open before you attempt to move it in the next step. For most apps around 3 seconds was sufficient. Some apps loaded quickly, and I could reduce the pause time to one or two seconds. A few I had to bump up to four or five seconds. You’ll just have to play with this, as it is quite dependant on the app, the speed of your Mac, and even the internet for apps that require access to the web.

Finally I added a Move Window action, then changed it to Move and Resize Front Window. You can manually enter the top corner coordinates, followed by the width and height.

Far easier though is to have the app positioned where you want it, then use the Get button, found in the Move and Resize Front Window action. This turns the mouse into cross hairs, and you have five seconds to draw a box around the app. This will get the coordinates and paste them into the action. From there you can make any minor tweaks.

Now, repeat! Repeat these three steps for each application you want to open. Here is a screen shot of my list.

There’s one more action, just off the bottom of the screen, a Move Mouse action.

After opening up my apps I wanted to position the mouse in a spot where I knew it would be.

IMPORTANT!!! Keep Your Hands Off The Keyboard and Mouse!!!

One important thing, make sure not to touch the keyboard or mouse while these macros are running. Otherwise you might interrupt the workflow and apps won’t open correctly or may not be where you want them positioned.

Of course if that happens its not a big deal, you can just run the macro a second time to get everything positioned right, but best not to waste the time if you can avoid it.

Variations

This app saves me a lot of time every day. I carry my MacBook onto a sunroom / porch I have on the back of my house, plug it in to my monitors (don’t worry the sunroom is secure), and run the Keyboard Maestro macro. Sure, it takes about a minute to run and open everything, but that is far faster than doing it manually. In addition I can do other tasks while it is running, such as plugging in my iPads and setting them on my desk, or sitting my Windows / Linux laptop in its docking station.

Because this is tied to a keyboard combination, I can have multiple versions. For the sunroom I enjoy working on I use Ctrl+Shift+Option+Cmd+P to start my work day. In addition to the sunroom, I also have an actual home office where Ctrl+Shift+Option+Cmd+O opens and positions everything. In addition, my in-laws kindly gave me a corner in a spare room to setup a small desk with some monitors so I can work when we visit there, using Ctrl+Shift+Option+Cmd+D. (D is the first letter of the town they live in, in case you were wondering.)

Finally I have yet a fourth version to open my apps when I am using only the internal monitor of my MacBook, with no external monitors attached. For it I use Ctrl+Shift+Option+Cmd+L (L for Laptop Only).

During the course of the day I’ll wind up moving applications around on the screen, dragging between monitors, and the like. At some point I like to refresh everything to put my apps back where I had them at the start of the day. I can of course run the full Ctrl+Shift+Option+Cmd+P (for example) and it works just fine.

However, if I know all the apps are already open, there is no sense in giving each one time to open. So I created a duplicate of the original macro, and simply removed all of the pause actions. I then use Ctrl+Option+Cmd+P to activate it. I did the same for the other macros, creating a version without the pause, and the only difference being the faster (much faster!) version doesn’t include Shift as part of the activation.

Thanks to MacGeekGab

I need to give a shout out to my favorite Apple podcast Mac Geek Gab | @MacGeekGab. In a past episode one of the hosts (I believe it was Dave) mentioned using Keyboard Maestro to do this very thing, although didn’t go into any details.

That gave me the inspiration to tackle this challenge. Through some trial and error, along with persistance, I was able to come up with a solution that worked for me.

Conclusion

If you are an Apple Mac user and don’t have Keyboard Maestro, it is a worth while investment. As a matter of fact, I have some upcoming posts in which I’ll document a few other things I use it for!

The same goes for Mac Geek Gab, if you aren’t listening to their podcast, you should!

Disclaimer, this was in no way a paid advertisement from either Keyboard Maestro or Mac Geek Gab. I received no compensation for doing this post. In fact I purchased Keyboard Maestro with my own hard earned money, and even donate to Mac Geek Gab. I just think they are both great tools and wanted to share them with you.

I record video training courses for Pluralsight, including several on the Apple MacOS platform. You’ll find a list of my courses with links on my About Me page.

If you don’t have a Pluralsight subscription, just go to my list of courses on Pluralsight . At the top is a Try For Free button you can use to get a free 10 day subscription to Pluralsight, with which you can watch my courses, or any other course on the site.