Introduction
Like many people, I use Apple’s multiple desktop spaces feature on MacOS. I use the first space for "business". My email reader, to do task list, social media, notes app, and the like goes here.
My second space is used for development. VSCode and related apps go into this spot. My third spot is either used for video recording, or other tasks as needed.
The MacOS spaces feature works in one of two ways. In the older method all desktop spaces were tied together. You used CTRL+Left Arrow or CTRL+Right Arrow to move between them, and the spaces on all monitors changed together. You got one menu bar across the top of the primary monitor.
You can actually change MacOS to revert back to this behavior, but I like having a menu bar on each display so don’t like to use it.
In the current, default mode each monitor has a space that is independent of the others. I can change the current space on one monitor, but the others remain as they were. Each monitor has its own menu bar across the top.
I have three monitors connected to my MacBook, and it can be annoying to have to change the space on each monitor individually, when the majority of the time I want to change them all together. Sadly there is no method built into MacOS to do this.
I finally found a way to accomplish this using Keyboard Maestro | @KeyboardMaestro. Be aware Keyboard Maestro is a paid app, but a one time purchase of only $36 (US). Well worth the investment for everything it does.
Just a preface first, this won’t be a step by step tutorial on how to use Keyboard Maestro. The Keyboard Maestro website, YouTube, and the internet contain a vast collection on the basic use of the Keyboard Maestro application. This post will focus on the solution I came up with.
OK, with that out of the way let’s see how to change desktop spaces simultaneously.
Changing Spaces On All Monitors
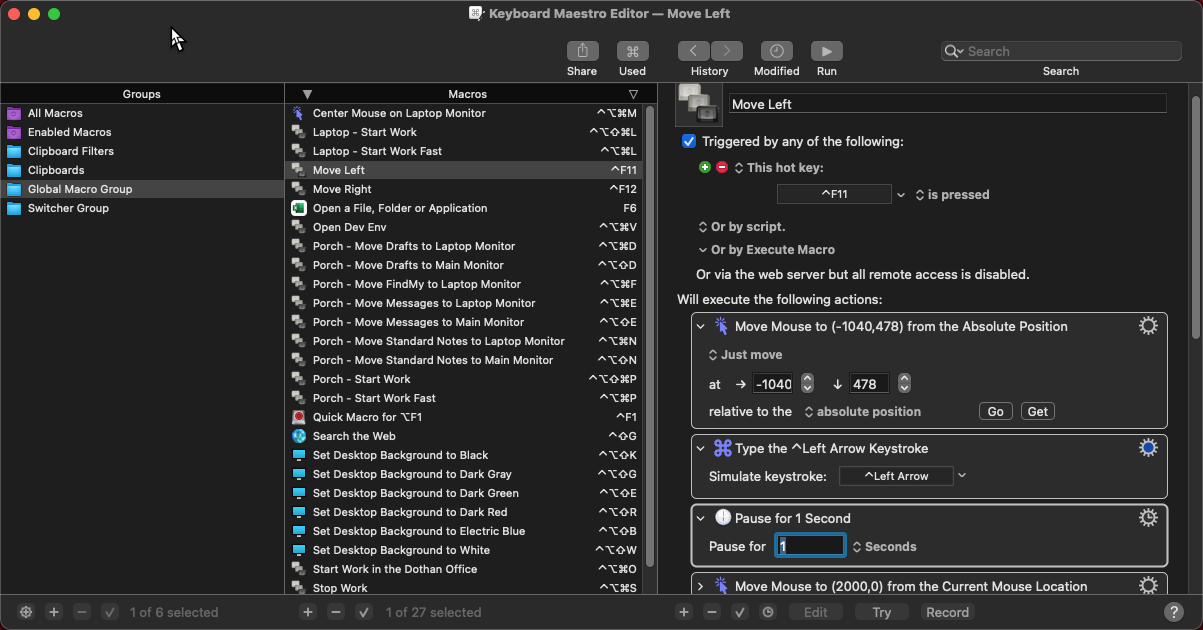
Changing the desktop space requires a few steps, as you’ll see in the image below.
In the first action I used Move or Click Mouse and changed it to Move Only, to relocate the mouse to an absolute position on my first monitor. I started with the leftmost monitor in my setup.
You can use the Get button found in the move mouse action to easily capture the coordinates. I just moved the mouse over to the middle of the monitor to grab the position.
Next, I have a Type a Keystroke action, and have it press CTRL+Right Arrow. I then have a Pause action, to make the macro wait one second before proceeding.
I found without the pause, my Mac was running so fast it didn’t have time to figure out where the cursor was before processing the CTRL+Right Arrow keystroke, so it wasn’t always changing the correct monitors desktop space. Adding the Pause fixed this.
For the second monitor I have another Mouse Move (but no click) that just moves the cursor 2000 pixels over from the last mouse position, which was on monitor 1. This is enough to move the mouse over to monitor 2.
I then have another keystroke action to press CTRL+Right Arrow, then another pause. I repeat these steps for the remaining monitors.
I suppose I could have positioned the mouse in an absolute position for all my monitors, but to me this will make the macro easier to reuse in other setups.

At the very end I added a final Mouse Move action to reposition the mouse over the center of my primary monitor. This way I’ll know where it is each time and won’t have to hunt it down.
I tied this macro to CTRL+F12. Now I can move the spaces for all my monitors one screen to the right with one key press.
Moving Left
To move everything back to the left, I duplicated the macro. Then I simply changed all of the keystroke actions to press CTRL+Left Arrow. Finally I bound the macro to CTRL+F11.
Disabling Changing On Some Spaces
If you are familiar with Keyboard Maestro, you may have noticed three actions toward the bottom that are disabled. Originally I had all three external monitors, plus the internal monitor on my MacBook, changing together.
As my MacBook tends to sit off to the side, I primarily use the internal monitor to hold the Apple Messages app in case my wife (aka she-who-must-be-obeyed) sends me a text. It lets me notice and respond quickly.
I also leave the Apple Home app on this monitor so I can turn the lights and fans in my house on and off easily. When I play music the Apple Music app sits here too. I opted to disable desktop space changing on this monitor, although I left the actions in the macro but disabled in case I should ever want to turn them back on.
It also serves as an example that you can opt to change some, but not all, desktop spaces at the same time.
Don’t Go Too Fast
Be aware you need to give Keyboard Maestro time to process the macro. You cannot rapidly press CTRL+F12 CTRL+F12 CTRL+F12… quickly and have the macro work right.
It’s best to press the activation keystroke (CTRL+F12 in my case), let go of the keyboard until all the spaces have changed, then press it again.
Even with that slight limitation, it is still far faster than having to move your mouse to each monitor and use the built in CTRL+Left/Right arrow keystrokes.
Also be aware I chose CTRL+F12 and CTRL+F11 for my activation keystrokes. You are free to pick any key combination that is not currently in use on your Mac.
Conclusion
I hope you’ll find this Keyboard Maestro macro as useful as I do. If so, please share this post with your friends, family, and anyone else who uses an Apple Mac product.
Disclaimer, this was in no way a paid advertisement for Keyboard Maestro. I received no compensation for doing this post. In fact I purchased Keyboard Maestro with my own hard earned money. I just think its a great tool and wanted to share this technique to change multiple desktop spaces simultaneously with you.
I record video training courses for Pluralsight, including several on the Apple MacOS platform. You’ll find a list of my courses with links on my About Me page.
If you don’t have a Pluralsight subscription, just go to my list of courses on Pluralsight . At the top is a Try For Free button you can use to get a free 10 day subscription to Pluralsight, with which you can watch my courses, or any other course on the site.
