Introduction
On my Apple MacOS, I prefer to use solid colors for my desktop backgrounds instead of pictures. There’s a few reasons for this.
First, and primarily, I record training videos for Pluralsight. Having a solid color for a background eliminates any visual distractions for the viewers.
Second, using a solid color provides a visual queue to which desktop space I’m working in. My previous post Moving Between Multiple MacOS Desktop Spaces With Keyboard Maestro, I documented how I like to have multiple spaces across my three external monitors. The first space for business apps, second for coding, and final space for video recording or other tasks.
I’ve noticed that when I first boot my MacBook, it doesn’t always restore the same colors I had when I shut down. One monitor might have a blue background, another might be dark gray. This happens often enough to be annoying, and something I want to easily correct.
There are also times when I’m working under different lighting conditions than normal, and a darker black background, or a very light gray may work better. Having the ability to change this easily was important to me.
If you read my last few posts, you saw how powerful Keyboard Maestro | @KeyboardMaestro is. So I turned to it and was happy to say I found a solution, although I admit it’s a bit of a workaround.
Before we get started, be aware Keyboard Maestro is a paid app. However it’s a one time purchase of only $36 (US). Well worth the investment for everything it does.
Additionally, this won’t be a step by step tutorial on how to use Keyboard Maestro. The Keyboard Maestro website, YouTube, and the internet have a plethora of those on the basic use of the Keyboard Maestro application. This post will focus on the solution I came up with.
OK, let’s go see how to add some color to our lives!
Setting The Background
Before you can proceed, you will first need a transparent PNG file. You can create your own, or grab one from the web. I found one at Wikimedia Commons. You can download the smallest size, then save it to your Documents folder (or some other common location, I went with Documents).
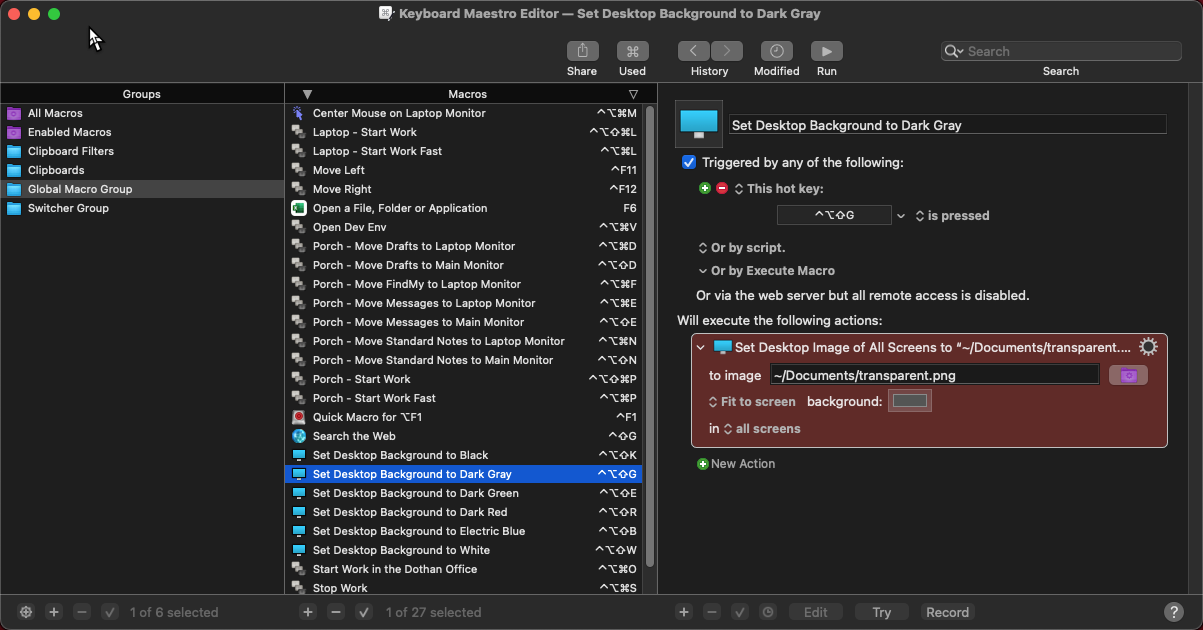
Next, start a new macro. I chose to bind this first one to Ctrl+Option+Shift+G, as I’ll be using it for a Gray background.
Next, add an action of Set Desktop Image. For the image file, select the transparent PNG file you created (or downloaded).
Set it to Fit to screen, then set the background to the color you want. In the image below, I chose a dark gray color.

Now you can repeat this, adding additional macros for each color you want to add. I have macros for dark gray, green, dark red, blue, and a light gray almost white in color. Normally I use dark gray for my "business" spaces, blue for my development spaces, and dark red or dark green for the third desktop space, depending on my mood. I can also change easily if lighting conditions would make a certain color easier to on my eyes.
As you can see, the workaround is to use a transparent image and set a background color. True, I could manually go set a background color each time directly through the MacOS Change Desktop Background interface, but that’s time consuming compared to a simple key combination.
Using with Pictures Too!
Here I chose a transparent image, but you could if you wished use this with normal pictures. When working from home, you may want a background of your family. At a company meeting, you may want to quickly change this to your company logo. If you are about to do some screen sharing, you may want just a solid background color, like I showed in this post.
Conclusion
This becomes a very handy tool for situations when, upon booting, MacOS doesn’t restore my colors correctly, or for changing them to meet my needs at the moment.
I hope you found this Keyboard Maestro macro to change your desktop background colors as useful as I do. If so, please share this post with your friends, family, and anyone else who uses an Apple Mac product.
Disclaimer, this was in no way a paid advertisement for Keyboard Maestro. I received no compensation for doing this post. In fact I purchased Keyboard Maestro with my own hard earned money. I just think its a great tool and wanted to share this technique to change multiple desktop spaces simultaneously with you.
I record video training courses for Pluralsight, including several on the Apple MacOS platform. You’ll find a list of my courses with links on my About Me page.
If you don’t have a Pluralsight subscription, just go to my list of courses on Pluralsight . At the top is a Try For Free button you can use to get a free 10 day subscription to Pluralsight, with which you can watch my courses, or any other course on the site.
