What is My COM Port?

Introduction

I’m a ham radio operator, and I recently gave a presentation to my local club on how to program your radio using software. To do this, we need to connect our radios using a USB cable.

Most of the radios use a concept called a VCP or Virtual COM Port. You install the VCP driver, then can connect your USB cable to your computer, plug the other end into the radio, and launch the software.

The software will want to know, what is the COM port number you are using. I have a variety of radios, and it seems each cable wants to use a different COM port, and every so often the cable will wind up using a different COM port than it did last time.

So how do you find out your COM port? Well it’s pretty easy if you know where to look.

Finding Your COM Port

The best place to find this is in the Windows Device Manager. Click on the magnifying glass next to the Start menu icon.

I have my Windows toolbar set to hide the search entry box, but some systems will have a text box right next to the search. Which ever way yours is configured, start to type “device manager” into the search.

You should see a pop up like you do in the image above when it finds the Device Manager application. Just click on it to run it.

Scroll down in Device Manager until you find the entry for “Ports (COM & LPT)“. Click the arrow beside it in order to expand the list, and you should now see the COM port for your cable, in this case COM10.

Note that your cable will need to be plugged in for the entry to appear.

Conclusion

There you go, I told you it was easy, the trick is knowing where to look.

While I did write this with my fellow amateur radio operators in mind, there are all kinds of devices that need to use a COM port to access them from your PC. Using this quick guide you can easily find where to look to get the right COM port number for your situation.

Advertisement

Having Multiple Entries for the Same PC in Microsoft Remote Desktop Application on Apple macOS

Introduction

In a previous blog post, Using the Microsoft Remote Desktop Application on Apple macOS, I showed how easy it was to remote control a Windows computer from your Mac.

One question I get asked is “Can I have multiple entries for the same computer?” The answer is yes!

This, of course, leads to another question, “Why would you want to?”

Reasons for Multiple Entries

There are a number of valid reasons for wanting multiple entries in Remote Desktop to the same computer. Let’s cover a couple by using examples.

First, let’s say you have a Windows 10 computer in the family room where your child plays games and does school work. Wisely you have setup their account as a “standard user”.

You have an account as well, as an administrator, to handle administrative tasks such as installing software, making sure updates are being processed and the like.

You could setup entries in Microsoft Remote Desktop, one for each user that logs into the computer. This allows you to have one entry to login as yourself, and a second to login using your offspring’s ID.

Now when your child comes to ask you to install the latest updates to Minecraft on the family computer, you can simply remote to it from your Mac using their ID, and install the updates providing your admin user ID and password. You’ll also have the entry to login as yourself, so you can apply updates and do maintenance.

For the second reason, you may wish to access your remote PC with different sets of option. In the blog post I mentioned earlier, I set it up to use all the monitors on my Mac.

Every so often though, I want to have my remote Windows computer running in a window. This allows me to see something on my remote machine, while still having my macOS desktop available.

One example, in my previous post I showed how to configure Windows to allow for remote access. I did so by having the Windows machine in a window on my Mac on one monitor, while creating the post in Safari on my macBook on a second monitor. This let me have them side by side, making it easy to create the instructions.

Rather than having to change the settings each time, I have two entries for my main Windows computer. The first, which you saw created in the first blog post in this series, opens the Windows machine using all monitors. The second opens it up in just a window.

Those are just two reasons, I’m sure you’ll be able to come up with many more.

Adding a Second Entry for the Windows PC

First, I’m going to assume you’ve already read my first article, Using the Microsoft Remote Desktop Application on Apple macOS. If you haven’t, please take a moment now to do so.

With Microsoft Remote Desktop open on your Mac, click the + button at the top, then pick Add PC in the drop down.

Note that for security reasons, in the screen shots I’ve replaced with the actual name of my computer with <name>.

Start with the name of the computer in the PC name, and pick the user account to login in as, or leave it as “Ask when required“.

Now we want to use the Friendly name to indicate not just the computer name, but also how this is used. For this example I’m going to have my remote machine display in a window, so I’ve entered <name> in a Window.

Next we’ll need to configure it to show up in a window, so click on the Display tab.

Here I will uncheck the default of Start session in a full screen, then check on Fit session to window.

Then, at the bottom I checked on Update the session resolution on resize. This way when I resize the window on my Mac, it will resize the computer I’m remoting into so the desktop will fit the window.

You can change the Devices & Audio and Folders if you wish. Since I’ve already covered those in the first article I’ll just click on the Add button.

Update the Existing Connection

Before we open the new connection, we should update the friendly name of the existing one to make it clear what the difference is. To do so, click on the pencil icon in the upper right of the connection created in the first article.

Go to the Friendly name field, and enter the name of the computer followed by (for this situation) All Monitors, then click Save.

Below you can see it now reads <name> All Monitors, and beside it the new entry we just added for <name> in a Window.

It’s now very easy to tell the difference in the two connections.

Launching the New Connection

Let’s now launch the new connection by double clicking on it.

Here you can see a new window appears on my Mac, showing my Windows desktop. (Note that you can see a bigger version of any of the images in my blog posts by double clicking on it).

You can see the window with the full Windows 10 desktop, including the Windows task bar. You can also see the macOS toolbar across the bottom, as well as the Mac menu bar at the top.

You can also resize the window. If you checked the Update the session resolution on resize option, the resizing the window will also resize the Windows desktop as you see below.

You can see my Windows 10 desktop now fits nicely into my resized window.

Please note you can only have one connection to a computer active at a time. If I am in the windowed version of my connection, then go back to the Microsoft Remote Desktop connection window and double click on the <name> All Monitors, it will disconnect the <name> in a Window session then launch the all monitors version.

Any time you launch a connection, it will disconnect any existing connection, if there is one, in favor of the newly launched one.

Conclusion

In this article we showed how to create multiple connections to the same computer in the Microsoft Remote Desktop application on macOS. This works with Big Sur as well as previous versions of macOS.

We also covered various reasons why you might wish to create multiple connections within Remote Desktop.

Armed with this information you can now create multiple connections to the same computer to fit the ways in which you want to use the remote computer.

Supressing “The certificate Couldn’t Be Verified” message Using the Microsoft Remote Desktop Application on Apple macOS

Introduction

In my previous blog post, Using the Microsoft Remote Desktop Application on Apple MacOS, I showed how easy it is to connect to one of your Windows computers from your Mac.

I frequently use the Microsoft Remote Desktop application on my Apple MacBook Pro to connect to one of my Windows computers. It presents a nice interface that’s easy to use and setup.

Once you’ve added your computer to the Microsoft Remote Desktop application (you’ll find the instructions in my previous post), all you have to do is double click on it to access your remote computer.

Here is the launching point, note that for security reasons in all of the images in this article I’ve blurred out the name of my computer and replaced it with <name>.

There is one irritating behavior. When connecting to a computer it frequently displays the following message: “You are connecting to the RDP host <name>. The certificate couldn’t be verified back to a root certificate. Your connection may not be secure. Do you want to continue?

Having to stop every time and click Continue is really annoying. Especially if you are on your home network, connecting to a computer you own and trust. There’s an easy fix though!

Suppressing the Warning Message

Simply click the Show Certificate button to display the certificate information.

Once you review, simply put a check mark in the “Always trust...” checkbox (pointed to by the arrow) then click Continue.

Since you are changing the trust certificates for your MacBook (or other Apple Mac computer, like the Mac Mini), macOS will prompt you to enter your admin password. Do so, then continue.

From here on out, all you need to do to connect to your remote computer is double click on it, and (if you’ve not saved it within the remote desktop program) enter your credentials. No more having to click to continue past the “certificate couldn’t be verified” message.

Conclusion

I’ll wrap this up with two quick notes. First, this works on the last several versions of macOS including Big Sur.

Second, while I’ve used Windows as the example, this will work with any OS (such as various Linux distros) that support RDP (Remote Desktop Protocol). Sadly, macOS does not support RDP so you cannot connect to another Mac from the Microsoft Remote Desktop application.

Using the Microsoft Remote Desktop Application on Apple macOS

Introduction

I use many computers in my daily life, including Windows, Apple Mac’s, and Linux computers running a variety of distros. It’s very convenient for me to be able to remote into another computer from whichever computer I happen to be on.

On my MacBook (although this would work on any Apple machine running macOS, such as a Mac Mini), the Microsoft Remote Desktop application is a fantastic program for remoting to another computer.

While primarily designed for accessing a Windows machine, it will work with most computers that support the RDP (Remote Desktop Protocol) such as many Linux distros.

Note that it will not let you connect to another Apple Mac, as macOS does not support the Remote Desktop Protocol. You can go from a Mac to Windows (or some Linux) computers using the Remote Desktop application, but not to another Mac.

Microsoft Remote Desktop is free, and in the Apple App Store. Just do a search for Microsoft Remote Desktop, get and install it. But don’t open it quite yet, as we have to configure the computer you are going to connect to.

Configure Your Windows Computer

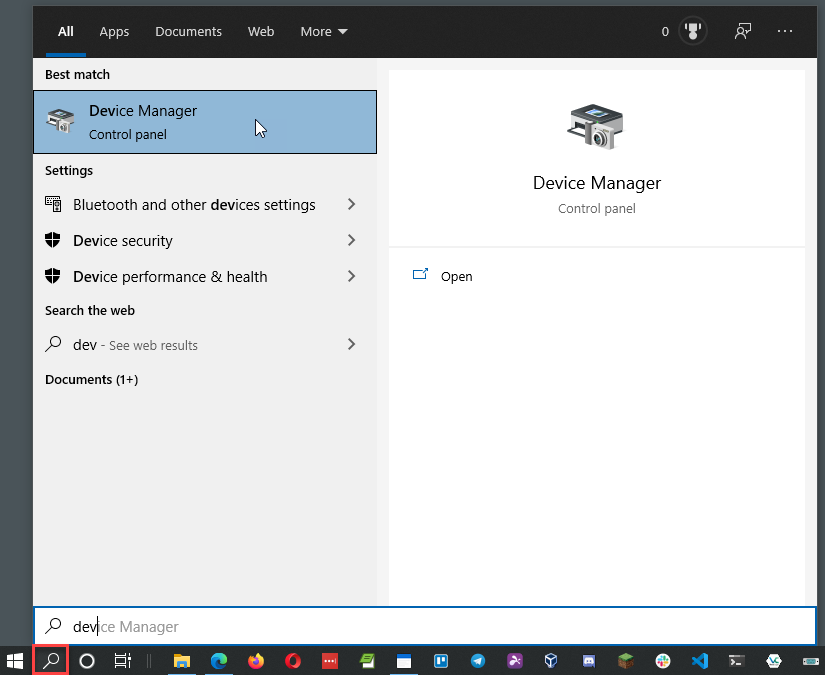
I’m going to assume you are connecting to a Windows 10 Pro computer. Click on the Start button, the pick Settings. In the Windows Settings, pick System.

On the System page, scroll down in the menu on the left and click on Remote Desktop. (You can click on the image below, or any of the ones in this article, to see them in their full resolution).

You’ll first need to toggle on the Enable Remote Desktop setting, as I’ve done here.

Next, look under “How to connect to this PC”. This has the name you need to enter into the Microsoft Remote Desktop app. In this image it shows <name>, but for you it will show the name of the computer. Note that for security reasons, I’ve replaced the actual name of my computers with simply <name> in the screen captures.

Finally, at the bottom look at the User accounts section. By default, if you are an administer on the computer, you are automatically able to remote to the computer.

If you want a standard user, in other words a non-admin user, to be able to remote in you’ll need to add them using the “Select users that can remotely access this PC” link.

At this point you’ve now setup your Windows computer to be remoted into. Note you only have to do this once on this computer, after that it can be remoted to from other computers.

Adding a PC to Microsoft Remote Desktop on your Mac

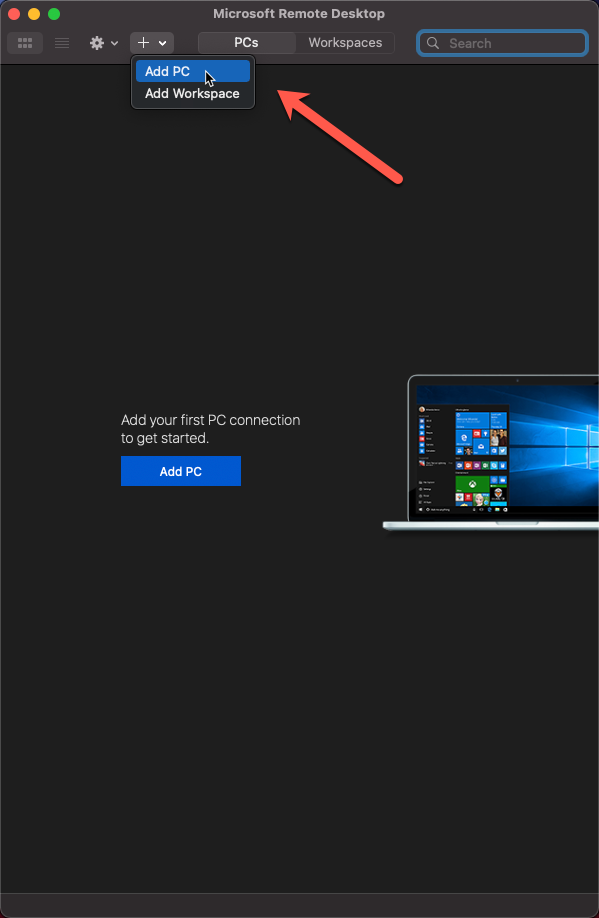
Now return to your Mac. Assuming you’ve installed the Microsoft Remote Desktop application, open it.

The first time in, you’ll see the big “Add PC” button right in the middle. After you’ve added the first machine, using the instructions here, you can add more computers using the plus button (pointed at by the big red arrow) and pick “Add PC” in the menu.

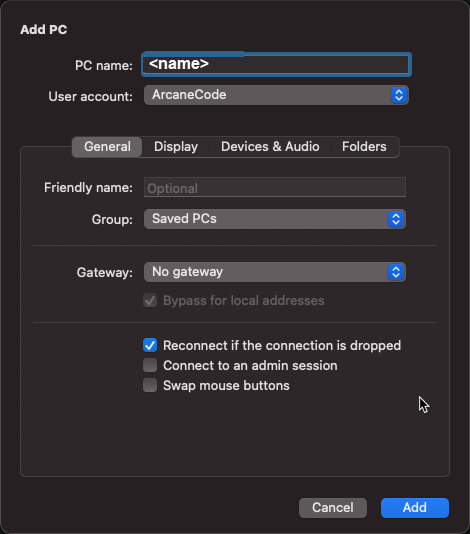
You’ll then be shown the Add PC window. Start by entering the name of the computer you want to connect to.

After entering the computers name, you’ll see the User account line, which by default is set to Ask when required. In this mode you will be prompted for your login credentials every time.

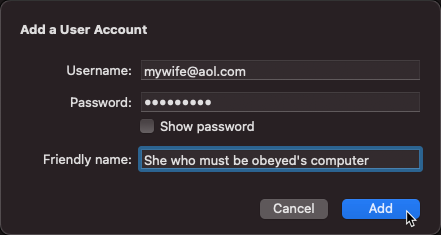
As an alternative, you can save your credentials by picking Add User Account… in the User account drop down. You’ll then be prompted for your Username and Password. You can also create a “friendly name” for the account.

For example, if you were setting up a connection to your wife’s computer, you’d have to give her full user name, perhaps it’s her e-mail address. In the friendly name could just enter “She who must be obeyed’s computer”.

One nice thing Microsoft Remote Desktop does is save your credentials. Then when you add more computers that use these same credentials you can just pick it from the User account drop down and not have to recreate them every time. This is especially nice for when you use your same Microsoft credential to login to multiple Windows computer.

Once you add the user account, or leave it at the default to ask each time, you’re ready to look at some of the options in Remote Desktop. It’s worth your time to understand these, as it will affect your experience when working with remote computers.

Friendly name can be helpful if the computer has a cryptic name. Often when a PC is purchased the default name is something like WINRPXM457JB. Most home users don’t realize they can rename their computer and leave it at the default. Using the friendly name you can enter “She who must be obeyed’s computer” and know what machine it is.

I find this even more helpful in work environments where they use naming conventions like “HR-PC-001”, “HR-PC-002”, etc. You could instead use meaningful names like “Anna’s computer”, “Jack’s computer”, or “The nice lady who brings us donuts computer”.

If you have a lot of computers you connect to, you may want to group them. By default, there’s one group “Saved PCs”. You may want to create groups such as “My computers”, “Wife’s computers”, “Kid’s computers” and so on. This is totally optional, but the more computers you need to work with the more useful it will become.

The Gateway option is used in corporate environments that have setup Remote Desktop Gateway servers. Since this article is geared toward home users, it shouldn’t affect you. If you are in a corporate environment and need to remote in, your friendly neighborhood system administrator will be able to tell you if you need a gateway, and if so what do you need to enter here.

The other options are pretty straight forward, so let’s click on the Display tab.

Display Options

Here you have some choices on how the remote machine is displayed on your Mac. One notable one is “Use all monitors“. If your Mac has multiple monitors connected to it, you may want to have the remote computer displayed on all of them. To do so, check this box. If you do some of the other options become disabled.

Alternatively, you may want the remote computer only on one monitor so you can still access your Apple computer on the other monitors. Leaving this unchecked allows this.

If you don’t select Use all monitors, you then have the choice to start the remote session in full screen, or show it in a window.

Next up are quality settings, such as the color depth or optimizing for Retina displays. Note that the higher settings you pick, the more bandwidth and processing power it will take.

In my selection, shown above, I chose to use all monitors at a high quality. Make your own selections then click on the Devices & Audio tab.

Devices & Audio Options

This tab controls what gets shared between the host computer, your Mac, and the remote computer (typically a Windows computer).

If, for example, you started a video playing on your remote computer, the “Play sound” option controls where you hear the audio. The default, On this computer simply means the Mac running Microsoft Remote Desktop.

I generally go with the default options, shown here, then go to the Folders tab.

Folder Options

Using the folders tab, you gain the ability to transfer files between your Mac and the computer you are remote controlling.

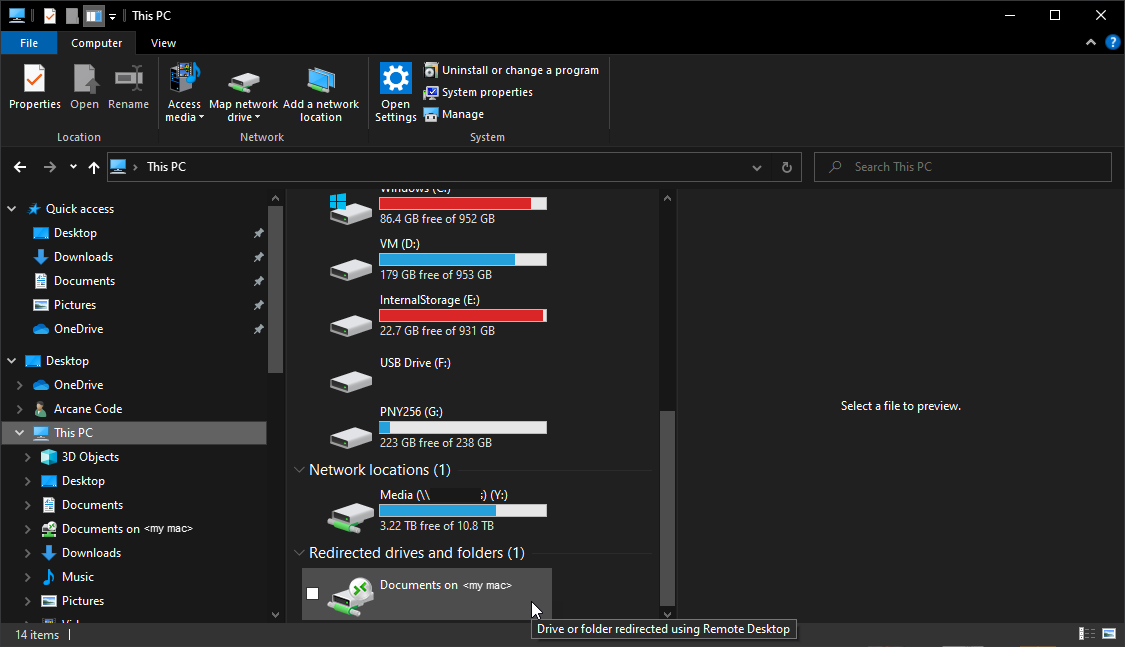
Start by checking the “Redirect folders” option. Then in the lower left click the + button. In the dialog that pops up, select one of the folders on your Mac. After you’ve connected to your remote computer, this will show up as a folder in your remote computer. Here’s what it looks like on Windows, after you have remoted in.

You’ll see the name of the folder you picked, in this example the Documents folder, the text on my, then the name of your Mac, in this case represented by <my mac>.

From here you can double click to open the Mac’s folder in File Explorer, and begin copying files back and forth. Do note there is a “Read Only” checkbox in the Add PC dialog’s folder options. If you check it, on the Windows computer you connect to will be able to read and copy files from the Mac, but will not be able to copy files to the Mac.

Using redirect folders is optional, and only needed if you wish to move files between the two computers. To be honest, I seldom use this option as I’m a heavy user of Microsoft OneDrive.

If I need something, I simply save it into my OneDrive on the remote computer, then I can open it in my OneDrive folder on my Mac, and vice versa. If you aren’t a user of OneDrive or a similar service then this will be a useful tool for you, should you need to share files.

OK, you’re all done, just click the Add button. This computer will now be added to your Microsoft Remote Desktop window.

Connect To a Remote PC

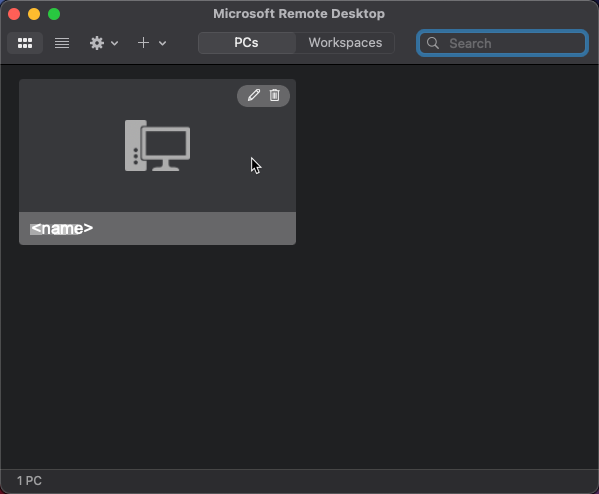
You can connect by simply double clicking on the block with the computer’s name (in this example represented by <name>).

Note the two icons in the upper right of the computer box. The pencil icon can be used to edit the settings we just saw. The trashcan can be used to remove this computer from your remote desktop application.

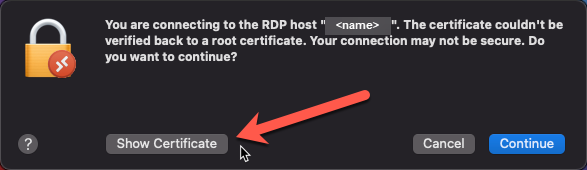
When you double click on the computer, you may be shown a message “You are connecting to the RDP host <name>. The certificate couldn’t be verified back to a root certificate. Your connection may not be secure. Do you want to continue?

If you are connecting to your own computer, that you trust, likely on your home network, then you can click the Continue button. In a future post we’ll show you how to resolve this so it will skip this dialog.

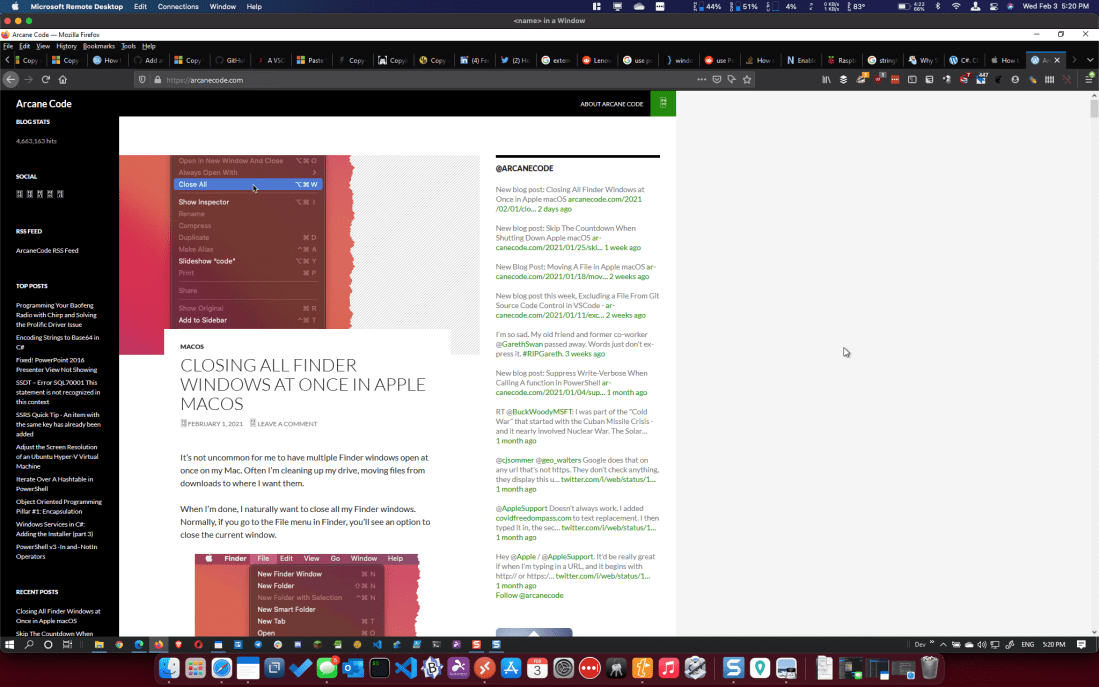
Once you have connected, you’ll see the remote computer, probably full screen (unless you changed the property back in the Display options).

Exiting a Remote Desktop Session

I will say, it’s not at all intuitive how to switch back to your Apple macOS desktop, or how to exit a remote desktop session once you are in it. Since I’ve shown you how to get into a remote desktop session, I should take a moment and show you how to get out of it.

To switch back to your macOS machine, simply use the CTRL key, plus the left arrow to swap to the previous desktop. Using CTRL plus right arrow will go back to the Remote Desktop session.

If you are using the virtual desktops feature in macOS, you can use CTRL and the left or right arrows to move past the remote desktop session to other macOS virtual desktops, then go back to the remote desktop.

To exit a remote desktop session, while you are looking at your remote computer simply drag your cursor to the very top of the screen and let it sit there a few seconds.

The Apple menu bar will pop up. You can then use the Window menu, and click Close. Alternatively you can click the Red X button in the Remote Desktop window to close the session.

Also note it’s possible to connect to multiple computers at the same time. You can use either the CTRL and left/right arrow to swap between them, or in the Window menu pick a different remote desktop to connect to.

Network Connectivity

Please note that both the Apple Mac and the computer you are remoting to must be on the same network. Typically this will be your home network, or perhaps a work network.

By default, Remote Desktop won’t work if, for example, you go to a coffee shop with your Mac and your Windows computer is still at home.

It is possible to work around this by setting up a VPN connection back to your home network. Setting that up, however, is beyond the scope of this already long blog post.

Summary

In this post, you saw how to install and configure Microsoft Remote Desktop on Apple’s macOS and connect to a Windows Computer. The screen captures were from macOS Big Sur and Windows 10, but I’ve also tested it with Catalina and Mojave.

Opening Port 80 in Windows Firewall to Support Calling SSRS From Another Computer

Recently I was working on another article for RedGate’s SimpleTalk site. As part of it, I had SSRS installed on a Windows 10 computer, and needed to connect to it from another computer. I was having a lot of issues connecting, until I remembered SSRS connects using Port 80, and by default Windows 10 (and previous versions) block Port 80 for incoming traffic.

The solution was to, obviously, open Port 80 on the Windows 10 computer. Doing so was not difficult, but did require quite a few steps, and of course administrator rights on the computer.

First, open the Windows 10 Settings. Then, click on Network & Internet.

image

On the Status window, click on Windows Firewall.

image

From here, click on Advanced settings.

image

If prompted confirm you do wish to make changes. When the Windows Defender Firewall dialog appears, click on Inbound Rules.

SNAGHTMLef395d1

Now click on New Rule

image

In the New Inbound Rule Wizard window, change the type of rule to be Port. Then click next.

image

On the next window, leave the rule applying to the default of TCP. For the port, assuming you are using the default setup, enter 80 for the port number. If you setup SSRS on a different port then obviously use that port number instead.

image

On the action page we tell Windows what we want to do if it finds incoming traffic on this port. For this development environment we will take the default of Allow the connection. If you had setup https service on your report server, then you could take the second option of allow if secure.

image

Next, we need to specify what network type the rule should apply to. For the scenario, I am on a small network, such as you might have at home, and that network was setup as private. Thus I am leaving Private checked on, and unchecking Domain and Public.

Unchecking public is especially important if you plan to take your laptop out to a coffee shop, you don’t want someone trying to hack into your machine via port 80. When done just click next.

image

On the last screen we’ll give the firewall rule a name, and a description. When done, click finish.

image

As you can see, the new rule now appears in our Inbound Rules area.

SNAGHTMLf01e748

Once you have completed working with your SSRS server, I’d suggest you return here, right click on the rule, and either disable it, or if you know it will no longer be needed, delete it.

And with that you should now be able to connect to the computer running SSRS from another computer on your network.

Windows 10 Icons Not Showing, Preview Not Working

I had a weird issue with Windows 10 today. All of a sudden, my icons weren’t displaying correctly. When I had the Preview Pane on, nothing was displayed. Even more bizarre, The Layout area of the View pane in Windows Explorer, had all the icons disabled.

Turned out I had a corrupted icon cache. To fix this for yourself, first open up a copy of Windows Explorer (or My Computer or whatever you wish to call it).

Go to the View tab, and make sure the Hidden Items is checked on.

SNAGHTML17f6c4

Now navigate to C:\Users\(User Name)\AppData\Local, where of course (User Name) is replaced with your user name.

Find the file IconCache.db, right click and delete it. Yes, that’s right, delete it. It’s OK, it won’t hurt.

To be really thorough, you could now head to the Recycle Bin, and clean it out, or at least open the Recycle Bin and remove the IconCache.db file. However you could skip this step if your the nervous type.

OK, that done, restart your computer.

When you return to the folder, such as your Pictures folder, Windows will start rebuilding the icon cache automatically, and you should now see your icons working again, and the preview pane should also now be functional.

Standard disclaimer, no warranty or guarantees provided, this is what worked to me (and to be honest I’m making it a blog post to remind me should it happen again). This may or may not work for you, but as the icon cache will automatically build itself it’s pretty safe to try.  Good luck!