Introduction
With this post I’ll continue my series on useful tools and utilities. In this post I’ll talk about an outstanding application called Standard Notes. You can find and download Standard Notes from its website, https://standardnotes.org/.
Now, I know what you are thinking, “Yet another note taking app? What makes this so special?”
Well as it turns out a lot. Let me start by covering some of its special characteristics, then we’ll get a short overview on how to use it.
Multi Platform
As I stated in my previous post on Microsoft To Do, I have a strong preference for apps that work across multiple platforms. Standard Notes has apps for Windows, macOS, and almost every Linux Distro. In addition, it also has mobile apps for Android as well as iOS, both phone and tablet.
In addition, you can also login to the Standard Notes with your web browser and access your notes that way. Handy for when you are using a computer or device that you can’t or don’t want to install the Standard Notes application on.
The notes you enter are synced across all of your devices, much like Microsoft To Do. Enter a note on your Mac, and it will be there on your Android device, or any combination of the platforms I just mentioned.
Open Source
Standard Notes is an open source project. All of the source code is available for you to inspect, and even contribute to.
The syncing ability is handled by Standard Notes using their sync server software. The Standard Notes sync server is also an open source project that you can download. As such you can stand up your own private sync server and use it to sync all of your notes. Very useful if you are super concerned about security, or want to stand up your own Standard Notes server for your companies private use.
This also has some very positive implications to the longevity of Standard Notes. Let’s say the owners of Standard Notes win a bazillion dollars in the lottery. They hang up a “going out of business” sign on their website and head off to a remote island in the Bahamas for an early retirement.
You (or your company) could download the server project and spin up your own sync server. You can restore your backup to the new server, make an adjustment in the app to point to your private sync server and you are back in business. This capability should make any business more confident in adopting Standard Notes.
I mentioned backups, by default Standard Notes will perform an automated backup on a regular basis. You can (and should!) also do a periodic manual backup via the Account menu.
Encrypted Notes
Speaking of security, the biggest benefit to Standard Notes is encryption. It uses industry standard encryption, not something they made up themselves.
All of your note data is encrypted on your device. It is then sent to the sync server over an encrypted connection. As Standard Notes doesn’t have your password they have no way to decrypt the data. Even if someone got access to their servers, all the data will be gibberish.
They do make it clear, if you forget your password, they have no way of helping you. You need to make sure to store your password in a safe place like your password vault.
Freemium Model
Standard Notes uses what is known as a “freemium” model. The base application is free. You can take an unlimited number of notes, and these will be synced for you.
In the free model, you are restricted to text only notes. In addition, you are stuck with the basic color scheme of a white or gray background with black text.
With the paid model, you gain access to different color themes. It also enables you to use the rich set of extensions Standard Notes offers. Most of these extensions are around various editors. One is a code editor, that gives syntax highlighting for a huge array of languages.
There is another editor which gives you a “Word” like environment to do bold, italic, and the like. There is also a MarkDown editor if you prefer to edit and save MarkDown data.
Another editor I use a lot is the checklist. It lets you create check lists, and once you mark an item complete it moves to the bottom under completed tasks. This can be useful when the contents of your checklist are sensitive and need to be kept extra secure.
The premium model is done with subscriptions of 1, 3, and 5 years. The 5 year model works out to less than $3 (US) a month (at the time of this writing), which is very reasonable and funds their sync servers and development.
Setting Up Standard Notes
The Standard Notes website has instructions for downloading and installing it on the variety of platforms it supports, so I will refer you to it for your computer or device.
When you open Standard Notes the first time, it will open up with the Account pane. Note that for all the images in this post you can click on it to open up a bigger version.

You’ll need to start by clicking the Register button to create an account. When you do, it will prompt you for an email address and password. It will then send you an email just to confirm you are a real person.

Note the big No Password Reset box, warning you that if you lose your password, there is nothing the Standard Notes group can do to help you. I highly advise the use of a password manager, such as LastPass, which will be the subject of a future blog post.
Also note that the combination of your email and password is used to generate your security encryption keys. This means your email address will be case sensitive.
YourName@email.com, yourname@email.com, and YOURNAME@EMAIL.COM are all different. When you login to your other devices, you must key in both your email address and password in exactly the same case you use to create your account.
Using Standard Notes
Here is the Standard Notes app with some sample notes I’ve created.

The left side panel is the Views panel. You can organize your notes into groups called Tags in Standard Notes. You can enter any text you want for a tag name.
Additionally a note can have multiple tags associated with it. This will let the same note appear in multiple tag views.
The center column is the list of notes. If you click on a tag, the list of notes is filtered to show just the ones with that tag. In addition to the name of the note, it also has the first few words of the note and the last date the note was modified on (although you can change this in the settings).
In the example above, I have a note called “Harbor Freight Shopping List”. Under the title of the note I have two tags, Ham (referring to my Ham Radio hobby) and Lists. I could click in this area to type in the name of another tag if I wish.
In this next example, I’ve clicked on the Household tag in the Views pane.

As you can see, my list of notes is now reduced to just two, the ones who have the tag Household assigned to them.
Uses for Standard Notes
The uses for Standard Notes are only limited by your imagination. Because your notes are encrypted, you could use it to store information like phone numbers, vehicle VIN numbers, even passwords (although I’d suggest a more robust password manager of some type, such as LastPass).
It could also be used to store all kinds of tips and tricks. Items that don’t necessarily need to be encrypted, but you’d like to store and have handy in the future.
Anytime I have to do a search to figure out how to do something, I make a note so I can refer back to it in the future.
Premium Benefits
As a big fan of Standard Notes, I have purchased the premium subscription. I first did a one year subscription to see if I liked it, but got hooked so when it was time to renew I went with the five year subscription and haven’t regretted it.
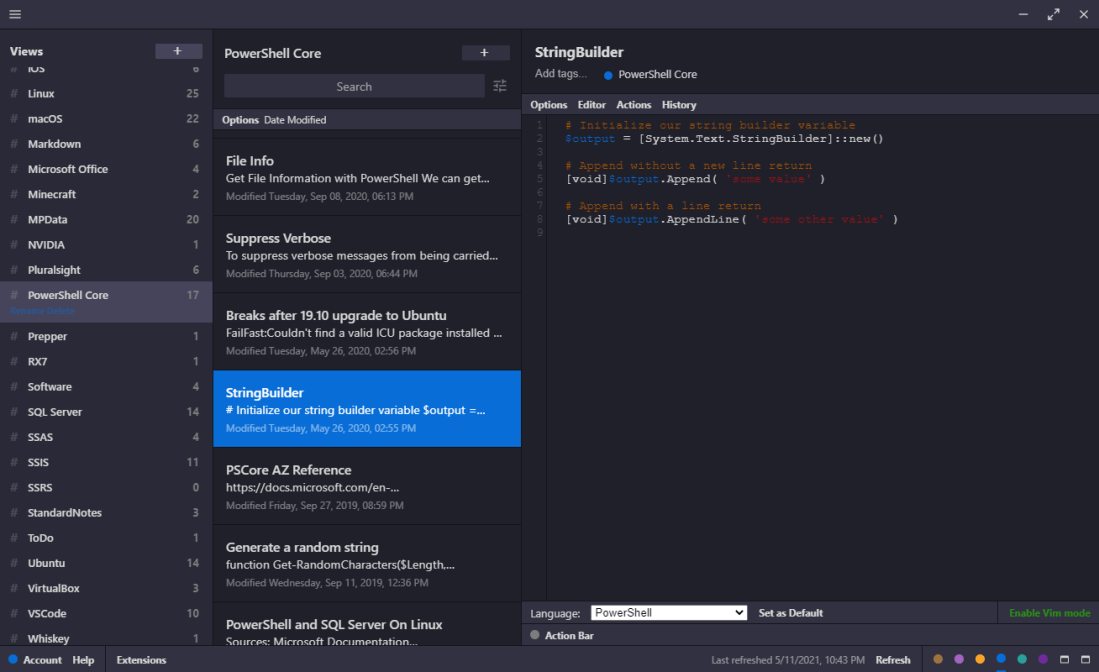
Here you can see my Standard Notes paid subscription with one of the color themes applied.

As you can see from my list of tags on the left, I have a LOT of notes in Standard Notes. Here you can see a PowerShell script to remind me how to use the StringBuilder in PowerShell. I’m using the code editor, and have selected the PowerShell language.
This is just one of the many languages available, pretty much every programming language is included.
I also use Standard Notes for check lists, regular notes, and more.
In addition to the editors, the extensions also provide for various color themes, plus a selection of enhancements to Standard Notes. One developers may find useful is the GitHub Push extension, allowing you to push a note up to GitHub.
Want an extension but don’t see it? The Standard Notes site on GitHub has instructions for authoring your own extensions. This is also where you can access the source code for Standard Notes, the Standard Notes server, and more. You can also log issues, make suggestions for improvements and new features, and check for solutions to past issues.
Also note that your premium subscription unlocks the premium features on all of your devices. There is no limit to the number of devices or computers you can have Standard Notes (even with your premium subscription) running on.
Passcode Lock
Another useful feature is the Passcode Lock. This is similar to the pin login feature of Windows 10. You can turn on Passcode Lock in the Account menu area.
When you launch Standard Notes it will prompt you for the Passcode Lock. The lock can be any combination of letters, numbers, and special characters you want. I use a long complex gibberish password for my Standard Notes account, but use a little easier to remember and type Passcode Lock.
I consider this a “nosy person” feature. It keeps a nosy family member or coworker from walking up to your computer while you are getting coffee and snooping at what’s in your Standard Notes.
In addition, you can set an Autolock timer. After a certain amount of time Standard Notes will lock itself. By default Autolock is set to Off.
It also has an Immediate setting, which locks Standard Notes the minute you click away from it. There are also timers for 1 minute, 5 minutes, and 1 hour.
You can also remove the Passcode Lock when you decide you no longer need it.
On iOS, you can also lock Standard Notes using either Face ID or the Fingerprint reader. I would imagine Android tablets/phones that support biometric security also have this feature, but my Android tablet lacks biometric security so I’m unable to test this.
Other Notable Features
I just wanted to mention a few other useful features.
You have the ability to sort the list of notes in a variety of ways. By default it uses most recent at the top, but you can also sort alphabetically. You can also reverse the sort so oldest is first, or titles are sorted Z to A.
You can also Pin notes so they will always appear at the top of the note list, regardless of what sort order you select. In addition to pinning, a note can be Locked, which puts it into a read only state.
You can also get rid of a note by selecting Move to Trash, then go to the trash can and choose to delete all notes in the trash can or just individual ones.
The final feature I’ll mention is the ability to Archive a note. Let’s say you have a note on how to do something in Ubuntu 16.04. It’s highly unlikely you’ll need to use this on a normal basis, and don’t want to see it cluttering up your list.
However, the information is valuable, and on the off chance you may need it you really don’t want to trash it. This is where the Archive feature comes in. In any note, simply pick Archive in its Options menu. The note will no longer appear in the list view or searches.
You can easily bring it back though. First, in the list view’s options menu you can turn on the appearance of Archived notes. Later you can use the same option to again suppress the appearance of Archived notes.
If you suddenly find that previously archived note is useful, you can pick the note, then in the note editors options menu just Unarchive it.
Standard Notes Version
The instructions in this post are valid at the time I wrote it, using Standard Notes version 3.6.9.
Standard Notes is under continual development, so depending on when you read this there may be some subtle differences between your version and the one I’m using for this post. The core concepts should remain constant though.
Standard Disclaimer
I just want to be clear this is in no way a paid for post. Nor do I receive any discount for talking about it. I paid my own money for it just like everyone else. I just love the tool and wanted to share it with others.
Conclusion
Give Standard Notes a try. You can do so for free, and I think once you do you will quickly find it an indispensable tool in your kit. It’s a tool I use literally every single day.