Fun With PowerShell – Showing Book Data at the Library of Congress with Start-Process

In my previous post, Fun With PowerShell – Opening Websites with Start-Process, I showed how to use the Start-Process cmdlet to open a website. This is part of my ongong ArcaneBooks Project, in which I created a new function to display the webpage for a book at the OpenLibrary website by using the ISBN.

I wanted to create a similar function to work with the Library of Congress website, and so let me present the Show-LCCNBookData function.

Show-LCCNBookData

The function I created, Show-LCCNBookData is almost identical to the Show-ISBNBookData function I covered in the previous post, so I won’t go into a lot of depth in this post.

As with the ISBN version, I made this an advanced function so users could pipe data into it.

function Show-LCCNBookData
{
  [CmdletBinding(HelpURI="https://github.com/arcanecode/ArcaneBooks/blob/1ebe781951f1a7fdf19bb6731487a74fa12ad08b/ArcaneBooks/Help/Get-ISBNBookData.md")]
  [alias("slccn")]
  param (
         [Parameter( Mandatory = $true,
                     ValueFromPipeline = $true,
                     HelpMessage = 'Please enter the LCCN (Library of Congress Control Number).'
                     )]
         [string] $LCCN
        )

Note I still need to update the help URL to the correct one, but the rest of the function opening is complete, with the sole parameter being the $LCCN.

Now we fall into the process block.

  process
  {
    foreach($number in $LCCN)
    {
      Write-Verbose "Beginning Show-LCCNBookData for $ISBN at $(Get-Date).ToString('yyyy-MM-dd hh:mm:ss tt')"

      $lccnCleaned = $LCCN.Replace('-', '').Replace(' ', '')
      $lccnPrefix = $lccnCleaned.Substring(0,2)
      $lccnPadded = $lccnCleaned.Substring(2).PadLeft(6, '0')

      # Now combine the reformatted LCCN and save it as a property
      $lccnFormatted ="$($lccnPrefix)$($lccnPadded)"

      $baseURL = "https://lccn.loc.gov/"

      $url = "$($baseURL)$($lccnFormatted)"

      Write-Verbose 'Opening the Book on Library of Congress Number'

      Start-Process $url

      Write-Verbose "Finished Getting Data for $($LCCN)"
    }

    Write-Verbose "Done opening the web pages at Library of Congress"

  }

When we fall into the process loop we first need to clean up the LCCN that was passed in. As was documented in my LCCN overview post the LCCN is the two digit year at front, then six digits. If the number of digits after the first two isn’t six in length we have to zero pad it to become six, which will make the entire LCCN string eight digits.

We then append the formatted LCCN to the base URL for the LOC website. Then we use the Start-Process cmdlet to open the webpage.

Calling Show-LCCNBookData

Calling the function is pretty easy, you can either pass in a Library of Congress Control Number as a parameter or via the pipeline. All these examples should open the Library of Congress website, in your default browser, with the book associated with the LCCN you passed in.

# Pass in a single LCCN as a parameter
$LCCN = '54009698'
Show-LCCNBookData -LCCN $LCCN -Verbose

# Alias
$LCCN = '54009698'
slccn -LCCN $LCCN -Verbose

# Pipe in a single ISBN
$LCCN = '54-9698'
$LCCN | Show-LCCNBookData

.EXAMPLE
# Pipe in an array of LCCNs
$LCCNs = @( '54-9698'
          , '40-33904'
          , '41-3345'
          , '64-20875'
          , '74-75450'
          , '76-190590'
          , '71-120473'
          )
$LCCNs | Show-LCCNBookData -Verbose

In the final example we can actually pipe in an array of LCCNs, it should open up a page for each one.

Note the Library of Congress isn’t perfect, sometimes it will bring up a page with multiple items for the number passed in as it may have multiple entries. It’s still faster though than having to do manual searches on the LoC website.

See Also

You may find more helpful information at the links below.

ArcaneBooks Project at GitHub

ArcaneBooks Project Introduction

ArcaneBooks – Library of Congress Control Number (LCCN) – An Overview

Fun With PowerShell – Advanced Functions

Fun With PowerShell – Opening Websites with Start-Process

Fun With PowerShell – Strings

Fun With PowerShell – Write-Verbose

Conclusion

This post and the previous one demonstrates how easy it can be to create helper functions for your modules. My two show functions are designed to let users quickly bring up the webpage for the books they are working with.

If you like PowerShell, you might enjoy some of my Pluralsight courses. PowerShell 7 Quick Start for Developers on Linux, macOS and Windows is one of many PowerShell courses I have on Pluralsight. All of my courses are linked on my About Me page.

If you don’t have a Pluralsight subscription, just go to my list of courses on Pluralsight . At the top is a Try For Free button you can use to get a free 10 day subscription to Pluralsight, with which you can watch my courses, or any other course on the site.

Fun With PowerShell – Opening Websites with Start-Process

Introduction

As part of my ArcaneBooks Project I described how to use the OpenLibrary Simple API to get book data.

In that post I also showed a way to bring up the webpage for an ISBN. I had a thought, why not build a function to add to the module to do that? This way a user would have an easy way to compare the output of the web API call to what the site holds.

In this post I’ll describe how to use the Start-Process cmdlet to open a target webpage.

Show-ISBNBookData

I created a new advanced function and named it Show-ISBNBookData. Here is the opening of the function.

function Show-ISBNBookData
{
  [CmdletBinding(HelpURI="https://github.com/arcanecode/ArcaneBooks/blob/1ebe781951f1a7fdf19bb6731487a74fa12ad08b/ArcaneBooks/Help/Get-ISBNBookData.md")]
  [alias("sisbn")]
  param (
         [Parameter( Mandatory = $true,
                     ValueFromPipeline = $true,
                     HelpMessage = 'Please enter the ISBN.'
                     )]
         [string] $ISBN
        )

If you want to learn more about advanced functions, see my post Fun With PowerShell – Advanced Functions. Briefly, the CmdletBinding attribute will turn this into an advanced function. Advanced functions allow you to input one or more parameters via the pipeline.

It has one parameter, the ISBN number you want to find. This can be passed in normally, or via the pipeline.

The Process Loop

In order to process multiple items from the pipeline you must enclose the heart of the function inside a process { } block. The process block is called once for each item passed in via the pipeline.

I then use the Replace method of the string object to remove any dashes or spaces from the ISBN that was passed in. This is then combined with the base OpenLibrary URL to create a new string, $url.

  process
  {
    foreach($number in $ISBN)
    {
      Write-Verbose "Beginning Show-ISBNBookData for $ISBN at $(Get-Date).ToString('yyyy-MM-dd hh:mm:ss tt')"

      $isbnFormatted = $ISBN.Replace('-', '').Replace(' ', '')
      $baseURL = "https://openlibrary.org/isbn/"

      $url = "$($baseURL)$($isbnFormatted)"

      Write-Verbose 'Opening the Book on OpenLibrary'

      Start-Process $url

      Write-Verbose "Finished Getting Data for $($ISBN)"
    }

The magic comes in the Start-Process cmdlet. This cmdlet analyzes the string that was passed in. It then looks for the default application for it, and attempts to open the associated application for the passed in string.

As an example, if you were to pass in the name of a Microsoft Word document, Start-Process would open Microsoft Word with the document name you passed in.

In this case, passing in a URL will attempt to open up your default web browser to the page you passed in.

If you called Show-ISBNBookData using the pipeline, the function will attempt to open up a new tab in your browser for each URL passed in via the pipeline.

Note I also used several Write-Verbose commands, you can learn more about it at Fun With PowerShell – Write-Verbose.

An Example

Calling the function is very simple.

$ISBN = '0-87259-481-5'
Show-ISBNBookData -ISBN $ISBN -Verbose

This should open up the following webpage in your default browser.

https://openlibrary.org/books/OL894295M/Your_HF_digital_companion

This is a reference to the book You HF Digital Companion.

See Also

You may find more helpful information at the links below.

ArcaneBooks Project

Fun With PowerShell – Advanced Functions

Fun With PowerShell – Strings

Fun With PowerShell – Write-Verbose

OpenLibrary Simple API

Conclusion

As you can see, Start-Process is extremely easy to use. Just pass in a URL or the name of a file, and PowerShell will attempt to open the item using the default application assigned in the operating system. In the ArcaneBooks project I’m using it to open a website, but you can use it for a variety of purposes.

If you like PowerShell, you might enjoy some of my Pluralsight courses. PowerShell 7 Quick Start for Developers on Linux, macOS and Windows is one of many PowerShell courses I have on Pluralsight. All of my courses are linked on my About Me page.

If you don’t have a Pluralsight subscription, just go to my list of courses on Pluralsight . At the top is a Try For Free button you can use to get a free 10 day subscription to Pluralsight, with which you can watch my courses, or any other course on the site.

Fun With PowerShell – Elapsed Timers

Introduction

I’m still working on my documentation for my ArcaneBooks project, but wanted to have something for you to read this week, so decided to show you how to create an elapsed timer in PowerShell.

It can be helpful to determine how long a process runs in PowerShell. You can use it to determine what parts of code may need to be optimized, or gather metrics around your functions.

Creating and Using a Timer

The .NET framework has a class named System.Diagnostics.Stopwatch. It has a static function named StartNew that you can call which will create a new instance from the Stopwatch class.

$processTimer = [System.Diagnostics.Stopwatch]::StartNew()

So now you go off and do your code, routine, whatever it is you want to measure. When you are done, you call the Stop method of your timer.

$processTimer.Stop()

Now what? How do we get the time from this? Well to do that you can grab the Elapsed property of your timer.

$processTimer.Elapsed

This produces the following output:

Days              : 0
Hours             : 0
Minutes           : 0
Seconds           : 20
Milliseconds      : 698
Ticks             : 206988710
TotalDays         : 0.000239570266203704
TotalHours        : 0.00574968638888889
TotalMinutes      : 0.344981183333333
TotalSeconds      : 20.698871
TotalMilliseconds : 20698.871

It’d be nice to have it in something more readable. So in this example I’ll capture the elapsed time into a variable, then use PowerShell’s string formatting technique to produce something easily understandable.

$ts = $processTimer.Elapsed
$elapsedTime = "{0:00}:{1:00}:{2:00}.{3:00}" -f $ts.Hours, $ts.Minutes, $ts.Seconds, ($ts.Milliseconds / 10)
Write-Host "All done - Elapsed Time $elapsedTime `r`n"

This produces:

All done - Elapsed Time 00:00:20.70

Alternatively you could use a string that expanded the time fields a bit. In this example I’ll also include the number of days. Since the timer shows days, milliseconds probably aren’t that important so I’ll omit them. If you needed it though it’d be easy enough to add.

$elapsedTime = "The process took $($ts.Days) days, $($ts.Hours) hours, $($ts.Minutes) minutes, and $($ts.Seconds) seconds."
Write-Host "All done - Elapsed Time $elapsedTime `r`n"

This will produce:

All done - Elapsed Time The process took 0 days, 0 hours, 0 minutes, and 20 seconds.

Multiple Timers

You may have a situation where you need multiple timers. For example, one for a full function, and a second to log the time of a loop in the function. Just create multiple process timer variables, for example $processTimer1 and $processTimer2.

There’s nothing special about the variable name either, you could use names like $myFunctionsTimer, $mainLoopTimer, and $loggingTimer.

See Also

If you want to learn more about the string formatting technique used in this post, see my Fun With PowerShell – String Formatting post.

Conclusion

Optimizing your PowerShell code is made much easier when you can measure the runtime of sections of code. It lets you know what sections are running slow, and when you make changes did you actually improve things or make it worse.

As you saw in this post, creating one or more timers is very simple. You can insert them into your code temporarily, or leave them there as part of your metrics logging strategy.

Fun With PowerShell – Authoring About Help

Introduction

In my previous post, Fun With PowerShell – Authoring Help, I covered how to author comment based help for your functions.

In addition to help for your functions, it’s also possible to write about_ help. PowerShell itself contains many about topics for PowerShell itself.

These about topics are designed to provide further information for your users, information that may not fit into the confines of a functions help. These texts can be as long as you need.

The Contents of an About Topic File

An about file can contain literally any text you want. Whatever is in there will be returned when you use Get-Help to retrieve its contents.

However, there is a suggested guideline for the formatting of an about file.


about_TopicName

SHORT DESCRIPTION
   Brief description, one to two sentences.

LONG DESCRIPTION
   Much longer text, could be several paragraphs.

BACKGROUND
   This isn't a standard option but one I like to include to provide context
   to the reader about why the module was created. What problem was it meant
   to solve.

NOTE
   Miscellaneous notes about the module, such as the copyright

TROUBLESHOOTING NOTE
   Warning notes of issues you may find, perhaps a to-do list

SEE ALSO
  links to relevant things, such as the project github site
  or the authors website

ABOUT TOPICS
   List other about topics

KEYWORDS
   Keywords here

I usually leave one blank line at the top, to separate the text from the Get-Help command, but this is just my personal preference.

It is then customary to put the name of the about topic, as shown.

The next two are self explanatory, a short and long description for the topic. While not required by PowerShell code, it is highly suggested as PowerShell can use the text in the SHORT DESCRIPTION with Get-Help, but we’ll talk about that later in the post.

Next up is a section I call BACKGROUND. I usually include this in the about topic for a module, to explain what problem this module was meant to solve, how it came to be, and so on. If I have any other about topics I generally omit this unless it is appropriate to the topic. To be clear, this is something I do, not a standard.

The note section is just what it says, it is for any notes that haven’t been covered in the other sections. I generally use this to place the copyright notice, the author name and contact info, and similar data.

The TROUBLESHOOTING NOTE area is used to let the user know of any issues they may encounter. One common one I find is that about topics don’t display correctly in some (but not all) version of Linux.

You might also include information about functions that will have further development done, or perhaps a note that documentation is still being worked on. This type of information can be especially useful for a module that is still in the alpha or beta stages, where further work will still be done.

Under the SEE ALSO section you can provide links to a projects github site, the PSGallery page, the author website, or other relevant links.

In the about topic page for the module, I like to provide a full list of all the about topics provided in the module, so the reader will know what else is available. Again, I usually only include this in the about page for the module itself and omit from other about topics unless it is relevant. We’ll touch on the about topic for a module momentarily.

The final section allows you to place keywords for a module or about topic. These can be useful when searching for a module that covers the included keywords.

Placement of About Topics

Under the modules main folder, you should create a folder with the standard language abbreviation for your target language. For example, for US English the folder would be named en-us. If I were to also write documentation for the French language (which would be a real feat as I don’t know any French) I would create a folder named fr-FR.

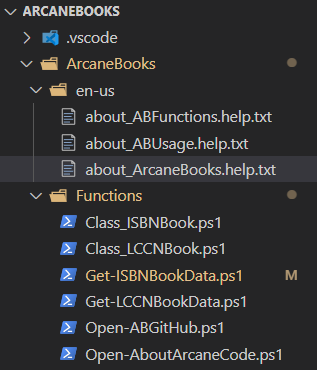
Here is the layout for my ArcaneBooks module.

At the top is the folder ArcaneBooks, which is the root folder for the module. Under it is a folder, en-us where English language help files are placed. Here I only have about topics, but if I were using XML based help those files would also be placed here.

Let’s talk now about how to name your about files.

Naming Your About Topic Files

The names of all about files should begin with about_. They should end with .help.txt. To create an about topic for the module itself (which you should at the very least include one about for the module) use the module name as I did here, with about_ArcaneBooks.help.txt.

If you then call help for the module, Get-Help ArcaneBooks, it will display the contents of the about file with the module name, about_ArcaneBooks.help.txt.

I’ve included two other about topics for the ArcaneBooks module. The first, about_ABFunctions, displays a list of functions in the module, with the synopsis of its purpose. I’ve found this to be of aid to the end user to help them see what functions are in the module. They can see this information using Get-Help about_ABFunctions.

The final about topic, about_ABUsage, has examples of how to use the module. I usually develop a PS1 script to test out a module as it is being developed. I find this makes for great examples of how to use the module overall, and include a copy inside an about topic so an end user can use it as well. As with the functions, a user can see this using Get-Help about_ABUsage.

Getting Help

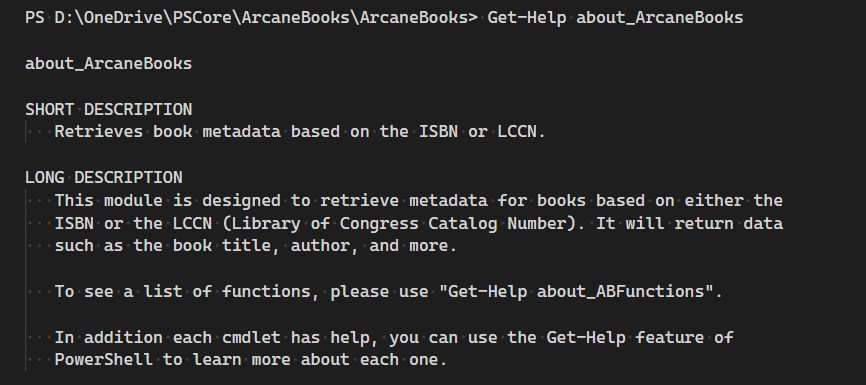
This is an example of calling help for the module.

PS D:\OneDrive\PSCore\ArcaneBooks\ArcaneBooks> Get-Help about_ArcaneBooks

about_ArcaneBooks

SHORT DESCRIPTION
   Retrieves book metadata based on the ISBN or LCCN.

LONG DESCRIPTION
   This module is designed to retrieve metadata for books based on either the
   ISBN or the LCCN (Library of Congress Catalog Number). It will return data
   such as the book title, author, and more.

   To see a list of functions, please use "Get-Help about_ABFunctions".

   In addition each cmdlet has help, you can use the Get-Help feature of
   PowerShell to learn more about each one.

BACKGROUND
   The author (Robert Cain aka ArcaneCode) is a member of the Alabama
   Historical Radio Society(https://alhrs.org/). They are beginning a project
   to create metadata for their library (title, author, publisher, etc.) and
   store it in cloud based software.

   Naturally we want to automate as much of this as possible, since the
   collection is rather extensive. Some of our books are so old they have
   neither an ISBN or a Library of Congress Catalog Number (LCCN for short).
   Those will require manual intervention to key in the data.

   Fortunately many of the books have the LCCN, the newer books have an ISBN,
   and a very few have both.

   The goal with this project was to allow a user to create a simple text file
   using notepad, Excel, or something similar. The user can enter an LCCN into
   one file or the ISBN in another.

   That data file will be piped through the appropriate cmdlets found in this
   module and produce a list of metadata for each book including things such
   as the book title, author, publication date, and the like.

   This output can then be piped into standard PowerShell cmdlets to output
   the data to formats such as CSV, XML, JSON, and the like.

   The sources used in this module are the Library of Congress or the
   Open Library site, which is part of the Internet Archive. Both provide
   web APIs that can use to retrieve data.

   For more information, please see the online documentation at the projects
   GitHub site, https://github.com/arcanecode/ArcaneBooks .

NOTE
   Author: Robert C Cain | @ArcaneCode | arcane@arcanetc.com

   This code is Copyright (c) 2023 Robert C Cain All rights reserved

   The code herein is for demonstration purposes. No warranty or guarantee
   is implied or expressly granted.

   This module may not be reproduced in whole or in part without the express
   written consent of the author.

TROUBLESHOOTING NOTE
   Help for the about_* topics doesn't work correctly on all versions of
   Linux due to issues with PowerShell's Help system.

SEE ALSO
     https://github.com/arcanecode/ArcaneBooks
     
About Arcane Code
ABOUT TOPICS about_ArcaneBooks about_ABFunctions about_ABUsage KEYWORDS ArcaneBooks, ISBN, LCCN

Getting A List of About Topics

Using Get-Help, you can get a list of all the about topics for modules loaded into memory.

Get-Help about_*

Here is a partial output of the result of the command.

Name                              Category  Module                    Synopsis
----                              --------  ------                    --------
about_ABFunctions                 HelpFile                            This is a listing of the functions available in the ArcaneBooks module.
about_ABUsage                     HelpFile                            Provides examples on how to call the functions with example data.
about_ArcaneBooks                 HelpFile                            Retrieves book metadata based on the ISBN or LCCN.
about_Aliases                     HelpFile
about_Alias_Provider              HelpFile

In order to get the synopsis to show up in the output, you must include a SHORT DESCRIPTION. Then the synopsis must appear on the line immediately after it. There cannot be a blank line between, if there is Get-Help won’t display the synopsis.

Conclusion

As you can see, creating about topic help is very simple. Just create a folder to store it, then create the text file (or files) you need. Name them appropriately, and PowerShell then takes care of the rest!

Fun With PowerShell – Authoring Help

Introduction

Having good help is vital to the construction of a module. It explains not only how to use a function, but the purpose of the module and even more.

Naturally I’ve included good help text in the ArcaneBooks module, but as I was going over the construction of the ArcaneBooks module I realized I’d not written about how to write help in PowerShell. So in this post and the next I’ll address this very topic.

Two Types of Help

There are two ways of creating help for functions in PowerShell modules. The newer method is to create XML files with the help text. I’ll be honest, I’m not a big fan of this method.

The XML is more difficult to author and read in plain text format as the help is surrounded by XML tags. To be able to effectively author it a third party tool is needed.

There is one advantage to the XML format, if you wish to internationalize your module you can write individual XML help files for each language you need. These can all be bundled with your module. In my case I’m only going to use English, so this isn’t of benefit to my ArcaneBooks module.

I’ll admit that I may be a bit old fashioned, but I still prefer the original comment based help when authoring help. It keeps the help text with the function, and is easier to read when looking at the raw code.

Comment Blocks

As its name implies, comment based help is created by placing specially crafted comment blocks beside the function declarations of the functions in your module.

As you may know, a normal comment in PowerShell begins with a #, commonly called a pound sign or hash tag. Some examples:

# This is a comment

$x = 1  # Set X equal to 1

A comment block allows you to create comments that are multiple lines. They begin with a <# and end with #>. An example would be:

<#
Here is a comment block

More text here
#>

You can add text after and before the # characters. I often use these to creeate dividers in my code.

<#-----------------------------------------------
  Do some interesting stuff in this section
-----------------------------------------------#>

I’ll dive a bit deeper into the structure of the comment help block, but first lets talk about placement.

Placement of Comment Help

To associate a help block with a function, it needs to be positioned right before or right after the function declaration.

<#
Comment based help here
#>
function DoSomething()
<#
Comment based help here
#>

$x = 1

Either of these are valid, but I much prefer the first version. It keeps the function declaration close to its code.

Contents of Comment Based Help

There is a defined template of what needs to be in comment based help.

<#
.SYNOPSIS
A short one liner that describes the function

.DESCRIPTION
Detailed description of the function

.PARAMETER ParamName
Information about the parameter.

Add additional .PARAMETER tags for more parameters

.INPUTS
What inputs are allowed, useful for when a function allows input to be piped in.

.OUTPUTS
Explanation of what the function outputs.

Can also include sample data

.EXAMPLE
Code example

.EXAMPLE
Additional examples, just add more .EXAMPLE tags as needed

.NOTES
Notes here like author name

.LINK
Link to online help

.LINK
Additional link(s)
#>

As you can see, it uses a series of tags to describe what is in the section. Each tag is preceded by a period.

The SYNOPSIS and DESCRIPTION are both required. In the synopsis you place a short description of the function. One, no more than two sentences go here.

In the description you can place an expanded explanation of the function. You can go into detail of its purpose. It doesn’t need to be a novel, but two to three paragraphs are not uncommon.

Next comes the parameters. Each parameter should be listed individually, getting a PARAMETER tag followed by the name of the parameter. In the accompanying text you can include details to the nature of the parameter, whether it is required, and if appropriate the data type.

Again, you should include one parameter tag for each of your functions parameters.

In the INPUTS area you can give an overall description of the data that will be input to the function. It is also a good place to describe data that can be input to the function through the pipeline.

The OUTPUTS is the place to describe what data is returned from the function. This may be a single value, or an object with multiple values. When returning an object I like to list each property along with a sample value for each.

You should include at least one EXAMPLE section in your help. Include a small code sample of calling your function.

It’s a good idea though to include multiple example sections. For instance, if your function allows for input through the pipeline, have one example for passing data in normally, than a second for using the pipeline. Include as many as you need to give the reader a good set of examples on how to use your function.

NOTES is for just what it says, an area to include any additional notes about the function. In here I often include information such as the author name, copyright notices, and any other information I’d like to have included.

Finally is the LINK section. If you have online help, the first link tag should point to the online help web address that will be used with the -Online switch of the Get-Help cmdlet. You can include as many links as needed, I usually include at least one more pointing to the project website, such as a github site, or back to my own blog.

A Real World Example

Here is a real world example from the ArcaneBooks project I’ve been developing. This is the help for the Get-ISBNBookData function.

<#
.SYNOPSIS
Gets book data from OpenLibrary.org based on the ISBN

.DESCRIPTION
Uses the more advanced API at OpenLibrary to retrieved detailed information
based on the 10 or 13 character ISBN passed in.

.PARAMETER ISBN
A 10 or 13 digit ISBN number. The passed in value can have spaces or dashes,
it will remove them before processing the request to get the book data.

.INPUTS
Via the pipeline this cmdlet can accept an array of ISBN values.

.OUTPUTS
The cmdlet returns one or more objects of type Class ISBNBook with the
following properties. Note that not all properties may be present, it
depends on what data the publisher provided.

ISBN | The ISBN number that was passed in, complete with an formatting
ISBN10 | ISBN as 10 digits
ISBN13 | ISBN in 13 digit format
Title | The title of the book
LCCN | Library of Congress Catalog Number
Author | The author(s) of the book
ByStatement | The written by statement provided by the publisher
NumberOfPages | Number of pages in the book
Publishers | The Publisher(s) of this book
PublishDate | The publication date for this edition of the book
PublisherLocation | The location of the publisher
Subject | Generic subject(s) for the work
LibraryOfCongressClassification | Specialized classification used by Library of Congress
DeweyDecimalClass | Dewey Decimal number
Notes | Any additional information provided by the publisher
CoverUrlSmall | URL link to an image of the book cover, in a small size
CoverUrlMedium | URL link to an image of the book cover, in a medium size
CoverUrlLarge | URL link to an image of the book cover, in a large size

.EXAMPLE
# Pass in a single ISBN as a parameter
$ISBN = '0-87259-481-5'
$bookData = Get-ISBNBookData -ISBN $ISBN
$bookData

.EXAMPLE
# Pipe in a single ISBN
$ISBN = '0-87259-481-5'
$bookData = $ISBN | Get-ISBNBookData
$bookData

.EXAMPLE
# Pipe in an array of ISBNs
$ISBNs = @( '0-87259-481-5'
          , '0-8306-7801-8'
          , '0-8306-6801-2'
          , '0-672-21874-7'
          , '0-07-830973-5'
          , '978-1418065805'
          , '1418065803'
          , '978-0-9890350-5-7'
          , '1-887736-06-9'
          , '0-914126-02-4'
          , '978-1-4842-5930-6'
          )
$bookData = $ISBNs | Get-ISBNBookData -Verbose
$bookData

$bookData | Select-Object -Property ISBN, Title

.NOTES
ArcaneBooks - Get-ISBNBookData.ps1

Author: Robert C Cain | @ArcaneCode | arcane@arcanetc.com

This code is Copyright (c) 2023 Robert C Cain All rights reserved

The code herein is for demonstration purposes.
No warranty or guarantee is implied or expressly granted.

This module may not be reproduced in whole or in part without
the express written consent of the author.

.LINK
https://github.com/arcanecode/ArcaneBooks/blob/1ebe781951f1a7fdf19bb6731487a74fa12ad08b/ArcaneBooks/Help/Get-ISBNBookData.md

.LINK
http://arcanecode.me
#>

When I use the command Get-Help Get-ISBNBookData -Full this is the output.

SYNTAX
    Get-ISBNBookData [-ISBN] <String> [<CommonParameters>]


DESCRIPTION
    Uses the more advanced API at OpenLibrary to retrieved detailed information
    based on the 10 or 13 character ISBN passed in.


PARAMETERS
    -ISBN <String>
        A 10 or 13 digit ISBN number. The passed in value can have spaces or dashes,
        it will remove them before processing the request to get the book data.

        Required?                    true
        Position?                    1
        Default value
        Accept pipeline input?       true (ByValue)
        Accept wildcard characters?  false

    <CommonParameters>
        This cmdlet supports the common parameters: Verbose, Debug,
        ErrorAction, ErrorVariable, WarningAction, WarningVariable,
        OutBuffer, PipelineVariable, and OutVariable. For more information, see
        about_CommonParameters (https://go.microsoft.com/fwlink/?LinkID=113216).

INPUTS
    Via the pipeline this cmdlet can accept an array of ISBN values.


OUTPUTS
    The cmdlet returns one or more objects of type Class ISBNBook with the
    following properties. Note that not all properties may be present, it
    depends on what data the publisher provided.

    ISBN | The ISBN number that was passed in, complete with an formatting
    ISBN10 | ISBN as 10 digits
    ISBN13 | ISBN in 13 digit format
    Title | The title of the book
    LCCN | Library of Congress Catalog Number
    Author | The author(s) of the book
    ByStatement | The written by statement provided by the publisher
    NumberOfPages | Number of pages in the book
    Publishers | The Publisher(s) of this book
    PublishDate | The publication date for this edition of the book
    PublisherLocation | The location of the publisher
    Subject | Generic subject(s) for the work
    LibraryOfCongressClassification | Specialized classification used by Library of Congress
    DeweyDecimalClass | Dewey Decimal number
    Notes | Any additional information provided by the publisher
    CoverUrlSmall | URL link to an image of the book cover, in a small size
    CoverUrlMedium | URL link to an image of the book cover, in a medium size
    CoverUrlLarge | URL link to an image of the book cover, in a large size


NOTES


        ArcaneBooks - Get-ISBNBookData.ps1

        Author: Robert C Cain | @ArcaneCode | arcane@arcanetc.com

        This code is Copyright (c) 2023 Robert C Cain All rights reserved

        The code herein is for demonstration purposes.
        No warranty or guarantee is implied or expressly granted.

        This module may not be reproduced in whole or in part without
        the express written consent of the author.

    -------------------------- EXAMPLE 1 --------------------------

    PS > # Pass in a single ISBN as a parameter
    $ISBN = '0-87259-481-5'
    $bookData = Get-ISBNBookData -ISBN $ISBN
    $bookData


    -------------------------- EXAMPLE 2 --------------------------

    PS > # Pipe in a single ISBN
    $ISBN = '0-87259-481-5'
    $bookData = $ISBN | Get-ISBNBookData
    $bookData


    -------------------------- EXAMPLE 3 --------------------------

    PS > # Pipe in an array of ISBNs
    $ISBNs = @( '0-87259-481-5'
              , '0-8306-7801-8'
              , '0-8306-6801-2'
              , '0-672-21874-7'
              , '0-07-830973-5'
              , '978-1418065805'
              , '1418065803'
              , '978-0-9890350-5-7'
              , '1-887736-06-9'
              , '0-914126-02-4'
              , '978-1-4842-5930-6'
              )
    $bookData = $ISBNs | Get-ISBNBookData -Verbose
    $bookData

    $bookData | Select-Object -Property ISBN, Title


RELATED LINKS
    https://github.com/arcanecode/ArcaneBooks/blob/1ebe781951f1a7fdf19bb6731487a74fa12ad08b/ArcaneBooks/Help/Get-ISBNBookData.md
    http://arcanecode.me

See Also

The ArcaneBooks Project – An Introduction

Conclusion

As you can see, implementing comment based help is quite easy. It’s also important, as users rely on help to understand how to use the functions you author. You’ll also find it helpful as a reminder to yourself about the functionality of your own code down the road.

Another useful feature for help is to create about_ help for your modules. You’ve likely seen these before, Microsoft provides a long list of about topics for PowerShell itself.

You can create your own set of about help for your module, and in the next post I’ll show you how.

ArcaneBooks – Parsing Library of Congress Control Number (LCCN) Data With PowerShell

Introduction

In my previous post in this series, ArcaneBooks – Library of Congress Control Number (LCCN) – An Overview, I provided an overview of the LCCN and the basics of calling its public web API to retrieve data based on the LCCN.

In this post I will demonstrate how to call the API and dissect the data using PowerShell. This will be a code intensive post.

You can find the full ArcaneBooks project on my GitHub site. Please note as of the writing of this post the project is still in development.

The code examples for this post can be located at https://github.com/arcanecode/ArcaneBooks/tree/main/Blog_Posts/005.00_LCCN_API. It contains the script that we’ll be dissecting here.

XML from Library of Congress

For this demo, we’ll be using an LCCN of 54-9698, Elements of radio servicing by William Marcus. When we call the web API URL in our web browser, we get the following data.

<zs:searchRetrieveResponse xmlns:zs="http://docs.oasis-open.org/ns/search-ws/sruResponse">
  <zs:numberOfRecords>2</zs:numberOfRecords>
  <zs:records>
    <zs:record>
      <zs:recordSchema>mods</zs:recordSchema>
      <zs:recordXMLEscaping>xml</zs:recordXMLEscaping>
      <zs:recordData>
        <mods xmlns:xsi="http://www.w3.org/2001/XMLSchema-instance"
          xmlns="http://www.loc.gov/mods/v3" version="3.8" xsi:schemaLocation="http://www.loc.gov/mods/v3 http://www.loc.gov/standards/mods/v3/mods-3-8.xsd">
          <titleInfo>
            <title>Elements of radio servicing</title>
          </titleInfo>
          <name type="personal" usage="primary">
            <namePart>Marcus, William. [from old catalog]</namePart>
          </name>
          <name type="personal">
            <namePart>Levy, Alex,</namePart>
            <role>
              <roleTerm type="text">joint author</roleTerm>
            </role>
          </name>
          <typeOfResource>text</typeOfResource>
          <originInfo>
            <place>
              <placeTerm type="code" authority="marccountry">nyu</placeTerm>
            </place>
            <dateIssued encoding="marc">1955</dateIssued>
            <issuance>monographic</issuance>
            <place>
              <placeTerm type="text">New York</placeTerm>
            </place>
            <agent>
              <namePart>McGraw Hill</namePart>
            </agent>
            <dateIssued>[1955]</dateIssued>
            <edition>2d ed.</edition>
          </originInfo>
          <language>
            <languageTerm authority="iso639-2b" type="code">eng</languageTerm>
          </language>
          <physicalDescription>
            <form authority="marcform">print</form>
            <extent>566 p. illus. 24 cm.</extent>
          </physicalDescription>
          <subject authority="lcsh">
            <topic>Radio</topic>
            <topic>Repairing. [from old catalog]</topic>
          </subject>
          <classification authority="lcc">TK6553 .M298 1955</classification>
          <identifier type="lccn">54009698</identifier>
          <recordInfo>
            <recordContentSource authority="marcorg">DLC</recordContentSource>
            <recordCreationDate encoding="marc">820525</recordCreationDate>
            <recordChangeDate encoding="iso8601">20040824072855.0</recordChangeDate>
            <recordIdentifier>6046000</recordIdentifier>
            <recordOrigin>Converted from MARCXML to MODS version 3.8 using MARC21slim2MODS3-8_XSLT1-0.xsl (Revision 1.172 20230208)</recordOrigin>
          </recordInfo>
        </mods>
      </zs:recordData>
      <zs:recordPosition>1</zs:recordPosition>
    </zs:record>
  </zs:records>
  <zs:nextRecordPosition>2</zs:nextRecordPosition>
  <zs:echoedSearchRetrieveRequest>
    <zs:version>2.0</zs:version>
    <zs:query>bath.lccn=54009698</zs:query>
    <zs:maximumRecords>1</zs:maximumRecords>
    <zs:recordXMLEscaping>xml</zs:recordXMLEscaping>
    <zs:recordSchema>mods</zs:recordSchema>
  </zs:echoedSearchRetrieveRequest>
  <zs:diagnostics xmlns:diag="http://docs.oasis-open.org/ns/search-ws/diagnostic">
    <diag:diagnostic>
      <diag:uri>info:srw/diagnostic/1/5</diag:uri>
      <diag:details>2.0</diag:details>
      <diag:message>Unsupported version</diag:message>
    </diag:diagnostic>
  </zs:diagnostics>
</zs:searchRetrieveResponse>

Let’s see how to retrieve this data then parse it using PowerShell.

Parsing LCCN Data

First, we’ll start by setting the LCCN in a variable. This is the LCCN for "Elements of radio servicing" by William Marcus

$LCCN = '54-9698'

To pass in the LCCN to the web API, we need to remove any dashes or spaces.

$lccnCleaned = $LCCN.Replace('-', '').Replace(' ', '')

After 2001 the LCCN started using a four digit year. By that time however, books were already printing the ISBN instead of the LCCN. For those books we’ll be using the ISBN, so for this module we can safely assume the LCCNs we are receiving only have a two digit year.

With that said, we’ll use the following code to extract the two digit year.

$lccnPrefix = $lccnCleaned.Substring(0,2)

Since digits 0 and 1 are the year, we’ll start getting the rest of the LCCN at the third digit, which is in position 2 and go to the end of the string, getting the characters.

Next, the API requires the remaining part of the LCCN must be six digits. So we’ll use the PadLeft method to put 0’s in front to make it six digits.

$lccnPadded = $lccnCleaned.Substring(2).PadLeft(6, '0')

Now combine the reformatted LCCN and save it to a variable.

$lccnFormatted ="$($lccnPrefix)$($lccnPadded)"

Now we’ll combine all the parts to create the URL needed to call the web API.

$baseURL = "http://lx2.loc.gov:210/lcdb?version=3&operation=searchRetrieve&query=bath.lccn="
$urlParams = "&maximumRecords=1&recordSchema=mods"
$url = "$($baseURL)$($lccnFormatted)$($urlParams)"

It’s time now to get the LCCN data from the Library of Congress site. We’ll wrap it in a try/catch so in case the call fails, for example from the internet going down, it will provide a message and exit.

Note at the end of the Write-Host line we use the PowerShell line continuation character of ` (a single backtick) so we can put the foreground color on the next line, making the code a bit more readable.

try {
  $bookData = Invoke-RestMethod $url
}
catch {
  Write-Host "Failed to retrieve LCCN $LCCN. Possible internet connection issue. Script exiting." `
    -ForegroundColor Red
  # If there's an error, quit running the script
  exit
}

Now we need to see if the book was found in the archive. If not the title will be null. We’ll use an if to check to see if the LCCN was found in their database. If not, the title property will be null. If so we display a message to that effect.

If it was found, we fall through into the else clause to process the data. The remaining code resides within the else.

# We let the user know, and skip the rest of the script
if ($null -eq $bookData.searchRetrieveResponse.records.record.recordData.mods.titleInfo.title)
{
  Write-Host = "Retrieving LCCN $LCCN returned no data. The book was not found."
}
else # Great, the book was found, assign the data to variables
{

To get the data, we start at the root object, $bookData. The main node in the returned XML is searchRetrieveResponse. From here we can use standard dot notation to work our way down the XML tree to get the properties we want.

Our first entry gets the Library of Congress Number. The syntax is a little odd. If we walk XML tree, we find this stored in:

<identifier type="lccn">54009698</identifier>

If we display the identifier property using this code:

$bookData.searchRetrieveResponse.records.record.recordData.mods.identifier

We get this result.

type #text
---- -----
lccn 54009698

The LCCN we want is stored in the property named #text. But #text isn’t a valid property name in PowerShell. We can still use it though if we wrap the name in quotes.

  $LibraryOfCongressNumber = $bookData.searchRetrieveResponse.records.record.recordData.mods.identifier.'#text'

From here we can process other properties that are easy to access.

  $Title = $bookData.searchRetrieveResponse.records.record.recordData.mods.titleInfo.title
  $PublishDate = $bookData.searchRetrieveResponse.records.record.recordData.mods.originInfo.dateIssued.'#text'
  $LibraryOfCongressClassification = $bookData.searchRetrieveResponse.records.record.recordData.mods.classification.'#text'
  $Description = $bookData.searchRetrieveResponse.records.record.recordData.mods.physicalDescription.extent
  $Edition = $bookData.searchRetrieveResponse.records.record.recordData.mods.originInfo.edition

Now we get to the section where an XML property can contain one or more values.

Books can have multiple authors, each is returned in its own item in an array. One example is the book subjects. Here is a sample of the XML:

<subject authority="lcsh">
  <topic>Radio</topic>
  <topic>Repairing. [from old catalog]</topic>
</subject>

As you can see, this has two topics. What we need to do is retrieve the root, in this case subject, then loop over each item.

For our purposes we don’t need them individually, a single string will do. So in the PowerShell we’ll create a new object of type StringBuilder. For more information on how to use StringBuilder, see my post Fun With PowerShell – StringBuilder.

In the loop if the variable used to hold the string builder is empty, we’ll just add the first item. If it’s not empty, we’ll append a comma, then append the next value.

  $authors = [System.Text.StringBuilder]::new()
  foreach ($a in $bookData.searchRetrieveResponse.records.record.recordData.mods.name)
  {
    if ($a.Length -gt 1)
      { [void]$authors.Append(", $($a.namePart)") }
    else
      { [void]$authors.Append($a.namePart) }
  }
  $Author = $authors.ToString()

As a final step we used the ToString method to convert the data in the string builder back to a normal string and store it in the $Author variable.

From here, we’ll repeat this logic for several other items that can hold multiple values. The books subjects is one example.

  $subjects = [System.Text.StringBuilder]::new()
  $topics = $bookData.searchRetrieveResponse.records.record.recordData.mods.subject | Select topic
  foreach ($s in $topics.topic)
  {
    if ($subjects.Length -gt 1)
      { [void]$subjects.Append(", $($s)") }
    else
      { [void]$subjects.Append($s) }
  }
  $Subject = $subjects.ToString()

A book could have multiple publishers over time. The author could shift to a new publisher, or more likely a publishing house could be purchased and the new owners name used. The data is returned as an array, so combine them as we did with authors and subjects.

Note that in the returned data, the publisher is stored as an "agent". We’ll use the name Publisher to keep it consistent with the ISBN data.

  $thePublishers = [System.Text.StringBuilder]::new()
  foreach ($p in $bookData.searchRetrieveResponse.records.record.recordData.mods.originInfo.agent)
  {
    if ($thePublishers.Length -gt 1)
      { [void]$thePublishers.Append(", $($p.namePart)") }
    else
      { [void]$thePublishers.Append($p.namePart) }
  }
  $Publishers = $thePublishers.ToString()

Since there could be multiple publishers, logically there could be multiple publishing locations. This section will combine them to a single location.

  $locations = [System.Text.StringBuilder]::new()
  foreach ($l in $bookData.searchRetrieveResponse.records.record.recordData.mods.originInfo.place.placeTerm)
  {
    if ($locations.Length -gt 1)
      { [void]$locations.Append(", $($l.'#text')") }
    else
      { [void]$locations.Append($l.'#text') }
  }
  $PublisherLocation = $locations.ToString()

All done! We’ll give a success message to let the user know.

  Write-Host "Successfully retrieved data for LCCN $LCCN" -ForegroundColor Green

Finally, we’ll display the results. Note some fields may not have data, that’s fairly normal. The Library of Congress only has the data provided by the publisher. In addition some of the LCCN data dates back many decades, so the data supplied in the 1940’s may be different than what is supplied today.

  "LCCN: $LCCN"
  "Formatted LCCN: $lccnFormatted"
  "Library Of Congress Number: $LibraryOfCongressNumber"
  "Title: $Title"
  "Publish Date: $PublishDate"
  "Library Of Congress Classification: $LibraryOfCongressClassification"
  "Description: $Description"
  "Edition: $Edition"
  "Author: $Author"
  "Subject: $Subject"
  "Publishers: $Publishers"
  "Publisher Location: $PublisherLocation"
}

The Result

Here is the result of the above code.

LCCN: 54-9698
Formatted LCCN: 54009698
Library Of Congress Number: 54009698
Title: Elements of radio servicing
Publish Date: 1955
Library Of Congress Classification: TK6553 .M298 1955
Description: 566 p. illus. 24 cm.
Edition: 2d ed.
Author: Marcus, William. [from old catalog], Levy, Alex,
Subject: Radio, Repairing. [from old catalog]
Publishers: McGraw Hill
Publisher Location: nyu, New York

As you can see it returned a full dataset. Not all books my have data for all the fields, but this one had the full details on record with the Library of Congress.

See Also

This section has links to other blog posts or websites that you may find helpful.

The ArcaneBooks Project – An Introduction

ArcaneBooks – ISBN Overview, PowerShell, and the Simple OpenLibrary ISBN API

ArcaneBooks – PowerShell and the Advanced OpenLibrary ISBN API

ArcaneBooks – Library of Congress Control Number (LCCN) – An Overview

Fun With PowerShell – StringBuilder

The GitHub Site for ArcaneBooks

Conclusion

In this document we covered the basics of the LCCN as well as the web API provided by the Library of Congress. Understanding this information is important when we integrate the call into our PowerShell code.

Fun With PowerShell – StringBuilder

Introduction

As I was creating the next post in my ArcaneBooks series, I realized I had not written about the StringBuilder class. As the code in my ArcaneBooks module relies on it in several places, I thought it best to add a new post to my Fun With PowerShell series explaining how to use it before continuing.

It’s a common need in any language, and PowerShell is no exception, to need to add more text to an existing string.

What many people don’t realize though is that PowerShell strings are immutable. They cannot change. As an example, let’s talk about what happens behind the scenes when you execute this code sample.

$x = 'Arcane'
$x = $x + 'Code'

First, PowerShell creates a variable in memory. For an example, we’ll say the memory is located at position 0001.

In the second line of code, PowerShell creates a second variable in memory, let’s say it is position 0002. Into position 0002, it copies the data from position 0001 then adds the Code string.

Next, it changes $x to point to memory location 0002. Finally, it marks position 0001 as no longer in use. At some point in the future, the garbage collector will clean up the memory when there is some idle time. The garbage collector is a system function that removes chunks of memory that are no longer in use, freeing up memory for other code to use.

Why This Is Bad

In the example above, we only had one variable (the one at location 0001) that needed to be garbage collected. Imagine though you were looping over thousands of records of data, building a complex string that perhaps you’ll later save to a file. The amount of work the garbage collector would need to do is enormous. It would have a negative impact on system performance, and create a slow running script.

To solve this, the StringBuilder class was created. Behind the scenes it uses a linked list. Let me step through an example a step at a time.

Step 1 – Create an empty string builder object

$output = [System.Text.StringBuilder]::new()

Step 2 – Append text to the StringBuilder variable we created

To add a string value, we will use the Append method. Note when we use methods such as Append it returns data. Most of the time we don’t need to see this. By using [void] before the line, the output of the Append method is discarded.

[void]$output.Append('Arcane')

We now have an item in memory, we’ll call it position one. This holds two values, the string value and a pointer to the next item. If there is no next item, the pointer value is null.

Position Text Pointer to next item
0001 Arcane null

Step 3 – Append a second string

[void]$output.Append('Code')

The string builder now updates the linked list.

Position Text Pointer to next item
0001 Arcane 0002
0002 Code null

Step 4 – Retrieve the data

When we go to retrieve the data, the string builder will go through the chain, assemble the final data and return it. In order to copy it into a standard string variable, we’ll need to use the ToString method to convert the result from a string builder object to a standard string.

$result = $output.ToString()

Why this is a good solution

Here, PowerShell only created one variable, then kept appending to the linked list. When we are done with the variable $output the garbage collector only has to cleanup one variable, not hundreds or (potentially) thousands.

When you only have a few items, and are sure their sizes are small, then using a string builder may not provide much benefit in terms of performance. However, when you have an unknown number of items then string builder can be a friend.

In addition to Append, string builder has several more methods that are of use. Let’s look at them now.

Append

While we just looked at using Append, I want to use this section to remind you to include proper spacing when creating your strings.

$output = [System.Text.StringBuilder]::new()
[void]$output.Append( 'PowerShell is awesome!' )
[void]$output.Append( ' It makes my life much easier.' )
[void]$output.Append( ' I think I''ll go watch some of Robert''s videos on Pluralsight.' )
$output.ToString()

This results in:

PowerShell is awesome! It makes my life much easier. I think I''ll go watch some of Robert''s videos on Pluralsight.

Note that on the second and third calls to the Append method I included a space at the beginning of the line. This was needed to make the output look like a true series of sentences, with spaces after the periods.

You could have also put spaces at the end of the lines, that is up to you and your needs when building your code.

AppendLine

When appending, you sometimes want a carriage return / line feed character added to the end of the text that was appended. To handle this, we have the Appendline method.

$output = [System.Text.StringBuilder]::new()
[void]$output.Append( 'PowerShell is awesome!' )
[void]$output.AppendLine( ' It makes my life much easier.' )
[void]$output.Append( 'I think I''ll go watch some of Robert''s videos on Pluralsight.' )
$output.ToString()

In the result, you can see the line wraps after the "…much easier." line.

PowerShell is awesome! It makes my life much easier.
I think I'll go watch some of Robert's videos on Pluralsight.

This can be handy when, for example, you are building a string that will be written out as a CSV (comma separated values) file. Each row of data will be saved as an individual line.

You may also have situations where you are building a big string that you want as something more readable. Perhaps you are building a string that will be emailed as a report. In it you’d want blank lines between each paragraph.

To accomplish this, you can just use AppendLine without passing a value into it.

$output = [System.Text.StringBuilder]::new()
[void]$output.Append( 'PowerShell is awesome!' )
[void]$output.AppendLine( ' It makes my life much easier.' )
[void]$output.AppendLine()
[void]$output.Append( 'I think I''ll go watch some of Robert''s videos on Pluralsight.' )
$output.ToString()

The output from this code is:

PowerShell is awesome! It makes my life much easier.

I think I'll go watch some of Robert's videos on Pluralsight.

AppendFormat

The third version of append is AppendFormat. It allows you to append a numerical value, and specify a string format.

In the example below, the first parameter is {0:C}. Into the spot where the 0 is, the numeric value in the second parameter, $value is placed. The :C indicates a currency format should be used.

$value = 33
$output = [System.Text.StringBuilder]::new()
[void]$output.Append( 'The value is: ' )
[void]$output.AppendFormat( "{0:C}", $value )
$output.ToString()

This results in:

The value is: $33.00

The formats supported by string builder are identical to the ones that the string data type uses.

For more information on string formatting, please see my post Fun With PowerShell String Formatting

Insert

You may have a situation where you need to insert text into the text already saved in your string builder variable. To accomplish this, we can use the Insert method.

As the first parameter we pass in the position we wish to start inserting at. The second parameter holds the text to be inserted.

$output = [System.Text.StringBuilder]::new()
[void]$output.Append( 'Arcane' )
[void]$output.Append( ' writes great blog posts.' )
[void]$output.Insert(6, 'Code')
$output.ToString()

The output of the above sample is:

ArcaneCode writes great blog posts.

Remove

In addition to inserting text, we can also remove text using the Remove method. It requires two parameters, the first is the position to start removing at, the second is the number of characters to remove.

$output = [System.Text.StringBuilder]::new()
[void]$output.Append( 'ArcaneCode' )
[void]$output.Append( ' writes great blog posts.' )
[void]$output.Remove(6, 4)
$output.ToString()

In this example I’m removing the text Code from ArcaneCode.

Arcane writes great blog posts.

Replace

You may recall that the string data type has a replace method. So too does the string builder, also named Replace. In the first parameter you pass in the character to be replaced. The second is what you want to replace it with.

$output = [System.Text.StringBuilder]::new()
[void]$output.Append( 'ArcaneCode' )
[void]$output.AppendLine( ' writes great blog posts.' )
[void]$output.Append( 'I think I''ll go watch some of Robert''s videos on Pluralsight.' )
[void]$output.Replace('.', '!')
$output.ToString()

In this simple example, I’m going to replace all periods in the text with exclamation marks.

ArcaneCode writes great blog posts!
I think I'll go watch some of Robert's videos on Pluralsight!

Be aware Replace works on the entire text held in string builder, replacing every occurance found. If you want to limit the replacements, you’d have to do so prior to any appending you do.

The Replace method is most commonly used to remove special characters from your text, perhaps a result from reading in data from file that contains things like squiggly braces and brackets.

The replacement character can be an empty string, which results in simply removing the unwanted character.

Finally, you can stack multiple methods into one operation. For example, if the string builder holds the text:

{ArcaneCode}, [arcanecode.com]

You can do:

$output.Replace('{', '').Replace('}', '').Replace('[', '').Replace(']', '')

Which results in the following text:

ArcaneCode, arcanecode.com

And you aren’t limited to stacking replaces, you can mix and match methods.

$output = [System.Text.StringBuilder]::new()
[void]$output.Append( '[ArcaneCode]' ).Replace('[', '').Replace(']', '').Insert(6, ' ')
$output.ToString()

Results in:

Arcane Code

If you get carried away this can get ugly and hard to read. But it is possible so you should know about it. There are times when it can make the code more compact and a bit easier to read, such as:

[void]$output.Replace('[', '').Replace(']', '')

Adding the first string when you create a StringBuilder object

There is one last capability to look at. When you instantiate (fancy word for create) the new string builder object, you can pass in the first text value to be stored in the string builder.

Here I’m passing in the text ArcaneCode when we create the variable.

$output = [System.Text.StringBuilder]::new('ArcaneCode')
[void]$output.Append( ' writes great blog posts.' )
$output.ToString()

The output is like you’d expect.

ArcaneCode writes great blog posts.

See Also

You may find more helpful information at the links below.

Fun With PowerShell Strings

Fun With PowerShell String Formatting

If you want to go deeper on the internals of the StringBuilder class, Andrew Lock has a great series of articles at his blog.

Conclusion

The string builder class can be a great tool for optimizing your scripts that do a lot of text manipulation.

Now that you have an understanding of the string builder class, we’re free to proceed with the next post in the ArcaneBooks project.

ArcaneBooks – Library of Congress Control Number (LCCN) – An Overview

Introduction

This is part of my ongoing series on my ArcaneBooks project. The goal is to provide a module to retrieve book data via provided web APIs. In the SEE ALSO section later in this post I’ll provide links to previous posts which cover the background of the project, as well as how to use the OpenLibrary APIs to get data based on the ISBN.

In this post I will provide an overview of using the Library of Congress API to get data based on the LCCN, short for Library of Congress Control Number.

The next post in this series will provide code examples and an explanation of how to use PowerShell to get data using the Library of Congress API.

LCCN Overview

The abbreviation LCCN, according to the Library of Congress’s own website, stands for Library of Congress Control Number. When the system was first created in 1898, however, LCCN stood for Library of Congress Card Number, and I’ve seen it both ways in publications.

I’ve also seen a few places define it as Library of Congress Catalog Number, although this was never an official designation.

The LCCN was created in 1898 to provide a unique value to every item in the Library of Congress. This not only includes books, but works of art, manuscripts (not in book form), maps, and more.

LCCN Format

The LCCN has two parts, a prefix followed by a serial number. From 1898 to 2000 the prefix was two digits, representing the year. Beginning in 2001 the prefix became four digits, representing the year.

The serial number is simple a sequential number. 45-1 was the first number assigned in 1945. 45-1234 was the 1,234th item assigned in that year.

Be aware from 1969 to 1972 there was an experiment where the single digit of 7 was used for the prefix. They decided this scheme wasn’t going to work out, and reverted to the standard format of year followed by serial number.

Here are a few examples of real LCCNs from books in my personal collection. You can use these in your own testing.

LCCN Title
54-9698 Elements of Radio Servicing
40-33904 Radio Handbook Twenty-Second Edition
41-3345 The Radio Amateur’s Handbook 42nd Edition 1965
64-20875 Early Electrical Communication
74-75450 VHF Handbook for Radio Amateurs
76-190590 Wire Antennas for Radio Amateurs
71-120473 73 Vertical, Beam, and Triangle Antennas

Accessing Book Data from the Library of Congress

The Library of Congress actually provides two web APIs for getting book data. The first API is for accessing assets, such as digital assets. It doesn’t return much data for books.

The second is the LC Z39.50 system, accessible through lx2.loc.gov. Here is an example of calling it to retrieve a record for the book Elements of Radio Servicing, which has the LCCN of 54-9698. (It should, of course, all be used as a single line just in case your web browser wraps it.)

http://lx2.loc.gov:210/lcdb?version=3&amp;operation=searchRetrieve&amp;query=bath.lccn=54009698&amp;maximumRecords=1&amp;recordSchema=mods

Breaking it down, the root call is to http://lx2.loc.gov:210/lcdb. After this is a question mark ?, followed by the parameters.

The first parameter is version=3. This indicates which format to use for the return data. It supports two versions, 1.1 and 3. For our purposes we’ll use the most current version, 3.

Following the ampersand &amp; is operation=searchRetrieve. This instructs the Library of Congress’s API that we want to do a search to retrieve data.

Next is the core piece, we need to tell it what LCCN number to look up, query=bath.lccn=54009698. The root object is bath, then it uses the property lccn.

The LCCN has to be formatted in a specific way. We start with the two or four digit year. In the above example, 54-9698, this would be the two digit year of 54.

Next is the serial number. If the number is less than six digits, it must be left zero padded to become six. Thus 9698 becomes 009698. The year and serial number are combined, removing any dashes, spaces, or other characters and becomes 54009698.

Following is maximumRecords=1, indicating we only expect one record back. That’s all we’ll get back with a single LCCN anyway, so this will work fine for our needs.

The final parameter is recordSchema=mods. The API supports several formats.

Record Schema Description Notes
dc Dublin Core (bibliographic records) Brings back just the basics (Name, author, etc)
mads MADS (authority records) Brief, not a lot of info
mods MODS (bibliographic records) Very readable XML schema, most info
marcxml MARCXML – the default schema Abbreviated schema, not readable
opacxml MARCXML (wth holdings attached) As above with a bit more info

You are welcome to experiment with different formats, but for this module we’ll be using mods. It provides the most information, and is in XML. XML is very easy to read, and it works great with PowerShell.

ISBN and Library of Congress

It is possible to use the Library of Congress to look up the ISBN. In my testing though, the interface provided by OpenLibrary provided more data. Thus we’ll be using it for looking up ISBNs in this module.

We’ll use the LCCN API for books where we only have the LCCN.

See Also

The ArcaneBooks Project – An Introduction

ArcaneBooks – ISBN Overview, PowerShell, and the Simple OpenLibrary ISBN API

ArcaneBooks – PowerShell and the Advanced OpenLibrary ISBN API

Conclusion

In this document we covered the basics of the LCCN as well as the web API provided by the Library of Congress. Understanding this information is important when we integrate the call into our PowerShell code.

ArcaneBooks – PowerShell and the Advanced OpenLibrary ISBN API

Introduction

This post continues my series on my ArcaneBooks project. For a background see my post The ArcaneBooks Project – An Introduction.

For this project I am using the OpenLibrary.org website, which provides two web APIs to access book data based on the ISBN. OpenLibrary is sponsored by the InternetArchive.

In a previous post, ArcaneBooks – ISBN Overview, PowerShell, and the Simple OpenLibrary ISBN API, I covered the use of the first API which I nicknamed the Simple API as it is a bit easier to use and dissect the results. I also provided a background on what the ISBN is and how it is formed.

In this post I’ll dive into the more complex of the APIs, what I call the Advance API.

Be aware the use of Simple and Advance are my terms, so I can easily distinguish between the two. They are not terms used by the OpenLibrary.

The Advanced OpenLibrary API

The format of the Advanced API is slightly different from the simple. Here is template.

https://openlibrary.org/api/books?bibkeys=ISBN:[ISBN Goes Here]&jscmd=data&format=json"

You will replace the [ISBN Goes Here] text with the ISBN number you want to look up. Be aware this can only be digits, you must remove any spaces, dashes, or other characters.

Let’s look at a code example of calling the API and getting all its properties.

Calling The API with PowerShell

First, set an ISBN to lookup. We’ll include some dashes for the demo. The title of the book is "Your HF Digital Companion"

$ISBN = '0-87259-481-5'

Now remove any spaces or dashes, then create the URL.

$isbnFormatted = $ISBN.Replace('-', '').Replace(' ', '')
$baseURL = "https://openlibrary.org/api/books?bibkeys=ISBN:"
$urlParams = "&jscmd=data&format=json"
$url = "$($baseURL)$($isbnFormatted)$($urlParams)"

Now let’s call the URL and put the data into a variable.

$bookData = Invoke-RestMethod $url

If we look at the data held by the variable, we get back a single column. That column holds JSON formatted data. (Note I truncated the XML for readability purposes.)

$bookData

This is the output of displaying the variable.

ISBN:0872594815
---------------
@{url=https://openlibrary.org/books/OL894295M/Your_HF_digital_companion; key=/books/OL894295M; title=Your HF digital companion; authors=System.Object[]; number_of_pages=197; …

We could address the data like:

$bookData.'ISBN:0872594815'.Title

Note we had to wrap the ISBN number in quotes since a colon : isn’t an allowed in property names. However, when we make the call the ISBN isn’t set in stone.

But we do have it in a variable, and we can use string interpolation to format the property.

$bookData."ISBN:$isbnformatted".title

This returns "Your HF digital companion". And yes, the words "digital" and "companion" should normally be capitalized, but this is the way the title comes from OpenLibrary.

Now that we have the formatting for the property name down, we can get the other properties. Note that not all properties that are returned will have data.

$ISBN10 = $bookData."ISBN:$isbnformatted".identifiers.isbn_10
$ISBN13 = $bookData."ISBN:$isbnformatted".identifiers.isbn_13
$Title = $bookData."ISBN:$isbnformatted".title
$LCCN = $bookData."ISBN:$isbnformatted".identifiers.lccn
$NumberOfPages = $bookData."ISBN:$isbnformatted".number_of_pages
$PublishDate = $bookData."ISBN:$isbnformatted".publish_date
$LibraryOfCongressClassification = $bookData."ISBN:$isbnformatted".classifications.lc_classifications
$DeweyDecimalClass = $bookData."ISBN:$isbnformatted".classifications.dewey_decimal_class
$Notes = $bookData."ISBN:$isbnformatted".notes
$CoverUrlSmall = $bookData."ISBN:$isbnformatted".cover.small
$CoverUrlMedium = $bookData."ISBN:$isbnformatted".cover.medium
$CoverUrlLarge = $bookData."ISBN:$isbnformatted".cover.large

The ByStatement sometimes begins with the word "By ". If so we want to remove it. However if we try and do a replace and the by_statement column is null, attempting to call the Replace method will result in an error. So first we have to check for null, and only if the by_statement isn’t null do we attempt to do a replace.

if ($null -eq $bookData."ISBN:$isbnformatted".by_statement)
  { $ByStatement = '' }
else
  { $ByStatement = $bookData."ISBN:$isbnformatted".by_statement.Replace('by ', '') }

For the remaining data, each item can have multiple entries attached. For example, a book could have multiple authors. For our purposes we will just combine into a single entry.

We’ll create a new variable of type StringBuilder, then loop over the list of items in the JSON, combining them into a single string.

In the if, we check to see if the string already has data, if so we append a comma before adding the second (or more) authors name.

Finally we use the ToString method of the StringBuilder class to convert the value back into a standard string data type.

Books can have multiple authors, as stated each is returned in its own item in an array. This code will combine them into a single string.

Note that when we call the Append method of the StringBuilder class, we need to prepend it with [void], otherwise it will send output to the console which we don’t want.

$authors = [System.Text.StringBuilder]::new()
foreach ($a in $bookData."ISBN:$isbnformatted".authors)
{
  if ($authors.Length -gt 1)
    { [void]$authors.Append(", $($a.name)") }
  else
    { [void]$authors.Append($a.name) }
}
$Author = $authors.ToString()

Subjects can be an array, let’s combine them into a single string.

$subjects = [System.Text.StringBuilder]::new()
foreach ($s in $bookData."ISBN:$isbnformatted".subjects)
{
  if ($subjects.Length -gt 1)
    { [void]$subjects.Append(", $($s.name)") }
  else
    { [void]$subjects.Append($s.name) }
}
$Subject = $subjects.ToString()

A book could have multiple publishers over time. The author could shift to a new publisher, or more likely a publishing house could be purchases and the new owners name used. The data is returned as an array, so combine them as we did with authors and subjects.

$thePublishers = [System.Text.StringBuilder]::new()
foreach ($p in $bookData."ISBN:$isbnformatted".publishers)
{
  if ($thePublishers.Length -gt 1)
    { [void]$thePublishers.Append(", $($p.name)") }
  else
    { [void]$thePublishers.Append($p.name) }
}
$Publishers = $thePublishers.ToString()

Since there could be multiple publishers, logically there could be multiple publishing locations. This will combine them into a single string.

$locations = [System.Text.StringBuilder]::new()
foreach ($l in $bookData."ISBN:$isbnformatted".publish_places)
{
  if ($locations.Length -gt 1)
    { [void]$locations.Append(", $($l.name)") }
  else
    { [void]$locations.Append($l.name) }
}
$PublisherLocation = $locations.ToString()

Now print out all the returned data.

$ISBN10
$ISBN13
$Title
$LCCN
$NumberOfPages
$PublishDate
$LibraryOfCongressClassification
$DeweyDecimalClass
$Notes
$CoverUrlSmall
$CoverUrlMedium
$CoverUrlLarge
$ByStatement
$Author
$Subject
$Publishers
$PublisherLocation

The Output

Here is the output, I put it into a table for easier reading.

Item Value
ISBN10 95185134
ISBN13 [Missing Value]
Title Your HF digital companion
LCCN [Missing Value]
Number of Pages 197
Publish Date 1995
LibraryOfCongressClassification TK5745 .F572 1995
DeweyDecimalClass 004.6/4
Notes Includes bibliographical references.
Based on Your RTTY/AMTOR companion. 1st ed. c1993.
CoverUrlSmall https://covers.openlibrary.org/b/id/12774631-S.jpg
CoverUrlMedium https://covers.openlibrary.org/b/id/12774631-M.jpg
CoverUrlLarge https://covers.openlibrary.org/b/id/12774631-L.jpg
ByStatement Steve Ford.
Author Steve Ford
Subject Radiotelegraph, Amateurs’ manuals
Publishers American Radio Relay League
PublisherLocation Newington, CT

See Also

The following operators and functions were used or mentioned in this article’s demos. You can learn more about them in some of my previous posts, linked below.

Fun With PowerShell Logic Branching

Fun With PowerShell Loops

Fun With PowerShell Strings

Fun With PowerShell String Formatting

Conclusion

In this post we saw how to use what I call the advanced API offered by OpenLibrary to retrieve book data based on the ISBN.

In the next post we’ll see how to get book data based on the Library Of Congress Catalog Number, using PowerShell and the Library of Congresses web API.

The demos in this series of blog posts was inspired by my Pluralsight course PowerShell 7 Quick Start for Developers on Linux, macOS and Windows, one of many PowerShell courses I have on Pluralsight. All of my courses are linked on my About Me page.

If you don’t have a Pluralsight subscription, just go to my list of courses on Pluralsight . At the top is a Try For Free button you can use to get a free 10 day subscription to Pluralsight, with which you can watch my courses, or any other course on the site.

(No) Fun With PowerShell – Disappearing Modules and OneDrive

Introduction

I was having a weird problem with PowerShell, while working on my ArcaneBooks project. I would install a module, and it would work fine at first. I could see the module when I used Get-Module -ListAvailable, and use it.

The problem occurred when I closed the terminal (whether the Windows Terminal or in VSCode), then reopened it. The module had vanished! It was no longer there, I would get an error if I tried to import it, and Get-Module -ListAvailable would no longer show it. I could reinstall, it’d be there, but again when I closed the terminal and reopened it would be gone.

I Binged and Googled and DuckDucked with no luck, so I put out a cry for help on Twitter. While waiting I went to a second computer. Both machines had Windows 10 Pro, and on the second machine I updated PowerShell so both were on 7.3.3 (current release as of this blog post). By golly, on the second machine everything worked correctly!

I could install a module, exit the terminal, return, and it would still be there. Confused even more now, I returned to Twitter.

A kindly user named Flavien Michaleczek | @_Flavien suggested I look into the pathing. So I checked the $env:PSModulePath on both computers.

The paths on both were identical, except for the first entry. On the working computer, the first entry was C:\Users\arcan\Documents\PowerShell\Modules. Pretty standard.

On the non-working computer, the path was set to D:\OneDrive\Documents\PowerShell\Modules. Apparently at some point I told Windows to store my Documents folder on OneDrive, which I’d stored on my D drive for space reasons.

I rolled up my sleeves and took a look in D:\OneDrive\Documents and what did I find?

Apparently every time I installed a module, PowerShell was creating a brand new PowerShell folder in my Documents drive, using PowerShell plus my computer name followed by a number. It would use that folder right up until I closed the terminal.

Not The Fix, But Getting There

Can you guess what folder I didn’t find in the Documents folder?

It was D:\OneDrive\Documents\PowerShell!

That’s right dear reader, there was no folder in Documents named just PowerShell. So, I manually created it.

I now opened a new terminal and installed a module. Looking in the D:\OneDrive\Documents\PowerShell I could see it had created a Modules folder, and in it was the module I’d just installed.

I held my breath, closed the terminal, and reopened. Now when I did Get-Module -ListAvailable it showed up! And I could import it and use it. I deleted all the duplicate PowerShell-ArcaneHP-xx folders and returned to work, foolishly thinking I’d solved the problem.

But It Didn’t Quite Work

Things looked good until I came back the next day and tried again, to discover the PowerShell folder was gone!. I said some dirty words and went back to diagnosing things, comparing my working machine to the broken one.

I realized, in comparing the paths between the working and broken computers, that on the working computer my Documents folder was NOT in my OneDrive. Realizing OneDrive may be at issue I returned to scouring the web with a new set of search terms.

I found OneDrive has a habit of arbitrarily deleting files and folders. None of the entries I found online could explain why, or the logic it used. It wasn’t necessarily the PowerShell folder, people had pictures, documents, and more disappear.

To be fair they didn’t vanish entirely, they went into the OneDrive recycle bin, but if you didn’t know to look there you might have lost some important data.

The Fix

I found a fix, well to be precise it’s not really a fix but a work around.

And you may not like it. Be sure to read through to the end of this post before trying it, as you need to understand the ramifications of what happens when you do this.

The trick is to tell OneDrive not to sync your Documents folder. There’s just a few basic steps.

Right click on your OneDrive icon in the taskbar, and pick Settings.

Under Sync and backup, click the Manage backup button.

Click on the toggle button beside Documents, to turn it off. It will prompt you to make sure you know what you are doing, just confirm you no longer want to sync Documents.

Click on Save Changes at the bottom. Then close the OneDrive Settings dialog by clicking the X in the upper right corner.

Ramifications

At this point you now have not one but two documents folders. You’ve probably noticed when you open File Explorer, you see an entry for "Documents".

This is what Microsoft calls a Symbolic Link. It’s nothing more than a built in shortcut.

Before the change, when you let OneDrive handle your Documents folder the symbolic link pointed to C:\Users\[your_user_name_here]\OneDrive\Documents.

After you remove Documents from under the control of OneDrive, this symbolic link now redirects to C:\Users\[your_user_name_here]\Documents. This is now your default "Documents" folder, often called your local Documents folder. Windows will want to default to saving to your local Documents folder when you try to save a file using many apps, such as Office. If you want these saved in OneDrive all you have to do is tell the application to save to one of your OneDrive folders.

Your previous Documents folder from OneDrive should still be there, it would be located at C:\Users\[your_user_name_here]\OneDrive\Documents. Making the change to remove Documents from the control of OneDrive does not move any of the files or folders you previously had in OneDrive to the new local Documents folder.

As I want to be clear, I need to state something in big bold clear text.

After making the change, your (local) Documents folder will no longer be backed up automatically. You will be responsible for backing up your Documents folder manually!

Of course the easy answer to the above issue is to just save somewhere on your OneDrive, but I felt I needed to state this clearly.

For me, making the change to no longer let OneDrive manage Documents wasn’t a big deal as I rarely used the default Documents folder anyway. Instead I have folders in OneDrive setup for the different items I work on, such as PowerShell scripts, Pluralsight courses, blog posts, and the like.

If you were a heavy user of Documents though, you’ll have to retrain yourself to save to an appropriate spot in OneDrive.

Cleanup

As a last step, open File Explorer, go to your local Documents folder (the one at C:\Users\[your_user_name_here]\Documents). It should be empty, although it may have a link to the OneDrive Documents folder.

In the local, empty Documents folder create a PowerShell folder, from here you should be good to go.

Conclusion

If you suffer from disappearing module syndrome, check to see if your Documents folder is being stored in OneDrive. If so, carefully consider following the instructions in this post to remove Documents from the control of OneDrive, understanding you’ll now be responsible for backing up anything stored there.

This issue consumed far too much of my time this week, so next week I’ll be picking back up on the ArcaneBooks series. In my previous post I talked about the "basic" web API for getting book data from OpenLibrary using the ISBN. In my next post I’ll continue the discussion on extracting ISBN book numbers using their "advanced" API.

If you like PowerShell, you might enjoy some of my Pluralsight courses. PowerShell 7 Quick Start for Developers on Linux, macOS and Windows is one of many PowerShell courses I have on Pluralsight. All of my courses are linked on my About Me page.

If you don’t have a Pluralsight subscription, just go to my list of courses on Pluralsight . At the top is a Try For Free button you can use to get a free 10 day subscription to Pluralsight, with which you can watch my courses, or any other course on the site.

ArcaneBooks – ISBN Overview, PowerShell, and the Simple OpenLibrary ISBN API

Introduction

In this post we’ll begin with an overview of what an ISBN is. We’ll then talk about the website that will be the source for our data. It has two different web APIs (Application Programming Interface) that we can use. We’ll discuss one here, then in the next blog post cover the advanced version.

First though, if you haven’t read the introductory post in this series, The ArcaneBooks Project – An Introduction, I’d highly recommend doing so as it lays the foundation for why and how this project to get ISBN data originated.

ISBN Overview

ISBN, or International Standard Book Number, is a 10 or 13 digit number used to uniquely identify a book. You can find more information on ISBNs at https://www.isbn.org.

Every country has a service that creates an ISBN number for works created in that country, and cannot create numbers for books in other countries. ISBN’s began in 1970 as a ten digit number. In 2007, due to a dwindling supply of numbers, it was switched to a thirteen digit number.

Thirteen digit numbers in the US currently begin with 978-0 and 978-1, and 979-8. For purposes of this module, though, we will be able to use either the ten or thirteen number version of the ISBN.

Publishers sometimes vary the format through the inclusion or exclusion of dashes and/or spaces to separate the parts of the ISBN. For our purposes this won’t be relevant.

The data source we use (more on that momentarily) requires us to use only the number with no spaces or dashes. Thus the cmdlet in this module to fetch the ISBN data will remove any spaces or dashes from the number before it is used.

Converting Between Ten and Thirteen Characters

It is possible, although not necessary for this module, to convert the ten digit ISBN to a thirteen digit one. The https://www.isbn.org website has an online converter which you’ll find at https://www.isbn.org/ISBN_converter.

There is also a good blog article at The Postulate. In it the author gives an overview of how to convert from ten to thirteen character ISBNs, and provides code samples in Python.

Again, since our source can use either format of the ISBN, there are no plans at this time to implement the routine as PowerShell code.

Data Source – The Simple OpenLibrary API

In the ArcaneBooks PowerShell module that we are building, we will use the OpenLibrary.org API to get our data. The OpenLibrary website is run by the Internet Archive.

As I mentioned in the introduction, OpenLibrary actually has two different APIs we can call. The first I call the Simple API as it is very easy to use and parse the data.

The second API I’ve called the Advanced version, as it returns much more data, but the returned JSON is more complex to parse.

Note the words Simple and Advanced are my words to describe their APIs, not OpenLibrary’s. I just needed an easy way to distinguish between the two.

For our ArcaneBooks module we’ll be using the Advanced version as it contains extra data we need for our project. That may not be the case for you, so in this post I’ll cover how to use the Simple version. The next post will dive into the more complex Advanced API.

The OpenLibrary Simple API works in one of two ways. Whichever mode you choose, any dashes, spaces, etc must be removed before calling their URLs. Only a string of ten or thirteen numbers can be passed in.

In the first method, you can return an HTML webpage with the book data nicely formatted. The URL (Uniform Resource Locater, a fancy way of saying the web address) to access this is formatted like:

https://openlibrary.org/isbn/[isbn]

Where [isbn] is replaced by the ten or thirteen character ISBN number.

https://openlibrary.org/isbn/0672218747

Will bring up the book data for William Orr’s The Radio Handbook.

We can also return the data in JSON format. To get the data in JSON, all we have to do is append .json to the url. This url will return the same book in JSON format.

https://openlibrary.org/isbn/0672218747.json

The OpenLibrary is flexible, you can use either the ten or thirteen digit number in the call. Both of these examples will bring up the same book, Master Handbook of Ham Radio Circuits by Robert J. Traister.

https://openlibrary.org/isbn/0830678018.json
https://openlibrary.org/isbn/9780830678013.json

The Output JSON

Below is an example of the JSON output (formatted) as returned by the simple API when we call it using the call of https://openlibrary.org/isbn/0672218747.json.

{
  "publishers": [
    "Sams"
  ],
  "languages": [
    {
      "key": "/languages/eng"
    }
  ],
  "identifiers": {
    "goodreads": [
      "3084620"
    ],
    "librarything": [
      "1522789"
    ]
  },
  "title": "Radio Handbook",
  "physical_format": "Hardcover",
  "number_of_pages": 1168,
  "isbn_13": [
    "9780672218743"
  ],
  "isbn_10": [
    "0672218747"
  ],
  "publish_date": "December 1982",
  "key": "/books/OL7667922M",
  "authors": [
    {
      "key": "/authors/OL1196498A"
    }
  ],
  "works": [
    {
      "key": "/works/OL8273120W"
    }
  ],
  "type": {
    "key": "/type/edition"
  },
  "subjects": [
    "Radio",
    "Technology & Industrial Arts"
  ],
  "latest_revision": 6,
  "revision": 6,
  "created": {
    "type": "/type/datetime",
    "value": "2008-04-29T15:03:11.581851"
  },
  "last_modified": {
    "type": "/type/datetime",
    "value": "2022-02-16T09:26:53.493088"
  }
}

Parsing the Returned Data

Below is PowerShell code for accessing the data from OpenLibrary. We call the Simple API using Invoke-RestMethod, then parse its various properties.

For an explanation of what is happening, see the comments in the PowerShell sample code. Note that the sample code doesn’t access every property returned, just enough of them to show you how to deal with the various ways the returned JSON is formatted.


# Set the URL and call the API via Invoke-RestMethod
# The returned JSON data will be held in the variable $BookData
$url = 'https://openlibrary.org/isbn/0672218747.json'
$bookData = Invoke-RestMethod $url

# Here is an extract of part of the JSON code.
# Below we'll show how to access it with PowerShell

<#
   ...more json here
   "title": "Radio Handbook",
   "number_of_pages": 1168,
   ...more json follows
#>

# Here we can just use the variable holding the returned JSON,
# then dot notation to access the property we want
# We're also using string interpolation. Because we are accessing
# properties of an object, we have to wrap it in $()
"Title: $($bookData.title)"
"Number Of Pages: $($bookData.number_of_pages)"

# Identifiers is a JSON object with two values, goodreads and librarything

<#
   ...more json here
   "identifiers": {
     "goodreads": [
       "3084620"
     ],
     "librarything": [
       "1522789"
     ]
   },
   ...more json follows
#>

# We can get the data by just using additional dot notation after the
# identifiers object
"GoodReads Number: $($bookData.identifiers.goodreads)"
"LibraryThing Number: $($bookData.identifiers.librarything)"


# Subjects is returned as a JSON array within the Subjects property

<#
   ...more json here
  "subjects": [
    "Radio",
    "Technology & Industrial Arts"
  ],
   ...more json follows
#>

# You can deal with these in two ways.
# First, you can list individually
foreach ($s in $bookData.subjects)
{
  "Subject: $s"
}

# In the second method you could combine in a single string

# Start by creating a StringBuilder object to append the strings
# as efficiently as possible
$mySubjects = [System.Text.StringBuilder]::new()

# Loop over the BookData Subjects array, copying the current
# subject into the variable $s
foreach ($s in $bookData.subjects)
{
  if ($mySubjects.Length -gt 1)
  {
    # If we already have data in our StringBuilder $mySubjects,
    # then add a comma first, then the name of the subject from $s
    [void]$mySubjects.Append(", $($s)")
  }
  else
  {
    # If the length of our StringBuilder variable is less than 1,
    # it's empty so we'll just append the name of the subject without
    # a comma in front
    [void]$mySubjects.Append($s)
  }
}

# We need to convert the StringBuilder to a normal String to
# use it effectively, for example as a property in a class
$myCombinedSubjects = $mySubjects.ToString()
"Combined Subjects: $myCombinedSubjects"

# The created and last_modified properties are objects,
# simliar to the identifiers

<#
   ...more json here
  "created": {
    "type": "/type/datetime",
    "value": "2008-04-29T15:03:11.581851"
  },
  "last_modified": {
    "type": "/type/datetime",
    "value": "2022-02-16T09:26:53.493088"
  }
   ...more json follows
#>

# For both of these we only need the value property, so we can
# just ignore the type
"Created: $($bookData.created.value)"
"Last Modified: $($bookData.last_modified.value)"

Sample Data

Here are some sample ISBNs you can use for testing the sample code.

ISBN Title
0-87259-481-5 Your HF Digital Companion
0-8306-7801-8 Master Handbook of Ham Radio Circuits (Hardback)
0-8306-6801-2 Master Handbook of Ham Radio Circuits (Paperback)
0-672-21874-7 Radio Handbook Twenty-Second Edition
0-07-830973-5 Electricity Principles and Applications
1418065803 Delmar’s Standard Textbook of Electricity
978-0-9890350-5-7 The Antique Wireless Association Review Volume 31
1-887736-06-9 Crystal Set Projects
0-914126-02-4 Vintage Radio

See Also

For some of the techniques in this blog posts samples, I’ve written other posts in the past which cover their use.

To learn more about String Interpolation, see my post Fun With PowerShell Strings.

My post Fun With PowerShell Arrays will demonstrate how to work with arrays in PowerShell.

Conclusion

In this post we began with an overview of the ISBN, what it is and its history. We then dove into how to access the simple form of the OpenLibrary API to retrieve a books data based on the ISBN.

In my next post I will cover the use of OpenLibrary’s advanced API to get book data.

If you want to learn more about PowerShell, I have many courses on Pluralsight. Two courses in particular I would recommend are:

PowerShell 7 Quick Start for Developers on Linux, macOS, and Windows

Everyday PowerShell for Developers on Linux, macOS, and Windows

The ArcaneBooks Project – An Introduction

Introduction

As some of you may know, I’ve been a ham (amateur) radio operator since 1999, holding the call sign N4IXT. I’m a member of several clubs, including the Birmingham Amateur Radio Club, the Shelby County Amateur Radio Club (where I’m also the webmaster), and the Amateur Radio Relay League (ARRL), in which I am a life member.

More importantly for this post, I am a member of the Alabama Historical Radio Society. We are beginning a project to catalog our exhibits and library into cloud based software named PastPerfect. As part of this effort we’ll be entering data for our extensive library into the software.

Naturally we want to automate as much of this as possible, since the collection is rather extensive. Some of our books are so old they have neither an ISBN (International Standard Book Number) or a Library of Congress Catalog Number (LCCN for short). Others have only the LCCN, the newer books have an ISBN, and a very few have both.

In the process of meeting with other museums I learned this is a need for many other organizations. So I decided to do something about it.

I plan to create a PowerShell module with cmdlets that can retrieve book metadata, such as title, author, and the like. This module will then be made available as on open source project on my website so other groups can use it as well.

As a source a user can pass in either an ISBN or LCCN number, or better yet pipe in an entire list of numbers from a text file, and generate book data.

The sources we’ll use are the Library of Congress and the Open Library site, which is part of the Internet Archive. Both provide web APIs we can use to retrieve data, and we’ll document that information in upcoming posts.

Why PowerShell?

You may be wondering why I chose PowerShell for this project. There were several good reasons.

First, and people often forget this, PowerShell is multi-platform. It can run on Windows, MacOS, and Linux. If you want to learn more on this you should watch my Pluralsight course PowerShell 7 Quick Start for Developers on Linux, macOS and Windows.

Next, the PowerShell code is viewable by anyone. Any user can download the code and easily examine it before running. This should address security concerns by many organizations.

The third reason is readability. As many will point out, there are other languages such as Python that will meet the above needs. In general though, code from other languages can be hard to read and execute for people who aren’t developers. I’m imagining my module will be used by many people with only a basic understanding of tech. As such a simple command like Get-BookByISBN -ISBN 1234567890 will be much easier to use.

Finally, well hey I just love PowerShell! As I need to turn this project around quickly I wanted to use something I already know and love.

The Plan

In the next two posts I will cover what ISBNs and LCCNs are, and the web APIs (Application Programming Interface) that we’ll use to get the data.

I’ll then begin a series of posts documenting the PowerShell code needed to retrieve the book data, and how you can use the book data for your organization.

The series will wrap up with the creation of the ArcaneBooks PowerShell Module, and its publication to my Github site.

Kusto Will Return!

For those of you who have been following Kusto Query Language series over the last few years, don’t worry it will return! I’m just taking a short diversion for the next month or so to document this project. Then we’ll return to the world of Kusto.

Conclusion

In this post I established the groundwork for my new ArcaneBooks PowerShell project. In the next few posts we’ll cover terms and data sources, then look at the PowerShell code needed to achieve our results.

I have a long series of blog posts on PowerShell, you’ll find them listed at my Fun With PowerShell Roundup

If you want to take a deeper dive into PowerShell, I have many PowerShell courses at Pluralsight, you’ll find them listed on my About Me page.

One course that may be especially helpful is my Pluralsight course PowerShell 7 Quick Start for Developers on Linux, macOS and Windows, as it dives into the creation of functions, modules, and more.

If you don’t have a Pluralsight subscription, just go to my list of courses on Pluralsight . At the top is a Try For Free button you can use to get a free 10 day subscription to Pluralsight, with which you can watch my courses, or any other course on the site.

The Fun With PowerShell Roundup

PSCustomObject Sample

Introduction

Since September 2020 I’ve been posting extensively about PowerShell in a series I’ve titled Fun With PowerShell. In my next post I will begin a series on a new topic, but before I do I wanted to leave with a Fun With PowerShell Roundup" post.

Below you will find a listing of all posts in my Fun With PowerShell series. Note there are other posts I’ve done in this time frame, but since they did not focus on PowerShell I’ve omitted them from this listing.

The Posts

Date Title
20-09-29 VSCode User Snippets for PowerShell and MarkDown
20-12-05 Two New PowerShell Courses for Developers on Pluralsight
20-12-14 Iterate Over A Hashtable in PowerShell
20-12-21 Fixing the Failed To Acquire Token Error When Logging Into Azure from PowerShell
21-01-04 Suppress Write-Verbose When Calling A function in PowerShell
21-07-05 Fun with PowerShell Get-Random
21-07-12 Fun With PowerShell Strings
21-07-26 Fun With PowerShell Arrays
21-08-02 Fun With PowerShell Hash Tables
21-08-09 Fun With PowerShell Logic Branching
21-08-16 Fun With PowerShell Code Formatting
21-08-23 Fun with PowerShell Loops
21-07-19 Fun With PowerShell String Formatting
21-08-30 Fun With PowerShell Basic Functions
21-09-06 Fun With PowerShell Advanced Functions
21-09-13 Fun With PowerShell Pipelined Functions
21-09-20 Fun With The PowerShell Switch Parameter
21-09-20 Fun With the PowerShell Switch Parameter
21-09-27 Fun With PowerShell Write-Verbose
21-10-04 Fun With PowerShell Write-Debug
21-10-11 Fun With VSCode Snippets for Markdown and PowerShell
21-10-18 Fun With PowerShell Providers
21-11-15 Fun with PowerShell Enums
21-11-29 More Fun with PowerShell Enums
21-12-06 Fun with PowerShell Enum Flags
21-12-14 Fun With PowerShell Classes – The Basics
22-01-10 Fun With PowerShell Objects – PSCustomObject
22-01-17 Fun With PowerShell Objects – Adding Methods to PSCustomObject
22-01-24 Fun With PowerShell Objects – Creating Objects from C#
22-01-31 Fun With PowerShell Objects – Modifying Existing Objects
22-02-07 Fun With PowerShell Classes – Static Properties and Methods
22-02-14 Fun With PowerShell Classes – Overloading
22-02-21 Fun With PowerShell Classes – Constructors
22-03-24 Fun With PowerShell – Extracting Blog Titles and Links from a WordPress Blog with PowerShell
22-03-28           Fun With PowerShell – Extracting Blog Titles and Links from a WordPress Blog with PowerShell – Generating Markdown

Conclusion

This is the wrap up post for my Fun With PowerShell series. Use it as an index to quickly refer back to posts of interest to you. These will make a good quick reference to the many aspects of PowerShell programming.

In my next blog post I’ll begin a new "Fun With…" series, so stay tuned for more fun.

All of the posts in my Fun With PowerShell series were inspired by my Pluralsight course PowerShell 7 Quick Start for Developers on Linux, macOS and Windows, one of many PowerShell courses I have on Pluralsight. All of my courses are linked on my About Me page.

If you don’t have a Pluralsight subscription, just go to my list of courses on Pluralsight . At the top is a Try For Free button you can use to get a free 10 day subscription to Pluralsight, with which you can watch my courses, or any other course on the site.

Fun With PowerShell – Extracting Blog Titles and Links from a WordPress Blog with PowerShell – Generating Markdown

Introduction

In my previous blogpost, Fun With PowerShell – Extracting Blog Titles and Links from a WordPress Blog with PowerShell, I described how I extracted the title, link, and publication date for posts in my WordPress blog using PowerShell. I then went on to use PowerShell to generate HTML code that I could insert into a post, or create a basic webpage.

It would also be useful to generate Markdown, instead of HTML, in case I want to use it somewhere such as my GitHub page. In this post we’ll see how to do just that, and create Markdown from the output array of PSCustomObjects.

For all of the examples we’ll display the code, then (when applicable) under it the result of our code. In this article I’ll be using PowerShell Core, 7.2.2, and VSCode. The examples should work in PowerShell 5.1 in the PowerShell IDE, although they’ve not been tested there.

Additionally, be on the lookout for the backtick ` , PowerShell’s line continuation character, at the end of many lines in the code samples. The blog formatting has a limited width, so using the line continuation character makes the examples much easier to read. My post Fun With PowerShell Pipelined Functions dedicates a section to the line continuation character if you want to learn more.

To run a snippet of code highlight the lines you want to execute, then in VSCode press F8 or in the IDE F5. You can display the contents of any variable by highlighting it and using F8/F5.

Where to Start

Much of the work has already been done in the previous post. Review it, stopping at the Creating HTML section. The array we created will now be used in generating Markdown.

This is the reason I created an array of custom objects holding the title, link, and publication date. Just as I used it to create HTML, I can now use it to generate Markdown.

Generating Markdown

Like I did with the HTML, I created a function to create Markdown. This is and advanced function that I’ll pipeline the array of PSCustomObjects into.

function Get-WPMarkdown()
{
  [CmdletBinding()]
  param (
          [Parameter (ValuefromPipeline)] $wpObjects
        , [switch] $FormatAsTable
        )

  process
  {
    # Create a formatted output line
    if (!$FormatAsTable.IsPresent)
    {
      # Create each line as a paragraph
      $outLine = @"
$($wpObjects.PubDate) - [$($wpObjects.Title)]($($wpObjects.Link))
"@
    }
    else
    {
      # Create each line as a row in a table
      $outLine = @"
|$($wpObjects.PubDate)|[$($wpObjects.Title)]($($wpObjects.Link))|
"@
    }

    # Return the formatted line
    $outLine
  }

}

The first parameter accepts the custom objects we generated from the pipeline. The second is a switch that will format the output as a row in a Markdown table, as opposed to just a line of Markdown text.

I then check to see if the switch was passed in, and format the line to return accordingly. Finally I send the generated line out of the function.

Using the Get-WPMarkdown Function

Now all we have to do is call the function. As a reminder, the data in the $outData variable is the array of custom objects we generated in the previous posts.

$outMd = $outData | Get-WPMarkdown

$wpOutputMd = 'D:\OneDrive\BlogPosts\Markdown\arcanecode.wordpress2.md'
Out-File -FilePath $wpOutputMd -InputObject $outMd -Force

This will generate our data as rows in a Markdown file. Below is a small example.

2020-09-29 - [VSCode User Snippets for PowerShell and MarkDown](https://arcanecode.com/2020/09/29/vscode-user-snippets-for-powershell-and-markdown/)
2020-12-05 - [Two New PowerShell Courses for Developers on Pluralsight](https://arcanecode.com/2020/12/05/two-new-powershell-courses-for-developers-on-pluralsight/)
2020-12-14 - [Iterate Over A Hashtable in PowerShell](https://arcanecode.com/2020/12/14/iterate-over-a-hashtable-in-powershell/)

Outputting a Markdown Table

In the code there was a switch to format the output Markdown as a table.

$outMd = $outData | Get-WPMarkdown -FormatAsTable

As I did with the HTML example, I wanted to wrap the generated data in the appropriate Markdown code to make this a complete Markdown table. I created another function to handle this.

function Add-WPMarkdownHeader()
{
  [CmdletBinding()]
  param (
          [Parameter (Mandatory = $true)]
          $markdownData
        )

  # Create a new array
  $outTable = @()

  # Add the html to create a left aligned table header
  $outTable += '|Date|Post|'
  $outTable += '|:-----|:-----|'

  # Add the existing table row data
  foreach ($row in $markdownData) { $outTable += $row }

  # Return the output
  return $outTable
}

As you can see, it creates a new array, adding the Markdown code for a table header, one specific for our data. It then cycles through the array that was passed in and adds it to the new array. Once done this new array is returned by the function.

To call it we simply use the following sample to write it to a file.

$outTable = Add-WPMarkdownHeader $outMd
Out-File -FilePath $wpOutputMd -InputObject $outTable -Force

Here is a sample of the output.

|Date|Post|
|:-----|:-----|
2020-09-29 - [VSCode User Snippets for PowerShell and MarkDown](https://arcanecode.com/2020/09/29/vscode-user-snippets-for-powershell-and-markdown/)
2020-12-05 - [Two New PowerShell Courses for Developers on Pluralsight](https://arcanecode.com/2020/12/05/two-new-powershell-courses-for-developers-on-pluralsight/)
2020-12-14 - [Iterate Over A Hashtable in PowerShell](https://arcanecode.com/2020/12/14/iterate-over-a-hashtable-in-powershell/)

Conclusion

In this post we saw how to generate Markdown code from a WordPress blog extract. Combined with the code in my previous post I now have a handy script I can use to generate HTML and Markdown code from my blog posts. This will be handy for both now, and when I want to create wrap up posts for future series.

These techniques can be easily adapted for any XML file that you wish to create a summary listing for, in HTML or Markdown or both.

The demos in this series of blog posts were inspired by my Pluralsight course PowerShell 7 Quick Start for Developers on Linux, macOS and Windows, one of many PowerShell courses I have on Pluralsight. All of my courses are linked on my About Me page.

If you don’t have a Pluralsight subscription, just go to my list of courses on Pluralsight . At the top is a Try For Free button you can use to get a free 10 day subscription to Pluralsight, with which you can watch my courses, or any other course on the site.

Fun With PowerShell – Extracting Blog Titles and Links from a WordPress Blog with PowerShell

Introduction

Since September of 2020 I have been blogging heavily on PowerShell. In a few posts I’m going to start a new series on a different subject, but first I wanted to provide a wrap up post with links to all my recent PowerShell posts.

Extracting all of those titles and links by hand seemed like a labor intensive task, so of course I wanted to automate it. In addition, I’ll be able to reuse the code when I’m ready to wrap up my next, or a future, series.

My blog is hosted on WordPress.com, which provides an export function. In this post I’ll cover the code I created to extract all my links, and how I generated HTML from it. In my next post I’ll show the same methodology for generating Markdown, and in the next post will do the PowerShell roundup.

For all of the examples we’ll display the code, then (when applicable) under it the result of our code. In this article I’ll be using PowerShell Core, 7.2.2, and VSCode. The examples should work in PowerShell 5.1 in the PowerShell IDE, although they’ve not been tested there.

Additionally, be on the lookout for the backtick ` , PowerShell’s line continuation character, at the end of many lines in the code samples. The blog formatting has a limited width, so using the line continuation character makes the examples much easier to read. My post Fun With PowerShell Pipelined Functions dedicates a section to the line continuation character if you want to learn more.

To run a snippet of code highlight the lines you want to execute, then in VSCode press F8 or in the IDE F5. You can display the contents of any variable by highlighting it and using F8/F5.

Extracting Data from WordPress

One of the administrator tools in the WordPress.com site is the ability to extract your blog. You can generate an XML file with the entire contents of your blog. This includes all of the data including the post itself, comments, and associated metadata. They do provide the ability to limit the extract by by date range and subjects.

As you can guess this extract file is large, far too much to sift through by hand. That’s where PowerShell came to my rescue!

For each post, the exported XML file has three lines we are interested in, the tags with <title>, <pubDate> and <link>. I tackled this in stages.

As the first stage, I simply loop over the data in the file, looking for the XML tags I need. When I’ve found all three, I have a small function that creates a PowerShell custom object. After each object is created, it is added into an array. I needed to do a little filtering, as over the last year I’ve added a few more blog posts on other topics. I did not want these to be included in my future "Fun With PowerShell Roundup" post.

Once I have an array of custom objects, I can easily use them in multiple scenarios. For generating HTML I created a function that takes each object and generates a line of HTML code. It also has a way to generate the line as an HTML row instead of a series of paragraphs.

For my purposes, this was all I needed. However there may be times when you wish to generate a complete, but basic, web page. There is one more function I created that will take the output of the HTML rows and add the lines needed to make it a valid HTML page.

Generating a Custom WordPress Object

I mentioned a function to create a custom object, so let’s start with that.

function Get-WPObject()
{
  [CmdletBinding()]
  param (
          [Parameter( Mandatory = $true ) ]
          [string] $Title
        , [Parameter( Mandatory = $true ) ]
          [string] $Link
        , [Parameter( Mandatory = $true ) ]
          [string] $PubDate
        )

  # Build a hash table with the properties
  $properties = [ordered]@{ Title = $Title
                            Link = $Link
                            PubDate = $PubDate
                          }

  # Start by creating an object of type PSObject
  $object = New-Object –TypeName PSObject `
                       -Property $properties

  # Return the newly created object
  return $object
}

The function is straightforward, it takes the three passed in parameters and creates a custom object from it. This is a common technique, it allows you to easily generate a custom object. It also leverages code reuse.

If you want to get a more detailed explanation on creating and using custom PowerShell objects, see my post Fun With PowerShell Objects – PSCustomObject.

Creating The Array

Before we create the array, we need to read in the data from the WordPress XML extract file. I create a variable to hold the location, then read it in.

$wpInput = 'D:\OneDrive\BlogPosts\Markdown\arcanecode.wordpress.2022-03-08.000.xml'

# Read the data from input file
$inData = Get-Content $wpInput

Now it’s time to read in the data from the XML file, one line at a time.

# Setup an empty array to hold the output
$outData = @()

foreach ($line in $inData)
{

  # Extract the title. Replace the XML tags with the Markdown for a link title
  if ($line.Trim().StartsWith('<title>'))
  {
    $title = $line.Trim().Replace('<title>', '').Replace('</title>', '')
  }

  # Extract the link, replacing the XML tags with the Markdown link characters
  if ($line.Trim().StartsWith('<link>'))
  {
    $link = $line.Trim().Replace('<link>', '').Replace('</link>', '')

    # For some reason the WordPress export uses http instead of https. Since the
    # blog supports https, lets fix that.
    $link = $link.Replace('http:', 'https:')
  }

  if ($line.Trim().StartsWith('<pubDate>'))
  {
    # Extract just the date, then covert it to a DateTime datatype
    $pubDateTemp = [DateTime]($line.Trim().Replace('<pubDate>', '').Replace('</pubDate>', ''))

    # Now use the ToString feature of a DataTime datatype to format the date
    $pubDate = $pubDateTemp.ToString('yyyy-MM-dd')

    # In addition to links to the blog posts themselves, the exported XML file also
    # has links to images. To weed these out, we will search for posts that have PowerShell
    # in the title. The Contains method is case sensitive so it will omit the links
    # to the images.
    #
    # When a match is found, it passes the Title/Link/PubDate to our function, which will
    # generate a custom object. This object will be added to our output array.
    if ($title.Contains('PowerShell'))
    {
      $outData += Get-WPObject -Title $title -Link $link -PubDate $pubDate
    }

  }

} # End the foreach ($line in $inData) loop

First I create an empty array that will hold the output. To learn more about arrays, see my post Fun With PowerShell Arrays.

Now I enter a foreach loop, to go over each line in the array. If you don’t know, when you use Get-Content it returns each line in the file as a row in an array. That’s what I want here, but be aware if you add the -Raw switch to the Get-Content it returns the entire file as one big text string.

The data in the XML occurs in the order of Title, Link, then PubDate. PubDate is the Publication Date for the blog post.

As I find the title and link, I remove the XML tags then copy the data into a local variable. For some reason the extract uses http for the links, so I wanted to correct it to use https.

When I find the PubDate, I wanted to reformat it as a string in YYYY-MM-DD format. I extract just the date portion of the line by removing the XML tags. I then cast it to a [DateTime] and store it in a temporary variable.

I can then call the ToString method of the DataTime datatype to format it in a format I want, namely YYYY-MM-DD (Year, Month, Day).

Next I check to see if the title contains the word PowerShell. If so, I now have the three pieces of info I need, and call my function to generate the PSCustomObject and add it to the output array.

Creating HTML

To create the HTML I wrote a function, Get-WPHtml. Like the other functions I created this as an Advanced function. To read up on Advanced Functions, see my article Fun With PowerShell Advanced Functions.

I needed this so I could pipe the data from the array containing my WordPress PSCustomObjects into it. By doing it this way, I could reuse the Get-WPHtml with any array that has objects with three properties of Title, Link, and PubDate.

Let’s look at the function.

function Get-WPHtml()
{
  [CmdletBinding()]
  param (
          [Parameter (ValuefromPipeline)] $wpObjects
        , [Parameter (Mandatory = $false)] $Indent = 0
        , [switch] $FormatAsTable
        )

  process
  {
    # Create a string with spaces to indent the code. If not used no indent is created.
    $space = ' ' * $Indent

    # Create a formatted output line
    if (!$FormatAsTable.IsPresent)
    {
      # Create each line as a paragraph
      $outLine = @"
$space<p>$($wpObjects.PubDate) - <a href="$($wpObjects.Link)" target=blank>$($wpObjects.Title)</a></p>
"@
    }
    else
    {
      # Create each line as a row in a table
      $outLine = @"
$space<tr> <td>$($wpObjects.PubDate)</td> <td><a href="$($wpObjects.Link)" target=blank>$($wpObjects.Title)</a></td> </tr>
"@
    }

    # Return the formatted line
    $outLine
  }

}

The first parameter will accept the data from our pipeline, as I explain in my article Fun With PowerShell Pipelined Functions. Next is an optional parameter that allows the user to indent each row a certain number of spaces. The final parameter toggles between formatting each row as a standard paragraph or as a table row.

The process block will run once for each piece of data passed in from the pipeline. It creates a variable with the number of spaces the user indicated. If the user didn’t pass a value in, this will wind up being an empty string.

Next we check to see if the switch FormatAsTable was passed in, then create an output string based on the users choice. For more on switches, refer to my article Fun With the PowerShell Switch Parameter.

As a final step we return the newly formatted line, which puts it out to the pipeline.

Using the New Function

Using these functions is easy. We take the array of custom objects, then pipe it into the new Get-WPHtml function using an indent of 2. The result is copied into the $outHtml variable which will be an array.

Finally we set the path for our output file, then use the Out-File cmdlet to write to disk.

$outHtml = $outData | Get-WPHtml -Indent 2

# Save the new array to a file. Use Force to overwrite the file if it exists
$wpOutputHtml = 'D:\OneDrive\BlogPosts\Markdown\arcanecode.wordpress2.html'
Out-File -FilePath $wpOutputHtml -InputObject $outHtml -Force

Creating a Full HTML Page

For my purposes, I am going to take the data in the file and copy and paste it into the WordPress post editor when I create my roundup blog post. For testing purposes, however, it was convenient to have a full webpage. With a full webpage I can open it in a web browser, see the result, and test it out. Further, in other projects I may actually need a full webpage and not the part of one that I’ll be using for my blog.

The version of the webpage with just paragraph tags will open OK in a browser, but the version of the table will not. So let’s fix that.

Here is the function I created to wrap the output of the previous function, when called using the -FormatAsTable flag, in the necessary HTML to make it a functioning webpage.

function Add-WPHtmlHeader()
{
  [CmdletBinding()]
  param (
          [Parameter (Mandatory = $true)]
          $htmlData
        )

  # Create a new array
  $outTable = @()

  # Add the html to create a left aligned table header
  $outTable += '<style>th { text-align: left; } </style>'
  $outTable += '<table>'
  $outTable += '<tr>'
  $outTable += '<th>Date</th> <th>Post</th>'
  $outTable += '</th>'

  # Add the existing table row data
  foreach ($row in $htmlData) { $outTable += $row }

  # Add the closing table tag
  $outTable += '</table>'

  # Return the output
  return $outTable
}

The one parameter is the array that was output from our Get-WPHtml function. While you can add rows to an array, or change values at a specific position, you can’t insert new rows at specific positions. As such we have to create a new empty array, which was done with $outTable.

We then add the lines needed to create the table header. For this article I’m assuming you are familiar with basic HTML tags.

Once the header rows have been added we cycle through the input array, adding each row to the new output array.

Finally we add the closing tag to finish off the table element, then return the output.

Generating the Complete Webpage

Now that the hard part is done, all we have to do is call the function, passing in the output of the previous function, stored in $outHtml. This will then be written to a file using the Out-File cmdlet.

$outTable = Add-WPHtmlHeader $outHtml

# Save the new array to a file. Use Force to overwrite the file if it exists
Out-File -FilePath $wpOutputHtml -InputObject $outTable -Force

The Output

Here is a sample of the output of our hard work. Note I’ve only included a few rows of blog posts to keep it brief.

<style>th { text-align: left; } </style>
<table>
<tr>
<th>Date</th> <th>Post</th>
</th>
  <tr> <td>2020-09-29</td> <td><a href="https://arcanecode.com/2020/09/29/vscode-user-snippets-for-powershell-and-markdown/" target=blank>VSCode User Snippets for PowerShell and MarkDown</a></td> </tr>
  <tr> <td>2020-12-05</td> <td><a href="https://arcanecode.com/2020/12/05/two-new-powershell-courses-for-developers-on-pluralsight/" target=blank>Two New PowerShell Courses for Developers on Pluralsight</a></td> </tr>
  <tr> <td>2020-12-14</td> <td><a href="https://arcanecode.com/2020/12/14/iterate-over-a-hashtable-in-powershell/" target=blank>Iterate Over A Hashtable in PowerShell</a></td> </tr>
</table>

Conclusion

In this post we tackled a project to create an HTML page based on the export of a WordPress blog. In the process we used many of the techniques I’ve blogged about over the last year and a half.

For the next post we’ll use these same techniques to create an output file in Markdown format.

The demos in this series of blog posts were inspired by my Pluralsight course PowerShell 7 Quick Start for Developers on Linux, macOS and Windows, one of many PowerShell courses I have on Pluralsight. All of my courses are linked on my About Me page.

If you don’t have a Pluralsight subscription, just go to my list of courses on Pluralsight . At the top is a Try For Free button you can use to get a free 10 day subscription to Pluralsight, with which you can watch my courses, or any other course on the site.