Fun With PowerShell – Extracting Blog Titles and Links from a WordPress Blog with PowerShell – Generating Markdown

Introduction

In my previous blogpost, Fun With PowerShell – Extracting Blog Titles and Links from a WordPress Blog with PowerShell, I described how I extracted the title, link, and publication date for posts in my WordPress blog using PowerShell. I then went on to use PowerShell to generate HTML code that I could insert into a post, or create a basic webpage.

It would also be useful to generate Markdown, instead of HTML, in case I want to use it somewhere such as my GitHub page. In this post we’ll see how to do just that, and create Markdown from the output array of PSCustomObjects.

For all of the examples we’ll display the code, then (when applicable) under it the result of our code. In this article I’ll be using PowerShell Core, 7.2.2, and VSCode. The examples should work in PowerShell 5.1 in the PowerShell IDE, although they’ve not been tested there.

Additionally, be on the lookout for the backtick ` , PowerShell’s line continuation character, at the end of many lines in the code samples. The blog formatting has a limited width, so using the line continuation character makes the examples much easier to read. My post Fun With PowerShell Pipelined Functions dedicates a section to the line continuation character if you want to learn more.

To run a snippet of code highlight the lines you want to execute, then in VSCode press F8 or in the IDE F5. You can display the contents of any variable by highlighting it and using F8/F5.

Where to Start

Much of the work has already been done in the previous post. Review it, stopping at the Creating HTML section. The array we created will now be used in generating Markdown.

This is the reason I created an array of custom objects holding the title, link, and publication date. Just as I used it to create HTML, I can now use it to generate Markdown.

Generating Markdown

Like I did with the HTML, I created a function to create Markdown. This is and advanced function that I’ll pipeline the array of PSCustomObjects into.

function Get-WPMarkdown()
{
  [CmdletBinding()]
  param (
          [Parameter (ValuefromPipeline)] $wpObjects
        , [switch] $FormatAsTable
        )

  process
  {
    # Create a formatted output line
    if (!$FormatAsTable.IsPresent)
    {
      # Create each line as a paragraph
      $outLine = @"
$($wpObjects.PubDate) - [$($wpObjects.Title)]($($wpObjects.Link))
"@
    }
    else
    {
      # Create each line as a row in a table
      $outLine = @"
|$($wpObjects.PubDate)|[$($wpObjects.Title)]($($wpObjects.Link))|
"@
    }

    # Return the formatted line
    $outLine
  }

}

The first parameter accepts the custom objects we generated from the pipeline. The second is a switch that will format the output as a row in a Markdown table, as opposed to just a line of Markdown text.

I then check to see if the switch was passed in, and format the line to return accordingly. Finally I send the generated line out of the function.

Using the Get-WPMarkdown Function

Now all we have to do is call the function. As a reminder, the data in the $outData variable is the array of custom objects we generated in the previous posts.

$outMd = $outData | Get-WPMarkdown

$wpOutputMd = 'D:\OneDrive\BlogPosts\Markdown\arcanecode.wordpress2.md'
Out-File -FilePath $wpOutputMd -InputObject $outMd -Force

This will generate our data as rows in a Markdown file. Below is a small example.

2020-09-29 - [VSCode User Snippets for PowerShell and MarkDown](https://arcanecode.com/2020/09/29/vscode-user-snippets-for-powershell-and-markdown/)
2020-12-05 - [Two New PowerShell Courses for Developers on Pluralsight](https://arcanecode.com/2020/12/05/two-new-powershell-courses-for-developers-on-pluralsight/)
2020-12-14 - [Iterate Over A Hashtable in PowerShell](https://arcanecode.com/2020/12/14/iterate-over-a-hashtable-in-powershell/)

Outputting a Markdown Table

In the code there was a switch to format the output Markdown as a table.

$outMd = $outData | Get-WPMarkdown -FormatAsTable

As I did with the HTML example, I wanted to wrap the generated data in the appropriate Markdown code to make this a complete Markdown table. I created another function to handle this.

function Add-WPMarkdownHeader()
{
  [CmdletBinding()]
  param (
          [Parameter (Mandatory = $true)]
          $markdownData
        )

  # Create a new array
  $outTable = @()

  # Add the html to create a left aligned table header
  $outTable += '|Date|Post|'
  $outTable += '|:-----|:-----|'

  # Add the existing table row data
  foreach ($row in $markdownData) { $outTable += $row }

  # Return the output
  return $outTable
}

As you can see, it creates a new array, adding the Markdown code for a table header, one specific for our data. It then cycles through the array that was passed in and adds it to the new array. Once done this new array is returned by the function.

To call it we simply use the following sample to write it to a file.

$outTable = Add-WPMarkdownHeader $outMd
Out-File -FilePath $wpOutputMd -InputObject $outTable -Force

Here is a sample of the output.

|Date|Post|
|:-----|:-----|
2020-09-29 - [VSCode User Snippets for PowerShell and MarkDown](https://arcanecode.com/2020/09/29/vscode-user-snippets-for-powershell-and-markdown/)
2020-12-05 - [Two New PowerShell Courses for Developers on Pluralsight](https://arcanecode.com/2020/12/05/two-new-powershell-courses-for-developers-on-pluralsight/)
2020-12-14 - [Iterate Over A Hashtable in PowerShell](https://arcanecode.com/2020/12/14/iterate-over-a-hashtable-in-powershell/)

Conclusion

In this post we saw how to generate Markdown code from a WordPress blog extract. Combined with the code in my previous post I now have a handy script I can use to generate HTML and Markdown code from my blog posts. This will be handy for both now, and when I want to create wrap up posts for future series.

These techniques can be easily adapted for any XML file that you wish to create a summary listing for, in HTML or Markdown or both.

The demos in this series of blog posts were inspired by my Pluralsight course PowerShell 7 Quick Start for Developers on Linux, macOS and Windows, one of many PowerShell courses I have on Pluralsight. All of my courses are linked on my About Me page.

If you don’t have a Pluralsight subscription, just go to my list of courses on Pluralsight . At the top is a Try For Free button you can use to get a free 10 day subscription to Pluralsight, with which you can watch my courses, or any other course on the site.

Fun With PowerShell – Extracting Blog Titles and Links from a WordPress Blog with PowerShell

Introduction

Since September of 2020 I have been blogging heavily on PowerShell. In a few posts I’m going to start a new series on a different subject, but first I wanted to provide a wrap up post with links to all my recent PowerShell posts.

Extracting all of those titles and links by hand seemed like a labor intensive task, so of course I wanted to automate it. In addition, I’ll be able to reuse the code when I’m ready to wrap up my next, or a future, series.

My blog is hosted on WordPress.com, which provides an export function. In this post I’ll cover the code I created to extract all my links, and how I generated HTML from it. In my next post I’ll show the same methodology for generating Markdown, and in the next post will do the PowerShell roundup.

For all of the examples we’ll display the code, then (when applicable) under it the result of our code. In this article I’ll be using PowerShell Core, 7.2.2, and VSCode. The examples should work in PowerShell 5.1 in the PowerShell IDE, although they’ve not been tested there.

Additionally, be on the lookout for the backtick ` , PowerShell’s line continuation character, at the end of many lines in the code samples. The blog formatting has a limited width, so using the line continuation character makes the examples much easier to read. My post Fun With PowerShell Pipelined Functions dedicates a section to the line continuation character if you want to learn more.

To run a snippet of code highlight the lines you want to execute, then in VSCode press F8 or in the IDE F5. You can display the contents of any variable by highlighting it and using F8/F5.

Extracting Data from WordPress

One of the administrator tools in the WordPress.com site is the ability to extract your blog. You can generate an XML file with the entire contents of your blog. This includes all of the data including the post itself, comments, and associated metadata. They do provide the ability to limit the extract by by date range and subjects.

As you can guess this extract file is large, far too much to sift through by hand. That’s where PowerShell came to my rescue!

For each post, the exported XML file has three lines we are interested in, the tags with <title>, <pubDate> and <link>. I tackled this in stages.

As the first stage, I simply loop over the data in the file, looking for the XML tags I need. When I’ve found all three, I have a small function that creates a PowerShell custom object. After each object is created, it is added into an array. I needed to do a little filtering, as over the last year I’ve added a few more blog posts on other topics. I did not want these to be included in my future "Fun With PowerShell Roundup" post.

Once I have an array of custom objects, I can easily use them in multiple scenarios. For generating HTML I created a function that takes each object and generates a line of HTML code. It also has a way to generate the line as an HTML row instead of a series of paragraphs.

For my purposes, this was all I needed. However there may be times when you wish to generate a complete, but basic, web page. There is one more function I created that will take the output of the HTML rows and add the lines needed to make it a valid HTML page.

Generating a Custom WordPress Object

I mentioned a function to create a custom object, so let’s start with that.

function Get-WPObject()
{
  [CmdletBinding()]
  param (
          [Parameter( Mandatory = $true ) ]
          [string] $Title
        , [Parameter( Mandatory = $true ) ]
          [string] $Link
        , [Parameter( Mandatory = $true ) ]
          [string] $PubDate
        )

  # Build a hash table with the properties
  $properties = [ordered]@{ Title = $Title
                            Link = $Link
                            PubDate = $PubDate
                          }

  # Start by creating an object of type PSObject
  $object = New-Object –TypeName PSObject `
                       -Property $properties

  # Return the newly created object
  return $object
}

The function is straightforward, it takes the three passed in parameters and creates a custom object from it. This is a common technique, it allows you to easily generate a custom object. It also leverages code reuse.

If you want to get a more detailed explanation on creating and using custom PowerShell objects, see my post Fun With PowerShell Objects – PSCustomObject.

Creating The Array

Before we create the array, we need to read in the data from the WordPress XML extract file. I create a variable to hold the location, then read it in.

$wpInput = 'D:\OneDrive\BlogPosts\Markdown\arcanecode.wordpress.2022-03-08.000.xml'

# Read the data from input file
$inData = Get-Content $wpInput

Now it’s time to read in the data from the XML file, one line at a time.

# Setup an empty array to hold the output
$outData = @()

foreach ($line in $inData)
{

  # Extract the title. Replace the XML tags with the Markdown for a link title
  if ($line.Trim().StartsWith('<title>'))
  {
    $title = $line.Trim().Replace('<title>', '').Replace('</title>', '')
  }

  # Extract the link, replacing the XML tags with the Markdown link characters
  if ($line.Trim().StartsWith('<link>'))
  {
    $link = $line.Trim().Replace('<link>', '').Replace('</link>', '')

    # For some reason the WordPress export uses http instead of https. Since the
    # blog supports https, lets fix that.
    $link = $link.Replace('http:', 'https:')
  }

  if ($line.Trim().StartsWith('<pubDate>'))
  {
    # Extract just the date, then covert it to a DateTime datatype
    $pubDateTemp = [DateTime]($line.Trim().Replace('<pubDate>', '').Replace('</pubDate>', ''))

    # Now use the ToString feature of a DataTime datatype to format the date
    $pubDate = $pubDateTemp.ToString('yyyy-MM-dd')

    # In addition to links to the blog posts themselves, the exported XML file also
    # has links to images. To weed these out, we will search for posts that have PowerShell
    # in the title. The Contains method is case sensitive so it will omit the links
    # to the images.
    #
    # When a match is found, it passes the Title/Link/PubDate to our function, which will
    # generate a custom object. This object will be added to our output array.
    if ($title.Contains('PowerShell'))
    {
      $outData += Get-WPObject -Title $title -Link $link -PubDate $pubDate
    }

  }

} # End the foreach ($line in $inData) loop

First I create an empty array that will hold the output. To learn more about arrays, see my post Fun With PowerShell Arrays.

Now I enter a foreach loop, to go over each line in the array. If you don’t know, when you use Get-Content it returns each line in the file as a row in an array. That’s what I want here, but be aware if you add the -Raw switch to the Get-Content it returns the entire file as one big text string.

The data in the XML occurs in the order of Title, Link, then PubDate. PubDate is the Publication Date for the blog post.

As I find the title and link, I remove the XML tags then copy the data into a local variable. For some reason the extract uses http for the links, so I wanted to correct it to use https.

When I find the PubDate, I wanted to reformat it as a string in YYYY-MM-DD format. I extract just the date portion of the line by removing the XML tags. I then cast it to a [DateTime] and store it in a temporary variable.

I can then call the ToString method of the DataTime datatype to format it in a format I want, namely YYYY-MM-DD (Year, Month, Day).

Next I check to see if the title contains the word PowerShell. If so, I now have the three pieces of info I need, and call my function to generate the PSCustomObject and add it to the output array.

Creating HTML

To create the HTML I wrote a function, Get-WPHtml. Like the other functions I created this as an Advanced function. To read up on Advanced Functions, see my article Fun With PowerShell Advanced Functions.

I needed this so I could pipe the data from the array containing my WordPress PSCustomObjects into it. By doing it this way, I could reuse the Get-WPHtml with any array that has objects with three properties of Title, Link, and PubDate.

Let’s look at the function.

function Get-WPHtml()
{
  [CmdletBinding()]
  param (
          [Parameter (ValuefromPipeline)] $wpObjects
        , [Parameter (Mandatory = $false)] $Indent = 0
        , [switch] $FormatAsTable
        )

  process
  {
    # Create a string with spaces to indent the code. If not used no indent is created.
    $space = ' ' * $Indent

    # Create a formatted output line
    if (!$FormatAsTable.IsPresent)
    {
      # Create each line as a paragraph
      $outLine = @"
$space<p>$($wpObjects.PubDate) - <a href="$($wpObjects.Link)" target=blank>$($wpObjects.Title)</a></p>
"@
    }
    else
    {
      # Create each line as a row in a table
      $outLine = @"
$space<tr> <td>$($wpObjects.PubDate)</td> <td><a href="$($wpObjects.Link)" target=blank>$($wpObjects.Title)</a></td> </tr>
"@
    }

    # Return the formatted line
    $outLine
  }

}

The first parameter will accept the data from our pipeline, as I explain in my article Fun With PowerShell Pipelined Functions. Next is an optional parameter that allows the user to indent each row a certain number of spaces. The final parameter toggles between formatting each row as a standard paragraph or as a table row.

The process block will run once for each piece of data passed in from the pipeline. It creates a variable with the number of spaces the user indicated. If the user didn’t pass a value in, this will wind up being an empty string.

Next we check to see if the switch FormatAsTable was passed in, then create an output string based on the users choice. For more on switches, refer to my article Fun With the PowerShell Switch Parameter.

As a final step we return the newly formatted line, which puts it out to the pipeline.

Using the New Function

Using these functions is easy. We take the array of custom objects, then pipe it into the new Get-WPHtml function using an indent of 2. The result is copied into the $outHtml variable which will be an array.

Finally we set the path for our output file, then use the Out-File cmdlet to write to disk.

$outHtml = $outData | Get-WPHtml -Indent 2

# Save the new array to a file. Use Force to overwrite the file if it exists
$wpOutputHtml = 'D:\OneDrive\BlogPosts\Markdown\arcanecode.wordpress2.html'
Out-File -FilePath $wpOutputHtml -InputObject $outHtml -Force

Creating a Full HTML Page

For my purposes, I am going to take the data in the file and copy and paste it into the WordPress post editor when I create my roundup blog post. For testing purposes, however, it was convenient to have a full webpage. With a full webpage I can open it in a web browser, see the result, and test it out. Further, in other projects I may actually need a full webpage and not the part of one that I’ll be using for my blog.

The version of the webpage with just paragraph tags will open OK in a browser, but the version of the table will not. So let’s fix that.

Here is the function I created to wrap the output of the previous function, when called using the -FormatAsTable flag, in the necessary HTML to make it a functioning webpage.

function Add-WPHtmlHeader()
{
  [CmdletBinding()]
  param (
          [Parameter (Mandatory = $true)]
          $htmlData
        )

  # Create a new array
  $outTable = @()

  # Add the html to create a left aligned table header
  $outTable += '<style>th { text-align: left; } </style>'
  $outTable += '<table>'
  $outTable += '<tr>'
  $outTable += '<th>Date</th> <th>Post</th>'
  $outTable += '</th>'

  # Add the existing table row data
  foreach ($row in $htmlData) { $outTable += $row }

  # Add the closing table tag
  $outTable += '</table>'

  # Return the output
  return $outTable
}

The one parameter is the array that was output from our Get-WPHtml function. While you can add rows to an array, or change values at a specific position, you can’t insert new rows at specific positions. As such we have to create a new empty array, which was done with $outTable.

We then add the lines needed to create the table header. For this article I’m assuming you are familiar with basic HTML tags.

Once the header rows have been added we cycle through the input array, adding each row to the new output array.

Finally we add the closing tag to finish off the table element, then return the output.

Generating the Complete Webpage

Now that the hard part is done, all we have to do is call the function, passing in the output of the previous function, stored in $outHtml. This will then be written to a file using the Out-File cmdlet.

$outTable = Add-WPHtmlHeader $outHtml

# Save the new array to a file. Use Force to overwrite the file if it exists
Out-File -FilePath $wpOutputHtml -InputObject $outTable -Force

The Output

Here is a sample of the output of our hard work. Note I’ve only included a few rows of blog posts to keep it brief.

<style>th { text-align: left; } </style>
<table>
<tr>
<th>Date</th> <th>Post</th>
</th>
  <tr> <td>2020-09-29</td> <td><a href="https://arcanecode.com/2020/09/29/vscode-user-snippets-for-powershell-and-markdown/" target=blank>VSCode User Snippets for PowerShell and MarkDown</a></td> </tr>
  <tr> <td>2020-12-05</td> <td><a href="https://arcanecode.com/2020/12/05/two-new-powershell-courses-for-developers-on-pluralsight/" target=blank>Two New PowerShell Courses for Developers on Pluralsight</a></td> </tr>
  <tr> <td>2020-12-14</td> <td><a href="https://arcanecode.com/2020/12/14/iterate-over-a-hashtable-in-powershell/" target=blank>Iterate Over A Hashtable in PowerShell</a></td> </tr>
</table>

Conclusion

In this post we tackled a project to create an HTML page based on the export of a WordPress blog. In the process we used many of the techniques I’ve blogged about over the last year and a half.

For the next post we’ll use these same techniques to create an output file in Markdown format.

The demos in this series of blog posts were inspired by my Pluralsight course PowerShell 7 Quick Start for Developers on Linux, macOS and Windows, one of many PowerShell courses I have on Pluralsight. All of my courses are linked on my About Me page.

If you don’t have a Pluralsight subscription, just go to my list of courses on Pluralsight . At the top is a Try For Free button you can use to get a free 10 day subscription to Pluralsight, with which you can watch my courses, or any other course on the site.

Getting Healthy With Tech

Introduction

Over the last few months, I’ve been working hard to get healthier. I’m diabetic, with high blood pressure, and overweight (like a lot of people in IT). So, I’ve been working hard to change that.

I’m also a tech nerd and a data guy. I’ve been using tech to track my progress, examine many critical metrics, and trend these over time.

I thought others may benefit from what I’ve done in this area over the last few months, and thought I’d share the tech and apps I’ve been using here.

Apple Watch

I use multiple platforms for my daily work, including Windows and Linux, but in my opinion it’s Apple who has health tech really nailed down. My Apple Watch is my first tool for tracking my health.

With it, I can track my exercises. Every day, no excuses, I do a minimum of thirty minutes of exercise although as I’ve progressed it’s turned into forty or more. I have an indoor exercise bike for rainy days, or on a nice day head to the great outdoors for a swift walk.

When I walk, I use walking / hiking poles to give my arms a bit of a workout. On days where I do my indoor bike, I do some weightlifting with some handheld barbells to work my arms.

My watch tracks the length of my workout, how many calories I burned, what the weather was like, and if I walk what path did I take, and what elevation change was included in my route.

In addition, it also tracks my blood oxygen level, heart rate, and has an ECG function. It also tracks my sleep to see how much rest I’m getting at night. The watch also has a cool little mindfulness app, which helps me calm down and focus.

Finally, it provides reminders to stand up every hour. Like a lot of IT people, when I get seated in front of my PC I get really focused and lose track of time. Suddenly 3 hours can go by. Then when I stand up my bad back has gone stiff, and my arthritic hips let me know they aren’t happy.

The reminder to stand every hour has really made a difference. Getting up and moving around hourly really helps eliminate those stiff and sore times.

Apple iPhone / iPad

The information in my watch feeds back to the Fitness and Health apps on my iPhone. Here I can review my information from the watch, combined with data from my other apps and tools, more of which I’ll cover momentarily.

As you can see, the fitness app gives me a nice dashboard of my progress. Today I did a 2.03-mile walk. My total exercise time for today was 50 minutes. Note that if I had done multiple exercise activities, for example 30 minutes on my bike and 10 minutes of weights, it would combine that time.

It also shows my total calories burned, along with my target for today. So far, I’ve done 440 of 600 calories for my day today. The fitness app helps you calculate your target, but you can override it. In addition, it will prompt you to increase it over time based on your past workouts.

For example, when I first started my goal was 520 calories. It then increased to 560, and now to 600. I’m sure in the near future I’ll be prompted to increase it further, although as I mentioned I can change this whenever I feel I’m ready.

Finally, it also shows how many times I’ve stood today, with a goal of standing up at least once during an hour, for 12 hours in the day.

The circles show your progress in a quick graphical format. Once the circle is closed you’ve completed your goal for the day, although it will continue the circle beyond the target. This makes it easy to challenge yourself to meet your goal.

Some refer to this as the “gameification” of exercise. Turning exercise into a game, much like trying to get a high score in a video game. While intellectually I understand what is going on, it’s still a fun challenge to meet these goals and very satisfying to see those circles close.

Beyond the software built into my Apple devices, there are some other devices and applications I use.

Basic App Requirements

Before I list the apps and devices, I wanted to list a few of my basic requirements in selecting health apps. You may not have these same requirements, so you may find other apps that work better for you.

First, the app must work on both iPad and iPhone, with bonus points if there is an associated app for the Apple Watch. I like to do my monitoring of data on the iPad (which has a nice big screen my old eyes can see) but be able to register things like taking my meds on my iPhone, which is generally handy.

Next, the app needed to sync between the iPad / iPhone. I found many good apps, but very few that had the ability to synchronize their information between devices.

Finally, it needs to be easy to use. My wife is also tracking her health, but while smart she’s not a technical person so it has to be good for an average user, and not just tech nerds like me.

Omron Blood Pressure Monitor

To keep track of my blood pressure I use a monitor from a company called Omron. They have multiple devices, mine has Bluetooth and allows for two users, which is nice as you can share with your spouse / significant other / pesky relative that won’t leave.

My model is the BP7350, but there are a range of models that support this functionality. In the Apple Appstore they have a corresponding Omron Connect app. It’s pretty simple, you take your BP on the machine, then open the app and it syncs that reading to the iPhone.

As you can see it displays my readings for today. I can tap the History button on the bottom to see my readings over time. Should my meter and phone not automatically synchronize, I can tap the Sync button in the upper right corner to have the two sync.

If you tap the + button, it brings up an additional menu. Tap on Profile, then App Settings and it will let you copy your readings into the Apple Health App.

Blood Glucose

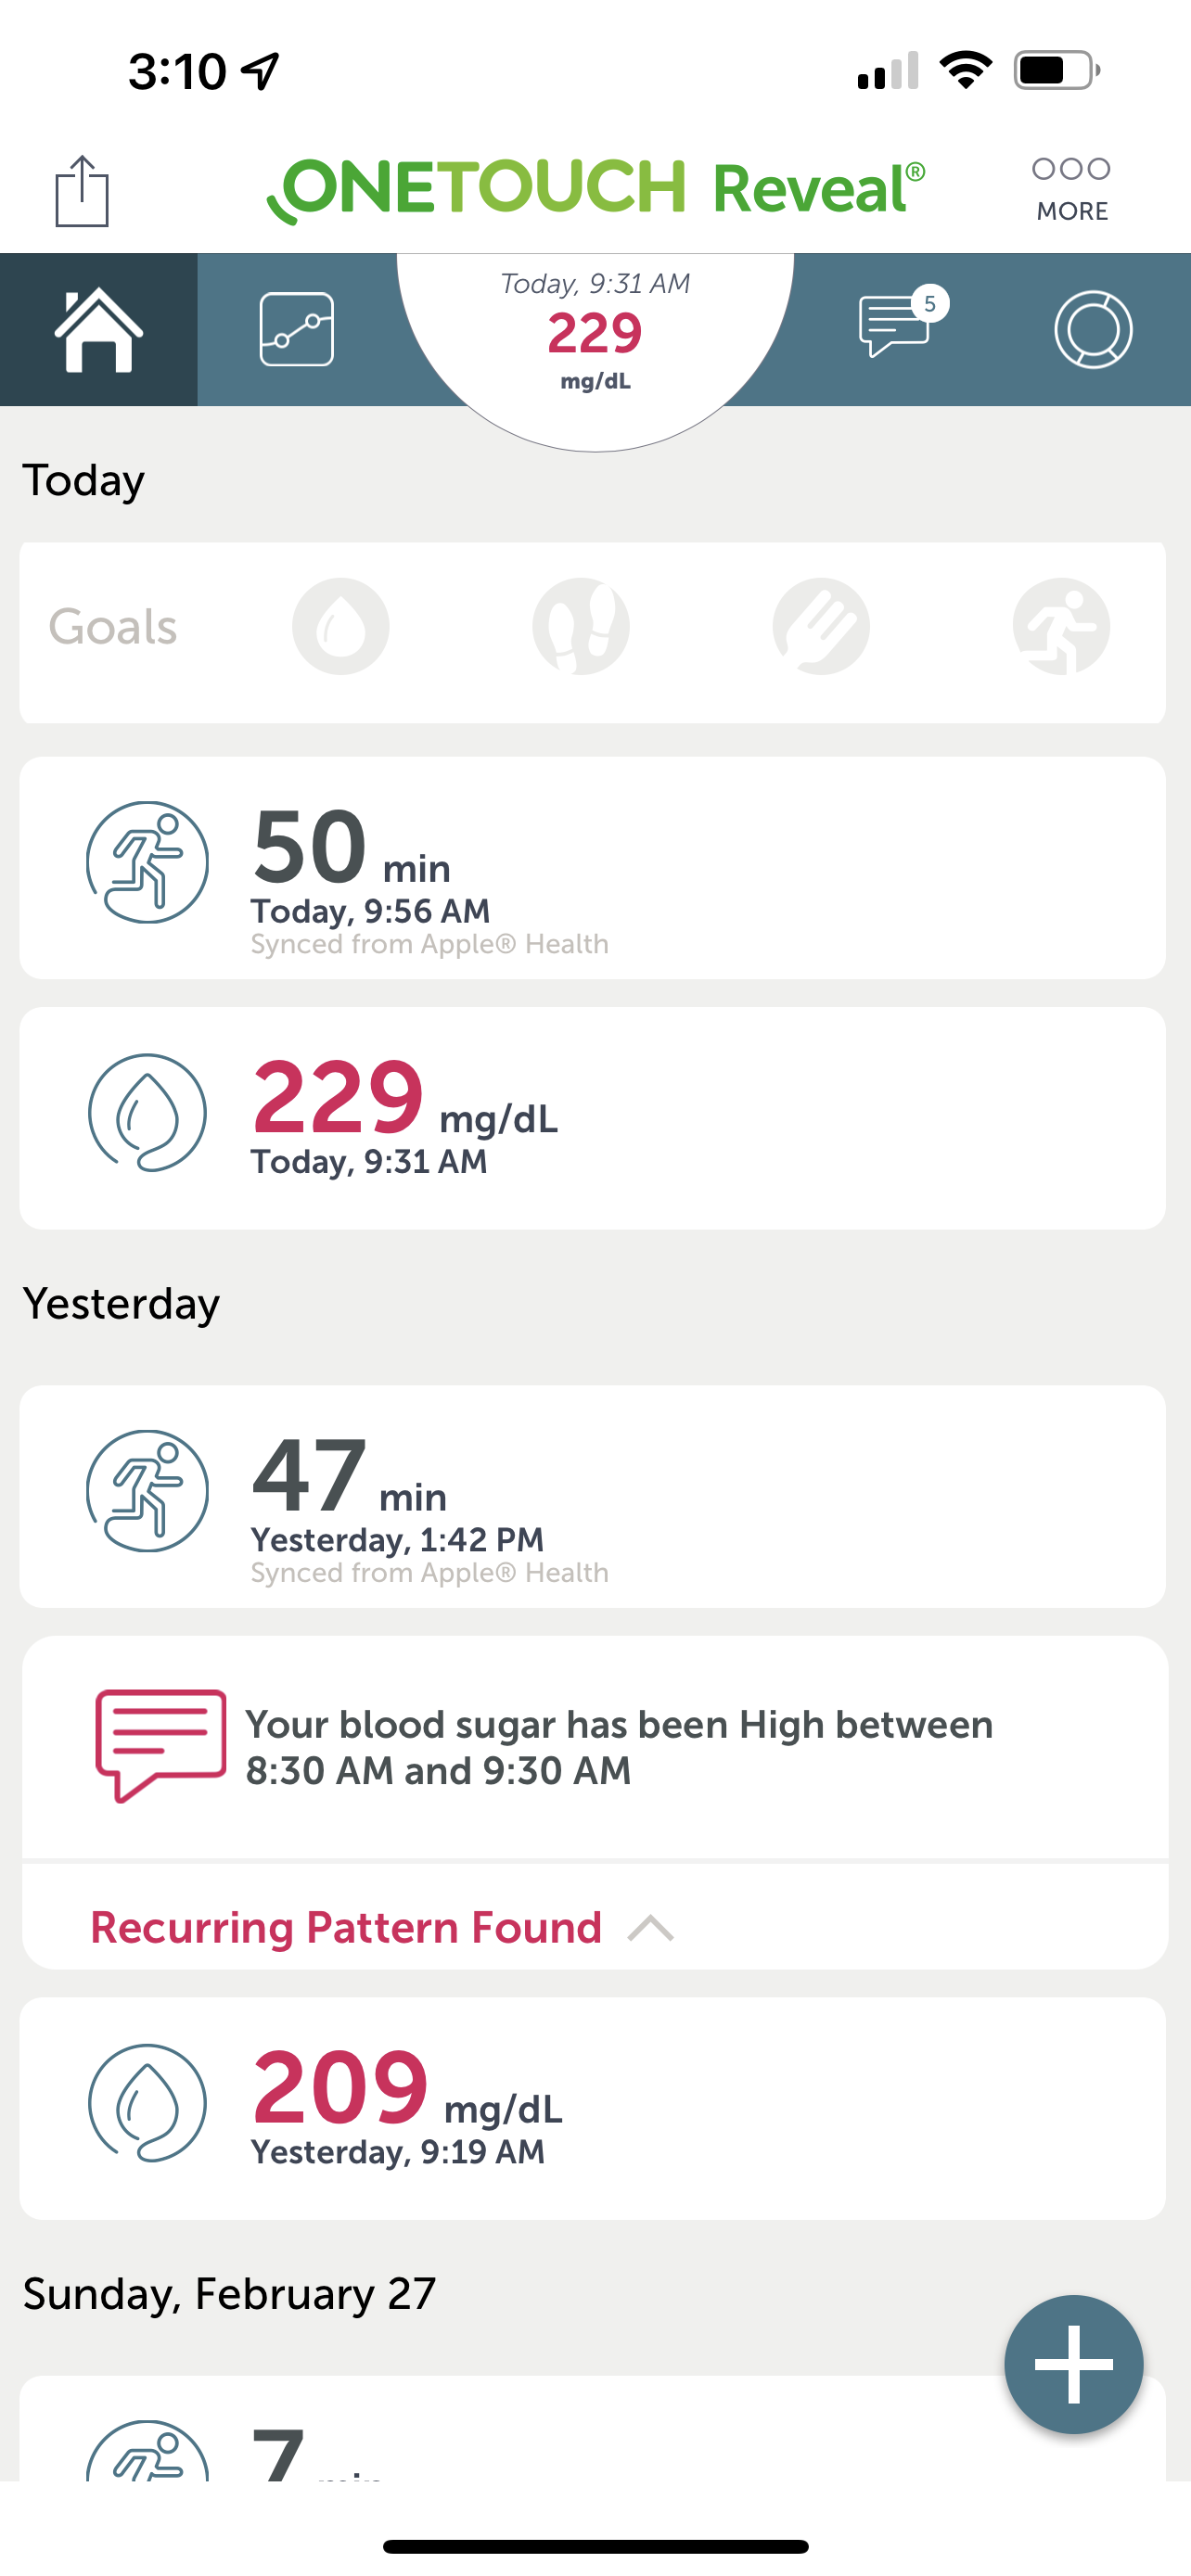
Being diabetic it’s important to monitor my blood glucose (aka blood sugar) every day. For that, I use the OneTouch Verio Flex meter. While this meter is not in my insurance company’s “approved” list, it was only $26 (US). The test strips run about $22 (US) for thirty, about a month’s supply.

Both of these I happily pay out of pocket for the convenience of easily tracking my readings. There is a corresponding OneTouch app for the iPhone, it pairs with the meter over Bluetooth. I just take my reading and it automatically syncs to my phone.

As you can see it forms a two-way link to the Apple Health and Fitness apps. It copies my daily reading into Apple Health and reads in my workouts from Fitness. It also looks for and warns about negative trends.

And yes, before someone points it out, I know my sugars are way too high. Late last year we found out my previous meds had quit working. The doctor’s office says it happens sometimes. So, my doctor and I are working with different medications to see what is most effective for me. It’s still a work in progress.

I mentioned it is a two-way link, the app also writes my glucose numbers into my Apple Health app.

Weight Tracking

As you might expect as part of getting healthier, I wanted to lose weight. Thus, I needed an effective way to track it. Ideally, I wanted to be able to just step on a scale, and it be recorded in an app.

I already used some Wyze cameras, since I had the app already it was an easy choice to select the Wyze scale.

In addition to weight, it also has other measurements such as BMI. One tip, don’t step off the scale too soon. Let it read your weight in, then wait a second. It will then calculate its other measurements. At that point you can step off, and the readings will show up in the Wyze app.

On the screen that displays your weight, you can go into the settings (gear icon in the upper right) and turn on data sharing with third party apps, like Apple Health. At $33 (US) this was a no brainer purchase.

Hydration

Staying hydrated is important for good health. Especially for diabetics, as it helps keep the sugars flushed from your system.

Note, don’t take anything here as medical advice, I’m not a doctor, I’m just sharing what mine told me. Your situation may vary, so be sure to consult your own physician.

To track my hydration, and to get reminders that it is time to drink, I selected an app called WaterMinder. It has iPhone and iPad apps as well as an app for the Apple Watch. You enter basic data like your age, height, weight, and it calculates how much water you should take in.

To be honest this is the one failing I found with the app, the number it creates is about half of what every other site I found said I should be getting. For me it said 80 ounces a day, so I just doubled that, and overrode the goal to 160 ounces a day. Again, be sure to do your own research and discuss the proper fluid intake goals with your own doctor.

As you can see, the app provides a cute little graphic showing your intake for the day. So far, I’ve taken in 100.8 oz, or 63% of my goal. To add data, you can tap the + button and quick pick a water cup amount. Alternatively, you can tap the icon to the right of it, and it brings up a menu with various kinds of liquids and lets you type in how many ounces.

That’s one of the things I really like about this app. If you, for example, drink milk, it calculates how much water is in the milk then adds just that amount of water to your hydration total.

The app will sync between devices, but it’s not always automatic. You can force it though, although I didn’t see it documented. Just tap the + button, then tap outside it, and it will force a sync.

You can also share your readings with another user of the WaterMinder. I share mine with my wife, and she shares hers with me. We can see how much water the other one has ingested and encourage each other.

The app also has a nice history feature. It will show your trend over time, but for a given day it will also show you each individual entry. That way you can track exactly what you’d consumed that day.

Medication

Many people, as they get older, take one or more medications. Even younger, healthier folks tend to take one or more vitamins. As such, it’s important to have a way to track not just what medications you take but to remind you when it is time to take them.

I spent a lot of time trying a multitude of apps to find one that met my requirements. I finally found one called EveryDose.

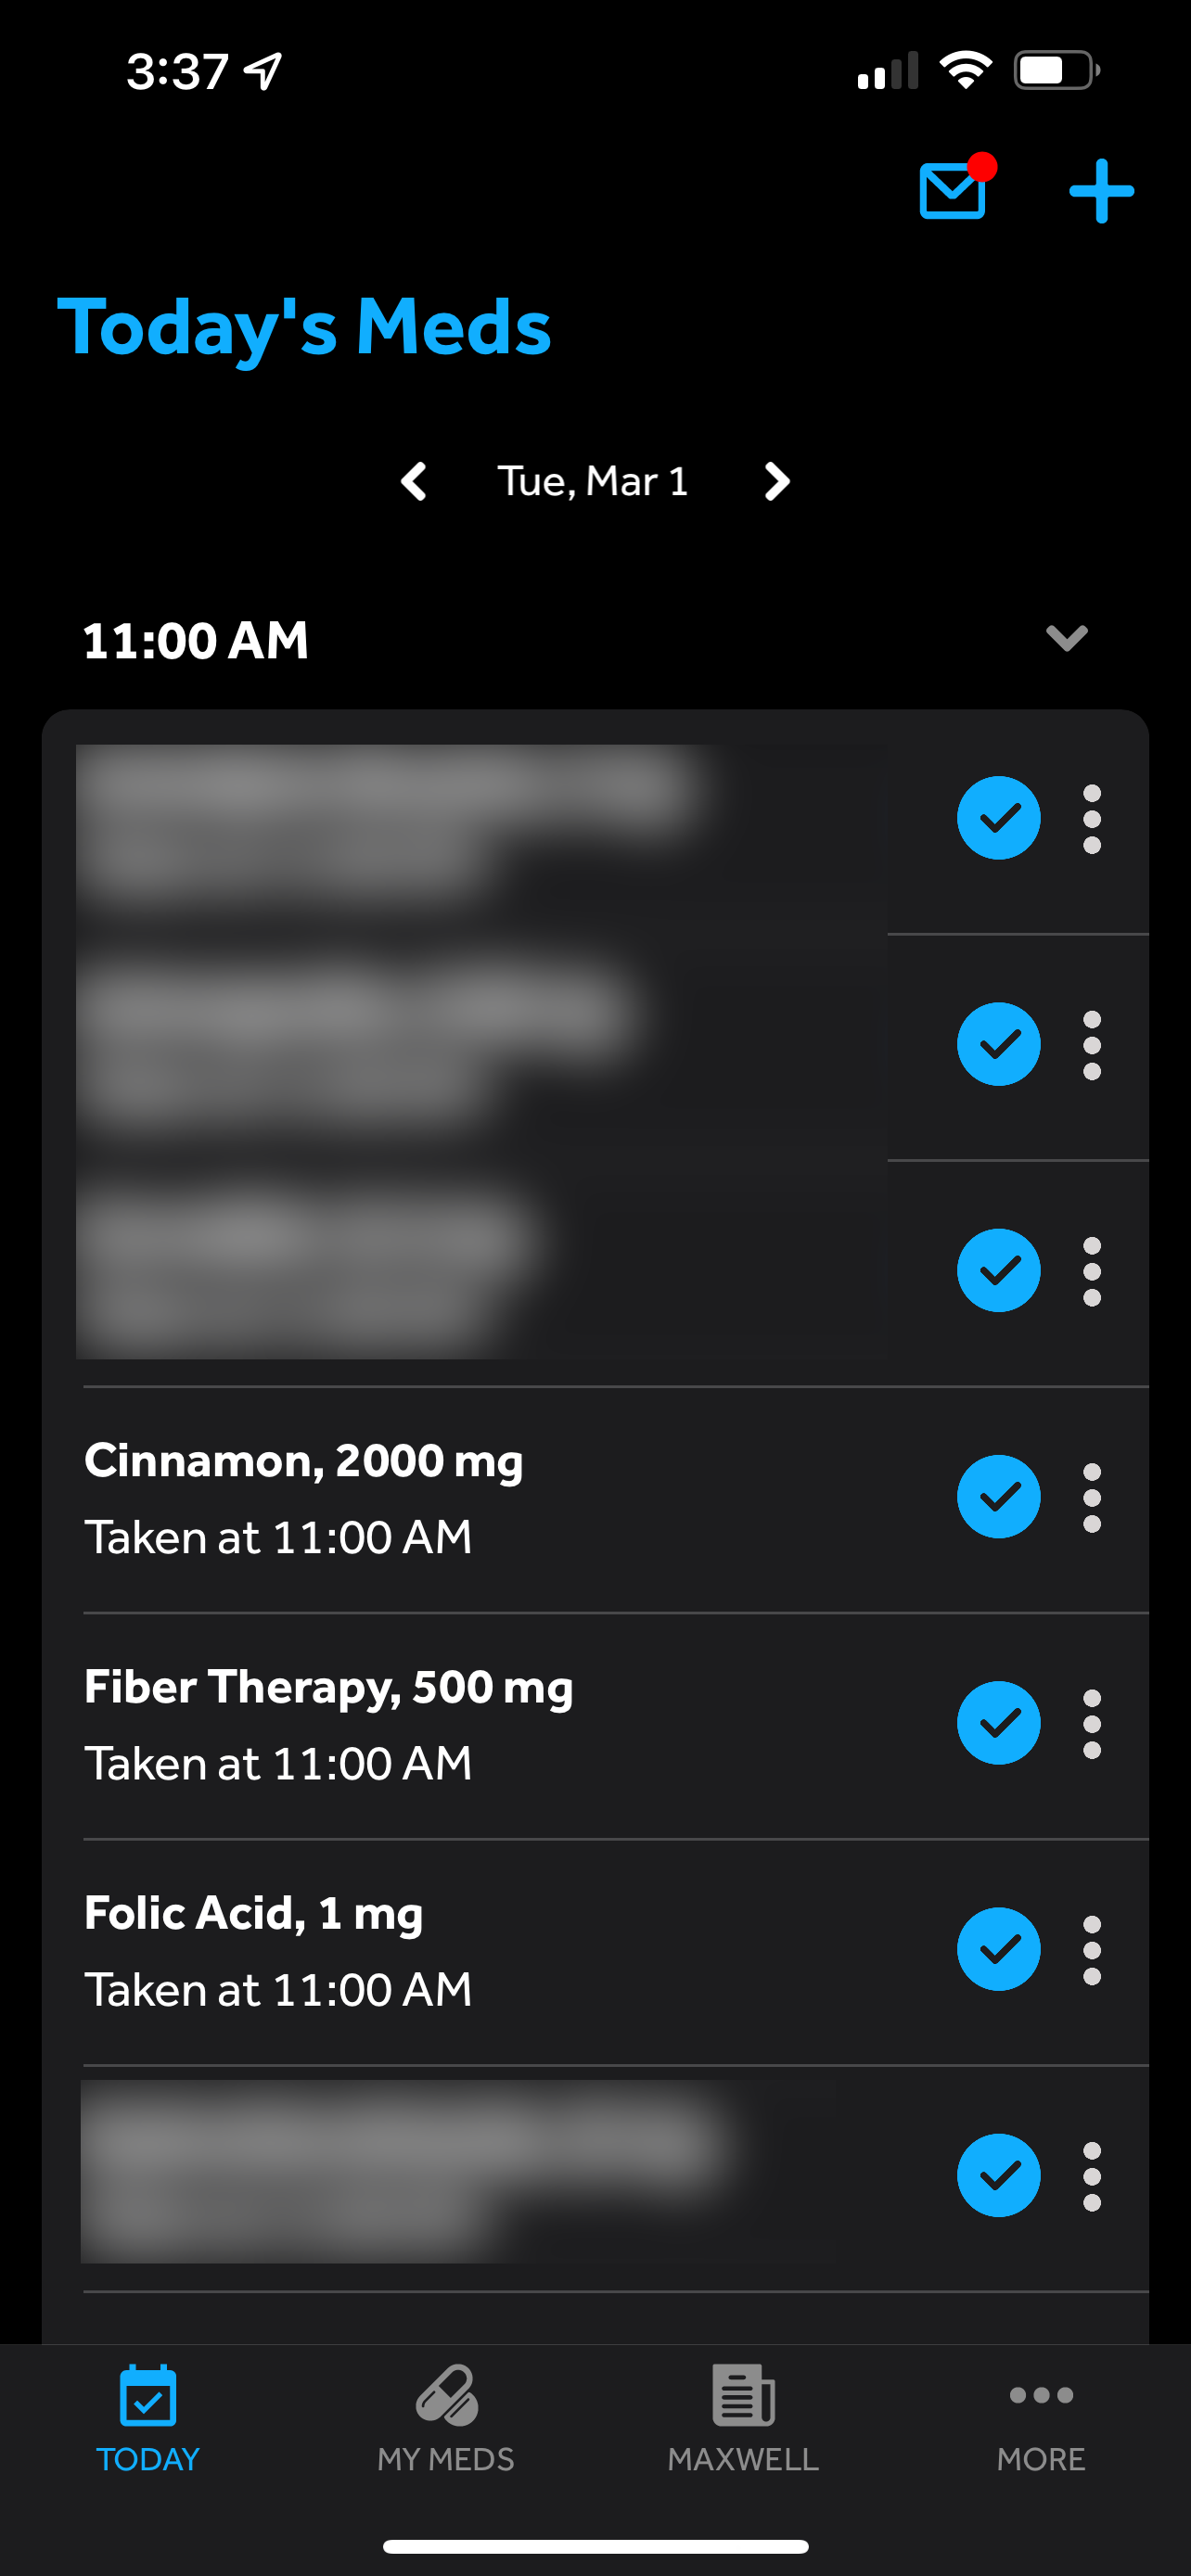
EveryDose is simple to use. You enter in all your medications. Built in there is a list of valid medications, so as you begin to type you can then pick your medication from the list. Should your medication not be in the list, no problem you can elect to add it anyway.

You also enter the strength of the pill, for example 50 mg, then the dose, 1 pill, 2, 1.5 pills, etc. Like the medications, you can enter a custom value as well.

As part of the data entry, you can select a time of day to take the medication, as well as a frequency (as needed, once a day, once a week, etc.).

Note I’ve blurred out my prescription meds, but you can also enter your vitamins into the app to track them. When the reminder alert goes off, you can tell the app you took the meds on time, just now, or enter a specific date/time.

If you need to, you can go down the list and pick the meds you took individually. This is handy should you run out of a particular pill that day.

You can export your list of meds so you can easily share with your doctor or pharmacist, plus great logging so you can see which meds you have taken on what days.

The one thing it lacked was integration into Apple Health. I’d love to see it enter my vitamins and such into those areas in Apple Health. But its other features were enough to make me go with it.

Exporting Health Data

You can take your health data to the next level by exporting it. Once exported, you can add it to your own database, or most importantly share it with your health care provider.

To do that well, I found an excellent app called Health Auto Export. This is a multicomponent application. There is one app that runs on the iPhone itself. This app provides some simple reporting, but its main purpose is to run in the background and update your personal database. This data can then be used by the Health Auto Export iPad app, as well as their app that runs on MacOS.

The primary purpose is to export your health data to a variety of formats such as CSV. You can bring this into Excel or Numbers, then slice and dice to provide your doctor with just the information they need.

It also has a nice dashboard which you can customize. Here’s an example of mine:

This gives me an easy-to-use dashboard I can view on my Mac or my iPads. I can drill down, using the menu on the left, to get more details, along with trends displayed over various charts and graphs.

As I mentioned, the most important functionality for me is the ability to export data. This has allowed me to share with my doctor, which helps him adjust my medication and track my health.

Conclusion

As I work to improve my health, I’ve explored a variety of apps and tools to track my progress. I wanted to share what I’ve found so far in case you, too, are seeing to improve your health.

I said this earlier in the post but want to reiterate: I am not a medical professional, and I am not offering medical advice. Please consult your physician before embarking on any healthcare, such as exercise, hydration, medication, and the like.

For me this is a journey, a work in progress. It’s possible, even likely, that as time goes by, I will find other apps and devices to improve my health.

If you have suggestions, perhaps you’ve found a better app or device, then by all means share them in the comments so we can all get healthier. My slogan has become:

Exercise, hydrate, medicate, every day! No excuses. Be a monster!

ArcaneCode