SQL Server 2016 Reporting Services Cookbook On Sale Until Jan 13, 2021

My last book, SQL Server 2016 Reporting Services Cookbook, is on sale until January 13th, 2021.

You can get the E-Book version for just $5 (US) when ordering direct from my publisher.

Now you may be thinking, “2016? That’s oooooold!” But in fact little has changed in Reporting Services since the 2016 release. All of the topics and techniques are still just as valid in SQL Server 2019.

To order your copy of the book, just jump on over to SQL Server 2016 Reporting Services Cookbook | Packt (packtpub.com)

Hurry though, offer is only good until January 13, 2021

Opening Port 80 in Windows Firewall to Support Calling SSRS From Another Computer

Recently I was working on another article for RedGate’s SimpleTalk site. As part of it, I had SSRS installed on a Windows 10 computer, and needed to connect to it from another computer. I was having a lot of issues connecting, until I remembered SSRS connects using Port 80, and by default Windows 10 (and previous versions) block Port 80 for incoming traffic.

The solution was to, obviously, open Port 80 on the Windows 10 computer. Doing so was not difficult, but did require quite a few steps, and of course administrator rights on the computer.

First, open the Windows 10 Settings. Then, click on Network & Internet.

image

On the Status window, click on Windows Firewall.

image

From here, click on Advanced settings.

image

If prompted confirm you do wish to make changes. When the Windows Defender Firewall dialog appears, click on Inbound Rules.

SNAGHTMLef395d1

Now click on New Rule

image

In the New Inbound Rule Wizard window, change the type of rule to be Port. Then click next.

image

On the next window, leave the rule applying to the default of TCP. For the port, assuming you are using the default setup, enter 80 for the port number. If you setup SSRS on a different port then obviously use that port number instead.

image

On the action page we tell Windows what we want to do if it finds incoming traffic on this port. For this development environment we will take the default of Allow the connection. If you had setup https service on your report server, then you could take the second option of allow if secure.

image

Next, we need to specify what network type the rule should apply to. For the scenario, I am on a small network, such as you might have at home, and that network was setup as private. Thus I am leaving Private checked on, and unchecking Domain and Public.

Unchecking public is especially important if you plan to take your laptop out to a coffee shop, you don’t want someone trying to hack into your machine via port 80. When done just click next.

image

On the last screen we’ll give the firewall rule a name, and a description. When done, click finish.

image

As you can see, the new rule now appears in our Inbound Rules area.

SNAGHTMLf01e748

Once you have completed working with your SSRS server, I’d suggest you return here, right click on the rule, and either disable it, or if you know it will no longer be needed, delete it.

And with that you should now be able to connect to the computer running SSRS from another computer on your network.

SQL Server 2016 Reporting Services Cookbook–On Sale Until 2018!

SQL Server 2016 Reporting Services CookbookHappy  Holidays! As a gift to everyone, PACKT Publishing has put the e-book version of my SQL Server 2016 Reporting Services Cookbook on sale for just $5.

Yes, that’s right, for the same price as a pumpkin spice chai tea latte with extra whip cream, and a quick trip to http://bit.ly/ssrscook, you could be reading this magnificent tome of wisdom.

Now, I can year some of you going “but Robert, SQL Server 2017 is out now, is this still relevant?” Yes, absolutely! Very few changes were made to the 2017 version of SSRS, so everything in this book is just as valid.

And it’s not just my book that is on sale, all the e-books at PACKT are on sale for the same low low price. So after you get done adding the SQL Server 2016 Reporting Services Cookbook to your shopping cart, be sure to check out the other awesome titles on PACKT Publishing.

This book, by the way, makes an excellent companion to two of my Pluralsight courses.

The SQL Server Reporting Services Playbook, https://www.pluralsight.com/courses/sql-server-reporting-playbook, is designed for people who are totally new to SSRS and need to get up to speed FAST.

Already know SSRS, and just want to learn what’s new with SSRS 2016? Then my appropriately named What’s New in SQL Server 2016 Reporting Services course, https://www.pluralsight.com/courses/sql-server-2016-reporting-services, is just the thing for you. It goes over just the new features in SSRS 2016 (and still applicable to 2017) and does it fast. With this short course you can be up and running with 2016/2017.

What? You don’t have a Pluralsight subscription? Well I’m shocked, but OK I can help you out. Just send me an email to

free@pluralsight.com

and I can fix you up with a code good for 30 days during which you can watch my courses, or any of the fine courses at Pluralsight. (If you want to see all my courses, just click the About Me link at the top, or go to http://arcanecode.me).

If you have some free time during the holiday season, and want to avoid the in-laws, then curling up with a great book (like the SQL Server 2016 Reporting Services Cookbook) beside the yuletide fire can be a great way to spend your time!

SQL Sever 2016 Reporting Services Cookbook has arrived!


SQL Server 2016 Reporting Services Cookbook by [Priyankara, Dinesh, Cain, Robert C.]I’m proud to announce my latest book, the SQL Server 2016 Reporting Services Cookbook, has been released! This was a real labor of love, it consumed most of my summer and well into the fall.

This book was published via Packt Press, and my coauthor was Dinesh Priyankara (blog | twitter).

In this book we cover recipes for almost all aspects of SQL Server Reporting Services. What’s inside? Just take a look:

Chapter 1 – Getting it Ready – Configuring Reporting Services.

Chapter 2 – Authoring Reports with SQL Server Data Tools

Chapter 3 – Advanced Report Authoring with SQL Server Data Tools

Chapter 4 – Authoring Reports with Report Builder

Chapter 5 – Improving User Experience – New Designing and Visualization Enhancements

Chapter 6 – Authoring Reports with the Mobile Report Publisher

Chapter 7 – Consuming Reports – Report Access Enhancements

Chapter 8 – Reporting Solutions for BI – Integration

Chapter 9 – SharePoint Integration

Chapter 10 – Administering and Managing Reporting Services

Chapter 11 – Securing Reports in Reporting Services

Chapter 12 – Custom Programming and Integration to .NET applications

That’s a lot of great material, over 500 pages of Reporting Services fun.

You can get the book through the publisher site:

https://www.packtpub.com/big-data-and-business-intelligence/sql-server-2016-reporting-services-cookbook

or use this shortcut: http://bit.ly/ssrscook

You can also get it on Amazon.

https://www.amazon.com/Server-2016-Reporting-Services-Cookbook-ebook/dp/B01HY3TC68/ref=tmm_kin_swatch_0?_encoding=UTF8&qid=1480527666&sr=8-6

Or use the shortcut: http://bit.ly/ssrscookbook

Note as of this blog post Amazon has the Kindle version ready, the print version still shows as a preorder, but that will be out shortly. If you want the print version consider going to the publisher site as you can get both the print and e-book version for one low price.

I want to thank my coauthor, Dinesh, who did a great job on his half of the book, as well as in designing the overall contents. Also a shout out to our editor, Amrita, who kept us in line and on track.

Enjoy!

SSRS 2012 Report Manager can’t load Microsoft.ReportingServices.SharePoint.ObjectModel

So I did it again, I broke my SQL Server. Well, sort of. I have a Hyper-V VM of Windows Server 2012R2 I use for development. On it I had SQL Server 2012 Developer Edition with all the latest service packs. I recently needed to do some work with 2014 as well, so installed SQL Server 2014 Developer Edition side by side. Everything seemed happy, until I opened up the SQL Server 2012 Report Manager webpage. It looked OK at first, but when I started clicking on things I started getting this error:

System.Configuration.ConfigurationErrorsException: Could not load file or assembly ‘Microsoft.ReportingServices.SharePoint.ObjectModel’ or one of its dependencies. The located assembly’s manifest definition does not match the assembly reference

Icky. So a web search turned up one hit, a connect item filed by Brian Judge:

https://connect.microsoft.com/SQLServer/feedback/details/1088671/sql-server-2012-reporting-services-errors-after-installing-sql-server-2014

At the bottom, Brian gives the clue on how to fix the issue when he says:

If I change the redirect to stay on 11.0.0.0 for the following policies then the problem appears to be resolved:

C:\Windows\assembly\GAC_MSIL\Policy.11.0.Microsoft.ReportingServices.SharePoint.ObjectModel

C:\Windows\assembly\GAC_MSIL\Policy.11.0.Microsoft.ReportingServices.SharePoint.Server

C:\Windows\assembly\GAC_MSIL\Policy.11.0.Microsoft.ReportingServices.SharePoint12.Server

C:\Windows\assembly\GAC_MSIL\Policy.11.0.Microsoft.ReportingServices.SharePoint14.Server


Alas, there are no specific instructions on just how to change the redirect. For those not familiar with the way these things work, I wanted to amplify his fix.

First, open a command window in administrator mode. I used the one that came with Visual Studio (the Developer Command Prompt for VS2012).

Next, change directory by using the “cd” command to the first item in the list above. (Click on the pic for a bigger image, should you have poor eyesight).

image

Using the DIR command, we can see one directory with a version number followed by what appears to be a hash value of some type. Issue another CD into that folder.

image

Using the DIR command again you will find two files in that folder:

image

Use notepad to edit the one with the .config extenstion.

image

When it appears, you will see something like:

image

Simply change the number in the newVersion from 12, to 11.

image

Repeat the steps for all four of the folders in the list above.

Next, and this is important kids, you need to stop and restart your SQL Server 2012 Reporting Services service, or simply reboot the computer. After that, your SSRS 2012 Report Manager should start to behave normally again. I’ve also tested the 2014 Report Manager, and it seems to work fine after the changes were applied. (In theory it shouldn’t have been affected, but you can never be too careful).

If you found this post useful, do us a favor. Go to the Microsoft Connect article linked at the top and give it an up vote, so Microsoft will begin to take notice. Also thanks again to Brian Judge (whom I do not know but hope to meet) for filing the original bug and giving the clue to fixing it.

SSRS Training Resources

I’ve been asked to provide links to some useful resources for learning about SQL Server Reporting Services. Below are a list of my favorite blogs, books, and other sites to learn from.

A quick disclaimer, some of the links below are by co-workers or other people I have an affiliation with, financial or otherwise. That’s because I’m lucky enough to work with some of the best people in the field. Also, in the case of the books I’ve linked to the Kindle version where possible, mostly because I’m a Kindle junkie. There are paper versions of the books, and you are free to buy from your favorite retailer.

Books

Microsoft SQL Server 2008 Reporting Services Step by Step – A great beginner book, loaded with good examples.

Pro SQL Server 2008 Reporting Services – This book goes much more in-depth with SSRS, delves into many advanced topics.

Microsoft SQL Server Reporting Services Recipes – 2008 or 2012 version of book. This is a great book, especially if you are doing Business Intelligence reporting. Note Amazon says the 2008 version is no longer available in the US, but I’m betting you can find it in your local bookstore or from other retailers. The 2012 version is available for pre-order.

Applied Microsoft SQL Server 2008 Reporting Services – Great book, like the book above covers many aspects of SSRS including BI reporting. Note Amazon only sells the paper version, you can also get it in PDF format direct from the publishers website.

Professional SQL Server 2012 Administration – I mention this book because I wrote the chapter on SQL Server Reporting Services. I don’t go deep into creating reports, although I briefly cover Report Builder. I do go into configuring SSRS and how to do scale out deployments, the total chapter is around 50 pages.

Blogs

Paul Turley – Paul is an active blogger and fellow Microsoft MVP. He is also co-author of the Reporting Services Recipes book I listed above.

Tep Lachev – An active blogger, Teo is not only a good resource for SSRS but for other BI tools such as PowerPivot. He is also author of the Applied Microsoft SQL Server 2008 Reporting Services book, listed above.

Videos

Pragmatic Works Webinars – On our website we have a big catalog of past webinars (all of which are free to watch), many of which focus on SSRS.

Pluralsight – Pluralsight has an extensive catalog of courses, including some great SSRS content. It’s subscription bases so there is a modest fee (starts at $29 US per month last I checked) but well worth it for the training you can get. There’s also a free trial.

For a quick link direct to this post, you can use http://bit.ly/arcanessrs

SSRS Quick Tip – An item with the same key has already been added

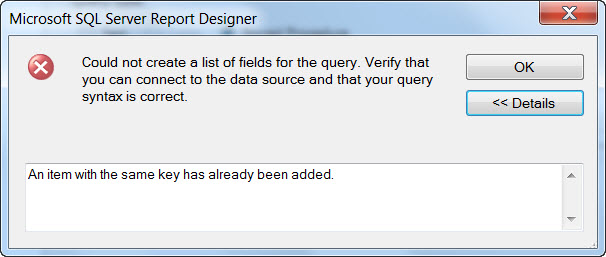
I was in the process of creating a new report in SQL Server Reporting Services today. I was loading my dataset from a stored procedure, and when I hit the “Refresh Fields” button I recieved the following error:

“Could not create a list of fields for the query. Verify that you can connect to the data source and that your query syntax is correct.”

When I clicked the details button I got this further information:

“An item with the same key has already been added.” Here’s a screen shot of my error.

Well this had me scratching my head, as I had made sure to run the stored procedure, and it executed with no errors. After doing some considerable research I finally found a question in the Technet forums that was tangentially related to the error. This gave me the clue to figure out what I had done.

In my stored procedure, I had inadvertantly included the same column name from two different tables. My query looked something like:

SELECT a.Field1, a.Field2, a.Field3, b.Field1, b.field99
FROM TableA a JOIN TableB b on a.Field1 = b.Field1

SQL handled it just fine, since I had prefixed each with an alias (table) name. But SSRS uses only the column name as the key, not table + column, so it was choking.

The fix was easy, either rename the second column, i.e. b.Field1 AS Field01 or just omit the field all together, which is what I did.

As it took me a while to figure this out, tought I’d pass it along to anyone else who might be looking.

Linked Subreports in SQL Server 2008 Reporting Services

Note, before getting started with this lesson there are some prerequisites you should know about. Please read my post Getting Started with SQL Server 2008 to ensure you have everything setup correctly, otherwise you will be missing objects required to get the code here to work correctly.

The previous lesson showed how to include a subreport into another report. This could be used to link independent reports together into a single report. It can also be useful to have a related subreport. A subreport whose data is driven by that of the main report. This can be accomplished by the use of paramenters.

For this lab we’ll create a subreport that returns category totals for the region passed in from the main report. Note that this is a greatly simplified example to illustrate the technique. Even though in this sample everything comes from the same database, each report could just as easily come from completely different data sources. Subreports would be a great technique for combining data from different systems.

Step 1. Create the subreport.

Use Contoso as the shared datasource. For the query, enter:

SELECT [Region]
     , [ProductCategoryName]
     , SUM([TotalAmount]) AS ProductTotal
  FROM [ContosoRetailDW].[Report].[V_SubcategoryRegionTotalsByYear]
 WHERE [Region] = @pRegion
 GROUP BY [Region], [ProductCategoryName]
 ORDER BY [Region], [ProductCategoryName]

Use a tabular report, move everything into the details area, Generic for the table style, and for the report name use “Subreport – Region Category Totals”.

Step 2. Cleanup the subreport.

Click the edge Region texbox in the header (so it’s selected instead of being edited), and press delete. Repeat with the [Region] textbox in the detail row. We won’t need it since Region will be displayed on the parent report.

Change the other headers to Category and Total. Make them wider, make what had been the Region column smaller but leave it, it will give a nice indent padding when included on the parent report. In the textbox properties for ProductTotal, make sure to set the Number to Currency, and in the Alignment area change the Horizontal to right align.

Remove the “Subreport – Region Category Totals” text box

Click on the main table grid, then move it to top of body. Collapse the body to fit the table.

Step 3. Add the parameter.

In the Report Data window, right click on Parameters and pick Add Parameter. Name the property Region. For the prompt, enter “Region – Hidden”. Since the prompt will never be visible, it really doesn’t matter, but making a habit of entering the name and the word Hidden will give a clear indicator that this parameter is a hidden one.

Leave the data type set to text, and check on “Allow blank value”. If you don’t, the report will error out when used as a subreport. Next, set the visibility to Hidden. This means it won’t appear if you run the report, but you can still pass in parameters, from another report or via a URL. Click OK to close the properties window.

Finally, we need to bind the parameter to the parameter the dataset needs. Right click on the dataset and go to properties. On the parameters area @pRegion should already be present (remember, it was part of the WHERE clause in the SQL query). Pick @Region in the drop down for Parameter Value.

Step 4. Create the main report.

Add a new report, using Contoso as the shared datasource. For the query, use:

SELECT [RegionCountryName]
  FROM [Report].[V_Regions]

Use a tabular report, move the RegionCountryName to the details area, and pick Corporate for the style. Finally, for the name use “Regional Report”.

Step 5. Layout the report.

Since there’s only one column, expand it to take up the width of the body.

Right click on the row selector (the gray box with the lines on the left of the table) and pick Insert Row->Inside Group Below.

Into that area, drag a Subreport control from the toolbox. Note in this case there is only one column, but if there were multiple cells you could highlight them, right click and pick Merge Cells.

Step 6. Setup the subreport.

Right click on the subreport control.

Under “Use this report as a subreport” select the “Subreport – Region Category Totals”. Under the parameters area, click Add. Select Region under Name, and for the Value select RegionCountryName.

Step 7. Preview the report

Preview the report to see your results:

clip_image002[4]

Notes

Just a few notes. In this report, we left the table headers in the subreport (Category and Total). Often these are removed, to make the subreport blend in more with the parent.

Here only one parameter was passed, however you can pass multiple parameters if you need to.

Using Subreports as Areas of Your SQL Server Reporting Services Report

Note, before getting started with this lesson there are some prerequisites you should know about. Please read my post Getting Started with SQL Server 2008 to ensure you have everything setup correctly, otherwise you will be missing objects required to get the code here to work correctly.

Subreports are an incredibly useful concept within Reporting Services. They allow you to compartmentalize complex logic. They also allow you to create reports that can be used in many different parent reports.

In this lab, we’ll look at how to create a subreport and use it as a region within a parent report. For this example, we’ll create a base report, then a subreport that will function as an executive summary which we can place at the top of the report body. These types of summaries are commonplace in the reporting world.

Let’s get started by creating our base report. This will be identical to the base report used in other labs.

Step 1. Add the main report

As with our other reports, right click on the Reports branch in Solution Explorer, pick Add New Report, and (if you haven’t already disabled it) click next to move past the welcome screen.

Step 2. Set the data source.

Pick the Contoso shared data source, or setup a new source to Contoso, and click Next.

Step 3. Setup the query.

In the query builder, we’ll be using one of our views. Enter this SQL statement:

SELECT [FiscalYear]

      ,[ProductCategoryName]

      ,[ProductSubcategory]

      ,[Region]

      ,[TotalAmount]

  FROM [ContosoRetailDW].[Report].[V_SubcategoryRegionTotalsByYear]

and click next.

Step 4. Set the format.

For the report type we’ll use the simple Tabular format, so just click Next.

Step 5. Determine field placement in the report.

To keep this simple we’ll not use any groups on this report, so just put all report fields into the Details section. You can do it in one easy step by clicking on the top most item (FiscalYear), holding down the shift key, and clicking the bottom item (TotalAmount). This will select all of the fields, just click the Details button to move them. Then click Next.

Step 6. Select the formatting Style

Once again we’ll go with Corporate for the style and click Next.

Step 7. Name the report.

Finally we’ll give the report a name of “Regional Sales by Subcategory Subreports as Report Areas” and click Finish.

Step 8. Format report columns

To make the report a little easier to read, expand the width of the columns and format the Total Amount as Currency. (See the previous labs if you don’t recall how to accomplish this.)

Step 9. Add the subreport

It’s now time to create the subreport. Just like with a regular report, right click on the Reports branch in Solution Explorer, pick Add New Report, and (if you haven’t already disabled it) click next to move past the welcome screen.

Step 10. Set the data source.

Pick the Contoso shared data source, or setup a new source to Contoso, and click Next.

Step 11. Setup the query.

In the query builder, we’ll be using one of our views. Enter this SQL statement:

SELECT [ProductCategoryName]

      ,[CategoryTotal]

  FROM [ContosoRetailDW].[Report].[V_ProdcutCategoryExecutiveSummary]

 ORDER BY [ProductCategoryName]


and click next.

Step 12. Set the format.

For the report type we’ll use the simple Tabular format, so just click Next.

Step 13. Determine field placement in the report.

To keep this simple we’ll not use any groups on this report, so just put all report fields into the Details section.

Step 14. Select the formatting Style

Unlike other reports, we will pick Generic for the style and click Next.

Step 15. Name the report.

Finally we’ll give the report a name of “Subreport – Executive Summary” and click Finish. Note that is common to start the names of subreports with the name “Subreport” to make them easier to find.

Step 16. Format subreport columns and body

To make the report a little easier to read, expand the width of the columns and format the Total Amount as Currency. (See the previous labs if you don’t recall how to accomplish this.)

In addition, we don’t need the body to be any wider that what is needed. Click on the text box that has the body title “Subreport – Executive Summary” and shrink it to match the width of the table. Then hover the mouse over the right side of the report and drag it over to bump against the right side of the table.

Gotcha: If you try and shink the body first, it will not go. The right edge of the body can never be less than the right edge of the widest object (or the object whose right edge is farthest to the right).

Step 17. Setup the detail header

Start by changing the titles of the detail grid to “Product Category” and “Total”. Now highlight the entire row by clicking the gray row selector square to the left of the row.

We can change the fore and background color of this row to match those of the main report. You can pick from standard colors, or enter your own color value. As an example of the first, go to the Color property, and from the drop down pick the color white. You will see the property name change to “White”.  You could also have chose to just type in the word White.

You can also enter a hexadecimal value for the color. Click on the Background Color property and enter “#1c3a70”. (No quotes, but make sure to include the # so the entered value will be understood as hex and not a standard color, such as “White”.

Note that you can also change the values of each textbox independently, using the same technique. Most commonly though you will want to set the entire row.

Step 18. The “Green Bar” effect

Once upon a time, in a computer room in the distant past, all reports were printed on paper that had alternating blocks of green and white background. This was known as “Green Bar” paper. The color made it easy to follow long lines of text across the page.

It’s possible to setup the same effect within our report today. Highlight the detail row, then in the Background Color of the properties window, click the drop down, then instead of a color pick the Expression option. For the expression, enter:

=iif((RowNumber(NOTHING) MOD 2) = 0, "LightBlue", "White")

Using the MOD function we determine if it’s an odd or even row, and set the background color accordingly. For the colors any color constant or hexadecimal value would work.

Step 19. Add a value for the body header.

When a report is used as a subreport, any headers or footers are ignored. It can be useful to have a nice title though, so in this step we’ll create one.

19.1                Hover over the bottom of the body, and drag it down to expand the body height.

19.2                Now click on the grid. When the grid row/column bars appear, click on the one in the very upper left corner. When you do, the row/column bars hide themselves, and the grid sizing handles appear. In the upper left is an icon that points up/down/left/right. Click on it and drag the grid down, leaving space at the top for a textbox. Also leave a little space at the bottom that can serve as a gap between it and other items that might appear on the main report we place this subreport on.

19.3                Next drag a textbox from the toolbox onto the top of the page. Expand the textbox to take up the width of the body. Increase the font size to 12, make the font bold, and center it.

19.4                We have a place now to put our title, lets grab some data to put there. Add a new dataset by right clicking on the Contoso data connection in the Report Data window.

19.5                Name it “CurrentFiscalYear”, for the query text enter:

SELECT MAX(FiscalYear) AS CurrentYear

   FROM [Report].[V_ProdcutCategoryExecutiveSummary]

Click OK to save this new dataset.

19.6                Returning to the textbox, right click and pick Expression. For the expression text, enter:

="Executive Summary for " & Sum(Fields!CurrentYear.Value, "CurrentFiscalYear")

To build the center part of the string, click on the Datasets option under category. Then click on the CurrentFiscalYear dataset. In the Values area, one item appears, Sum(CurrentYear). Click on it to add the text to the current expression.

There is an oddity with getting fields from other datasets then the main one that supplies data to the body, they must be an aggregate expression such as Sum. However, since we are SUMing one value, the subreport will look like.

clip_image002   clip_image004

        Design Mode                                                                     Preview Mode

Step 20. Add subreport to main report.

Adding the subreport is quite simple. First, expand the body to make room above the grid similar to what was done in the above step. Then, drag the subreport from the Solution Explorer onto a blank area of the body.

Positioning it can be a bit of a pain, there’s no nice “put in the center” button. But with a little math you can accomplish it.

Return to the subreport a moment, and click on the grid which should take up the entire width of the body. In the properties window, expand the Size property to see the width. In this case it’s 2.3 inches.

Back in the main report, repeating the procedure with the main report’s grid, we see the width is 6.58 inches. Now it’s easy, (6.58 – 2.3) / 2 yields 2.14 inches. Use this for the left property of the subreport. The width isn’t that important, just set it wide in this case.

Step 21. Preview the report.


clip_image006

As you see, you now have an attractive subreport that you can reuse in multiple reports.

Report Headers and Footers

Note, before getting started with this lesson there are some prerequisites you should know about. Please read my post Getting Started with SQL Server 2008 to ensure you have everything setup correctly, otherwise you will be missing objects required to get the code here to work correctly.

A common feature to most reports are headers and footers that describe the report, and supply additional information such as the page numbering or print date. In this lab we’ll look at ways to customize the header and footer.

We’ll start by creating a basic report, then adding the headers and footers to it.

Step 1. Add the report

As with our other reports, right click on the Reports branch in Solution Explorer, pick Add New Report, and (if you haven’t already disabled it) click next to move past the welcome screen.

Step 2. Set the data source.

Pick the Contoso shared data source, or setup a new source to Contoso, and click Next.

Step 3. Setup the query.

In the query builder, we’ll be using one of our views. Enter this SQL statement:

SELECT [FiscalYear]
      ,[ProductCategoryName]
      ,[ProductSubcategory]
      ,[Region]
      ,[TotalAmount]
FROM [ContosoRetailDW].[Report].[V_SubcategoryRegionTotalsByYear]

and click next.

Step 4. Set the format.

For the report type we’ll use the simple Tabular format, so just click Next.

Step 5. Determine field placement in the report.

To keep this simple we’ll not use any groups on this report, so just put all report fields into the Details section. You can do it in one easy step by clicking on the top most item (FiscalYear), holding down the shift key, and clicking the bottom item (TotalAmount). This will select all of the fields, just click the Details button to move them. Then click Next.

Step 6. Select the formatting Style

Once again we’ll go with Corporate for the style and click Next.

Step 7. Name the report.

Finally we’ll give the report a name of “Regional Sales by Subcategory Headers and Footers” and click Finish.

Step 8. Format report columns

To make the report a little easier to read, expand the width of the columns and format the Total Amount as Currency. (See the previous labs if you don’t recall how to accomplish this.)

Previewing the report shows our data. There’s a lot of it, so let’s say we are the sales manager and we want to apply filters so we are only looking at pieces of our sales.

Step 9. Add a header area.

To add a header area to the report, simply right click anywhere outside the report body and select “Add Page Header”.

Step 10. Add a title.

A blank, white canvas should appear above your report body. Here you can create a header. Go to the toolbox, and drag in a Text Box. In it enter “Regional Sales Report”. Click on the text box and grab the sizing handles to enlarge it. Sometimes this can be a little tricky, if you click inside the text box it assumes you want to enter or edit the text and puts you in edit mode. You have to click right on the edge of the text box area to make the sizing handles appear.

Now add some visual impact. Either right click to access the fonts or use the toolbar above the design area. Make the font bold, and bump it up a few sizes, 16 generally works well.

Step 11. Add page numbers.

Drag another text box into the area. This time instead of static text we’ll use an expression to put in page numbers. Position the text box in the upper right corner of the report.

Right click on the text box, and in the pop up menu pick “Expression”.

In the expression builder you have a blank slate, only the beginning = is supplied for you. Similar to Excel, all expressions must start with an = sign.

The expression builder is very full featured and powerful, you can do a lot of complex things with it. It uses a VB.Net like language. In this lab though we’ll do something similar and concatenate some static text and build in variables to form a Page x of xx expression.

After the = sign enter “Page “ then an ampersand “&”. Page is simply static text, and the & will be used to join together our return value.

In the lower half of the Expression dialog you will see a Category and Item area, these are designed to make it easier to build expressions. Click on the “Built in Fields” Category. On the right the Item area will populate with the valid fields. Click on PageNumber.

Return to the upper area where it says “Set expression for Value” and after the page number type in & “ of “ & . Then go back to the Item list and click TotalPages. Your Expression dialog should now look like:

clip_image002

Click OK to close the Expression builder.

Step 12. Format the page number.

Select the text box for the page number by clicking on the edge, then using the toolbar right align the page number box. Page numbers are typically quite small on the header, so let’s bump down the font to 8 point.

Step 13. Resize the header.

In this example our header isn’t very large, but when we added it SSRS gave us a considerable amount of space. Let’s resize this to something more appropriate.

Hover over the dotted line between the header and report body with your mouse. It should turn into the up/down sizing handle. When it does, click and drag it up.

As an alternative, you could click in the empty area of the header, then in the Properties pane of VS/BIDS enter an explicit Height value. This is useful for situations where you have specific requirements that the header must be of an exact size. This often occurs with things like pre-printed forms or paper with the letterhead already printed on it.

Step 14. Preview the header.

OK, all done with this part. Switch to the Preview tab to see the header in action.

clip_image004

Step 15. Add the footer.

Working with footers are identical to working with headers. Start by right clicking in an empty spot in the design area and pick “Add Page Footer”.

Step 16. Add content.

Drag a text box onto the footer. Expand it to take up the entire width of the report, then enter the Expression dialog as you did before, right click and pick Expression from the menu.

It’s common for a business to want to copyright their intellectual property, so enter this as your expression:

="Copyright " & Year(Now()) & " ArcaneCode."

Hint: If you select Common Functions, Date & Time in the Category area of the Expression builder, you’ll see many common functions. When you click on one helpful hints will appear to the right.

Since we have a lot of unused space, we’ll again shrink the footer like we did the header. This time though hover over the bottom of the footer to make the resizing mouse icon appear, then drag it up to shrink it.

Step 17. Test in the Preview pane.

Once again, return to the Preview tab, scroll down and the footer should look something like:

clip_image006

Other ideas.

The things you can do in the header and footers are nearly infinite. Images, such as your corporate logo can be used. Trademarks, warning notices of intellectual property, print dates, the report name and URL, and the list of parameters used to generate the report are all common things that may appear in the header.

Interactive Sorting in SQL Server 2008 Reporting Services Reports

Note, before getting started with this lesson there are some prerequisites you should know about. Please read my post Getting Started with SQL Server 2008 to ensure you have everything setup correctly, otherwise you will be missing objects required to get the code here to work correctly.

Often users want the ability to sort the data in various ways. They have gotten used to tools like Microsoft Excel that let you sort on column headers. Fortunately this is a fairly simple ability to implement in SQL Server Reporting Services. Let’s start by creating a base report. (Note this is the same basic report we’ve used in other posts.)

Step 1. Add the report

As with our other reports, right click on the Reports branch in Solution Explorer, pick Add New Report, and (if you haven’t already disabled it) click next to move past the welcome screen.

Step 2. Set the data source.

Pick the Contoso shared data source, or setup a new source to Contoso, and click Next.

Step 3. Setup the query.

In the query builder, we’ll be using one of our views. Enter this SQL statement:

SELECT [FiscalYear]
     , [ProductCategoryName]
     , [ProductSubcategory]
     , [Region]
     , [TotalAmount]
  FROM [ContosoRetailDW].[Report].[V_SubcategoryRegionTotalsByYear]

and click next.

Step 4. Set the format.

For the report type we’ll use the simple Tabular format, so just click Next.

Step 5. Determine field placement in the report.

To keep this simple we’ll not use any groups on this report, so just put all report fields into the Details section. You can do it in one easy step by clicking on the top most item (FiscalYear), holding down the shift key, and clicking the bottom item (TotalAmount). This will select all of the fields, just click the Details button to move them. Then click Next.

Step 6. Select the formatting Style

Once again we’ll go with Corporate for the style and click Next.

Step 7. Name the report.

Finally we’ll give the report a name of “Regional Sales by Subcategory” and click Finish.

Step 8. Format report columns

To make the report a little easier to read, expand the width of the columns and format the Total Amount as Currency. (See the previous labs if you don’t recall how to accomplish this.)

Step 9. Apply sorting to the column headers.

Here’s where the magic happens. Right click on the first column of the report header, which should be Fiscal Year, and pick Text Box Properties.

clip_image002

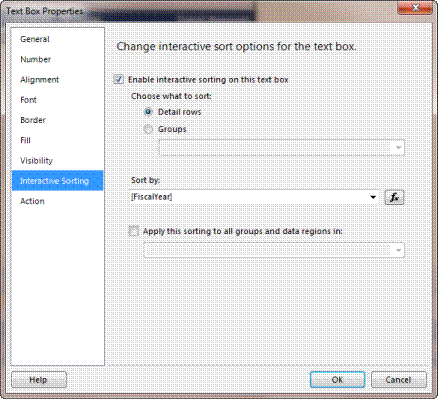
In the Text Box Properties dialog, first navigate to the Interactive Sorting area. Next, check on “Enable interactive sorting on this text box”.

Under “Choose what to sort” we’ll take the default of details. If we wanted to sort our groups, we could have picked the Groups option then picked the name of a group.

Next in the “Sort By” pick the FiscalYear field. Your dialog should now look like:

clip_image004

Click OK to save.

Repeat this step for the other columns, selecting the data associated with that column in the “Sort by” area.

Step 10. Preview your work

You should now be able to switch to the Preview tab. At the top right of each column you will now see a set of tiny up/down arrows, which when clicked will cause the report to sort by that column.

image

SQL Server 2008 Reporting Services and the “Select All” Parameter Issue

Note, before getting started with this lesson there are some prerequisites you should know about. Please read my post Getting Started with SQL Server 2008 to ensure you have everything setup correctly, otherwise you will be missing objects required to get the code here to work correctly.

In yesterday’s post, “Adding Query Parameters to SQL Server 2008 Reporting Services Reports”, we looked at how to add a Query Parameter to a report dataset. The steps hide a potentially fatal issue though: “Select All”. When you allow the user to select more than one parameter, they can also select all of them. Behind the scenes SSRS converts this to a long delimited list. Thus the query, when sent to the server, looks like:

SELECT [FiscalYear] 
     , [ProductCategoryName]
     , [ProductSubcategory]
     , [Region]
     , [TotalAmount]
  FROM [ContosoRetailDW].[Report].[V_SubcategoryRegionTotalsByYear]
 WHERE [Region] IN ('Armenia', 'Austrailia', 'Canada', 
                    --Rest of long list goes here

If you are certain beyond a doubt that you will only have a limited number of items in the list, then this is a nonissue and you can stop reading this now. However, what if you have a potentially unlimited or even just very large number of items in the list? Then you can easily exceed the buffer length SQL allows for a query string and cause a fatal error. Working around that requires several steps.

Step 1. Add a count dataset

First, we need an additional dataset, whose purpose is to count the number of items in the dataset used to supply values to the parameter list. In this example it will count the number of rows in the Region dataset.

Start by right clicking on the Contoso branch of the Report Data window and pick “Add Dataset”. Name it RegionCount, and give it a Query of:

SELECT COUNT(*) AS RegionCnt
  FROM [ContosoRetailDW].[Report].[V_Regions]

That’s all you need here, just click OK to close.

Step 2. Add an Internal Parameter

Next we need to add a parameter that will hold the result of the RegionCount Dataset. Right click on the parameters branch of the Report Data window and chose to add one. When the dialog appears start by giving it a good name, here we can use RegionCnt.

Now in the Data type, change it to an “Integer” since a count will always be an integer.

This parameter is one we never want the users to be able to see or change. Thus under parameter visibility “Visible” isn’t a good choice for us. That leaves us with “Hidden” and “Internal”. Hidden parameters are not visible in the user interface; however they can be updated when you call a report via its URL. Again, this is not a desirable option for us. Thus we will use Internal, which is similar to a private variable, only for use within the report.

clip_image002

Once you have the properties filled out click OK to close.

Step 3. Add the Query Parameters to the report dataset.

Now we fix our @pRegion parameter that we use in our SQL statement.

Right click on the main report dataset, pick dataset properties, and then go to the parameters area. If it already exists go to the @pRegion parameter (it should, but if not create it). Now we will need to change its value, and we’ll use an expression to do so. Click on the fx button to the right of the parameter value drop down and enter the follow text:

=iif(Parameters!Region.Count>=Parameters!RegionCnt.Value, "SELECTALL", Parameters!Region.Value)

The iif is pretty obvious. The RegionCnt.Value represents the number of items from the RegionCnt parameter, which came from the SELECT COUNT query. The Region.Count represents the number of items the user selected in the drop down. If they picked SELECT ALL, then all of them will be checked.

Thus, if the number of items checked is equal to or greater than the number of possible items it will return SELECTALL as the value (which we’ll use as a flag in just a moment). Otherwise it will simply return a list of the items selected.

Just to be clear, there’s nothing magical about “SELECTALL”, it’s just a string that makes it obvious what the purpose is. You could have used “ALL”, “allrows”, or “ArcaneCode”. Just as long as you use the same value here and in the SQL query, which you’ll see next.

Now we need to fix our SQL statement. While still in the Dataset Properties window, go back to the Query area and update your SQL Query to read:

SELECT [FiscalYear] 
     , [ProductCategoryName]
     , [ProductSubcategory]
     , [Region]
     , [TotalAmount]
  FROM [ContosoRetailDW].[Report].[V_SubcategoryRegionTotalsByYear]
 WHERE ( ('SELECTALL' IN (@pRegion)) OR ([Region] IN (@pRegion)) )

The first part of the WHERE clause will check to see if our SELECTALL is in the @pRegion parameter, which it will be if the user did a Select All in the parameter drop down in the user interface. If so that portion of the WHERE evaluates to true and all rows are returned. Otherwise it then checks the Region against the specific list returned in @pRegion.

Not Foolproof

Be aware that this solution is not foolproof. If the user has a long list of items and picks all but one item in the list the potential is still there to overflow the SQL query string buffer. In that situation you should reconsider the use of that column as a parameter, finding another means to limit the report. You could also use the expression language to check the length of the items selected (in this case Parameters!Region.Value) and if the length is too long either truncate it or replace it with the SELECTALL value.

Adding Query Parameters to SQL Server 2008 Reporting Services Reports

Note, before getting started with this lesson there are some prerequisites you should know about. Please read my post Getting Started with SQL Server 2008 to ensure you have everything setup correctly, otherwise you will be missing objects required to get the code here to work correctly.

In yesterday’s post “Adding Filter Parameters to Reports”, we explored how to add a filter to the report dataset. This had the advantage of being very fast when you wanted to look through different sets of data. The disadvantage to this method is that it brings back all possible rows for the report at once. Thus it can be very slow and database intensive and unnecessary when the user only wants to look at a subset of the data.

An alternative to Filters are Query Parameters. Query Parameters are applied at the SQL statement level, before the call to the SQL Server (or other database platform) is made. This limits the number of rows brought back from the server, increasing the speed and reducing the memory footprint required on the reporting server.

To begin, let’s create a base report. We’ll do the same as steps 1 to 10 in the “Adding Filter Parameters to Reports” lab, but in case you have not worked through it yet I will repeat them here.

Step 1. Add the report

As with our other reports, right click on the Reports branch in Solution Explorer, pick Add New Report, and (if you haven’t already disabled it) click next to move past the welcome screen.

Step 2. Set the data source.

Pick the Contoso shared data source, or setup a new source to Contoso, and click Next.

Step 3. Setup the query.

In the query builder, we’ll be using one of our views. Enter this SQL statement:

SELECT [FiscalYear]
     , [ProductCategoryName]
     , [ProductSubcategory]
     , [Region]
     , [TotalAmount]
  FROM [ContosoRetailDW].[Report].[V_SubcategoryRegionTotalsByYear]

and click next.

Step 4. Set the format.

For the report type we’ll use the simple Tabular format, so just click Next.

Step 5. Determine field placement in the report.

To keep this simple we’ll not use any groups on this report, so just put all report fields into the Details section. You can do it in one easy step by clicking on the top most item (FiscalYear), holding down the shift key, and clicking the bottom item (TotalAmount). This will select all of the fields, just click the Details button to move them. Then click Next.

Step 6. Select the formatting Style

Once again we’ll go with Corporate for the style and click Next.

Step 7. Name the report.

Finally we’ll give the report a name of “Regional Sales by Subcategory” and click Finish.

Step 8. Format report columns

To make the report a little easier to read, expand the width of the columns and format the Total Amount as Currency. (See the previous labs if you don’t recall how to accomplish this.)

Previewing the report shows our data. There’s a lot of it, so let’s say we are the sales manager and we want to apply filters so we are only looking at pieces of our sales.

Step 9. Add a new dataset to act as a source for the filter parameter

There are several choices we can use for creating filters. We could allow the user to simply key a value to use into a text box. It is also possible to hard code a list of values, for example “Yes” and “No”. In most cases though, you will want to create a filter based on a set of values in the database, which is what we’ll do in this lab.

Here we’ll apply a filter for the Region. To do so we’ll first need to create a dataset to supply this list from the database. In the Report Data window (if it’s not visible pick View->Report Data from the main BIDS (aka Visual Studio) menu) right click on Contoso and pick “Add Dataset”.

clip_image002

Give the new data source a good name. Here we can use Region.

We have several choices for a data source; here take the default of Text (which means we’ll just enter a query).

In the Query area we have many choices. Even though there is a designer built in, the best way is still to use SQL Server Management Studio to create and test your query, then paste it in here.

SELECT [RegionCountryName]
  FROM [ContosoRetailDW].[Report].[V_Regions]
 ORDER BY [RegionCountryName]

Once you’ve entered the above, click OK.

Step 10. Add the Region parameter

Now that we have a new dataset, we need to add a parameter to apply to our filter. Still in the Report Data window, right click on the Parameters and pick “Add Parameter”.

Give the parameter a good name. This is the variable name you’ll use elsewhere to refer to this item. Remember it, as you’ll need it later! Make sure it has no spaces and follows other typical guidelines for naming variables. For this example we can use the word Region.

Next you want to supply a prompt. This is the message shown on the report beside the parameter selection control. For our example let’s use “Select a Region to work with:”

You should now indicate the data type for the parameter. There are only a few you can pick from, for this though the default of Text will do fine.

Users often want to see multiple items on a report, but not all, so we’ll allow them to pick more than one by checking on the “Allow multiple values” check box. Your parameter window should now look like:

clip_image004

Next we need to tell the report where to get the data from. On the Available Views area, select the “Get values from a query” option. Then pick the new dataset we created, the Region one.

Below this you will see the Value field and Label field options. Frequently when dealing with data we have primary key data, such as an INT, that is needed to link data together. But we also need a human readable value, something that the users can see and understand.

A good example is the classic Employee table. You have an EmployeeID and an EmployeeName. For the value field, you’d pick the EmployeeID, but for the Label field you use the EmployeeName.

In this particular case, we are using the same field for both, and it’s perfectly valid to do so. Just pick “RegionCountryName” for both Value and Label drop downs.

clip_image006

For the rest of this example, know that we won’t do anything with Default Values or the Advanced Area. In the Default Values we can pick or set a value to be the default, and the Advanced lets us determine how often we need to refresh the source data for our parameter.

Step 11. Adding the Region Parameter to the report dataset

Next we’ll need to do two things to add the parameter to the dataset. First, right click on the main reports dataset and go to Dataset Properties.

Since we want to apply this parameter at the database level, we’ll need to add it as a parameter to our SQL query. In the query area of the Dataset Properties window enter:

SELECT [FiscalYear] 
     , [ProductCategoryName]
     , [ProductSubcategory]
     , [Region]
     , [TotalAmount]
  FROM [ContosoRetailDW].[Report].[V_SubcategoryRegionTotalsByYear]
 WHERE [Region] IN (@pRegion)

Next, we need to tell the query where the @pRegion parameter comes from. Go to the Parameters area of the Dataset Properties dialog. If Visual Studio / BIDS has not already done so, click add to add the @pRegion. Then in the drop down pick the @Report parameter object. Click OK to save the changes.

clip_image008

Return to the Preview tab and view the report several times, using various items in the list. Everything should update fine.

Except… having the Select All can cause some issues, which are covered in the next post.

Adding Filter Parameters to SQL Server 2008 Reporting Services Reports

Note, before getting started with this lesson there are some prerequisites you should know about. Please read my post Getting Started with SQL Server 2008 to ensure you have everything setup correctly, otherwise you will be missing objects required to get the code here to work correctly.

Often when a user looks at a report, they don’t want the entire report but just subsets of the data. To assist those users we have two methods for reducing the amount of data on a report, Filter Parameters (often just called Filters) and Query Parameters.

Query Parameters are applied before the query to get data is sent to the database, and only the data the fits the criteria from the parameter is brought back. This is ideal for situations where most of the time a user is going to look at only one set of data the report can provide. A salesman, for example, who only wants to look at his sales data. Each time a query filter is applied a round trip to the database occurs to update the data in the report.

Filters, which we’ll work with in this lab, are applied after the data is returned from the server. All possible data is returned from the database, and then the filter is applied to the data being seen. This means as a user switches from one filter to another it is very fast, as all the data is already present in memory and only data being displayed is changing. A sales manager would be a good example, one who will want to see the data for all his or her sales people, but only one at a time.

Let’s start our look at Filters by creating a fairly simple report.

Step 1. Add the report

As with our other reports, right click on the Reports branch in Solution Explorer, pick Add New Report, and (if you haven’t already disabled it) click next to move past the welcome screen.

Step 2. Set the data source.

Pick the Contoso shared data source, or setup a new source to Contoso, and click Next.

Step 3. Setup the query.

In the query builder, we’ll be using one of our views. Enter this SQL statement:

SELECT [FiscalYear]
     , [ProductCategoryName]
     , [ProductSubcategory]
     , [Region]
     , [TotalAmount]
  FROM [ContosoRetailDW].[Report].[V_SubcategoryRegionTotalsByYear]

and click next.

Step 4. Set the format.

For the report type we’ll use the simple Tabular format, so just click Next.

Step 5. Determine field placement in the report.

To keep this simple we’ll not use any groups on this report, so just put all report fields into the Details section. You can do it in one easy step by clicking on the top most item (FiscalYear), holding down the shift key, and clicking the bottom item (TotalAmount). This will select all of the fields, just click the Details button to move them. Then click Next.

Step 6. Select the formatting Style

Once again we’ll go with Corporate for the style and click Next.

Step 7. Name the report.

Finally we’ll give the report a name of “Regional Sales by Subcategory” and click Finish.

Step 8. Format report columns

To make the report a little easier to read, expand the width of the columns and format the Total Amount as Currency. (See the previous labs if you don’t recall how to accomplish this.)

Previewing the report shows our data. There’s a lot of it, so let’s say we are the sales manager and we want to apply filters so we are only looking at pieces of our sales.

Step 9. Add a new dataset to act as a source for the filter parameter

There are several choices we can use for creating filters. We could allow the user to simply key a value to use into a text box. It is also possible to hard code a list of values, for example “Yes” and “No”. In most cases though, you will want to create a filter based on a set of values in the database, which is what we’ll do in this lab.

Here we’ll apply a filter for the Region. To do so we’ll first need to create a dataset to supply this list from the database. In the Report Data window (if it’s not visible pick View->Report Data from the main BIDS (aka Visual Studio) menu) right click on Contoso and pick “Add Dataset”.

clip_image002

Give the new data source a good name. Here we can use Region.

We have several choices for a data source; here take the default of Text (which means we’ll just enter a query).

In the Query area we have many choices. Even though there is a designer built in, the best way is still to use SQL Server Management Studio to create and test your query, then paste it in here.

SELECT [RegionCountryName]
  FROM [ContosoRetailDW].[Report].[V_Regions]
 ORDER BY [RegionCountryName]

Once you’ve entered the above, click OK.

Step 10. Add the Region parameter

Now that we have a new dataset, we need to add a parameter to apply to our filter. Still in the Report Data window, right click on the Parameters and pick “Add Parameter”.

Give the parameter a good name. This is the variable name you’ll use elsewhere to refer to this item. Remember it, as you’ll need it later! Make sure it has no spaces and follows other typical guidelines for naming variables. For this example we can use the word Region.

Next you want to supply a prompt. This is the message shown on the report beside the parameter selection control. For our example let’s use “Select a Region to work with:”

You should now indicate the data type for the parameter. There are only a few you can pick from, for this though the default of Text will do fine.

Users often want to see multiple items on a report, but not all, so we’ll allow them to pick more than one by checking on the “Allow multiple values” check box. Your parameter window should now look like:

clip_image004

Next we need to tell the report where to get the data from. On the Available Views area, select the “Get values from a query” option. Then pick the new dataset we created, the Region one.

Below this you will see the Value field and Label field options. Frequently when dealing with data we have primary key data, such as an INT, that is needed to link data together. But we also need a human readable value, something that the users can see and understand.

A good example is the classic Employee table. You have an EmployeeID and an EmployeeName. For the value field, you’d pick the EmployeeID, but for the Label field you use the EmployeeName.

In this particular case, we are using the same field for both, and it’s perfectly valid to do so. Just pick “RegionCountryName” for both Value and Label drop downs.

clip_image006

For the rest of this example, know that we won’t do anything with Default Values or the Advanced Area. In the Default Values we can pick or set a value to be the default, and the Advanced lets us determine how often we need to refresh the source data for our parameter.

Step 11. Bind the parameter to the main reports Dataset Filter

Now that the parameter is setup, we need to bind it to the Dataset for our main report. By default, the report wizard named it DataSet1 when it setup our report. Right click on it and pick Dataset Properties.

In “the real world” we should have already renamed the default name of DataSet1 to something more meaningful. Let’s do so now, and call it MainReportData.

Next, you might be tempted to click on the Parameters area. But in this case what we will be doing is using the Region parameter as a Filter. When we use it as a filter, Reporting Services reads in the entire dataset, and then applies the value in our parameter before displaying it. This means as we change the value of the parameter, the switch from one set of data to another goes very fast.

Let’s go down to the Filters area, and click Add. In the Expression, pick [Region] from the drop down. This is the Region field from our query, not the parameter. Since we want to allow multiple regions, change the Operator to “In”. Finally for the value, enter the name of the parameter preceded by an @ sign. [@Region] is what we’ll type in.

clip_image008

OK all done, click OK to complete your task.

Step 12. Preview your work

After you save your work, click on the Preview tab. You will now see a new area above the report with the prompt you entered.

clip_image010

Open the drop down and pick a few of the items.

clip_image012

Over on the right side you’ll see the View Report button. Click it to generate the report. As you select different countries, you’ll see the view of the report data updates very quickly.