Fun With the PowerShell Switch Parameter

Introduction

Over the last few posts I’ve been covering PowerShell functions, both Basic Functions and Advanced Functions. In this post I had originally intended to cover two switches available to all advanced functions, Verbose and Debug.

But then it occurred to me, not everyone may know what a switch parameter is. And to be clear, I’m not talking about the switch statement. I covered that in my post Fun With PowerShell Logic and Branching.

Here, I’m talking about the ability to use what PowerShell calls a switch parameter.

We’ll take a deeper look in a moment, but first let me mention that for all of the examples, we’ll display the code, then under it the result of our code. In this article I’ll be using PowerShell Core, 7.1.3, and VSCode. The examples should work in PowerShell 5.1 in the PowerShell IDE, although they’ve not been tested there.

To run a snippet of code highlight the lines you want to execute, then in VSCode press F8 or in the IDE F5. You can display the contents of any variable by highlighting it and using F8/F5.

A Simple Switch Example

If you’ve been following my series, you know that you can pass in values, in other words parameters, to a function by name. For example:

Get-AValue -one 33 -two 42

-one and -two were the parameter names, and 33 and 42 the values passed in for them.

A switch is similar, you list the name of the switch on call to the function, but unlike a regular parameter you pass in no value. The presence of the switch is enough to tell the function what you want to do.

Let’s look at an example using the common Write-Host cmdlet.

Write-Host 'Hi Mom' -NoNewline -ForegroundColor Green
Write-Host ' and Dad' -ForegroundColor Yellow

Result:
Hi Mom and Dad Image

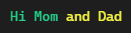
Normally, Write-Host displays its text, then automatically moves the cursor to the next line. However, Write-Host has a -NoNewLine switch. Including the switch will keep Write-Host from adding the line feed at the end, and allows us do fun things like having two different colors of text on the same line.

Note that we didn’t have to pass in any value, didn’t have to set it to true or false. Just including the switch was enough to say “hey don’t wrap to a new line”.

Implementing Your Own Switches

Switches wouldn’t be any fun if we couldn’t use them too! And it’s actually quite easy. I started off the whole PowerShell series on my blog with a post Fun With PowerShell Get-Random. In it I described (among other things) how to use the Get-Random cmdlet to return a random value from an array. We’ll borrow on that idea for this function.

function Get-RandomSouthAmericanCountry()
{
[CmdletBinding()]
param(
[switch] $UpperCase
)

$array = (
'Argentina', 'Bolivia', 'Brazil',
'Chile', 'Columbia', 'Ecuador',
'Guyana', 'Paraguay', 'Peru',
'Suriname', 'Uruguay', 'Venezuela'
)

# Get an item from the array and convert from
# a generic object to a string
$retVal = $($array | Get-Random).ToString()

# If user passed in upper case switch,
# upper case return value
if ($UpperCase.IsPresent)
{
$retVal = $retVal.ToUpper()
}

return $retVal

}

I’ll give a shout of sorts to my wonderful geek friends who live on the South American continent with this example, our Get-RandomSouthAmericanCountry function. Of course we start with [CmdletBinding()] to indicate this is an advanced function. Then we have our param block.

param(
[switch] $UpperCase
)

We have one parameter named $UpperCase. But instead of having a traditional data type in front, we have [switch]. This will indicate to PowerShell that $UpperCase is a switch. We’ll see how to use it within our code in a moment, but first let’s take a quick look at the rest of the function.

After the param block we have an array which lists the countries in South America (according to the countries of the world website I found).

I then fall to this line to get the country:

$retVal = $($array | Get-Random).ToString()

First, I use $array | Get-Random to get a random country. This will return an element from the array, but I need it to be a datatype of string rather than a generic object. So I wrap the result of Get-Random in $( ) to make PowerShell evaluate it as an object. Then I can call the .ToString() method of the object to convert it to a string. Finally it gets assigned to my return variable, $retVal.

The next part is where I look to see if my switch was used.

if ($UpperCase.IsPresent)
{
$retVal = $retVal.ToUpper()
}

Here, you use the name of the switch and access its .IsPresent property. This returns $true if the switch was passed in. Thus if it was passed in, the if statement will take affect and call the .ToUpper() method on our $retVal string. This is why we had to convert to a string, string data types have a .ToUpper() method, generic objects don’t.

As the final step we return the value held in $retVal, which sticks to the rule of having one exit point for a function.

After highlighting the function and running it using F8/F5 to get it in memory, we’ll call it. First, we’ll so so using it without the switch.

Get-RandomSouthAmericanCountry

Result:
Venezuela

Great, now let’s call it with our switch.

Get-RandomSouthAmericanCountry -UpperCase

Result:
URUGUAY

In this call, just including the switch caused the output to display in upper case.

Switches Work with Basic Functions Too

In the above example I used an advanced function. Be aware that if you are using a basic function, as I described in a previous article, you can still use a switch.

Here is the previous example rewritten as a basic function. (Note the function declaration should all be on one line, the blog layout will probably wrap it.)

function Get-RandomSouthAmericanCountryBasic([switch] $UpperCase)
{
$array = (
'Argentina', 'Bolivia', 'Brazil',
'Chile', 'Columbia', 'Ecuador',
'Guyana', 'Paraguay', 'Peru',
'Suriname', 'Uruguay', 'Venezuela'
)

# Get an item from the array and convert from
# a generic object to a string
$retVal = $($array | Get-Random).ToString()

# If user passed in upper case switch,
# upper case return value
if ($UpperCase.IsPresent)
{
$retVal = $retVal.ToUpper()
}

return $retVal

}

The only real difference is the removal of the [CmdletBinding()} statement and the param block. I then declared the [switch] $UpperCase inside the parenthesis like you would do with a basic function.

By the way, like most things in PowerShell casing isn’t important. These are all the same to PowerShell:

[switch] $UpperCase
[SWITCH] $UpperCase
[Switch] $UpperCase

When you strongly type your variables, for example using [int] or [string], it’s common to use lower case, so I generally stick to lower for [switch], but it’s not mandatory. Just pick a standard for you and your team, then stick with it.

Naming Switches

When creating your switches, be sure to use clear names. In our example, UpperCase was a good switch name. Especially when using the Get- verb in our function name, as it implied the results should be in upper case. It doesn’t occur to me that I need to pass in some value to make it happen.

Contrast that with a switch name like MaxValue. Here, I wonder if I want to return a maximum value, or if I need to pass in a value that I want to be the maximum value, or something else.

A Note on $switchName -eq $true

You may see examples on the web such as:

if ($UpperCase -eq $true)

to check to see if a switch is present. This is a much older, and very much out of date method. Microsoft recommends you use the .IsPresent method that you saw in these examples, you should stick to it in your code.

Conclusion

In this post we covered the useful switch parameter. It’s very easy to use, and can add a lot of flexibility to your functions. This also gives a good foundation for discussion of the Verbose and Debug switches built into all Advanced Functions in our next blog post.

The demos in this series of blog posts came from my Pluralsight course PowerShell 7 Quick Start for Developers on Linux, macOS and Windows, one of many PowerShell courses I have on Pluralsight. All of my courses are linked on my About Me page.

If you don’t have a Pluralsight subscription, just go to my list of courses on Pluralsight. At the top is a Try For Free button you can use to get a free 10 day subscription to Pluralsight, with which you can watch my courses, or any other course on the site.

Advertisement

Fun With PowerShell Logic Branching

Introduction

In this post, we’ll see how some of PowerShell’s logic branching works. Logic branching is where you execute certain lines of code only when a condition is true.

For all of the examples, we’ll display the code, then under it the result of our code. In this article I’ll be using PowerShell Core, 7.1.3, and VSCode. The examples should work in PowerShell 5.1 in the PowerShell IDE, although they’ve not been tested there.

To run a snippet of code highlight the lines you want to execute, then in VSCode press F8 or in the IDE F5. You can display the contents of an array variable (or any variable) by highlighting it and using F8/F5.

In either environment, you can run your entire script by pressing F5.

Logic Branching – if

No, I don’t mean “if” we want to do logic branching. if is a keyword in PowerShell. With it, you can pass in a condition, then execute code based on the value of the condition. This example will make it a bit more clear.

$var = 2
if ($var -eq 1)
{
  Clear-Host
  'If branch'
}
else
{
  Clear-Host
  'else branch'
}

Result:
else branch

Beside the if keyword are a set of parenthesis ( ). In it, you create some kind of expression, but, and this is important, the result of the equation must be either True or False.

In this example, I created a variable $var and set the value to 2. Then, inside the parenthesis I used $var - eq 1.

Following this I have a set of squiggly braces { } with code inside it. In PowerShell, this is known as a script block.

If my condition is true, it will execute the first script block. But what if you want to do something if it evaluates to false? That’s where the next keyword comes in, else.

Immediately after the script block associated with the if, you add the else keyword, followed by a second script block to be executed.

In the example above, the condition will evaluate to false, so the code in the else script block will run, displaying the result of “else branch“.

PowerShell also supports another keyword, elseif. I almost hesitate to provide a demo, because most developers say if you need to fall into an elseif, you should then change your code to use another branching method, which we’ll cover next. However for completeness let’s see an example.

$var = 2
if ($var -eq 1)
{
  Clear-Host
  'If branch'
}
elseif ($var -eq 33)
{
  Clear-Host
  'elseif branch'
}
else
{
  Clear-Host
  'else branch'
}

Result:
else branch

As before, we start with an if ($var -eq 1), but following that is our elseif. It will then check the condition in the elseif, ($var -eq 33). If it doesn’t find a match for it, it flows to the next section, the else.

Obviously if it finds a match, it executes the script block associated with the elseif. Once done it skips over any following elseif or else statements and goes on to the following our entire if construct.

A few things, first you can have elseif statements without an else. However it’s generally a good idea to have a default code handler should you not execute any of the other if / elseif statements.

Second, you can have as many elseif statements as you want. But as the old saying goes, just because you can do something, doesn’t mean you should. Most PowerShell developers (myself included) say if you have to resort to an elseif, you should really be using a switch.

Speaking of the switch….

More Fun with Logic Branching – switch

In addition to the if statement, there is another way to branch your code, the switch statement.

$var = 42
switch  ($var)
{
  41 {'Forty One'}
  42 {'Forty Two'}
  43 {'Forty Three'}
  default {'default'}
}

Result:
Forty Two

With the switch statement, you pass in a value. Unlike the if, the value does not need to evaluate to True or False, it can be any value.

It will then execute the script block that follows, evaluating each value in the list. If it finds a match, it will execute the code in the script block that follows.

In the example above, it finds a match on 42, and runs the code in the script block which prints out the text ‘Forty Two‘.

One issue you may encounter is multiple matches.

$var = 42
switch  ($var)
{
  41   {'Forty One'}
  42   {'Forty Two'}
  '42' {'Forty Two'}
  43   {'Forty Three'}
  default {'default"}
}

Result:
Forty Two
Forty Two

Here, it went down the list and found the first match of integer 42. It executed the script block, and continued down the list.

It next found the string of '42'. It converted the string to the same datatype as what was passed in, an integer 42, found a match, and executed that script block.

So how to stop execution after the first match? That’s where break comes in. When PowerShell finds break it will stop code execution and exit to the next line after the switch.

$var = 42
switch  ($var)
{
  41   {'Forty One'; break}
  42   {'Forty Two'; break}
  '42' {'Forty Two'; break}
  43   {'Forty Three'; break}
  default {'default'; break}
}

'Exit to this point'

Result:
Forty Two
Exit to this point

As you can see from the results, the switch found the first match at the int 42. The break statement said “skip the rest and go to the next line after”, which prints out Exit to this point.

This brings up the subject of type coercion. This is the converting of one data type before comparing to another. In PowerShell, anytime it compares values of two different datatypes, it converts the datatype on the right to match the datatype on the left.

For example, if you had an equation if ( 33 -eq '33') it will convert the string '33', on the right side of the -eq, to the datatype on the left side of the -eq, an integer 42.

With the switch statement, the left value is the one being passed in, in this case the variable $var. The right side are the values switch is looking at, here 41, 42, 43. This is something to keep in mind whenever you are writing your code.

In this example, it won’t make a difference.

$var = '42'
switch  ($var)
{
  41 {'Forty One'}
  42 {'Forty Two'}
  43 {'Forty Three'}
  default {'default'}
}

Result:
Forty Two

The code went down the list, converting each value to a string. It took the int, 42 and converted it to a string. It then found a match with the original string of 42 in the $var variable and printed out the ‘Forty Two‘ as found in the script block.

Let’s take a slightly different example.

$var = '042'
switch  ($var)
{
  41 {'Forty One'}
  42 {'Forty Two'}
  43 {'Forty Three'}
  default {'default'}
}

Result:
default

In this case it compared each value, but the string 042 doesn’t match the converted int of '42' so it didn’t match.

So what’s with the output of default? If the switch statement doesn’t find a match, it will execute in the script block associated with default.

The default is optional, if you omit it and no match is found and the switch simply exits and continues to the next line after the switch.

As a final point, I want to mention you don’t have to contain everything in the switch’s script blocks to a single line. This is perfectly valid code.

$var = 42
switch  ($var)
{
  41   {
         'Forty One'
         break
       }
  42   {
         'Forty Two'
         break
       }
  '42' {
         'Forty Two'
         break
       }
  43   {
         'Forty Three'
         break
       }
  default {
            'default'
            break
          }
}

While this example is a bit harder to read, you will encounter situations where trying to condense your script block to a single line will be difficult so don’t hesitate to use multiple lines if it improves readability.

Conslusion

This post focused on the logic branching mechanisms built into PowerShell, if and switch. Hopefully this will give you a better understanding of your options for handling conditional code execution in PowerShell.

The demos in this course came from my Pluralsight course PowerShell 7 Quick Start for Developers on Linux, macOS and Windows, one of many PowerShell courses I have on Pluralsight. All of my courses are linked on my About Me page.

If you don’t have a Pluralsight subscription, just go to my list of courses on Pluralsight. At the top is a Try For Free button you can use to get a free 10 day subscription to Pluralsight, with which you can watch my courses, or any other course on the site.