Fun With PowerShell Classes – Overloading

Introduction

This is the next installment in our series of advanced techniques for PowerShell classes. In the previous installment we saw how to implement static properties and methods. In this one, we’ll see how to overload your methods.

We’ll take a deeper look at overloading in a moment, but first let me mention that for all of the examples we’ll display the code, then under it the result of our code when applicable. In this article I’ll be using PowerShell Core, 7.2.1, and VSCode. The examples should work in PowerShell 5.1 in the PowerShell IDE, although they’ve not been tested there.

Additionally, many of the code samples have lines which end in a backtick `, PowerShell’s line continuation character. The blog formatting has a limited width, so using the line continuation character makes the examples much easier to read. My post Fun With PowerShell Pipelined Functions dedicates a section to the line continuation character if you want to learn more.

In VSCode you can highlight snippet of code then press F8 to execute it. In the IDE, use F5. You can display the contents of any variable by highlighting it and using F8/F5.

Starting Point

For easy reference, here is our demo class as we left it at the end of the previous post.

class TwittererRedux
{
  # Create a property
  [string]$TwitterHandle

  # Create a property and set a default value
  [string]$Name = 'Robert C. Cain'

  # Static Properties
  static [string] $Version = '2022.01.07.002'

  # Function that returns a string
  [string] TwitterURL()
  {
    $url = "https://twitter.com/$($this.TwitterHandle)"
    return $url
  }

  # Function that has no return value
  [void] OpenTwitter()
  {
    Start-Process $this.TwitterURL()
  }

  # Can launch a twitter page without instantiating the class
  static [void] OpenTwitterPage([string] $TwitterHandle)
  {
    # Note here we cannot call the $this.TwitterUrl function
    # because no object exists (hence no $this)
    $url = "http://twitter.com/$($TwitterHandle)"
    Start-Process $url
  }

}

The Need to Overload a Method

About half way into our class definition we have a method named TwitterURL. This function is pretty simple, it takes the value in the TwitterHandle property, composes the URL to the Twitter site for it, then returns it.

Here is what it would look like in action.

$twit = [TwittererRedux]::new()
$twit.TwitterHandle = 'ArcaneCode'
$twit.TwitterURL()

Result:

http://twitter.com/ArcaneCode

What if we had a lot of handles we wanted to get URLs for. It would be a two step process for each one, first assigning the handle to the TwitterHandle property, then calling the TwitterURL method.

$twit.TwitterHandle = 'ArcaneCode'
$twit.TwitterURL()
$twit.TwitterHandle = 'N4IXT'
$twit.TwitterURL()
$twit.TwitterHandle = 'ArcaneTC'
$twit.TwitterURL()
$twit.TwitterHandle = 'BuckWoodyMSFT'
$twit.TwitterURL()
$twit.TwitterHandle = 'tradney'
$twit.TwitterURL()
$twit.TwitterHandle = 'VKCsh'
$twit.TwitterURL()
$twit.TwitterHandle = 'TechTrainerTime'
$twit.TwitterURL()

Of course these could all be put into an array, or read in from a file and run through a foreach loop, even so it still takes two calls to our $twit object. Wouldn’t it be nice to set the TwitterHandle property and return the URL all in one method call?

But what to call the method? We could go with SetHandleAndGetURL, or perhaps UpdateAndGetTwitter, or even HeyHeresAMethodToSetTheTwitterHandleAndGetTheURL.

But in fact we already have a great name in TwitterURL. Its short and explains just what it does. It’s too bad we can’t use it more than once.

Oh wait, we can!

Implementing an Overloaded Method

To create an overload, create a new function within your class and use the same name. To differentiate, you need to have it accept a different number of parameters. Let’s make this clearer by the example below.

  [string] TwitterURL()
  {
    $url = "https://twitter.com/$($this.TwitterHandle)"
    return $url
  }

  [string] TwitterURL($twitterHandle)
  {
    $this.TwitterHandle = $twitterHandle
    $url = $this.TwitterURL()
    return $url
  }

At the top is our original function. Below it is the overloaded version. In it I pass in a single parameter, the $TwitterHandle. PowerShell can use this to determine which version of the function to call.

If you execute the TwitterURL method with no parameters, the version of the function at the top is executed.

When you call TwitterURL and pass in a parameter, the version of the function at the bottom gets run. In here I first access the TwitterHandle property of the current object (represented by $this) and update it from the parameter $twitterHandle.

Next, I called the original function to get the properly formatted URL from the (newly updated) TwitterHandle property.

I chose to do it this way to demonstrate it is possible to call the original version of a function from its overloaded version. It’s certainly not required though, as the code to format the URL could have been copied from the original function. The downside to this however is if I make a change to one area, I have to make it to both.

Also be aware that setting the TwitterHandle property may be considered a side effect by some. It’s not intuitively obvious this will happen, and some users may think this to be a bug. It’s important then to make sure you document this thoroughly in your documentation.

Let’s see it in action. First, here is the complete class with the new overloaded function added.

class TwittererRedux
{
  # Create a property
  [string]$TwitterHandle

  # Create a property and set a default value
  [string]$Name = 'Robert C. Cain'

  # Static Properties
  static [string] $Version = '2022.01.07.002'

  # Function that returns a string
  [string] TwitterURL()
  {
    $url = "https://twitter.com/$($this.TwitterHandle)"
    return $url
  }

  # Overloaded Function that returns a string
  [string] TwitterURL($twitterHandle)
  {
    $this.TwitterHandle = $twitterHandle
    $url = $this.TwitterURL()
    return $url
  }

  # Function that has no return value
  [void] OpenTwitter()
  {
    Start-Process $this.TwitterURL()
  }

  # Can launch a twitter page without instantiating the class
  static [void] OpenTwitterPage([string] $TwitterHandle)
  {
    # Note here we cannot call the $this.TwitterUrl function
    # because no object exists (hence no $this)
    $url = "http://twitter.com/$($TwitterHandle)"
    Start-Process $url
  }

}

After running this to get the updated class definition in memory let’s call it both ways.

# Create a new instance
$twit = [TwittererRedux]::new()

# Assign the handle, then call TwitterURL
$twit.TwitterHandle = 'ArcaneCode'
$twit.TwitterURL()

Result:

https://twitter.com/ArcaneCode

Now let’s call the overloaded version.

# Now call the overloaded version
$twit.TwitterURL('N4IXT')

Result:

https://twitter.com/N4IXT

We can also check the TwitterHandle property to ensure it has been updated.

$twit.TwitterHandle

Result:

N4IXT

We could have added additional overloads with more parameters. We could have defined [string] TwitterURL($twitterHandle, $anotherParameter), for example.

Other Ways to Differentiate an Overload

In the previous section I stated PowerShell differentiates overloads by the number of parameters passed into our function. There is one other way PowerShell can differentiate, and that is by the data type of each parameter. Let’s look at this simple example.

class over
{
  [string] hello()
    { return 'hello world' }

  [string] hello([string] $name)
    { return "hello string of $name"}

  [string] hello([int] $number)
    { return "hello integer of $number"}
}

As you can see, my class has three overloads. In the second two, we pass in a single parameter. What makes them different though is the data type for the parameter. In the first we use a string, the second an integer. To be accurate then, we need to say PowerShell can tell which overload to call by the number of parameters and the data type of each.

As should be obvious, you will need to strongly type all of your parameters for this to work, but when it comes to classes that’s not a bad idea anyway.

Just as proof, let’s see these working.

$o = [over]::new()
$o.hello()
$o.hello('mom')
$o.hello(33)

Result:

hello world
hello string of mom
hello integer of 33

You can also mix and match, with multiple data types and parameters. For example…

hello([string] $name, [int] $number)
hello([int] $number,  [string] $name)

Both of these are both valid. Just to reiterate, what you could not do is:

hello([string] $nameA, [int] $number)
hello([string] $nameB, [int] $anotherNumber)

PowerShell can’t make the distinction between the two, as they have the same number of parameters and data types in the same order.

Conclusion

Overloads can be very useful when working with classes. They allow you to continue to use method names you are familiar with yet alter them to meet your changing needs.

In our next installment we’ll cover the topic of class constructors, a way to populate properties when you instantiate your new object from the class definition.

The demos in this series of blog posts were inspired by my Pluralsight course PowerShell 7 Quick Start for Developers on Linux, macOS and Windows, one of many PowerShell courses I have on Pluralsight. All of my courses are linked on my About Me page.

If you don’t have a Pluralsight subscription, just go to my list of courses on Pluralsight . At the top is a Try For Free button you can use to get a free 10 day subscription to Pluralsight, with which you can watch my courses, or any other course on the site.

Advertisement

Fun With PowerShell Classes – Static Properties and Methods

Introduction

Over the last few articles we’ve been covering PowerShell objects. The first article in the series, Fun With PowerShell Classes – The Basics, covered the basics of using of the PowerShell class construct introduced in PowerShell version 5.

If you’ve not read it I’d suggest you do so now as we’ll be building on it in this article, as well as in the next two, as we explore the advanced capabilities of PowerShell classes. In this post we’ll cover the concept of static properties and methods.

Let me mention that for all of the examples we’ll display the code, then under it the result of our code if applicable. In this article I’ll be using PowerShell Core, 7.2, and VSCode. The examples should work in PowerShell 5.1 in the PowerShell IDE, although they’ve not been tested there.

At the end of the line in many code samples you may notice a backtick ` character. This is PowerShell’s line continuation character. The blog formatting has a limited width, so using the line continuation character makes the examples much easier to read. My post Fun With PowerShell Pipelined Functions dedicates a section to the line continuation character if you want to learn more.

To run a snippet of code highlight the lines you want to execute, then in VSCode press F8 or in the IDE F5. You can display the contents of any variable by highlighting it and using F8/F5.

Starting Point

Just as a refresher, here is the class we originally developed.

class Twitterer
{
  # Create a property
  [string]$TwitterHandle

  # Create a property and set a default value
  [string]$Name = 'Robert C. Cain'

  # Function that returns a string
  [string] TwitterURL()
  {
    $url = "https://twitter.com/$($this.TwitterHandle)"
    return $url
  }

  # Function that has no return value
  [void] OpenTwitter()
  {
    Start-Process $this.TwitterURL()
  }

}

We can create a new instance of the class by calling the static new method built into all PowerShell defined classes. Once created we can start assigning values to its properties.

$twit = [Twitterer]::new()
$twit.TwitterHandle = 'ArcaneCode'
$twit.TwitterHandle

With that reminder, let’s start diving in to some advanced features offered by classes.

Static Properties

In a previous post on creating PowerShell objects from C# code, I introduced the concept of static properties and methods. A static property or method is one that can be called without having to create a new instance of an object from the class.

To call a static method or property, use the name of the class in brackets, then two colons, then the name of the property or method you want to call. In fact, you’ve already done this in creating a new instance of a class when you used [Twitterer]::new().

It’s easy to create your own static properties and methods. Let’s create a new version of our class, and name it TwittererRedux. (Redux is a fancy word meaning ‘bring back’.) Then, we’ll add a new static property to it.

class TwittererRedux
{
  # Create a property
  [string]$TwitterHandle

  # Create a property and set a default value
  [string]$Name = 'Robert C. Cain'

  # Static Properties
  static [string] $Version = '2022.01.07.002'

  # Function that returns a string
  [string] TwitterURL()
  {
    $url = "https://twitter.com/$($this.TwitterHandle)"
    return $url
  }

  # Function that has no return value
  [void] OpenTwitter()
  {
    Start-Process $this.TwitterURL()
  }

}

In the properties area we add one new property, Version. At the front we added the keyword static. This, of course, is the indicator this property is available even without creating a new instance of the class.

Having a version number is a fairly common and useful thing to include in a class. Let’s see it in use. First though, make sure you’ve executed the above class definition for TwitterRedux to make sure it is memory.

[TwittererRedux]::Version

Result:

2022.01.07.002

Other examples of things you might wish to manifest as static properties include the author name, contact information, copyright, or perhaps a link to documentation or github where your class is stored.

Let’s turn now to the creation of a static method.

Static Methods

In our original version of the class we have a method called OpenTwitter. This accessed the objects function TwitterURL, which returned the formatted Twitter URL for the users handle, stored in the objects TwitterHandle property. Finally it opened up the Twitter page in the default browser.

It could be useful to have a function that would do something similar, only without having to go to the effort of creating a class, then populating the TwitterHandle property just so we could call this function.

We’ll do so by adding a new, static function to the class.

class TwittererRedux
{
  # Create a property
  [string]$TwitterHandle

  # Create a property and set a default value
  [string]$Name = 'Robert C. Cain'

  # Static Properties
  static [string] $Version = '2021.01.07.002'

  # Function that returns a string
  [string] TwitterURL()
  {
    $url = "https://twitter.com/$($this.TwitterHandle)"
    return $url
  }

  # Function that has no return value
  [void] OpenTwitter()
  {
    Start-Process $this.TwitterURL()
  }

  # Can launch a twitter page without instantiating the class
  static [void] OpenTwitterPage([string] $TwitterHandle)
  {
    # Note here we cannot call the $this.TwitterUrl function
    # because no object exists (hence no $this)
    $url = "http://twitter.com/$($TwitterHandle)"
    Start-Process $url
  }

}

We call the new method similar to the way we accessed our property, when we called the new method to create the class.

[TwittererRedux]::OpenTwitterPage('ArcaneCode')

If your coding went well, your default browser should open to my Twitter page (or whosever you passed in).

Restrictions on Static Properties and Methods

There is one restriction when working with static properties and methods, but it is one you need to know about.

> Static properties and methods must be self contained, and cannot reference other properties and methods of the class.

This makes sense if you think about it a moment. You are only accessing the class definition, i.e. the blue print. Normal properties and methods only exist once an object has been created from a class. While it makes sense, it isn’t intuitively obvious so I wanted to point it out.

A Note on Defining Classes

I just wanted to point out a little "gotcha" when working with classes. Within a single PowerShell script (i.e. PS1 file) you can only define a class once. Normally this is not a big issue.

However, if you are developing a class it’s possible you might want multiple versions of it. For example, at the top of the script you might want your original version.

Under it you might want basically the same code, but you’ve added a new method, or perhaps changed the code to an existing method. You want to do this for testing, so you can compare one version versus the other.

PowerShell, or more precisely VSCode or the PowerShell IDE, will generate an error for the second, third, or more versions in your code warning you it has already been defined.

The fix is pretty simple, you could just comment out all but one of the class definitions, leaving the one you are working with uncommented. Alternatively, you could just create multiple PS1 files and work with different versions in each. VSCode is especially nice for this as it lets you have your PS1 files side by side.

Conclusion

Static properties and methods are not difficult to implement, and can be quite useful. As you create your classes, think about situations where they may benefit from a static property or method.

In the next installment of this series we’ll continue our examination of the PowerShell class type by diving into overloads.

The demos in this series of blog posts were inspired by my Pluralsight course PowerShell 7 Quick Start for Developers on Linux, macOS and Windows, one of many PowerShell courses I have on Pluralsight. All of my courses are linked on my About Me page.

If you don’t have a Pluralsight subscription, just go to my list of courses on Pluralsight . At the top is a Try For Free button you can use to get a free 10 day subscription to Pluralsight, with which you can watch my courses, or any other course on the site.

Fun With PowerShell Objects – Modifying Existing Objects

Introduction

So far we’ve covered a lot in this series on PowerShell Objects. We began by creating a class using the class keyword introduced in PowerShell 5. We then looked at using PSCustomObject to create new objects, then add methods to those objects. In the previous post, we used C# code to create our PowerShell objects.

In this installment, we’ll see how to add properties and methods to existing objects created by someone else. For this example we’ll use objects returned by the Get-ChildItem cmdlet, but we could use any objects.

For all of the examples we’ll display the code, then (when applicable) under it the result of our code. In this article I’ll be using PowerShell Core, 7.2.1, and VSCode. The examples should work in PowerShell 5.1 in the PowerShell IDE, although they’ve not been tested there.

In the code samples be on the lookout for the backtick ` , PowerShell’s line continuation character, at the end of many lines. The blog formatting has a limited width, so using the line continuation character makes the examples much easier to read. My post Fun With PowerShell Pipelined Functions dedicates a section to the line continuation character if you want to learn more.

To run a snippet of code highlight the lines you want to execute, then in VSCode press F8 or in the IDE F5. You can display the contents of any variable by highlighting it and using F8/F5.

Getting The Objects to Work With

As stated in the Introduction, we will use the objects returned by the Get-ChildItem cmdlet to add a new property and method to. We’ll set our location (in my case to the folder where these samples are stored), call the Get-ChildItem cmdlet and store the result in a variable, $items.

Set-Location C:\Users\arcan\OneDrive\BlogPosts\Markdown
$items = Get-ChildItem

Let’s look a the first item in the $items collection to see what its datatype is.

$items[0].GetType()

Result:

IsPublic IsSerial Name     BaseType
-------- -------- ----     --------
True     False    FileInfo System.IO.FileSystemInfo

As you can see, each item is of type FileInfo. Each object contains information about the corresponding file it represents. You can find a full list of properties and methods for the FileInfo class in the online Microsoft Documentation for FileInfo.

Coding Our New Method

For this example, we are going to iterate over our collection of FileInfo objects. To each one, we’ll be adding one property and one method. The property will just be a number that can be used to uniquely identify each object. We’ll look more at that momentarily.

The method we’ll add will analyze the existing Extension property of the FileInfo object. As I’m sure you know, the extension is the data that occurs after the period in the file name, and is used to identify the type of file it is.

Here is the script block for this method.

# Define the custom script property
$script = {

  switch ($this.Extension)
  {
    '.cs'   {$retValue = 'C#'}
    '.md'   {$retValue = 'Markdown'}
    '.ps1'  {$retValue = 'Script'}
    '.psd1' {$retValue = 'Module Definition'}
    '.psm1' {$retValue = 'Module'}
    '.xml'  {$retValue = 'XML File'}
    '.pptx' {$retValue = 'PowerPoint'}
    '.csv'  {$retValue = 'Comma Separated Values file'}
    '.json' {$retValue = 'JavaScript Object Notation data'}
    default {$retValue = 'Sorry dude, no clue.'}
  }

  return $retValue
}

Within the switch statement, I use $this to access the current object. It then access the Extension property of the current object.

It then goes down the list, comparing the extension value to the text to the left of the squiggly brace. If it finds a match, it will run the code inside the script block. This simply sets a return value variable to a more human friendly text representation of the file type.

If no match is found, it runs the code by the default value. For more in the switch statement, see my post Fun With PowerShell Logic Branching.

Adding The Property and Method to the FileInfo Object

Now that our script is defined, it’s time to add it as well as a property to our FileInfo objects. Let’s see the code, then we’ll break it down.

# Create an item count variable
$itemCount = 0

# Iterate over each DirectoryInfo object in the $items collection
foreach($item in $items)
{
  # Add a note property, setting it to the current item counter
  $itemCount++
  $item | Add-Member –MemberType NoteProperty `
                     –Name ItemNumber `
                     –Value $itemCount

  # Add script property to the individual file object
  Add-Member -InputObject $item `
             -MemberType ScriptMethod `
             -Name 'ScriptType' `
             -Value $script

  # Now display the already existing Name property along with the
  # property and method we just added.
  "$($item.ItemNumber): $($item.Name) = $($item.ScriptType())"
}

We begin by creating a variable, $itemCount. Within the foreach loop we’ll increment it, then use it as our index for the ItemNumber property.

The foreach loop is entered, where we iterate over the collection of FileInfo objects stored in $items. Each time through the loop, the current item is copied into the $item variable. For more info on foreach, see my post Fun With PowerShell Loops.

The next line is straightforward, we simply increment the $itemCount by one.

You’ve seen the Add-Member cmdlet used in recent posts on adding properties and methods to a PSCustomObject, so I won’t delve deep into it here.

The first call to Add-Member takes the current FileInfo object, stored in $item, and adds a new property we’ll name ItemNumber. When we add it, we’ll go ahead and assign the value in $itemCount. Note that this property could be updated at a future time, although we won’t need to for this example.

We then call Add-Member a second time, adding in the script you saw earlier and naming it ScriptType.

Finally, we use string interpolation to build a nicely formatted string with the item number, the name of the file (a native property of the FileInfo object), and finally we call the method we just added ScriptType.

Here is the final output of our effort.

Result:

1: blog-template.md = Markdown
2: fun-with-powershell-classes-the-basics.md = Markdown
3: fun-with-powershell-classes-the-basics.ps1 = Script
4: fun-with-powershell-enum-flags-header.png = Sorry dude, no clue.
5: Fun-With-PowerShell-Enum-Flags.md = Markdown
6: Fun-With-PowerShell-Enums.md = Markdown
7: Fun-With-PowerShell-Objects-Part 1.md = Markdown
8: Fun-With-PowerShell-Objects-Part 1.ps1 = Script
9: Fun-With-PowerShell-Objects-Part 2.md = Markdown
10: Fun-With-PowerShell-Objects-Part 2.ps1 = Script
11: Fun-With-PowerShell-Objects-Part 3.cs = C#
12: Fun-With-PowerShell-Objects-Part 3.md = Markdown
13: Fun-With-PowerShell-Objects-Part 3.ps1 = Script
14: Fun-With-PowerShell-Objects-Part 4.md = Markdown
15: Fun-With-PowerShell-Objects-Part 4.ps1 = Script
16: fun-with-powershell-objects-part-1.png = Sorry dude, no clue.
17: Fun-With-PowerShell-Providers.md = Markdown
18: Fun-With-PowerShell-Write-Debug.md = Markdown
19: Fun-With-PowerShell-Write-Verbose-and-Write-Debug.md = Markdown
20: Fun-With-VSCode-Code-Snippets.md = Markdown
21: IMG_0965.JPG = Sorry dude, no clue.
22: more-fun-with-powershell-enums-header.png = Sorry dude, no clue.
23: More-Fun-With-PowerShell-Enums.md = Markdown
24: More-Fun-With-PowerShell-Enums.ps1 = Script
25: security-for-apartment-dwellers-01.png = Sorry dude, no clue.
26: Security-for-Apartment-Dwellers-header.png = Sorry dude, no clue.
27: Security-for-Apartment-Dwellers.md = Markdown

I author these blog posts in markdown within VSCode first, prior to copying them into my WordPress based blog. This folder contains a markdown file for each post, most of which have one or more accompanying code files associated with it.

I deliberately omitted the image type extensions (.jpg, .png) from the switch statement so you could see the default option being taken.

Persistance

There is an important fact you need to recall when using this technique. The new property and method only exist for the set of FileInfo objects contained in our $items collection. If I were to get another collection, perhaps using $moreItems = Get-ChildItem, the FileInfo objects stored in $moreItems will NOT have our ItemNumber and ScriptType in them.

You will have to explicitly add custom properties and methods to objects each time you need them.

Conclusion

As you can see, this technique offers many possibilities. You could define a script block at the top of your script that does a complex calculation, or perhaps formats data for easier reading by the end user. Then you simply add this script block to the objects you generate.

This makes your code much more readable. The complex part is at the top where we define the script block, out of the way of your loops.

It can also promote code reuse. You can create a separate script with many script blocks that you commonly use. You call that script from the one you are currently developing, and you instantly have a set of new properties and methods that can be added to the set of objects you are working with.

This method provides for extensibility with objects you did not author, or have the source code for. Perhaps you have a compiled PowerShell module that came from a vendor, but it lacks that one method that would, for your unique situation, make it much easier to work with. You can now code that method for yourself and use it.

As time goes on I’m sure you’ll find many situations you can use these techniques to solve problems.

In the next three installments of this series we’ll return to the PowerShell class type. We’ll look at some of the advanced abilities that it offers.

The demos in this series of blog posts were inspired by my Pluralsight course PowerShell 7 Quick Start for Developers on Linux, macOS and Windows, one of many PowerShell courses I have on Pluralsight. All of my courses are linked on my About Me page.

If you don’t have a Pluralsight subscription, just go to my list of courses on Pluralsight . At the top is a Try For Free button you can use to get a free 10 day subscription to Pluralsight, with which you can watch my courses, or any other course on the site.

Fun With PowerShell Objects – Creating Objects from C#

Introduction

This is the next installment in my series on creating objects in PowerShell. In the first installment we showed how to create an object using the class type introduced in PowerShell 5. That covered the basics, and in the last installment of this series we’ll cover some advanced techniques.

In the last two installment of this series, I covered the various ways to create objects using the PSCustomObject. We saw how to create it using the New-Object cmdlet, then how to add your custom properties to it using the Add-Member cmdlet. In the subsequent post we saw how to add new methods to it.

In this post, we’ll cover something new, creating an object based on C# code!

For all of the examples we’ll display the code, then (when applicable) under it the result of our code. In this article I’ll be using PowerShell Core, 7.2.1, and VSCode. The examples should work in PowerShell 5.1 in the PowerShell IDE, although they’ve not been tested there.

Additionally, be on the lookout for the backtick ` , PowerShell’s line continuation character, at the end of many lines in the code samples. The blog formatting has a limited width, so using the line continuation character makes the examples much easier to read. My post Fun With PowerShell Pipelined Functions dedicates a section to the line continuation character if you want to learn more.

To run a snippet of code highlight the lines you want to execute, then in VSCode press F8 or in the IDE F5. You can display the contents of any variable by highlighting it and using F8/F5.

Why C#

You may be asking yourself, why integrate C# code into PowerShell? Why not just define our objects using PowerShell? There are several reasons, especially if you are working with a team of C# developers, or are a C# developer yourself.

First, it can make testing your C# classes easy. You can code the class and save it in a .CS file. Then run some simple PowerShell to create a new object from your class and test its various properties and methods. This lets you make changes easily and test again. All without having to create a full blown C# project just to test.

It also allows for code reuse. Let’s say your C# developers have created a library to do some calculations, and you need to use one of the methods from that library, but that library expects you to pass in an object based on a class.

Let’s further the example, perhaps you have the task of reading in a CSV file, doing a calculation for each row, then outputting another CSV file, or maybe even a JSON file. This is a one time use, so you don’t want to go to the effort of creating a full blown C# project.

Using the techniques in this demo, you could simply access the C# file in which the class was defined, and generate an object from it in PowerShell. Then all you’d have to do is populate the object and pass it into the library to do the calculation, and output the result.

These are just a few simple examples, I’m sure you’ll come up with many more as the need arises. I’ll be honest, this isn’t something you will need to do a great deal, but when you do you’ll appreciate knowing how.

Embedding a C# Class in your PowerShell

In this first method, we’ll define a standard C# class within a here string then add it as a new data type in PowerShell. Once it exists as a type, we can then generate new objects from it. Let’s take a look at a very simple class definition.

$code = @"
using System;

public class SchemaTable
{
  public string DatabaseName;

  public string SchemaTableName(string pSchema, string pTable)
  {
    string retVal = "";  // Setup a return variable

    retVal = pSchema + "." + pTable;

    return retVal;

  } // public SchemaTableName

  public string FullName(string pSchema, string pTable)
  {
    string retVal = "";  // Setup a return variable

    retVal = this.DatabaseName + "." + pSchema + "." + pTable;

    return retVal;

  } // public FullName

} // class SchemaTable

"@

If you’ve read this far I’m going to assume you are familiar with C#, at least the basics of it, so I’ll keep this explanation at a high level.

We start by declaring a class named SchemaTable. The next line declares a variable (which will become a property) called DatabaseName.

I then create the first of two functions (which will become our methods). The SchemaTableName simply takes the two passed in values of pSchema and pTable and concatenates them together with a period between them.

The second, FullName, takes the value in DatabaseName and concatenates them with the schema and table name parameters, again using a period as a separator in the return string.

Next, we need to add this class as a new data type in PowerShell. You are already familiar with many data types, such as int, string, and more. We simply want to add a new data type to our PowerShell environment.

To do so, we will use the Add-Type cmdlet.

Add-Type -TypeDefinition $code `
         -Language CSharp

The first parameter, TypeDefinition, takes the C# code we defined in the here string. The second, Language, is pretty obvious. We simply need to let PowerShell know what language this code was written in.

As of right now, the only supported language is C#. Because of this, if you leave off the -Language CSharp parameter, it will default to C# as the language. I included it here for completeness, but will omit it for future examples in this post.

So now we’ve defined a class in C#, and have added it as a new data type in PowerShell. How then do we create an object from it?

We’ll turn to our old friend, New-Object.

$result = New-Object -TypeName SchemaTable

That’s it, that simple one line will create our new object based on the C# code we defined in the $code variable. You can even use Get-Member to display its properties and methods like you would with any other object.

$result | Get-Member

Result:

Name            MemberType Definition
----            ---------- ----------
Equals          Method     bool Equals(System.Object obj)
FullName        Method     string FullName(string pSchema, string pTable)
GetHashCode     Method     int GetHashCode()
GetType         Method     type GetType()
SchemaTableName Method     string SchemaTableName(string pSchema, string pTable)
ToString        Method     string ToString()
DatabaseName    Property   string DatabaseName {get;set;}

It contains the standard methods and properties built into all objects, but it also has the three we defined: FullName, SchemaTableName, and DatabaseName.

We can use these properties and methods just like ones in any other object. Let’s set the DatabaseName property, then display it.

$result.DatabaseName = 'MyDB'
$result.DatabaseName

Result:

MyDB

Likewise, we can access the methods we created. Here’s the SchemaTableName method.

$result.SchemaTableName('ASchema', 'ATable')

Result:

ASchema.ATable

And for completeness, the FullName method.

$result.FullName('ASchema', 'ATable')

Result:

MyDB.ASchema.ATable

C# Classes with Static Methods

In the original post in this series on basic PowerShell classes, I mentioned the concept of static methods and properties. As static method or property is simply one that can be called without having to generate a new object.

While we’ll circle back around to discuss implementing static methods and properties in PowerShell classes in the final post in this series, it is likely you’ll encounter C# classes with static methods and properties. As such we’ll go ahead and cover them here, while we are talking C#.

In the code below, I’ve defined a class with one method, and labeled it as static. In reality you will encounter many classes that have a mix of static and non-static members, but for this post we’ll keep the example simple.

$code = @"
using System;

public class StaticSchemaTable
{
  public static string FullName(string pSchema, string pTable)
  {
    string retVal = "";

    retVal = pSchema + "." + pTable;

    return retVal;

  } // public static FullName
} // class StaticSchemaTable
"@

As you can see, I’ve simply used the static keyword as part of the FullName function declaration. I also changed the name of the class, otherwise the code is the same as the previous demo.

Now we need to add this as a new type in our current PowerShell session.

Add-Type -TypeDefinition $code

Calling our static method requires different syntax. First, it won’t be necessary to create an object from it. Second, we’ll need to use the full name of our class in brackets, followed by two colons. We then indicate the name of the static function to call, and pass in any parameters.

$result = [StaticSchemaTable]::FullName('MySchema', 'myTable')
$result

Result:

MySchema.myTable

Static methods and parameters aren’t something that’s used a great deal, but they are used so you should know how to handle them.

Creating an Object from A C# File

While it is certainly possible to embed C# code right in your PowerShell, this could lead to some issues. The moment a developer makes a change to their .cs file, you are now out of sync. You don’t want to have to keep cutting and pasting all the time.

It makes far more sense, then, to simply access the C# file with the class definition, and load it at run time.

First, you need to create a C# file with the sample code. Here is what I put in my .cs file:

using System;

public class StaticSchemaTableInFile
{
  public static string FullName(string pSchema, string pTable)
  {
    string retVal = "";

    retVal = pSchema + "." + pTable;

    return retVal;

  } // public static FullName
} // class StaticSchemaTableInFile

This is the same static class you just saw, with the minor change to the class name.

In the next sample, I simply build the path to the file name, then use the Get-Content to read it.

$csPath = 'C:\Users\arcan\OneDrive\BlogPosts\Markdown\'
$file = "$($csPath)Fun-With-PowerShell-Objects-Part 3.cs"
$code = Get-Content $file | Out-String

Get-Content will read the contents of the file. By default Get-Content reads it as an array with each line in the file being an element, so we’ll have to pipe it through the Out-String cmdlet to convert it to a single string. This string is then stored in the $code variable. Of course you’ll need to update the path and file variables you used on your computer.

Now we do just like the previous demo, call Add-Type then run it.

Add-Type -TypeDefinition $code
$result = [StaticSchemaTableInFile]::FullName('mySchema', 'myTable')
$result

Result:

mySchema.myTable

Again, I reused the example from the static demo but we could also have used the first example, or any standard C# file containing class definitions.

Other Ways To Add Types

While outside the scope of this post, I did want to mention there are two other ways you can add new data types to your PowerShell scripts. First, Add-Type will let you load types stored in an assmebly, in other words a .dll file.

Second, if you are running on a Windows computer you can add types stored in native Windows APIs. If you want to learn more about these, I’ll refer you to the Add-Type Documentation at Microsoft.

Persistance

One last thing you need to be aware of. When you add a type it does not persist between sessions. The moment you close your command window or VSCode, that type goes away. You’ll need to recreate it the next time you run your script.

This is probably a good thing, as it’s doubtful you will need to use these types on a daily basis. Should you need to, though, you’ll have to edit your PowerShell profile and have them added within it.

Conclusion

In this post we saw how to create custom objects from C# classes. They could be embedded in our PowerShell code, or stored in external files. The subject of static methods and properties were mentioned, along with a demo on how to use them.

In the next post we’ll see a very useful technique, and cover the ability to add our own custom methods and properties to existing objects that others created, including ones built right into PowerShell.

The demos in this series of blog posts were inspired by my Pluralsight course PowerShell 7 Quick Start for Developers on Linux, macOS and Windows, one of many PowerShell courses I have on Pluralsight. All of my courses are linked on my About Me page.

If you don’t have a Pluralsight subscription, just go to my list of courses on Pluralsight . At the top is a Try For Free button you can use to get a free 10 day subscription to Pluralsight, with which you can watch my courses, or any other course on the site.

Fun With PowerShell Objects – Adding Methods to PSCustomObject

Introduction

In the previous installment of this series, I covered the various ways to create objects using the PSCustomObject. We saw how to create it using the New-Object cmdlet, then how to add your custom properties to it using the Add-Member cmdlet.

In this post we’ll learn how to add our own methods to our objects using script blocks. Before we go on, just a quick reminder on vocabulary.

In object oriented terminology, objects have properties and methods. From the perspective of the script writer who uses our object, they only know of the properties and methods we expose. They don’t know, or care, how we implemented them.

From the perspective of us, the authors of the code to create the object, it’s a little different. What the end user calls properties we store in variables. We implement our objects methods using functions.

When we are talking about our code in terms of writing our object, you will frequently see the terms properties and variables used interchangeably. Likewise you’ll see the terms method and function used interchangeably.

For all of the examples we’ll display the code, then (when applicable) under it the result of our code. In this article I’ll be using PowerShell Core, 7.2.1, and VSCode. The examples should work in PowerShell 5.1 in the PowerShell IDE, although they’ve not been tested there.

Additionally, be on the lookout for the backtick ` , PowerShell’s line continuation character, at the end of many lines in the code samples. The blog formatting has a limited width, so using the line continuation character makes the examples much easier to read. My post Fun With PowerShell Pipelined Functions dedicates a section to the line continuation character if you want to learn more.

To run a snippet of code highlight the lines you want to execute, then in VSCode press F8 or in the IDE F5. You can display the contents of any variable by highlighting it and using F8/F5.

Script Blocks

Before we get started, it’s important to understand the concept of a script block. A script block is a piece of code encapsulated within squiggly braces {}. This code is meant to execute as a unit. Here’s an example you’ve probably seen before.

$x = 1
if ($x -eq 1)
{ Write-Host 'Yep its one' }

The code on the last line is the script block. This unit of code, within the squiggly braces, will execute should the if statement evaluates to true.

It’s possible to define your own script blocks, and store them in a variable.

$hw = {
        Clear-Host
        "Hello World"
      }

Here I’ve generated a simple block with two lines. The first clears the display, the second prints Hello World.

Now you have a variable, $hw, holding a script block. How can we use this?

First, we could execute the script block stored in the variable. To do so, we need to precede the name of the variable with an ampersand &. The ampersand is the PowerShell shortcut for execute the code block contained in this variable.

& $hw

Result:

Hello World

Although it’s difficult to show, the display did indeed clear before displaying our text.

Note the space between the & and the variable name is optional, this works too.

&$hw

Personally I think the space makes it a bit easier to read, not to mention it’s easier for the eye to notice the &. Whichever way you go, I suggest picking a format and sticking to it.

There are some interesting ways we can use this concept. Of course we’ll look at using script blocks to add new methods to an object in a moment, but another fun thing you can do is pass a script block into a function.

A quick note, it is generally considered poor practice to have Write-Host statements within a function. Since this is just a simple demo though, we’ll use them just to illustrate our concepts.

function Run-AScriptBlock($block)
{
  Write-Host 'About to run a script block'

  & $block

  Write-Host "Block was run"
}

Run-AScriptBlock $hw

Result:

Hello World
Block was run

The first line to display "About to run…." did execute, but it was wiped out due to the Clear-Host in the script block.

The script block then displayed Hello World, and returned control to the function. The function then displayed "Block was run" then exited.

The PowerShell testing tool, Pester, makes extensive use of this functionality to pass the code blocks being tested into Pester’s unit testing functions.

Your imagination is probably running wild at the various ways you can use this. For example, you could build a string of PowerShell code based on certain conditions, then once the string of code is complete execute it.

At this point you have a nice foundation on the concept of script blocks, so let’s move on to the main topic of this post.

Starting Point

This post picks up where the previous one left off. If you recall, our previous post built a function to generate a custom object of type PSCustomObject. If you need an explanation please go back and read part 1 of this series, but to make it easy for you I’ll reproduce the function needed to create the object we’ll be working with.

function Create-Object ($Schema, $Table, $Comment)
{
  # Build a hash table with the properties
  $properties = [ordered]@{ Schema = $Schema
                            Table = $Table
                            Comment = $Comment
                          }

  # Start by creating an object of type PSObject
  $object = New-Object –TypeName PSObject -Property $properties

  Add-Member -InputObject $object `
             -MemberType AliasProperty `
             -Name 'Description' `
             -Value 'Comment'

  # Return the newly created object
  return $object
}

$myObject = Create-Object -Schema 'MySchema' `
                          -Table 'MyTable' `
                          -Comment 'MyComment'
$myObject

Adding a Method (aka Function) to an Object

With the knowledge above, combined with what we learned in the previous post, it turns out adding a simple function to an object is easy. First, we need to define our function in a script block. This function will combine the schema name and the table name with a period to separate the two.

$block = {
           $st = "$($this.Schema).$($this.Table)"
           return $st
         }

In this example I used string interpolation to build my return string. (For more on string interpolation, see my post Fun With PowerShell Strings.)

Note my use of the $this keyword. Just like with objects generated by the more modern classes in PowerShell 5 and beyond, $this is used to represent the current instance of our custom object. Thus we’ll be getting the schema and table names for the current object, stored in $myObject, and not one in another variable that was instantiated using the same code.

If you aren’t a fan of string interpolation, you could have opted for concatenation with $st = $this.Schema + '.' + $this.Table to generate the return value, but interpolation is the generally accepted best practice for building strings.

Concatenation is generally slower and takes more processing power than interpolation. Granted in this case it is barely measurable, but done over a dataset of millions of rows you might see an impact.

With the schema-table string ($st) built it is then returned.

Now we will use the Add-Member cmdlet to add this function to our custom object. Assuming you have already run the function to create the $myObject variable, shown in the Starting Point section, you can use the following code to achieve our goal.

Add-Member -InputObject $myObject `
           -MemberType ScriptMethod `
           -Name 'SchemaTable' `
           -Value $block

I start by passing in the object I wish to add a member to, our $myObject variable.

Next I indicate what type of member we are adding. ScriptMethod is the value to pass in to MemberType to indicate the data in the variable is a script block and should be manifested as a method.

The Name is next, in other words what we want to name this method. Finally into the Value parameter we pass in the variable holding the script block.

Once you add this new member, you can simply call it using the dot notation, with one important caveat. Because this is a method, you need to add parenthesis to the name of the method.

$myObject.SchemaTable()

Result:

MySchema.MyTable

Using the parenthesis lets PowerShell make the distinction between a property and a method.

Parameters

What’s that? You in the back row raising your hand, what did you say? Parameters? You want to add parameters to your new method?

Well, OK because you asked so nice.

This turns out to be pretty easy. We just need to add a param section within our script block.

$block = {
           param ($DatabaseName)
           $dst = "$DatabaseName.$($this.Schema).$($this.Table)"
           return $dst
         }

On the first line of our script block we use the param keyword, then have a list of our parameters within parenthesis. Here we only have one, $DatabaseName, but we could have more separated by commas.

I then build a string that uses the passed in database name, with the schema and table names already in the object, and finally return it.

Next, I use Add-Member to add this function to our object just like I did with the previous example, the only difference being the name and the variable with our script block. Now we can call it.

$myObject.DatabaseSchemaTable('MyDBName')

Result:

MyDBName.MySchema.MyTable

Conclusion

This post began with an explanation of script blocks. Using this knowledge we added new methods to our existing object. One even allowed us to pass in a parameter.

In in the next post we’ll see how to create custom objects from bits of C# code. Later on we’ll see how to add our own properties and methods to an existing object created by PowerShell.

Well conclude this series by returning to our discussion of PowerShell classes by looking at some advanced features of the built in class construct.

The demos in this series of blog posts were inspired by my Pluralsight course PowerShell 7 Quick Start for Developers on Linux, macOS and Windows, one of many PowerShell courses I have on Pluralsight. All of my courses are linked on my About Me page.

If you don’t have a Pluralsight subscription, just go to my list of courses on Pluralsight . At the top is a Try For Free button you can use to get a free 10 day subscription to Pluralsight, with which you can watch my courses, or any other course on the site.

Fun With PowerShell Objects – PSCustomObject

PSCustomObject Sample

Introduction

Before the holidays I had started a series on classes and objects in PowerShell. If you haven’t read my post Fun With PowerShell Classes – The Basics you should give it a quick read. There are terms that were defined in it that we’ll be using here.

For this post I’ll begin a series on the use of PSCustomObject. Prior to the addition of classes in PowerShell 5.0, this was the technique needed to create your own customized objects. It still has a lot of validity today though, as you can use these techniques to extend the objects other people defined, including those already built into PowerShell.

In addition, understanding the use of PSCustomObject will give you a better understanding of the way classes work.

First let me mention that for all of the examples we’ll display the code, then under it the result of our code when applicable. In this article I’ll be using PowerShell Core, 7.2.1, and VSCode. The examples should work in PowerShell 5.1 in the PowerShell IDE, although they’ve not been tested there.

Second, be on the lookout for the backtick ` , PowerShell’s line continuation character, at the end of many lines in the code samples. The blog formatting has a limited width, so using the line continuation character makes the examples much easier to read. My post Fun With PowerShell Pipelined Functions dedicates a section to the line continuation character if you want to learn more.

To run a snippet of code highlight the lines you want to execute, then in VSCode press F8 or in the IDE F5. You can display the contents of any variable by highlighting it and using F8/F5.

Code to Generate Our PSCustomObject

For these demos, I’m going to wrap the creation of our objects within a function. This is a common technique which allows us to create multiple objects based on a single set of code. Note this isn’t required, you could use these techniques anywhere in your code. I just find placing it in functions makes for greater reuse.

If you need a refresher on PowerShell functions, I’ll refer you back to my posts on functions: Fun With PowerShell Basic Functions; Fun With PowerShell Advanced Functions; and Fun With PowerShell Pipelined Functions.

Let’s take a look at our first example, then break down each line.

function Create-Object ($Schema, $Table, $Comment)
{
  # Build a hash table with the properties
  $properties = [ordered]@{ Schema = $Schema
                            Table = $Table
                            Comment = $Comment
                          }

  # Start by creating an object of type PSObject
  $object = New-Object –TypeName PSObject `
                       -Property $properties

  # Return the newly created object
  return $object
}

Our first line, obviously, defines our basic function. For this example I will be creating an object that holds the schema and table names for a database. It also will allow for a comment, so these are the three parameters that are passed in.

To add a list of properties to our object, we need to use a hash table. I define the hash table with three properties, Schema, Table, and Comment, and assign the parameter variables we passed in for their respective values. And yes, I do have a post on hash tables if you wish to know more about them, Fun With PowerShell Hash Tables.

Next is where the magic occurs. I call the cmdlet New-Object. For its TypeName parameter I use the value of PSObject. This will create a variable of type PSCustomObject. I then pass in my hash table name for the Property parameter.

This is assigned to the variable $object. In the final line I return that value to the calling code.

Before someone points it out, yes I could have made the last line of the function simply New-Object –TypeName PSObject -Property $properties and not assigned it to a variable. As I explain in my previously mentioned posts on functions, not consuming the output within the function returns the value to the code that called it.

Assigning to a value within my function, then returning that value, gives me some additional flexibility. Primarily I could use the Write-Verbose and Write-Debug statements to echo additional debugging information back to the developer (or user). It also allows for easier integration with testing tools, such as Pester.

For more info on Write-Verbose and Write-Debug, see my posts Fun With PowerShell Write-Verbose and Fun With PowerShell Write-Debug.

Creating Our Custom Object

Now that we have the function created, we can call it to create our custom object. We’ll then display its properties.

$myObject = Create-Object -Schema 'MySchema' `
                          -Table 'MyTable' `
                          -Comment 'MyComment'

# Display all properties
$myObject

Result:

Schema   Table   Comment
------   -----   -------
MySchema MyTable MyComment

As you can see, simply running the name of our variable produces a table. Across the top are the names of our properties, below it are the values we passed into the function to use as values.

If we want to prove to ourselves this is indeed a PSCustomObject, we can use the GetType method.

$myObject.GetType()

Result:

IsPublic IsSerial Name            BaseType
-------- -------- ----            --------
True     False    PSCustomObject  System.Object

As you can see in the Name column, it is indeed of type PSCustomObject!

Like any object, we can assign new values by referencing the individual properties.

$myObject.Schema = 'New Schema'
$myObject.Comment = 'New Comment'
$myObject

Result:

Schema     Table   Comment
------     -----   -------
New Schema MyTable New Comment

In the output, you can see the values for Schema and Comment were updated. The original value for the Table property remained unchanged.

Adding Properties One At A Time

There is an alternate method we can use to create a custom object. We can create an empty object, then use the Add-Member cmdlet to add each property individually.

Let’s rewrite our function to use this methodology.

function Create-Object ($Schema, $Table, $Comment)
{
  # Start by creating an object of type PSObject
  $object = New-Object –TypeName PSObject

  # Add-Member by passing in input object
  Add-Member -InputObject $object `
             –MemberType NoteProperty `
             –Name Schema `
             –Value $Schema

  # Alternate syntax, pipe the object as an input to Add-Member
  $object | Add-Member –MemberType NoteProperty `
                       –Name Table `
                       –Value $Table

  $object | Add-Member -MemberType NoteProperty `
                       -Name Comment `
                       -Value $Comment

  return $object
}

The function declaration is the same as in our first example. We then create an empty object through the line $object = New-Object –TypeName PSObject. This object now exists, but has none of our custom properties. Yet!

Now we are going to call the Add-Member cmdlet. Add-Member allows us to add new properties and methods to an existing object.

The first parameter, InputObject, is used to indicate what object we want to work with.

The next parameter is MemberType. There are a variety of types we can add to a custom object. In this case we want to add a text property, so the correct value to use is NoteProperty. We’ll see examples of other member types as we progress through this series.

The next two parameters are pretty self explanatory. The Name is what we want to call this property, and Value is the value we want it to have.

We then move on to add the Table property. In this example I wanted to show the alternative format for using Add-Member. You can take the object you want to add a member to, and pipe it into the Add-Member cmdlet. I’ve done this here for the Table property, as well as for the final property Comment.

Using this function has identical results as the previous example.

$myObject = Create-Object -Schema 'MySchema' `
                          -Table 'MyTable' `
                          -Comment 'MyComment'
$myObject

Result:

Schema   Table   Comment
------   -----   -------
MySchema MyTable MyComment

So why use Add-Member? Clearly the first example where we used a hash table to declare our property list was more compact.

Think about what we did here. We added new properties to an existing object! In this case it was a custom object we created. but this could be any PowerShell object. For example, we could have a list of file system objects returned to us by the Get-ChildItem cmdlet. Using Add-Member we have the ability to add new properties (and methods) to those objects.

We’ll see an example of this very thing in a future blog post, but for now let’s move on to the final section in today’s post.

Creating Property Aliases

If you’ve been in IT for any length of time, you’ve probably encountered the situation where two different groups refer to the same property by two different names. In our example, let’s say the DBA’s refer to the comment property as Comment. They would like to use that property name when they use your script.

Your software developers though don’t think of this as the comment property, instead they call it Description. They complain that having to use the property name "Comment" is causing a lot of coding errors.

This is one of those rare times we can make everyone happy, and we do so through the use of a property alias.

We’ll start with the same $object variable we left off with in the previous example. We’ll then use Add-Member to add a new alias.

Add-Member -InputObject $myObject `
           -MemberType AliasProperty `
           -Name 'Description' `
           -Value 'Comment' `
           -PassThru

Result:

Schema     Table   Comment     Description
------     -----   -------     -----------
New Schema MyTable New Comment New Comment

The first thing to note is the MemberType. Instead of a NoteProperty, we are using the type AliasProperty. This will let the Add-Member cmdlet know we are simply adding an alternate name for an existing property.

The Name parameter is the name for the alias. The Value is the name of the already existing property.

You’ll also note I added a switch to Add-Member, PassThru. In our previous examples, leaving this off ran the code but displayed no output. If want to see the results though, you can add the PassThru switch and the new values will be displayed in the terminal, as you saw in the Result section above.

Our alias added, you can see a new column Description. The value under it is identical to the one for comment.

Let’s change the Description property and see what happens.

$myObject.Description = 'The Description'
$myObject

Result:

Schema   Table   Comment         Description
------   -----   -------         -----------
MySchema MyTable The Description The Description

As you can see, both Comment and Description hold the newly updated value. Your users can now use these property names interchangeably.

We can of course update our original function to add the alias at the time the object is created.

function Create-Object ($Schema, $Table, $Comment)
{
  # Build a hash table with the properties
  $properties = [ordered]@{ Schema = $Schema
                            Table = $Table
                            Comment = $Comment
                          }

  # Start by creating an object of type PSObject
  $object = New-Object –TypeName PSObject `
                       -Property $properties

  Add-Member -InputObject $object `
             -MemberType AliasProperty `
             -Name 'Description' `
             -Value 'Comment'

  # Return the newly created object
  return $object
}

$myObject = Create-Object -Schema 'MySchema' `
                          -Table 'MyTable' `
                          -Comment 'MyComment'
$myObject

Result:

Schema   Table   Comment   Description
------   -----   -------   -----------
MySchema MyTable MyComment MyComment

As you can see, the function generated an object that included our alias. In this example I also combined methods. I used a hash table to define our initial set of properties, then used Add-Member to add the alias. I could have also put the addition of the alias in the second version of the function, where each property was added one at a time.

Conclusion

In this post we learned how to create a basic object using PSCustomObject. We added some properties, and even created an alias for one.

Now you may be asking "what about methods? Object can have methods too!" And you would be correct. In the next post in the series we’ll see how to add custom methods to our object.

In future posts we’ll see how to create custom objects from bits of C# code. Then we’ll see how to add our own properties and methods to an existing object created by PowerShell.

We’ll then return to our discussion of PowerShell classes by looking at some advanced features of the built in PowerShell class type.

The demos in this series of blog posts was inspired by my Pluralsight course PowerShell 7 Quick Start for Developers on Linux, macOS and Windows, one of many PowerShell courses I have on Pluralsight. All of my courses are linked on my About Me page.

If you don’t have a Pluralsight subscription, just go to my list of courses on Pluralsight . At the top is a Try For Free button you can use to get a free 10 day subscription to Pluralsight, with which you can watch my courses, or any other course on the site.

Fun With PowerShell Classes – The Basics

Introduction

In the last few posts we looked at the use of Enums, a technique closely associated with classes. In this post we’ll start looking at classes themselves. We’ll open with some terminology, then look at our first class.

For the next post in this series I plan to do a history lesson on the use of PSCustomObject. Prior to the addition of classes in PowerShell 5.0, this was the technique needed to create your own customized objects. From there we’ll return to the modern area and get into some advanced class techniques.

First let me mention that for all of the examples we’ll display the code, then under it the result of our code. In this article I’ll be using PowerShell Core, 7.2, and VSCode. The examples should work in PowerShell 5.1 in the PowerShell IDE, although they’ve not been tested there.

To run a snippet of code highlight the lines you want to execute, then in VSCode press F8 or in the IDE F5. You can display the contents of any variable by highlighting it and using F8/F5.

Terminology

If you are familiar with object oriented terminology, then this short overview will be familiar to you. However, many who come into PowerShell scripting do not come from a coding background. It’s worth taking a few paragraphs, then, to explain some common terms that will be used in this and future articles.

A class is code that is used as a blueprint to create an object variable in memory. In fact, all variables in PowerShell are objects, even built in ones like strings or integers. Their classes are already defined and ready to be used in the core PowerShell libraries.

The act of creating a new object from a class is called instantiation. You can instantiate multiple variables from the same class.

In most object oriented discussions, the classic example compares a class to a blueprint for a house. From that single blueprint a home builder can create an entire neighborhood of houses.

Each house has properties that can be set to make the houses different from each other, even though they are built from the same blueprint. House color, trim color, number of cars the garage will hold, are all properties that can be set on a per house basis.

Likewise, a PowerShell class has properties. These are made available through variables, and may be things like first name, last name, address, birth date, number of pets, or any number of other items that would apply to this instance of an object built from your class.

A house blueprint may also have tasks assigned to it. "Get building permit from city", for example, or "paint the trim". In the PowerShell world, a class can also have tasks assigned to it. These are created by using functions.

If you aren’t familiar with functions yet, you need to brush up. You can start with my series Fun With PowerShell Functions, then continue through the next few posts which move into advanced functions and pipelined functions.

When it comes to classes, we call these built in functions methods. A method is designed to act on the data within the function itself.

A simple example, you may have three properties, first name, middle name, and last name. You could create a method (in the form of a function) called full name, which concatenates the three parts of the name together, correctly formatting for times when a middle name is absent.

Methods in a class can return a value, but do not have to. We’ll see examples of both in this article.

Also be aware there are special types of properties and methods that are called static properties and static methods. These are pieces of code that PowerShell can execute from the class itself, without creating an object from that class.

We’ll see examples of how to create and use these in our future post on advanced classes, but I wanted to mention them as PowerShell classes have a static function we’ll need to use in order to instantiate new objects.

This short intro just hits the tip of the iceberg when it comes to object oriented methodology, entire books have been written on the subject. Hopefully it provides enough information to get you started.

So now that we’re all on the same page when it comes to terminology, let’s go create a class.

A Very Simple Class

This first example will be very simple. Take a look, then we will go over its parts.

class Twitterer
{
  # Create a property
  [string]$TwitterHandle

}

We begin the definition with the keyword class, followed by what we wish to name our class. In my previous articles on enums we used Twitter data as an example, so let’s stick to that.

After the name of the class we need an opening squiggly brace, and a closing one at the end. In PowerShell squiggly braces are used to define a scrpt block. You’ve seen these before, functions, foreach, if statements and more all use script blocks. Classes are no different, everything in the script block is the class definition.

With classes, as with most script blocks, it’s not necessary to put the opening squiggly brace on the next line, many use class Twitter { on a single line. I just feel having the squiggly braces vertically aligned makes things easier to read.

Within the class I have defined a single property, $TwitterHandle. Before the name of the variable I have indicated the variable type in brackets, [string]. Unlike regular PowerShell, all properties must be strongly typed.

Let’s create, or instantiate, a new variable from our class (after highlighting the class definition and using F8 or F5 to get it into memory).

$twit = [Twitterer]::new()

This syntax may look a bit odd, so let me explain. When we created our class we defined a single property. Anytime we define a class, though, PowerShell adds extra properties and methods behind the scenes.

One of those methods is new. New is a static method that can be called without the need to instantiate a new object, which is fortunate as it is the way we get new objects from our class.

To call a static method, we use the name of the class in brackets, followed by two colons, then the name of the static method. In PowerShell, to call a method you always have to use parenthesis after the name of the method even if it takes no parameters. This is unlike a regular function in PowerShell.

Finally, we assign our newly instantiated object to the variable $twit.

We can now access the properties (and methods) in our object by using what is formally known as dot notation. If you’ve done any PowerShell coding then you’ve likely used it a million times by now without realizing it had a formal name.

You simply use the name of our object, a period, then the name of the property, as in $twit.TwitterHandle. Of course if we run this right now, we won’t get anything back. This is because our variable is empty when the class is created. So let’s assign it a value.

$twit.TwitterHandle = 'ArcaneCode'
$twit.TwitterHandle

Result:

ArcaneCode

It’s that easy, we can use it like any other variable. Note one thing, when we created the property we used the $ in front of the variable. But outside the class when we reference it as a property the $ is omitted.

Default Values for Properties

There will be many times when you write a class in which you want to have some, or perhaps all, of its properties already populated with values. This will make it easier for your end user, especially for properties where the majority of the time the user can get by with the default value.

Creating a default value is simple, when you create the property you simply assign it a value.

class Twitterer
{
  # Create a property
  [string]$TwitterHandle

  # Create a property and set a default value
  [string]$Name = 'Robert C. Cain'
}

Here a second property, Name, has been added. After its declaration I simply assigned it a name (mine in this case) just like I would assign any value to a variable.

Now let’s create a new instance and examine the value in our Name property.

$twit = [Twitterer]::new()
$twit.Name

Result:

Robert C. Cain

Of course just because we’ve provided a default value doesn’t mean we can’t change it.

$twit.Name = 'Mr. Code'
$twit.Name

Result:

Mr. Code

Our First Method

Now that we’ve added properties, it’s time to add a little functionality with our first method. A class method in PowerShell works just like a function, only without the need for the function keyword. For this example, we’ll add a new method that takes the value in the $TwitterHandle property and return the URL to that handles Twitter page.

class Twitterer
{
  # Create a property
  [string]$TwitterHandle

  # Create a property and set a default value
  [string]$Name = 'Robert C. Cain'

  # Function that returns a string
  [string] TwitterURL()
  {
    $url = "https://twitter.com/$($this.TwitterHandle)"
    return $url
  }

}

The URL to a users Twitter account is simple, it is just twitter.com followed by the users twitter handle. Now, you might think you could just use $TwitterHandle to create this, but not so.

We need to let PowerShell know to use the TwitterHandle for this particular object. That’s where the $this variable comes into play.

$this is a built in variable which simply means "the current object I am running this code in". Using $this, I can reference any property or other method within this instance of my class.

I also want to point out that after the name of our method we added parenthesis. This is an indicator to PowerShell we are defining a method and not a property. In this case we are not passing in any values to our method, so they are empty. It is possible though to pass values in, which we’ll see in a future post.

Finally, note that my function, just like properties, is strongly typed. Since my URL is in the form of a string, I used [string] to indicate the data type being returned by this function.

$twit = [Twitterer]::new()
$twit.TwitterHandle = 'ArcaneCode'
$myTwitter = $twit.TwitterURL()
$myTwitter

Result:

https://twitter.com/ArcaneCode

No Return

In my previous example, our method returned a value. There will be cases though when you simply want your method to do something, and not return any values. For those times, we can use the return type of void.

class Twitterer
{
  # Create a property
  [string]$TwitterHandle

  # Create a property and set a default value
  [string]$Name = 'Robert C. Cain'

  # Function that returns a string
  [string] TwitterURL()
  {
    $url = "https://twitter.com/$($this.TwitterHandle)"
    return $url
  }

  # Function that has no return value
  [void] OpenTwitter()
  {
    Start-Process $this.TwitterURL()
  }

}

I’ve added a new method, OpenTwitter. Before it I used [void] to let Twitter know this particular method won’t be returning any data.

Within the function I call the PowerShell cmdlet Start-Process. This cmdlet will take the value passed into it and attempt to run the application that corresponds to it. For example, if I had passed in the file name to an Excel spreadsheet, PowerShell would have attempted to launch Microsoft Excel and open that file.

In this case we’re passing in a URL, so PowerShell will launch your default browser and open the Twitter webpage for that user.

Also note we used the $this built in variable to call the TwitterURL method for this current instance of our object, here $twit.

To run it we only need to call our method.

$twit = [Twitterer]::new()
$twit.TwitterHandle = 'ArcaneCode'
$twit.OpenTwitter()

If all went well your web browser should open to the Twitter page for the associated user held in the $TwitterHandle variable.

Conclusion

In this opening article we covered some of the basics of using classes in PowerShell. Even with this limited information you should be able to start creating useful classes. In future articles we’ll dive deeper into using classes in PowerShell.

I want to mention, as I write this in December 2021, that my posts for the rest of the year will diverge as I want to give a little gift and share some of my favorite things I’ve found on the internet this year. I’ll pick this series back up in January of 2022.

The demos in this series of blog posts came from my Pluralsight course PowerShell 7 Quick Start for Developers on Linux, macOS and Windows, one of many PowerShell courses I have on Pluralsight. All of my courses are linked on my About Me page.

If you don’t have a Pluralsight subscription, just go to my list of courses on Pluralsight . At the top is a Try For Free button you can use to get a free 10 day subscription to Pluralsight, with which you can watch my courses, or any other course on the site.

Fun with PowerShell Enum Flags

Fun with PowerShell Enum Flags

Introduction

In my last two posts, I introduced the concept of Enums in PowerShell, then got into some of the more advanced uses. In this post we’ll examine a special way to use an enum, known as a Flag.

First let me mention that for all of the examples we’ll display the code, then under it the result of our code. In this article I’ll be using PowerShell Core, 7.2, and VSCode. The examples should work in PowerShell 5.1 in the PowerShell IDE, although they’ve not been tested there.

To run a snippet of code highlight the lines you want to execute, then in VSCode press F8 or in the IDE F5. You can display the contents of any variable by highlighting it and using F8/F5.

A Brief Refresher on Binary Math

In order to understand how flags work you need at least a basic understanding of binary math. In this section I’ll see if I can’t provide a short, simple refresher on the subject.

In my previous article, I mentioned that I am a ham radio operator, and am a member of multiple clubs. In a small club it’s not unusual to hold multiple offices, for example I’m both the secretary and the webmaster for one of the clubs, as well as a paid member. We can denote this by using a single variable to hold this information through the use of an enum flag.

A flag is a single variable that can be broken into its individual bits to indicate multiple values. In our example, we’ll use a flag to indicate a member’s paid status, their office, and if they hold more than one position in the club, all with a single variable.

Let’s say we have six people standing in a row. Each person has a sign, the first reads "paid", the rest have the names of club offices.

When a member walks into a room, people hold up signs that indicate the person’s status in the club, while the others leave their signs face down. When the Vice President walks in, the paid sign is raised up, as is the Vice President sign. We then take a photograph to capture this information in a single place.

I happen to be both Secretary and Webmaster of my club, as well as a paid member, so in my case three signs would go up and be captured in a photo. If we happen to have a visitor to the club, none of the signs will be raised, and a photo will record that.

Bit flags work the same way. Each sign is a bit, and the photo corresponds to the variable that holds all the bits.

Let’s say we have a 32 bit integer. If all 32 of the bits are set to a 0, then the value of that integer will be 0.

If the bit in position one is set to 1, and all of the other bits are 0, it indicates the value of the variable is 1.

In the second bit position, if the value is set to 1 and all other bits set to 0, the integer value is 2. If both bits one and two are set to 1, the integer value will be 3, and so on.

This chart of binary numbers and their decimal counterparts may help clarify.

Binary Decimal
0000 0
0001 1
0010 2
0011 3
0100 4
0101 5
0110 6
0111 7
1000 8
1001 9
1010 10

These are just the first few as an example, you could continue this chart into the trillions of values if not higher.

Should you need a further refresher on binary numbers, I’d suggest the Binary Number article on Wikipedia as a good guide. It’s important to understand binary values in order to fully understand how flags work.

Enum Flags

Let’s create our own enum flag to hold the status of club members. You declare an enum as a flag by placing the [Flags()] modifier in front of the enum declaration, as you’ll see below. Note that the values must correspond to the integer value if a bit is set. The Wikipedia article includes a nice chart that shows a decimal number and what that number looks like in binary.

[Flags()] enum MemberStatus
{
  Paid = 1
  President = 2
  VicePresident = 4
  Secretary = 8
  Treasurer = 16
  Webmaster = 32
}

I could add more to this list if needed, using the value of 64 for the next member status, then 128, then 256, and so on.

Now lets represent a member status in a variable to show a member is the Vice President, and is also a paid member. To do so, we simply add the various statuses together.

$memStatus = [MemberStatus]::Paid + [MemberStatus]::VicePresident

$memStatus

Result:

Paid, VicePresident

What’s nice about using an enum flag is that when we display the variable PowerShell converts the flags back into the members from the enum.

We could also simply assign the total number. In this case, Paid (value of 1), plus Vice President (value 4), adds up to 5.

$memStatus = [MemberStatus] 5
$memStatus

Result:

Paid, VicePresident

Finally, if we want to display the numeric value behind our flag, we can cast it as an int.

[int]$memStatus

Result:

5

Is the Flag Set? HasFlag to the Rescue!

Often you will want to see if a specific flag is set, for example we want to see if a member is paid. Now, if the paid status is the only flag set, it’s easy, just use $someVariable -eq [MemberStatus]::Paid.

It gets much more complex if a variable has multiple flags set. Fortunately, enums have a method built in called HasFlag you can use to test with.

First, let’s load a variable with several flags from our MemberStatus enum.

$memStatus = [MemberStatus]::Webmaster + [MemberStatus]::Secretary + [MemberStatus]::Paid

$memStatus

Result:

Paid, Secretary, Webmaster

So now we’ve got our $memStatus variable loaded with multiple statuses. Also note that even though we added the status in reverse order, they are always returned in ascending order from the enum declaration.

Now we want to know if our secretary / webmaster has paid their dues for the year. To do so, we’ll call the HasFlag method of our variable, and pass in the status we wish to check.

$memStatus.HasFlag([MemberStatus]::Paid)

Result:

True

The GetHashCode Method

So far, when we’ve wanted to see the value of our enum derived variable, we’ve used [int] to cast the variable in integer form.

$memStatus = [MemberStatus]::Webmaster + [MemberStatus]::Secretary + [MemberStatus]::Paid

[int]$memStatus

Result:

41

This shortcut works, and is something I’ve seen in many blog posts and examples. However, there is a method that is more clear in terms of code self-documentation. Like using [int], it will return an unsigned, 32 bit integer: GetHashCode.

$memStatus = [MemberStatus]::Webmaster + [MemberStatus]::Secretary + [MemberStatus]::Paid

$memStatus.GetHashCode()

Result:

41

Both methods work, but in my opinion GetHashCode is clearer in terms of intention, especially to someone unfamiliar with enum flags. Whichever route you go I suggest being consistent throughout your code.

Conclusion

This article focused on the use of enums as flags. While it is not something I use frequently, enum flags can be extremely useful when an item can have multiple states simultaneously. Our club member status is one such example, another is file attributes. A file could have both the hidden and compressed attributes.

Enum flags can reduce the size of your data for an item. Rather than having six individual variables for the six member statuses, a single variable can hold them all. This reduction in the size of your data can be even more valuable when that data is being stored in a database or file.

The demos in this series of blog posts were derived from my Pluralsight course PowerShell 7 Quick Start for Developers on Linux, macOS and Windows, one of many PowerShell courses I have on Pluralsight. All of my courses are linked on my About Me page.

If you don’t have a Pluralsight subscription, just go to my list of courses on Pluralsight . At the top is a Try For Free button you can use to get a free 10 day subscription to Pluralsight, with which you can watch my courses, or any other course on the site.

More Fun with PowerShell Enums

Introduction

In a previous post, Fun with PowerShell Enums I introduced the concept of Enums.

In this post we’ll dive deeper into enums, taking a look at more of its properties a well as other ways to use enums.

First let me mention that for all of the examples we’ll display the code, then under it the result of our code. In this article I’ll be using PowerShell Core, 7.2, and VSCode. The examples should work in PowerShell 5.1 in the PowerShell IDE, although they’ve not been tested there.

To run a snippet of code highlight the lines you want to execute, then in VSCode press F8 or in the IDE F5. You can display the contents of any variable by highlighting it and using F8/F5.

Enums for Code Clarity

One major way enums can be used is to clarify your code. In my previous post on enums I mentioned I was a ham radio operator. The clubs I belong to meet on alternate Thursday nights. Let’s say I wrote a small PowerShell function to let me know if tonight is a ham club meeting.

Into that function I need to pass one parameter, a number that indicates the day of the week. If 0 is Sunday, and 6 Saturday, the number 4 represents a Thursday.

function IsItHamClubNight($Day)
{
  if ($Day -eq 4)
  { Write-Host "Yay! It's ham club night" }
  else 
  { Write-Host "Sorry, just a boring night" }
}

When I call this function, I have to know what number to use.

$day = 4
IsItHamClubNight $day

Result:

Yay! It's ham club night

Obviously it would be easier to pass in the name of the day of the week rather than a number. But this function is now heavily embedded in your organization, changing it would require a large effort.

By using an enum, we can provide the ability to use a human readable name, without the need to rewrite our function.

Enum DaysOfWeek
{
  Sunday = 0
  Monday = 1
  Tuesday = 2
  Wednesday = 3
  Thursday = 4
  Friday = 5
  Saturday = 6
}

Enums allow us to assign a value to each label. Here we made Sunday 0, and so on, but we can use any integer value. Now we can assign one of the enums to a variable and pass that into our function.

$day = [DaysOfWeek]::Thursday
IsItHamClubNight $day

Result:

Yay! It's ham club night

Even better, we can skip the use of a variable.

IsItHamClubNight ([DayOfWeek]::Thursday)

Which gives the same result. Now users of your function don’t have to remember which number represents Thursday, they can simply use the name of our enum followed by the day of the week. All of this without the need to modify our IsItHamClubNight function!

Getting the Enum Values

Let’s say you know the enum you want to use is DaysOfWeek, but you can’t quite recall the various day names. Was it Monday, or the short abbreviation Mon? Or maybe you just want the full list so you can iterate over them.

The Enum type has a method, GetEnumNames. It can be used to retrieve the members of the enum.

[DaysOfWeek].GetEnumNames()

Result:

Sunday
Monday
Tuesday
Wednesday
Thursday
Friday
Saturday

It actually returns a collection so you can use it to iterate over the members, as in a foreach loop.

foreach( $enumValue in [DaysOfWeek].GetEnumNames() )
{
  Write-Host "Enum Value is $enumValue"
}

Result:

Enum Value is Sunday
Enum Value is Monday
Enum Value is Tuesday
Enum Value is Wednesday
Enum Value is Thursday
Enum Value is Friday
Enum Value is Saturday

Alternatively you can pipe it, for example into a ForEach-Object.

[DaysOfWeek].GetEnumNames() |
  ForEach-Object { "{0} {1}" -f $_, [int]([DaysOfWeek]::$_) }

Result:

Sunday 0
Monday 1
Tuesday 2
Wednesday 3
Thursday 4
Friday 5
Saturday 6

This looks a bit cryptic so let me break it down. The "{0} {1}" -f indicates we want to create a formatted string. The {0} and {1} are placeholders. After the -f is a list of values. The first value will go into the {0}, the second into the {1}.

The next thing you see is $_. This is simply a PowerShell shortcut for "the current object coming through the pipeline". From the enum, Sunday will be first, then Monday, and so on.

Next you see [int]([DaysOfWeek]::$_). The [int] is used to convert what comes after it into an integer value. Next, we access the DayOfWeek enum, and give it the current object.

As a result, the output displays both the name from the enum, as well as the value associated with it.

If you want to learn more about string formatting, I’ll refer you to my post Fun With PowerShell String Formatting.

Enums with Duplicate Values

It is possible to assign the same numeric value to multiple items in an enum. For each position in our radio club, we want to indicate their level. President and Vice President are at the top, with Secretary and Treasurer in the second tier. Finally there are some appointed positions that are important, but not the top of the chain.

Here’s how this might be expressed in an enum.

Enum ClubPositions
{
  President = 1
  VicePresident = 1
  Secretary = 2
  Treasurer = 2
  Webmaster = 3
  Greeter = 3
  SnackBringer = 3
}

We can do comparisons between our various offices and their associated numeric value.

[ClubPositions]::President -eq 1
[ClubPositions]::VicePresident -eq 1

Result:

True
True

You can even compare two enums to each other.

[ClubPositions]::President -eq [ClubPositions]::VicePresident

Result:

True

Remember the GetEnumNames method we looked at a moment ago? This works as well.

[ClubPositions].GetEnumNames()

Result:

President
VicePresident
Secretary
Treasurer
Webmaster
Greeter
SnackBringer

There is one other method very similar to GetEnumNames, GetEnumValues. It doesn’t work quite like you’d think though.

First, let’s use it with our DaysOfWeek enum.

[DaysOfWeek].GetEnumValues()

Result:

Sunday
Monday
Tuesday
Wednesday
Thursday
Friday
Saturday

As you can see, there’s no real difference compared to GetEnumNames. But now let’s run it for the ClubPositions enum.

[ClubPositions].GetEnumValues()

Result:

VicePresident
VicePresident
Treasurer
Treasurer
Greeter
Greeter
Greeter

In the second example it went through the enum, and only returned one text value for each integer. This is why we only see one entry for each numeric value.

It actually does the same thing with the DaysOfWeek enum, but because we only used each integer value once, only one label for each value was returned.

Conclusion

Using enums to aid with code clarity was the first item in this blog post. We then saw how to assign values to the individual members of an enum, as well as how to iterate over the members of an enum.

In the next article in this series, we’ll look at the concept of using enums as bit flags for when you need to save multiple states for a single item.

The demos in this series of blog posts were derived from my Pluralsight course PowerShell 7 Quick Start for Developers on Linux, macOS and Windows, one of many PowerShell courses I have on Pluralsight. All of my courses are linked on my About Me page.

If you don’t have a Pluralsight subscription, just go to my list of courses on Pluralsight . At the top is a Try For Free button you can use to get a free 10 day subscription to Pluralsight, with which you can watch my courses, or any other course on the site.

Fun with PowerShell Enums

Introduction

This post begins a series on using Classes in PowerShell. As a first step, we will cover the use of an Enum, as enums are frequently used in combination with classes.

An Enum is a way to provide a set of predetermined values to the end user. This allows the user to pick from a finite list, and assure a value being passed into a function or class will be valid.

We’ll take a deeper look in a moment, but first let me mention that for all of the examples we’ll display the code, then under it the result of our code. In this article I’ll be using PowerShell Core, 7.2, and VSCode. The examples should work in PowerShell 5.1 in the PowerShell IDE, although they’ve not been tested there.

To run a snippet of code highlight the lines you want to execute, then in VSCode press F8 or in the IDE F5. You can display the contents of any variable by highlighting it and using F8/F5.

Basic Enum Declaration

Enum is short for enumerated value. As mentioned in the intro, it is a set of predetermined values that will ensure users of your script select a valid value required by your PowerShell code. Let’s start by defining a basic Enum.

Enum MyTwitters
{
  ArcaneCode
  ArcaneTC
  N4IXT
}

As you can see, the basic declaration is very simple. You simply use the keyword Enum followed by what you wish to name it. In the squiggly braces you list the valid values.

Here I’ve listed three of my Twitter accounts. The first is the main one I use, ArcaneCode. The second is the one I use for my company ArcaneTC (short for Arcane Training and Consulting). I use it primarily to announce new Pluralsight courses, so it doesn’t see a huge amount of use.

One of my hobbies is amateur radio, also known as ham radio. N4IXT is my FCC assigned amateur radio call sign I use to identify myself on the air. I don’t post a lot, I use it mostly to read through the latest news in the ham radio world.

Note that Enums cannot have spaces in their names, although you could use separators such as an underscore. Arcane_Code would be a valid value for an enum.

What are my valid Enum values?

You’ve now created an Enum, perhaps you’ve included it within a module you are providing to other programmers in your company. How can they retrieve a list of valid values?

Hopefully you’ve provided documentation, but it’s also easy for a user to have PowerShell return a list of values. First, make sure you have executed the code above by highlighting it and using F8 (VSCode) or F5 (PowerShell IDE) to get the Enum into memory. Then you can run the line of code below.

[MyTwitters].GetEnumNames()

Result:

ArcaneCode
ArcaneTC
N4IXT

As you can see, it simply returns a list of the values that we declared in the Enum.

Assigning an Enum to a Variable

Now we have our enum, and know what the values are. We’re now ready to use our enum in our script. Here I’ll just assign it to a variable, but we could also pass an enumerated value into a function.

Begin typing out the following code sample, and note what happens when you hit the second colon.

$tweet = [MyTwitters]::

When you have entered the second colon, you should see a list of the enumerated values in VSCode.

I say should as sometimes I’ve had VSCode return enums that were declared in my script, and not for the specific enum I was working with.

In the PowerShell ISE though, I’ve had it work right every time.

When complete, your assignment should look like:

$tweet = [MyTwitters]::ArcaneCode

Is it Valid?

So you have a value from the enum copied into your variable, $tweet. How do we test it?

It’s important to understand enums are objects. In addition to the values you provide they have a set of properties and methods you can use. In the previous example, you saw the GetEnumNames method being used.

Another useful method is IsDefined.

[enum]::IsDefined(([MyTwitters]), $tweet)

Result:

True

Into the IsDefined method you pass in your enumeration, then the value you want to test. Here our value is in the variable $tweet. If the value is contained in the enum, the method returns True.

What if the user passes in a value that is not contained in our enum?

$tweet = 'Invalid'
[enum]::IsDefined(([MyTwitters]), $tweet)

Result:

False

Returning False makes it easy to use an if statement and raise an error if the user tries to use an invalid value. For more on the if statement, see my post Fun with PowerShell Logic Branching.

Conclusion

For these examples we used my Twitter accounts for our enum values, but there are many more uses some of them extremely common. You could load an enum with the days of the week, months of the year, colors, and other common values your scripts might use.

In the introduction I mentioned we are starting our series on classes with the enum as enums are frequently used with classes. However this is not a requirement. You can use enums with any PowerShell code you want to write.

In the my next post we’ll continue exploring the enum. We’ll look at a few more useful methods, as well as see how to assign values to our enum values.

The demos in this series of blog posts came from my Pluralsight course PowerShell 7 Quick Start for Developers on Linux, macOS and Windows, one of many PowerShell courses I have on Pluralsight. All of my courses are linked on my About Me page.

If you don’t have a Pluralsight subscription, just go to my list of courses on Pluralsight . At the top is a Try For Free button you can use to get a free 10 day subscription to Pluralsight, with which you can watch my courses, or any other course on the site.

Fun With PowerShell Providers

Fun with PowerShell Providers

Introduction

Providers are an interesting concept in PowerShell. A provider allows us to use a standard method to communicate with different areas of your computer using the same set of commands. For example, the file system is accessed using a provider. When you use Get-ChildItem it goes through the file system provider to return a list of the files on your computer.

We’ll take a deeper look in a moment, but first let me mention that for all of the examples we’ll display the code, then under it the result of our code. In this article I’ll be using PowerShell Core, 7.1.5, and VSCode. The examples should work in PowerShell 5.1 in the PowerShell IDE, although they’ve not been tested there.

To run a snippet of code highlight the lines you want to execute, then in VSCode press F8 or in the IDE F5. You can display the contents of any variable by highlighting it and using F8/F5.

Listing the Providers

To start with, let’s get a list of the available providers. To do that, PowerShell has the Get-PSProvider cmdlet.

Get-PSProvider

Result:

Name         Capabilities                        Drives
----         ------------                        ------
Registry     ShouldProcess                       {HKLM, HKCU}
Alias        ShouldProcess                       {Alias}
Environment  ShouldProcess                       {Env}
FileSystem   Filter, ShouldProcess, Credentials  {C, D, E, H…}
Function     ShouldProcess                       {Function}
Variable     ShouldProcess                       {Variable}
Certificate  ShouldProcess                       {Cert}

As you can see, there are a variety of providers available out of the box. The default provider is the FileSystem. As stated in the introduction, when you use Get-ChildItem it goes through the FileSystem provider to get a list of files, or more specifically file system objects.

In the right most column of the output, you can see a list of drives. Using the drives we can navigate the provider. To see a detailed list of drives, you can use the Get-PSDrive cmdlet.

Get-PSDrive

Result:

Name           Used (GB)     Free (GB) Provider      Root                 CurrentLocation
----           ---------     --------- --------      ----                 ---------------
Alias                                  Alias
C                 898.79         53.83 FileSystem    C:\                  \Demo\PSCore-QuickStart
Cert                                   Certificate   \
D                 953.72          0.02 FileSystem    D:\
E                 875.38         56.00 FileSystem    E:\
Env                                    Environment
Function                               Function
HKCU                                   Registry      HKEY_CURRENT_USER
HKLM                                   Registry      HKEY_LOCAL_MACHINE
Variable                               Variable
WSMan                                  WSMan

The Name column shows the name we will use when we want to change our location. First look at the column Provider, then at the rows with FileSystem. It shows three drives, C, D, and E. These are the three hard drives on my computer.

The CurrentLocation shows where we are in the provider tree. In the FileSystem provider, these locations are folders. For the C drive, I happen to be in the \Demo\PSCore-QuickStart folder.

Let’s look at how to use some of the other providers.

The Environment Provider

To change to a different provider, you simply use Set-Location followed by the name to move to, just as you would to change to a different hard drive.

Set-Location env
Get-ChildItem

Result:

Name                           Value
----                           -----
__COMPAT_LAYER                 DetectorsAppHealth
ALLUSERSPROFILE                C:\ProgramData
APPDATA                        C:\Users\arcan\AppData\Roaming
CHROME_CRASHPAD_PIPE_NAME      \\.\pipe\crashpad_7700_VQTNLEXXNDEMJHTN
COLORTERM                      truecolor
CommonProgramFiles             C:\Program Files\Common Files
CommonProgramFiles(x86)        C:\Program Files (x86)\Common Files
CommonProgramW6432             C:\Program Files\Common Files
...list truncated for brevity...

This time Get-ChildItem recognized it was operating in the context of the Environment provider, and returned a list of environment variables and their values. (Note I’ve shortened the output for brevity.)

We can access these like any other collection.

$envVars = Get-ChildItem
$envVars[1].Name
$envVars[1].Value

Result:

ALLUSERSPROFILE
C:\ProgramData

Let’s look at another provider.

The Variable Provider

Another useful provider is the Variable provider. It gives access to a list of all variables and their values currently in memory. This includes both user defined variables and built in PowerShell variables. In this example I’ll create a new variable, $aVariable. I’ll then move to the variable provider and list them.

$aVariable = 'Some Value'
Set-Location variable
Get-ChildItem

Result:

Name                           Value
----                           -----
?                              True
^                              Set-Location
$                              Get-ChildItem
args                           {}
aVariable                      Some Value
ConfirmPreference              High
DebugPreference                SilentlyContinue
...list truncated for brevity...

This returns both the names and values for all of the variables. This can be an excellent debugging tool, for example logging all values when an error occurs.

Other Providers

In addition to the built in list of providers you have seen, many modules will add their own providers that you can navigate. On of my favorites is the SQL Server module.

I’ll go over it more in a future post, but know that through it you can use Get-ChildItem to navigate your list of servers, instances, databases, tables, and columns all as if they were your file system.

You will find many modules supply providers you’ll find useful.

Conclusion

In this post we took a brief look at providers, and how to navigate them. In addition, you are now aware there is a big world of providers outside the few default ones you saw in this post.

The demos in this series of blog posts came from my Pluralsight course PowerShell 7 Quick Start for Developers on Linux, macOS and Windows, one of many PowerShell courses I have on Pluralsight. All of my courses are linked on my About Me page.

If you don’t have a Pluralsight subscription, just go to my list of courses on Pluralsight . At the top is a Try For Free button you can use to get a free 10 day subscription to Pluralsight, with which you can watch my courses, or any other course on the site.

Fun With VSCode Snippets for Markdown and PowerShell

Introduction

I have a confession. I love Markdown. There I said it, my confession is out in the open for all to see.

Seriously though, I do find this documentation language very useful, and easy to use. With just a few commands I can produce a nicely formatted document that can be displayed in my code editor, as well as on platforms like GitHub. I’ve even begun authoring these blog posts in Markdown.

A big reason for me is the ability to integrate it into my projects. VSCode, as well as the full blow Visual Studio, support Markdown (with of course the proper extensions installed). When I create a new PowerShell project in VSCode, I can store the projects documentation in Markdown format right alongside the PowerShell code.

Speaking of VSCode…

VSCode Snippets

A great thing about VSCode is the ability to create your own code snippets. A snippet is a text replacement system where I can enter a few characters of text and VSCode will then replace it with the full snippet. Snippets are activated using the Intellisense feature of VSCode.

One example, I have a standard header I put at the top of my PowerShell scripts. When I defined this header as a snippet, I named it psheader. Now I can enter pshead into my PowerShell script. VSCode’s intellisense feature will prompt me with the list of snippets I have that being with pshead. I can then pick the one I want (psheader), press enter and the snippet of psheader will be replaced with the full text of my file header.

By default, pretty much every language in VSCode has the ability to handle snippets.

Except Markdown.

Markdown Snippets in VSCode

Shocking right? How could such an awesome language like Markdown not have snippets? (And yes, Markdown may not be a language in the strictest sense, but it’s a close enough word for now.)

Well it’s possible to enable Markdown snippets in PowerShell. Sometime back I created a GitHub project that shows you how to enable and use snippets for Markdown. In addition, I included my snippets for both PowerShell and Markdown.

Rather than reiterating everything here, I’ll just point you to that repository.

https://github.com/arcanecode/VSCode_User_Snippets

The main file in the repository, ReadMe.md gives a brief overview and explanation on how to use snippets.

The file Enable_Intellisense_in_Markdown.md does just what is says, shows you how to enable intellisense for Markdown in VSCode.

In VSCode, you can use certain replacements in your snippets. For example, you can embed the $CURRENT_YEAR snippet variable in your snippet (no matter what language) and when the snippet is generated into your code, it will replace the $CURRENT_YEAR with the actual current year.

I included a file, Snippet_Reference.md that lists the various snippet variables and gives a bit more explanation on how to use them.

If you aren’t familiar with Markdown, or don’t use it very often, you’ll find the file Markdown_Cheatsheet.md useful. It has a list of the most often used Markdown formatting commands.

Finally I included two .json files. These are the snippets I use for PowerShell and Markdown on my system. You can use these as a guide in creating your own snippets, or copy the ones you find useful onto your VSCode installation.

If you use the VSCode sync settings feature, they you will be happy to know snippets are included as part of the sync process. You can modify your snippet files on one computer and they will be copied to all the other computers you sync VSCode on.

Conclusion

This was a brief post that primarily served to bring awareness to snippets, as well as the ability to use them with Markdown files. Go take a look at the repository and with just a little effort I believe you’ll find yourself becoming much more productive with the addition of snippets to your toolbox.

Fun With PowerShell Write-Debug

Introduction

In my previous post, Fun With PowerShell Write-Verbose, I introduced the use of the built in -Verbose switch. In this post we’ll dive into its counterpart, the -Debug switch and its companion Write-Debug cmdlet.

In covering Write-Verbose, I mentioned verbose messages are typically targeted at the average user. The -Debug messages are meant to target the developer. These messages are meant to assist the PowerShell developer in trouble shooting and debugging their code.

We’ll take a deeper look at Debug momentarily, but first let me mention that for all of the examples we’ll display the code, then under it the result of our code. In this article I’ll be using PowerShell Core, 7.1.4, and VSCode. The examples should work in PowerShell 5.1 in the PowerShell IDE, although they’ve not been tested there.

To run a snippet of code highlight the lines you want to execute, then in VSCode press F8 or in the IDE F5. You can display the contents of any variable by highlighting it and using F8/F5.

$DebugPreference – An Introduction

Before we start discussing the Write-Debug cmdlet, we need to cover a PowerShell built in variable, $DebugPreference. If you want to see the value currently there, just type $DebugPreference into your terminal window and hit ENTER.

Depending on how your system is configured, this will usually be set to either Continue or SilentlyContinue. (If it is set to something else then likely you previously ran a script which changed it).

Usually you want it set to Continue. This will display the message provided to the Write-Debug cmdlet, after doing so it will continue to the next line of code.

If it is set to SilentlyContinue, the message is suppressed. Even if Write-Debug is executed, no text is displayed.

For these demos to work, you need to ensure your $DebugPreference is set to Continue, at least to start with. To set it, just assign it.

$DebugPreference = 'Continue'

Later we’ll see some more options when it comes to $DebugPreference, but for now let’s dig into the Write-Debug cmdlet.

Write-Debug

Just like the Verbose switch, the Debug switch is built in. You don’t have to explicitly declare it. Within your code simply use the Write-Debug cmdlet. If PowerShell detects the -Debug switch is passed in, it will display any messages from the Write-Debug cmdlet.

For this demo, we’ll reuse the Show-FileInfo from the previous blog post, Fun With PowerShell Write-Verbose.

function Show-FileInfo ()
{
  [CmdletBinding()]
  param ( [Parameter (ValueFromPipeline)]
          $file
        )

  begin
  {
    $fn = "$($PSCmdlet.MyInvocation.MyCommand.Name)"
    $st = Get-Date
    Write-Verbose @"
  `r`n  Function: $fn
  Starting at $($st.ToString('yyyy-MM-dd hh:mm:ss tt'))
"@
  }

  process
  {
    $dbgMsg = @"
`r`n  Function.......: $fn
  File Name......: $($file.FullName)
  File Length....: $("{0:N0} bytes." -f $file.Length)
  DebugPreference: $DebugPreference
  PS Version.....: $($PSVersionTable.PSVersion.ToString())
"@

    Write-Debug -Message $dbgMsg

    $retVal = "$($file.Name) is {0:N0} bytes long." -f $file.Length
    $retVal
  }

  end
  {
    $et = Get-Date
    $rt = $et - $st  # Run Time

    # Format the output time
    if ($rt.TotalSeconds -lt 1)
      { $elapsed = "$($rt.TotalMilliseconds.ToString('#,0.0000')) Milliseconds" }
    elseif ($rt.TotalSeconds -gt 60)
      { $elapsed = "$($rt.TotalMinutes.ToString('#,0.0000')) Minutes" }
    else
      { $elapsed = "$($rt.TotalSeconds.ToString('#,0.0000')) Seconds" }

    Write-Verbose @"
  `r`n  Function: $fn
  Finished at $($et.ToString('yyyy-MM-dd hh:mm:ss tt'))
  Elapsed Time $elapsed
"@
  }
}

The only modifications made are to the process block. We created a variable, $dbgMsg to hold the debugging message we wish to display. Since this is a multiline string, I’m going to do the same thing I did with the Verbose messages and begin with a carriage return / line feed escape sequence ( `r`n ). This will let the word DEBUG appear on a line by itself. Also note I indented the remaining lines two spaces, and used periods so the colons could be aligned. It’s a simple bit of formatting, but it makes the provided information much easier to read.

On the first line I have the name of the function. You’d be surprised how useful this can be. When developing a module or a large complex script with many functions, there may be times when you think your script is calling one function when it is actually calling another.

In this example I then show the file name, including the full path to the file. This can be a useful bit of information to the developer, as it lets us know exactly which directory we are in. Especially useful as the main function only displays the file name, not the full path to the file. The line after shows the file length.

I then display some environmental information. First, I show the value in the previously mentioned $DebugPreference variable. This, perhaps, could help me understand why some debug messages are not getting displayed.

On the next line I show the version of PowerShell this code is running in. Again, a potentially valuable piece of information. There’s always the possibility the developer is running a different version of PowerShell than the user having issues, and this may be a clue to an issue.

Finally, we call the Write-Debug cmdlet. The remaining code is the same as the original function from my previous blog post.

After you highlight the function and run it to put it in memory, let’s call it. For this demo I created a folder C:\Demo and copied a few random files into it.

First, let’s call it without the -Debug switch.

Get-ChildItem -Path 'C:\Demo' | Show-FileInfo

Result:

05 - Arrays and Hashtables.ps1 is 8,486 bytes long.
06 - Logic Branching and Looping.ps1 is 4,315 bytes long.
07 - Functions.ps1 is 11,200 bytes long.
08 - Classes.ps1 is 6,210 bytes long.
09 - Examples.ps1 is 3,125 bytes long.
SQLServer2019-x64-ENU-Dev.iso is 1,433,974,784 bytes long.
ubuntu-20.10-desktop-amd64.iso is 2,942,003,200 bytes long.
WideWorldImporters-2021-03-29.zip is 731,246,592 bytes long.
WideWorldImportersDW-2021-03-29.zip is 237,830,144 bytes long.

OK, so far so good. Since we didn’t use the -Debug switch, the Write-Debug statement is ignored. Now let’s call it again, only this time we’ll use -Debug when calling Show-FileInfo.

Get-ChildItem -Path 'C:\Demo' | Show-FileInfo -Debug

Result:

DEBUG:
  Function.......: Show-FileInfo
  File Name......: C:\Demo\05 - Arrays and Hashtables.ps1
  File Length....: 8,486 bytes.
  DebugPreference: Continue
  PS Version.....: 7.1.4
05 - Arrays and Hashtables.ps1 is 8,486 bytes long.
DEBUG:
  Function.......: Show-FileInfo
  File Name......: C:\Demo\06 - Logic Branching and Looping.ps1
  File Length....: 4,315 bytes.
  DebugPreference: Continue
  PS Version.....: 7.1.4
06 - Logic Branching and Looping.ps1 is 4,315 bytes long.
DEBUG:
  Function.......: Show-FileInfo
  File Name......: C:\Demo\07 - Functions.ps1
  File Length....: 11,200 bytes.
  DebugPreference: Continue
  PS Version.....: 7.1.4
07 - Functions.ps1 is 11,200 bytes long.
DEBUG:
  Function.......: Show-FileInfo
  File Name......: C:\Demo\08 - Classes.ps1
  File Length....: 6,210 bytes.
  DebugPreference: Continue
  PS Version.....: 7.1.4
08 - Classes.ps1 is 6,210 bytes long.
DEBUG:
  Function.......: Show-FileInfo
  File Name......: C:\Demo\09 - Examples.ps1
  File Length....: 3,125 bytes.
  DebugPreference: Continue
  PS Version.....: 7.1.4
09 - Examples.ps1 is 3,125 bytes long.
DEBUG:
  Function.......: Show-FileInfo
  File Name......: C:\Demo\SQLServer2019-x64-ENU-Dev.iso
  File Length....: 1,433,974,784 bytes.
  DebugPreference: Continue
  PS Version.....: 7.1.4
SQLServer2019-x64-ENU-Dev.iso is 1,433,974,784 bytes long.
DEBUG:
  Function.......: Show-FileInfo
  File Name......: C:\Demo\ubuntu-20.10-desktop-amd64.iso
  File Length....: 2,942,003,200 bytes.
  DebugPreference: Continue
  PS Version.....: 7.1.4
ubuntu-20.10-desktop-amd64.iso is 2,942,003,200 bytes long.
DEBUG:
  Function.......: Show-FileInfo
  File Name......: C:\Demo\WideWorldImporters-2021-03-29.zip
  File Length....: 731,246,592 bytes.
  DebugPreference: Continue
  PS Version.....: 7.1.4
WideWorldImporters-2021-03-29.zip is 731,246,592 bytes long.
DEBUG:
  Function.......: Show-FileInfo
  File Name......: C:\Demo\WideWorldImportersDW-2021-03-29.zip
  File Length....: 237,830,144 bytes.
  DebugPreference: Continue
  PS Version.....: 7.1.4
WideWorldImportersDW-2021-03-29.zip is 237,830,144 bytes long.

As you can see, our debugging messages are now displayed. For each file it shows the debug message, then shows the normal output of the function, the file name and size.

While a simple example, seeing not just the file name but the full file name including its path could supply valuable information to the developer, not to mention the environmental information.

What about the verbose messages? Well there’s no problem using both switches to see all the messages.

Get-ChildItem -Path 'C:\Demo' | Show-FileInfo -Verbose -Debug

Result (note a few files were omitted for brevity):

VERBOSE:
  Function: Show-FileInfo
  Starting at 2021-08-17 05:48:44 PM
DEBUG:
  Function.......: Show-FileInfo
  File Name......: C:\Demo\05 - Arrays and Hashtables.ps1
  File Length....: 8,486 bytes.
  DebugPreference: Continue
  PS Version.....: 7.1.4
05 - Arrays and Hashtables.ps1 is 8,486 bytes long.

*** Some rows removed here for brevity ***

DEBUG:
  Function.......: Show-FileInfo
  File Name......: C:\Demo\WideWorldImportersDW-2021-03-29.zip
  File Length....: 237,830,144 bytes.
  DebugPreference: Continue
  PS Version.....: 7.1.4
WideWorldImportersDW-2021-03-29.zip is 237,830,144 bytes long.
VERBOSE:
  Function: Show-FileInfo
  Finished at 2021-08-17 05:48:44 PM
  Elapsed Time 24.4972 Milliseconds

As you can see, we get the starting and ending messages from the use of -Verbose, as well as the debugging messages.

$DebugPreference – Digging Deeper

Inquire

In an earlier section of this post we introduced the built-in variable, $DebugPreference, and discussed two of its possible settings, Continue and SilentlyContinue.

What if, though, we wanted PowerShell to stop every time it encounters a Write-Debug?

To do that, we can set the $DebugPreference value to Inquire, as we’ll do in our process block.

  process
  {
    $DebugPreference = 'Inquire'

    $dbgMsg = @"
`r`n  Function.......: $fn
  File Name......: $($file.FullName)
  File Length....: $("{0:N0} bytes." -f $file.Length)
  DebugPreference: $DebugPreference
  PS Version.....: $($PSVersionTable.PSVersion.ToString())
"@

    Write-Debug -Message $dbgMsg

    $retVal = "$($file.Name) is {0:N0} bytes long." -f $file.Length
    $retVal
  }

Run the function to get the new version into memory, then let’s call Show-FileInfo again.

Get-ChildItem -Path 'C:\Demo' | Show-FileInfo -Debug

This time, it displays our first debug message, but then displays a prompt in the terminal window.

Result:

DEBUG:
  Function.......: Show-FileInfo
  File Name......: C:\Demo\05 - Arrays and Hashtables.ps1
  File Length....: 8,486 bytes.
  DebugPreference: Inquire
  PS Version.....: 7.1.4
Confirm
Continue with this operation?
[Y] Yes [A] Yes to All [H] Halt Command [S] Suspend [?] Help (default is "Yes"):

You now have the option to hit Y to continue (or just press ENTER), or stop by pressing H to stop execution. In this case, using S to suspend has the same affect as halting.

What about A, for Yes to All? You might think it will just run the rest of the script without stopping. For this demo though, that’s not the case. The A option is meant for the rare situations where you are piping data through the Write-Debug cmdlet.

In our demo, as I suspect in most situations you’ll encounter, pressing A has the same effect as pressing Y.

Stop

Using Inquire we can prompt the developer (or the person running the script) as to what they want to do once they hit the Write-Debug. Let’s imagine a situation though where want our script to stop running. In a moment we’ll look at a situation where this can be useful, but for now let’s just see stop in action.

Here we’ll just change our $DebugPreference to Stop.

  process
  {
    $DebugPreference = 'Stop'

    $dbgMsg = @"
`r`n  Function.......: $fn
  File Name......: $($file.FullName)
  File Length....: $("{0:N0} bytes." -f $file.Length)
  DebugPreference: $DebugPreference
  PS Version.....: $($PSVersionTable.PSVersion.ToString())
"@

    Write-Debug -Message $dbgMsg

    $retVal = "$($file.Name) is {0:N0} bytes long." -f $file.Length
    $retVal
  }

As usual, re-run the function to refresh the version in memory, then call Show-FileInfo again.

Get-ChildItem -Path 'C:\Demo' | Show-FileInfo -Debug

Result:

DEBUG:
  Function.......: Show-FileInfo
  File Name......: C:\Demo\05 - Arrays and Hashtables.ps1
  File Length....: 8,486 bytes.
  DebugPreference: Stop
  PS Version.....: 7.1.4
Write-Debug:
Line |
  30 |      Write-Debug -Message $dbgMsg
     |      ~~~~~~~~~~~~~~~~~~~~~~~~~~~~
     | The running command stopped because the preference variable "DebugPreference" or common parameter is set to Stop:
  Function.......: Show-FileInfo
  File Name......: C:\Demo\05 - Arrays and Hashtables.ps1
  File Length....: 8,486 bytes.
  DebugPreference: Stop
  PS Version.....: 7.1.4

You can see our debug message was displayed, then we got a message to let us know the debug preference was set to stop, which is why code execution stopped.

Conditional Stopping

The stop command becomes more useful when we make the stop conditional. We want our code to keep running until we find a certain condition. Once we find it, we’ll display debugging information then stop our script.

While Write-Debug doesn’t have a built in method for this, we can construct the code ourselves using a simple if statement. For this demo we’ll display our debug message until the point we hit a specified condition.
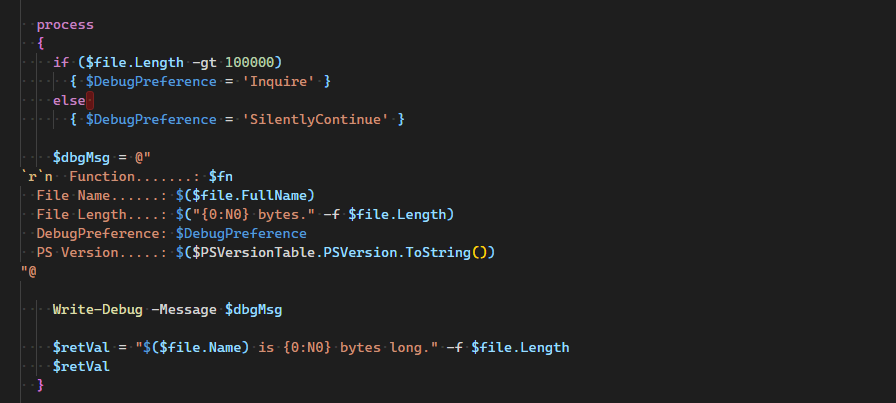
  process
  {
    if ($file.Length -gt 100000)
      { $DebugPreference = 'Stop' }
    else
      { $DebugPreference = 'Continue' }

    $dbgMsg = @"
`r`n  Function.......: $fn
  File Name......: $($file.FullName)
  File Length....: $("{0:N0} bytes." -f $file.Length)
  DebugPreference: $DebugPreference
  PS Version.....: $($PSVersionTable.PSVersion.ToString())
"@

    Write-Debug -Message $dbgMsg

    $retVal = "$($file.Name) is {0:N0} bytes long." -f $file.Length
    $retVal
  }

In this example, pretend we know something goes wrong when our file length exceeds 100 KB (100,000 bytes). We use an if statement to check the length. If it is greater than 100,000 bytes, it will set the $DebugPreference to Stop, otherwise it will set it to Continue.

Note we could have also chosen not to call Write-Debug at all if the length is less then 100,000 bytes, or any other number of things. I chose to go ahead and display the debug info in this case, as there’s always the possibility it may provide useful information. Let’s update our function in memory by running it, then we can execute it.

Get-ChildItem -Path 'C:\Demo' | Show-FileInfo -Debug

Result:

DEBUG:
  Function.......: Show-FileInfo
  File Name......: C:\Demo\05 - Arrays and Hashtables.ps1
  File Length....: 8,486 bytes.
  DebugPreference: Continue
  PS Version.....: 7.1.4
05 - Arrays and Hashtables.ps1 is 8,486 bytes long.
DEBUG:
  Function.......: Show-FileInfo
  File Name......: C:\Demo\06 - Logic Branching and Looping.ps1
  File Length....: 4,315 bytes.
  DebugPreference: Continue
  PS Version.....: 7.1.4
06 - Logic Branching and Looping.ps1 is 4,315 bytes long.
DEBUG:
  Function.......: Show-FileInfo
  File Name......: C:\Demo\07 - Functions.ps1
  File Length....: 11,200 bytes.
  DebugPreference: Continue
  PS Version.....: 7.1.4
07 - Functions.ps1 is 11,200 bytes long.
DEBUG:
  Function.......: Show-FileInfo
  File Name......: C:\Demo\08 - Classes.ps1
  File Length....: 6,210 bytes.
  DebugPreference: Continue
  PS Version.....: 7.1.4
08 - Classes.ps1 is 6,210 bytes long.
DEBUG:
  Function.......: Show-FileInfo
  File Name......: C:\Demo\09 - Examples.ps1
  File Length....: 3,125 bytes.
  DebugPreference: Continue
  PS Version.....: 7.1.4
09 - Examples.ps1 is 3,125 bytes long.
DEBUG:
  Function.......: Show-FileInfo
  File Name......: C:\Demo\SQLServer2019-x64-ENU-Dev.iso
  File Length....: 1,433,974,784 bytes.
  DebugPreference: Stop
  PS Version.....: 7.1.4
Write-Debug:
Line |
  33 |      Write-Debug -Message $dbgMsg
     |      ~~~~~~~~~~~~~~~~~~~~~~~~~~~~
     | The running command stopped because the preference variable "DebugPreference" or common parameter is set to Stop:
  Function.......: Show-FileInfo
  File Name......: C:\Demo\SQLServer2019-x64-ENU-Dev.iso
  File Length....: 1,433,974,784 bytes.
  DebugPreference: Stop
  PS Version.....: 7.1.4

As you can see, the first file we encounter with a length of 100,000 bytes or greater causes execution to stop.

Bear in mind, using Stop has a dramatic effect on your code. For my normal day to day development I may use a Stop, but when I send this script to production I’d either remove the stop logic all together, or at least replace it with the previously discussed Inquire setting.

Also note that if you use Stop, the script STOPS. The end block will never execute. This could potentially leave your script, as well as the scripting environment in an unstable state. So as cool as the Stop setting is, I recommend you use it sparingly and as a general rule do not include it in production code.

Resetting $DebugPreference

Once your script is done, it’s a good idea to restore the $DebugPreference setting so it is in a default state for next time. Of course, in the end block you could simply add $DebugPreference = 'SilentlyContinue' (or Continue), but what if that wasn’t the state when your script began?

It’s a better idea to capture the state of $DebugPreference when your script begins. So in the ‘begin’ block, we’ll add a line at the very top, $currentDebugPreference = $DebugPreference.

Then in the end block we’ll add a line to reset the debug preference variable to its value from the start of the script, $DebugPreference = $currentDebugPreference.

Below is the completed script with one other alteration, which you’ll find in the process block. I changed the Stop to Inquire and the Continue to SilentlyContinue. The first change will give us the option to stop or continue. The second will suppress the debug message for the files we (in our fictional scenario) know are OK, those below 100,000 bytes. This was done just for demo purposes, so you could see the effect of the various settings for $DebugPreference.

function Show-FileInfo ()
{
  [CmdletBinding()]
  param ( [Parameter (ValueFromPipeline)]
          $file
        )

  begin
  {
    $currentDebugPreference = $DebugPreference
    $fn = "$($PSCmdlet.MyInvocation.MyCommand.Name)"
    $st = Get-Date
    Write-Verbose @"
  `r`n  Function: $fn
  Starting at $($st.ToString('yyyy-MM-dd hh:mm:ss tt'))
"@
  }

  process
  {
    if ($file.Length -gt 100000)
      { $DebugPreference = 'Inquire' }
    else 
      { $DebugPreference = 'SilentlyContinue' }

    $dbgMsg = @"
`r`n  Function.......: $fn
  File Name......: $($file.FullName)
  File Length....: $("{0:N0} bytes." -f $file.Length)
  DebugPreference: $DebugPreference
  PS Version.....: $($PSVersionTable.PSVersion.ToString())
"@

    Write-Debug -Message $dbgMsg

    $retVal = "$($file.Name) is {0:N0} bytes long." -f $file.Length
    $retVal
  }

  end
  {
    $DebugPreference = $currentDebugPreference
    $et = Get-Date
    $rt = $et - $st  # Run Time

    # Format the output time
    if ($rt.TotalSeconds -lt 1)
      { $elapsed = "$($rt.TotalMilliseconds.ToString('#,0.0000')) Milliseconds" }
    elseif ($rt.TotalSeconds -gt 60)
      { $elapsed = "$($rt.TotalMinutes.ToString('#,0.0000')) Minutes" }
    else
      { $elapsed = "$($rt.TotalSeconds.ToString('#,0.0000')) Seconds" }

    Write-Verbose @"
  `r`n  Function: $fn
  Finished at $($et.ToString('yyyy-MM-dd hh:mm:ss tt'))
  Elapsed Time $elapsed
"@
  }
}

Now let’s run it, after highlighting the function and executing it so it is refreshed in memory. First I’ll set the $DebugPreference to Continue, so it will be different from either the Inquire or SilentlyContinue. Then I’ll call it, using both the Verbose and Debug switches. Finally I’ll display the $DebugPreference again, to prove it was reset at the end of the function. Note too when the Inquire kicks in I will just answer Y so the script can complete normally.

$DebugPreference = 'Continue'
Get-ChildItem -Path 'C:\Demo' | Show-FileInfo -Verbose -Debug
$DebugPreference

Result:

VERBOSE:   
  Function: Show-FileInfo
  Starting at 2021-08-17 06:25:46 PM
05 - Arrays and Hashtables.ps1 is 8,486 bytes long.
06 - Logic Branching and Looping.ps1 is 4,315 bytes long.
07 - Functions.ps1 is 11,200 bytes long.
08 - Classes.ps1 is 6,210 bytes long.
09 - Examples.ps1 is 3,125 bytes long.
DEBUG: 
  Function.......: Show-FileInfo
  File Name......: C:\Demo\SQLServer2019-x64-ENU-Dev.iso
  File Length....: 1,433,974,784 bytes.
  DebugPreference: Inquire
  PS Version.....: 7.1.4
Confirm
Continue with this operation?
[Y] Yes [A] Yes to All [H] Halt Command [S] Suspend [?] Help (default is "Yes"):
SQLServer2019-x64-ENU-Dev.iso is 1,433,974,784 bytes long.
DEBUG: 
  Function.......: Show-FileInfo
  File Name......: C:\Demo\ubuntu-20.10-desktop-amd64.iso
  File Length....: 2,942,003,200 bytes.
  DebugPreference: Inquire
  PS Version.....: 7.1.4
Confirm
Continue with this operation?
[Y] Yes [A] Yes to All [H] Halt Command [S] Suspend [?] Help (default is "Yes"):
ubuntu-20.10-desktop-amd64.iso is 2,942,003,200 bytes long.
DEBUG: 
  Function.......: Show-FileInfo
  File Name......: C:\Demo\WideWorldImporters-2021-03-29.zip
  File Length....: 731,246,592 bytes.
  DebugPreference: Inquire
  PS Version.....: 7.1.4
Confirm
Continue with this operation?
[Y] Yes [A] Yes to All [H] Halt Command [S] Suspend [?] Help (default is "Yes"):
WideWorldImporters-2021-03-29.zip is 731,246,592 bytes long.
DEBUG: 
  Function.......: Show-FileInfo
  File Name......: C:\Demo\WideWorldImportersDW-2021-03-29.zip
  File Length....: 237,830,144 bytes.
  DebugPreference: Inquire
  PS Version.....: 7.1.4
Confirm
Continue with this operation?
[Y] Yes [A] Yes to All [H] Halt Command [S] Suspend [?] Help (default is "Yes"):
WideWorldImportersDW-2021-03-29.zip is 237,830,144 bytes long.
VERBOSE:   
  Function: Show-FileInfo
  Finished at 2021-08-17 06:25:57 PM
  Elapsed Time 11.7336 Seconds
Continue

As you would probably expect by this point in the post, we show our verbose information. We then see a list of files from the normal code in the script. The debug messages for files under 100,000 bytes were suppressed because we’d set the $DebugPreference to SilentlyContinue.

We then see the debug messages, along with inquiries as to our wish to continue. Since we said yes to all of them, the code in the end block was able to execute and display the closing verbose message.

The very last line of the result is Continue, which came from the last line we used to run the script, $DebugPreference. This confirms the value was indeed reset to the value that was present when the script started.

Conclusion

Well this was a monster sized post, so thanks for sticking with it to the end. In it, we saw how the built in -Debug switch works along with the companion Write-Debug. We also covered the built-in PowerShell variable $DebugPreference, and saw how it can affect the behavior of the Write-Debug cmdlet.

As you can see, the use of Debug can provide valuable feedback to you as a PowerShell developer, supplying critical information about the internal state of your script as well as the environment it is running in.

If you want to learn more about PowerShell, check out my Pluralsight course PowerShell 7 Quick Start for Developers on Linux, macOS and Windows, one of many PowerShell courses I have on Pluralsight. All of my courses are linked on my About Me page.

If you don’t have a Pluralsight subscription, just go to my list of courses on Pluralsight . At the top is a Try For Free button you can use to get a free 10 day subscription to Pluralsight, with which you can watch my courses or any other course on the site.

Fun With PowerShell Write-Verbose

Introduction

In my previous post, Fun With the PowerShell Switch Parameter, I introduced the use of switches with PowerShell functions. We learned how they work, and how to create your own. For all functions, PowerShell creates a set of switches that are just “built in” to PowerShell. You do not have to explicitly create these yourself, you can simply use them and implement them within your own functions.

Two of the most used are -Verbose and -Debug. When used with the Write-Verbose and Write-Debug cmdlets they will display informational messages to the user of your functions. In this post, we’ll focus on the Verbose switch. The next post in the series will examine the Debug switch.

We’ll take a deeper look at Verbose in a moment, but first let me mention that for all of the examples, we’ll display the code, then under it the result of our code. In this article I’ll be using PowerShell Core, 7.1.4, and VSCode. The examples should work in PowerShell 5.1 in the PowerShell IDE, although they’ve not been tested there.

To run a snippet of code highlight the lines you want to execute, then in VSCode press F8 or in the IDE F5. You can display the contents of any variable by highlighting it and using F8/F5.

Write-Verbose

Messages displayed using the -Verbose switch are intended for the users. It can advise a user of long running processes, or let the user know a function is indeed being executed. Let’s take a look at a function we’ll use for this demo.

function Show-FileInfo ()
{
  [CmdletBinding()]
  param ( [Parameter (ValueFromPipeline)]
          $file
        )

  process
  {
    $retVal = "$($file.Name) is {0:N0} bytes long." -f $file.Length
    $retVal
  }

}

The purpose of this function is to take a stream of files from the pipeline, then display the file name and the file size. It’s extremely simple but will serve for this blog post. If you need more info on how pipelined functions work, please see my recent post Fun With PowerShell Pipelined Functions. That post will explain the structure of the function, including the begin, process and end blocks.

Let’s run this function. First, highlight the function and execute it to get it in memory. Then let’s call the function.

Get-ChildItem | Show-FileInfo

Result:

01 - Cmdlets.ps1 is 3,732 bytes long.
02 - Providers.ps1 is 1,819 bytes long.
03 - Variables.ps1 is 4,717 bytes long.
04 - Strings.ps1 is 7,970 bytes long.
05 - Arrays and Hashtables.ps1 is 8,486 bytes long.
06 - Logic Branching and Looping.ps1 is 4,315 bytes long.
07 - Functions.ps1 is 9,574 bytes long.
08 - Classes.ps1 is 6,210 bytes long.
09 - Examples.ps1 is 3,125 bytes long.
Company.csv is 9,694 bytes long.
Company.json is 19,479 bytes long.
ReadMe.md is 1,115 bytes long.

So far so good, you can see the files I have in my current folder (obviously your list of files will vary). Now let’s say we want to let the user know when the function starts and ends, so the user can get an idea of how long it will take to execute. Most of the time our function runs in an automated fashion so we don’t need this, however there may be times when a user wants to manually run it so they can get execution times.

We can modify our function to use the Write-Verbose cmdlet to display this message when the built in -Verbose switch is used. First, we’ll add a begin block to our function to show the start time.

begin
  {
    $fn = "$($PSCmdlet.MyInvocation.MyCommand.Name)"
    $st = Get-Date
    Write-Verbose @"
  `r`n  Function: $fn
  Starting at $($st.ToString('yyyy-MM-dd hh:mm:ss tt'))
"@
  }

The first thing we do is get the function name. PowerShell has a built in variable called $PSCmdlet which has information about the code currently being executed. It has an object property called MyInvocation, which has an object property named MyCommand. This has a property called Name which holds the name of the function currently being executed.

While this seems a bit more complicated than just keying in $fn = 'Show-FileName', it actually leverages code reuse. I can paste this into any function and continue, without the need to update anything.

Next I capture the current date and time into a variable called $st, short for start time.

The call to Write-Verbose comes next. By default, when a Write-Verbose is executed, it displayes the text VERBOSE: followed by the message, such as:

VERBOSE: Your Message Here

In my example though I want to display a multi line message. The first line will hold the name of the function, the second will be the start time. To accomplish this I am using a here string. If you aren’t familiar with here strings, see my post from July 12, 2021 named Fun With PowerShell Strings.

In the here string I start with the characters `r`n. This will send a carriage return – line feed to the here string, so the VERBOSE: will appear on a line by itself. I then add two spaces so the line with the function name will be indented two spaces. Not necessary, but I think it makes it more readable.

The next line is the starting time, also indented two spaces. Here I take the start time and convert it to a string. Into the ToString function I pass in a date format string to display the current date and time. This will produce year-month-day hour:minute:second, with the tt becoming AM or PM. Finally I close out the here string as well as the process block.

As is, this code could be copy and pasted into any function without modification, ready to use. You could even go so far as to make it a snippet in VSCode, I have a project on GitHub, VSCode_User_Snippets that explains how to create user snippets in VSCode. It was written to target implementing MarkDown snippets, but I also included my default PowerShell snippets. Note that the PowerShell IDE used with PowerShell 5.1 also allows for reusable code snippets.

OK, we’ve handled the message we want to show when the function starts. Now we’ll add an end block to display the ending time.

end
  {
    $et = Get-Date
    Write-Verbose @"
  `r`n  Function: $fn
  Finished at $($et.ToString('yyyy-MM-dd hh:mm:ss tt'))
"@
  }

Since I already had the function name in the $fn variable I didn’t have to get it again. I just grab the current time into the variable $et (for end time) and display it as I did in the opening.

For reference here is the function again with the new blocks added.

function Show-FileInfo ()
{
  [CmdletBinding()]
  param ( [Parameter (ValueFromPipeline)]
          $file
        )

  begin
  {
    $fn = "$($PSCmdlet.MyInvocation.MyCommand.Name)"
    $st = Get-Date
    Write-Verbose @"
  `r`n  Function: $fn
  Starting at $($st.ToString('yyyy-MM-dd hh:mm:ss tt'))
"@
  }

  process
  {
    $retVal = "$($file.Name) is {0:N0} bytes long." -f $file.Length
    $retVal
  }

  end
  {
    $et = Get-Date
    Write-Verbose @"
  `r`n  Function: $fn
  Finished at $($et.ToString('yyyy-MM-dd hh:mm:ss tt'))
"@
  }
}

If I run this, you'll see I get the exact same results I did the first time.

Get-ChildItem | Show-FileInfo

Result:

01 - Cmdlets.ps1 is 3,732 bytes long.
02 - Providers.ps1 is 1,819 bytes long.
03 - Variables.ps1 is 4,717 bytes long.
04 - Strings.ps1 is 7,970 bytes long.
05 - Arrays and Hashtables.ps1 is 8,486 bytes long.
06 - Logic Branching and Looping.ps1 is 4,315 bytes long.
07 - Functions.ps1 is 9,574 bytes long.
08 - Classes.ps1 is 6,210 bytes long.
09 - Examples.ps1 is 3,125 bytes long.
Company.csv is 9,694 bytes long.
Company.json is 19,479 bytes long.
ReadMe.md is 1,115 bytes long.

So how do I get the verbose messages to display? Well all I have to do is add the -Verbose switch to the call.

Get-ChildItem | Show-FileInfo -Verbose

Result:

VERBOSE:   
  Function: Show-FileInfo
  Starting at 2021-08-15 07:28:26 PM
01 - Cmdlets.ps1 is 3,732 bytes long.
02 - Providers.ps1 is 1,819 bytes long.
03 - Variables.ps1 is 4,717 bytes long.
04 - Strings.ps1 is 7,970 bytes long.
05 - Arrays and Hashtables.ps1 is 8,486 bytes long.
06 - Logic Branching and Looping.ps1 is 4,315 bytes long.
07 - Functions.ps1 is 9,574 bytes long.
08 - Classes.ps1 is 6,210 bytes long.
09 - Examples.ps1 is 3,125 bytes long.
Company.csv is 9,694 bytes long.
Company.json is 19,479 bytes long.
ReadMe.md is 1,115 bytes long.
VERBOSE:   
  Function: Show-FileInfo
  Finished at 2021-08-15 07:28:26 PM

Simply by adding the -Verbose switch, it now displays the text passed into any Write-Verbose cmdlets you coded. If you look at our param block, you won’t see the Verbose switch declared, as we had to in the previous article Fun With the PowerShell Switch Parameter.

PowerShell automatically adds the Verbose switch to every advanced function you author. You don’t have to do anything special. If PowerShell sees you’ve added the switch when you (or a user) runs your function, it will automatically execute any Write-Verbose cmdlets for you.

Taking It to the Next Level

As is, this function requires our user to manually calculate the run time by comparing the start and end times. But PowerShell developers are a courteous bunch, and so we’ll take care of this for them.

Let’s update the end block to perform the calculation.

  end
  {
    $et = Get-Date

    $rt = $et - $st  # Run Time

    # Format the output time
    if ($rt.TotalSeconds -lt 1)
      { $elapsed = "$($rt.TotalMilliseconds.ToString('#,0.0000')) Milliseconds" }
    elseif ($rt.TotalSeconds -gt 60)
      { $elapsed = "$($rt.TotalMinutes.ToString('#,0.0000')) Minutes" }
    else
      { $elapsed = "$($rt.TotalSeconds.ToString('#,0.0000')) Seconds" }


    Write-Verbose @"
  `r`n  Function: $fn
  Finished at $($et.ToString('yyyy-MM-dd hh:mm:ss tt'))
  Elapsed Time $elapsed
"@
  }

After getting my end time, I subtract the start time from the end time, and place it in the $rt variable, short for run time. This will produce a variable that is a datetime datatype.

A PowerShell datetime datatype has some very useful methods. The first we’ll use is TotalSeconds, which indicates how many seconds are in our variable. In the if statement, check to see if the run time seconds is less than 1. If so, it uses another property TotalMilliseconds that (obviously) returns the total number of milliseconds in the run time variable. It converts it to a string, and we pass in a string format so we get a nice output. Finally it appends the text Milliseconds so the user will now what time unit they are dealing with, and places it all in a variable $elapsed.

The elseif is similar. If the total seconds exceeds 60, we’ll display the run time in minutes. The else script block covers the case when the elapsed time is between 1 and 60 seconds.

Finally we add a third line to the here string passed into Write-Verbose.

Highlight the entire function and execute it so the new version is in memory. Then call the function using the Verbose switch.

Get-ChildItem | Show-FileInfo -Verbose

Result:

VERBOSE:   
  Function: Show-FileInfo
  Starting at 2021-08-15 07:59:39 PM
01 - Cmdlets.ps1 is 3,732 bytes long.
02 - Providers.ps1 is 1,819 bytes long.
03 - Variables.ps1 is 4,717 bytes long.
04 - Strings.ps1 is 7,970 bytes long.
05 - Arrays and Hashtables.ps1 is 8,486 bytes long.
06 - Logic Branching and Looping.ps1 is 4,315 bytes long.
07 - Functions.ps1 is 9,977 bytes long.
08 - Classes.ps1 is 6,210 bytes long.
09 - Examples.ps1 is 3,125 bytes long.
Company.csv is 9,694 bytes long.
Company.json is 19,479 bytes long.
ReadMe.md is 1,115 bytes long.
VERBOSE:   
  Function: Show-FileInfo
  Finished at 2021-08-15 07:59:39 PM
  Elapsed Time 19.9018 Milliseconds

As you can see, these few extra lines of code provides a more professional looking output, not to mention accurate. The user will not be forced to manually calculate times.

And don’t forget you can place these into code snippets for fast and easy use. As constructed both the opening and closing sections can simply be inserted without modification. Again, see my GitHub project, VSCode_User_Snippets for examples on using code snippets in Visual Studio Code.

Conclusion

In this post we saw how the built in -Verbose switch works along with the companion Write-Verbose. This can provide a useful tool to keep users appraised of extra, “meta” information such as run times without obscuring the output of the function when it is used in normal circumstances.

In the next blog post we’ll look at the counterpart for verbose, -Debug and it’s Write-Debug cmdlet.

If you want to learn more about PowerShell, check out my Pluralsight course PowerShell 7 Quick Start for Developers on Linux, macOS and Windows, one of many PowerShell courses I have on Pluralsight. All of my courses are linked on my About Me page.

If you don’t have a Pluralsight subscription, just go to my list of courses on Pluralsight . At the top is a Try For Free button you can use to get a free 10 day subscription to Pluralsight, with which you can watch my courses, or any other course on the site.

Fun With the PowerShell Switch Parameter

Introduction

Over the last few posts I’ve been covering PowerShell functions, both Basic Functions and Advanced Functions. In this post I had originally intended to cover two switches available to all advanced functions, Verbose and Debug.

But then it occurred to me, not everyone may know what a switch parameter is. And to be clear, I’m not talking about the switch statement. I covered that in my post Fun With PowerShell Logic and Branching.

Here, I’m talking about the ability to use what PowerShell calls a switch parameter.

We’ll take a deeper look in a moment, but first let me mention that for all of the examples, we’ll display the code, then under it the result of our code. In this article I’ll be using PowerShell Core, 7.1.3, and VSCode. The examples should work in PowerShell 5.1 in the PowerShell IDE, although they’ve not been tested there.

To run a snippet of code highlight the lines you want to execute, then in VSCode press F8 or in the IDE F5. You can display the contents of any variable by highlighting it and using F8/F5.

A Simple Switch Example

If you’ve been following my series, you know that you can pass in values, in other words parameters, to a function by name. For example:

Get-AValue -one 33 -two 42

-one and -two were the parameter names, and 33 and 42 the values passed in for them.

A switch is similar, you list the name of the switch on call to the function, but unlike a regular parameter you pass in no value. The presence of the switch is enough to tell the function what you want to do.

Let’s look at an example using the common Write-Host cmdlet.

Write-Host 'Hi Mom' -NoNewline -ForegroundColor Green
Write-Host ' and Dad' -ForegroundColor Yellow

Result:
Hi Mom and Dad Image

Normally, Write-Host displays its text, then automatically moves the cursor to the next line. However, Write-Host has a -NoNewLine switch. Including the switch will keep Write-Host from adding the line feed at the end, and allows us do fun things like having two different colors of text on the same line.

Note that we didn’t have to pass in any value, didn’t have to set it to true or false. Just including the switch was enough to say “hey don’t wrap to a new line”.

Implementing Your Own Switches

Switches wouldn’t be any fun if we couldn’t use them too! And it’s actually quite easy. I started off the whole PowerShell series on my blog with a post Fun With PowerShell Get-Random. In it I described (among other things) how to use the Get-Random cmdlet to return a random value from an array. We’ll borrow on that idea for this function.

function Get-RandomSouthAmericanCountry()
{
[CmdletBinding()]
param(
[switch] $UpperCase
)

$array = (
'Argentina', 'Bolivia', 'Brazil',
'Chile', 'Columbia', 'Ecuador',
'Guyana', 'Paraguay', 'Peru',
'Suriname', 'Uruguay', 'Venezuela'
)

# Get an item from the array and convert from
# a generic object to a string
$retVal = $($array | Get-Random).ToString()

# If user passed in upper case switch,
# upper case return value
if ($UpperCase.IsPresent)
{
$retVal = $retVal.ToUpper()
}

return $retVal

}

I’ll give a shout of sorts to my wonderful geek friends who live on the South American continent with this example, our Get-RandomSouthAmericanCountry function. Of course we start with [CmdletBinding()] to indicate this is an advanced function. Then we have our param block.

param(
[switch] $UpperCase
)

We have one parameter named $UpperCase. But instead of having a traditional data type in front, we have [switch]. This will indicate to PowerShell that $UpperCase is a switch. We’ll see how to use it within our code in a moment, but first let’s take a quick look at the rest of the function.

After the param block we have an array which lists the countries in South America (according to the countries of the world website I found).

I then fall to this line to get the country:

$retVal = $($array | Get-Random).ToString()

First, I use $array | Get-Random to get a random country. This will return an element from the array, but I need it to be a datatype of string rather than a generic object. So I wrap the result of Get-Random in $( ) to make PowerShell evaluate it as an object. Then I can call the .ToString() method of the object to convert it to a string. Finally it gets assigned to my return variable, $retVal.

The next part is where I look to see if my switch was used.

if ($UpperCase.IsPresent)
{
$retVal = $retVal.ToUpper()
}

Here, you use the name of the switch and access its .IsPresent property. This returns $true if the switch was passed in. Thus if it was passed in, the if statement will take affect and call the .ToUpper() method on our $retVal string. This is why we had to convert to a string, string data types have a .ToUpper() method, generic objects don’t.

As the final step we return the value held in $retVal, which sticks to the rule of having one exit point for a function.

After highlighting the function and running it using F8/F5 to get it in memory, we’ll call it. First, we’ll so so using it without the switch.

Get-RandomSouthAmericanCountry

Result:
Venezuela

Great, now let’s call it with our switch.

Get-RandomSouthAmericanCountry -UpperCase

Result:
URUGUAY

In this call, just including the switch caused the output to display in upper case.

Switches Work with Basic Functions Too

In the above example I used an advanced function. Be aware that if you are using a basic function, as I described in a previous article, you can still use a switch.

Here is the previous example rewritten as a basic function. (Note the function declaration should all be on one line, the blog layout will probably wrap it.)

function Get-RandomSouthAmericanCountryBasic([switch] $UpperCase)
{
$array = (
'Argentina', 'Bolivia', 'Brazil',
'Chile', 'Columbia', 'Ecuador',
'Guyana', 'Paraguay', 'Peru',
'Suriname', 'Uruguay', 'Venezuela'
)

# Get an item from the array and convert from
# a generic object to a string
$retVal = $($array | Get-Random).ToString()

# If user passed in upper case switch,
# upper case return value
if ($UpperCase.IsPresent)
{
$retVal = $retVal.ToUpper()
}

return $retVal

}

The only real difference is the removal of the [CmdletBinding()} statement and the param block. I then declared the [switch] $UpperCase inside the parenthesis like you would do with a basic function.

By the way, like most things in PowerShell casing isn’t important. These are all the same to PowerShell:

[switch] $UpperCase
[SWITCH] $UpperCase
[Switch] $UpperCase

When you strongly type your variables, for example using [int] or [string], it’s common to use lower case, so I generally stick to lower for [switch], but it’s not mandatory. Just pick a standard for you and your team, then stick with it.

Naming Switches

When creating your switches, be sure to use clear names. In our example, UpperCase was a good switch name. Especially when using the Get- verb in our function name, as it implied the results should be in upper case. It doesn’t occur to me that I need to pass in some value to make it happen.

Contrast that with a switch name like MaxValue. Here, I wonder if I want to return a maximum value, or if I need to pass in a value that I want to be the maximum value, or something else.

A Note on $switchName -eq $true

You may see examples on the web such as:

if ($UpperCase -eq $true)

to check to see if a switch is present. This is a much older, and very much out of date method. Microsoft recommends you use the .IsPresent method that you saw in these examples, you should stick to it in your code.

Conclusion

In this post we covered the useful switch parameter. It’s very easy to use, and can add a lot of flexibility to your functions. This also gives a good foundation for discussion of the Verbose and Debug switches built into all Advanced Functions in our next blog post.

The demos in this series of blog posts came from my Pluralsight course PowerShell 7 Quick Start for Developers on Linux, macOS and Windows, one of many PowerShell courses I have on Pluralsight. All of my courses are linked on my About Me page.

If you don’t have a Pluralsight subscription, just go to my list of courses on Pluralsight. At the top is a Try For Free button you can use to get a free 10 day subscription to Pluralsight, with which you can watch my courses, or any other course on the site.