Fun With PowerShell Objects – Modifying Existing Objects

Introduction

So far we’ve covered a lot in this series on PowerShell Objects. We began by creating a class using the class keyword introduced in PowerShell 5. We then looked at using PSCustomObject to create new objects, then add methods to those objects. In the previous post, we used C# code to create our PowerShell objects.

In this installment, we’ll see how to add properties and methods to existing objects created by someone else. For this example we’ll use objects returned by the Get-ChildItem cmdlet, but we could use any objects.

For all of the examples we’ll display the code, then (when applicable) under it the result of our code. In this article I’ll be using PowerShell Core, 7.2.1, and VSCode. The examples should work in PowerShell 5.1 in the PowerShell IDE, although they’ve not been tested there.

In the code samples be on the lookout for the backtick ` , PowerShell’s line continuation character, at the end of many lines. The blog formatting has a limited width, so using the line continuation character makes the examples much easier to read. My post Fun With PowerShell Pipelined Functions dedicates a section to the line continuation character if you want to learn more.

To run a snippet of code highlight the lines you want to execute, then in VSCode press F8 or in the IDE F5. You can display the contents of any variable by highlighting it and using F8/F5.

Getting The Objects to Work With

As stated in the Introduction, we will use the objects returned by the Get-ChildItem cmdlet to add a new property and method to. We’ll set our location (in my case to the folder where these samples are stored), call the Get-ChildItem cmdlet and store the result in a variable, $items.

Set-Location C:\Users\arcan\OneDrive\BlogPosts\Markdown
$items = Get-ChildItem

Let’s look a the first item in the $items collection to see what its datatype is.

$items[0].GetType()

Result:

IsPublic IsSerial Name     BaseType
-------- -------- ----     --------
True     False    FileInfo System.IO.FileSystemInfo

As you can see, each item is of type FileInfo. Each object contains information about the corresponding file it represents. You can find a full list of properties and methods for the FileInfo class in the online Microsoft Documentation for FileInfo.

Coding Our New Method

For this example, we are going to iterate over our collection of FileInfo objects. To each one, we’ll be adding one property and one method. The property will just be a number that can be used to uniquely identify each object. We’ll look more at that momentarily.

The method we’ll add will analyze the existing Extension property of the FileInfo object. As I’m sure you know, the extension is the data that occurs after the period in the file name, and is used to identify the type of file it is.

Here is the script block for this method.

# Define the custom script property
$script = {

  switch ($this.Extension)
  {
    '.cs'   {$retValue = 'C#'}
    '.md'   {$retValue = 'Markdown'}
    '.ps1'  {$retValue = 'Script'}
    '.psd1' {$retValue = 'Module Definition'}
    '.psm1' {$retValue = 'Module'}
    '.xml'  {$retValue = 'XML File'}
    '.pptx' {$retValue = 'PowerPoint'}
    '.csv'  {$retValue = 'Comma Separated Values file'}
    '.json' {$retValue = 'JavaScript Object Notation data'}
    default {$retValue = 'Sorry dude, no clue.'}
  }

  return $retValue
}

Within the switch statement, I use $this to access the current object. It then access the Extension property of the current object.

It then goes down the list, comparing the extension value to the text to the left of the squiggly brace. If it finds a match, it will run the code inside the script block. This simply sets a return value variable to a more human friendly text representation of the file type.

If no match is found, it runs the code by the default value. For more in the switch statement, see my post Fun With PowerShell Logic Branching.

Adding The Property and Method to the FileInfo Object

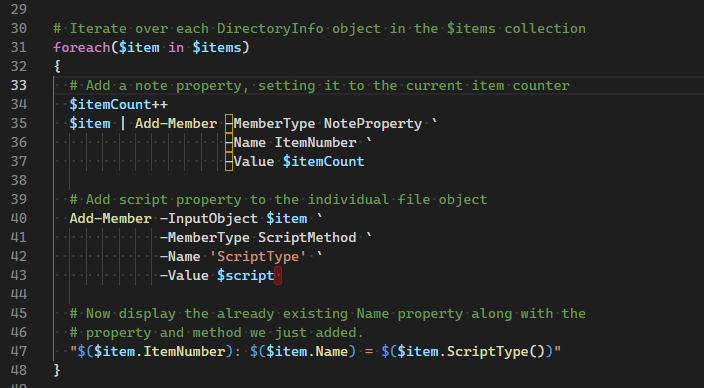
Now that our script is defined, it’s time to add it as well as a property to our FileInfo objects. Let’s see the code, then we’ll break it down.

# Create an item count variable
$itemCount = 0

# Iterate over each DirectoryInfo object in the $items collection
foreach($item in $items)
{
  # Add a note property, setting it to the current item counter
  $itemCount++
  $item | Add-Member –MemberType NoteProperty `
                     –Name ItemNumber `
                     –Value $itemCount

  # Add script property to the individual file object
  Add-Member -InputObject $item `
             -MemberType ScriptMethod `
             -Name 'ScriptType' `
             -Value $script

  # Now display the already existing Name property along with the
  # property and method we just added.
  "$($item.ItemNumber): $($item.Name) = $($item.ScriptType())"
}

We begin by creating a variable, $itemCount. Within the foreach loop we’ll increment it, then use it as our index for the ItemNumber property.

The foreach loop is entered, where we iterate over the collection of FileInfo objects stored in $items. Each time through the loop, the current item is copied into the $item variable. For more info on foreach, see my post Fun With PowerShell Loops.

The next line is straightforward, we simply increment the $itemCount by one.

You’ve seen the Add-Member cmdlet used in recent posts on adding properties and methods to a PSCustomObject, so I won’t delve deep into it here.

The first call to Add-Member takes the current FileInfo object, stored in $item, and adds a new property we’ll name ItemNumber. When we add it, we’ll go ahead and assign the value in $itemCount. Note that this property could be updated at a future time, although we won’t need to for this example.

We then call Add-Member a second time, adding in the script you saw earlier and naming it ScriptType.

Finally, we use string interpolation to build a nicely formatted string with the item number, the name of the file (a native property of the FileInfo object), and finally we call the method we just added ScriptType.

Here is the final output of our effort.

Result:

1: blog-template.md = Markdown
2: fun-with-powershell-classes-the-basics.md = Markdown
3: fun-with-powershell-classes-the-basics.ps1 = Script
4: fun-with-powershell-enum-flags-header.png = Sorry dude, no clue.
5: Fun-With-PowerShell-Enum-Flags.md = Markdown
6: Fun-With-PowerShell-Enums.md = Markdown
7: Fun-With-PowerShell-Objects-Part 1.md = Markdown
8: Fun-With-PowerShell-Objects-Part 1.ps1 = Script
9: Fun-With-PowerShell-Objects-Part 2.md = Markdown
10: Fun-With-PowerShell-Objects-Part 2.ps1 = Script
11: Fun-With-PowerShell-Objects-Part 3.cs = C#
12: Fun-With-PowerShell-Objects-Part 3.md = Markdown
13: Fun-With-PowerShell-Objects-Part 3.ps1 = Script
14: Fun-With-PowerShell-Objects-Part 4.md = Markdown
15: Fun-With-PowerShell-Objects-Part 4.ps1 = Script
16: fun-with-powershell-objects-part-1.png = Sorry dude, no clue.
17: Fun-With-PowerShell-Providers.md = Markdown
18: Fun-With-PowerShell-Write-Debug.md = Markdown
19: Fun-With-PowerShell-Write-Verbose-and-Write-Debug.md = Markdown
20: Fun-With-VSCode-Code-Snippets.md = Markdown
21: IMG_0965.JPG = Sorry dude, no clue.
22: more-fun-with-powershell-enums-header.png = Sorry dude, no clue.
23: More-Fun-With-PowerShell-Enums.md = Markdown
24: More-Fun-With-PowerShell-Enums.ps1 = Script
25: security-for-apartment-dwellers-01.png = Sorry dude, no clue.
26: Security-for-Apartment-Dwellers-header.png = Sorry dude, no clue.
27: Security-for-Apartment-Dwellers.md = Markdown

I author these blog posts in markdown within VSCode first, prior to copying them into my WordPress based blog. This folder contains a markdown file for each post, most of which have one or more accompanying code files associated with it.

I deliberately omitted the image type extensions (.jpg, .png) from the switch statement so you could see the default option being taken.

Persistance

There is an important fact you need to recall when using this technique. The new property and method only exist for the set of FileInfo objects contained in our $items collection. If I were to get another collection, perhaps using $moreItems = Get-ChildItem, the FileInfo objects stored in $moreItems will NOT have our ItemNumber and ScriptType in them.

You will have to explicitly add custom properties and methods to objects each time you need them.

Conclusion

As you can see, this technique offers many possibilities. You could define a script block at the top of your script that does a complex calculation, or perhaps formats data for easier reading by the end user. Then you simply add this script block to the objects you generate.

This makes your code much more readable. The complex part is at the top where we define the script block, out of the way of your loops.

It can also promote code reuse. You can create a separate script with many script blocks that you commonly use. You call that script from the one you are currently developing, and you instantly have a set of new properties and methods that can be added to the set of objects you are working with.

This method provides for extensibility with objects you did not author, or have the source code for. Perhaps you have a compiled PowerShell module that came from a vendor, but it lacks that one method that would, for your unique situation, make it much easier to work with. You can now code that method for yourself and use it.

As time goes on I’m sure you’ll find many situations you can use these techniques to solve problems.

In the next three installments of this series we’ll return to the PowerShell class type. We’ll look at some of the advanced abilities that it offers.

The demos in this series of blog posts were inspired by my Pluralsight course PowerShell 7 Quick Start for Developers on Linux, macOS and Windows, one of many PowerShell courses I have on Pluralsight. All of my courses are linked on my About Me page.

If you don’t have a Pluralsight subscription, just go to my list of courses on Pluralsight . At the top is a Try For Free button you can use to get a free 10 day subscription to Pluralsight, with which you can watch my courses, or any other course on the site.

Advertisement

Fun With PowerShell Objects – Creating Objects from C#

Introduction

This is the next installment in my series on creating objects in PowerShell. In the first installment we showed how to create an object using the class type introduced in PowerShell 5. That covered the basics, and in the last installment of this series we’ll cover some advanced techniques.

In the last two installment of this series, I covered the various ways to create objects using the PSCustomObject. We saw how to create it using the New-Object cmdlet, then how to add your custom properties to it using the Add-Member cmdlet. In the subsequent post we saw how to add new methods to it.

In this post, we’ll cover something new, creating an object based on C# code!

For all of the examples we’ll display the code, then (when applicable) under it the result of our code. In this article I’ll be using PowerShell Core, 7.2.1, and VSCode. The examples should work in PowerShell 5.1 in the PowerShell IDE, although they’ve not been tested there.

Additionally, be on the lookout for the backtick ` , PowerShell’s line continuation character, at the end of many lines in the code samples. The blog formatting has a limited width, so using the line continuation character makes the examples much easier to read. My post Fun With PowerShell Pipelined Functions dedicates a section to the line continuation character if you want to learn more.

To run a snippet of code highlight the lines you want to execute, then in VSCode press F8 or in the IDE F5. You can display the contents of any variable by highlighting it and using F8/F5.

Why C#

You may be asking yourself, why integrate C# code into PowerShell? Why not just define our objects using PowerShell? There are several reasons, especially if you are working with a team of C# developers, or are a C# developer yourself.

First, it can make testing your C# classes easy. You can code the class and save it in a .CS file. Then run some simple PowerShell to create a new object from your class and test its various properties and methods. This lets you make changes easily and test again. All without having to create a full blown C# project just to test.

It also allows for code reuse. Let’s say your C# developers have created a library to do some calculations, and you need to use one of the methods from that library, but that library expects you to pass in an object based on a class.

Let’s further the example, perhaps you have the task of reading in a CSV file, doing a calculation for each row, then outputting another CSV file, or maybe even a JSON file. This is a one time use, so you don’t want to go to the effort of creating a full blown C# project.

Using the techniques in this demo, you could simply access the C# file in which the class was defined, and generate an object from it in PowerShell. Then all you’d have to do is populate the object and pass it into the library to do the calculation, and output the result.

These are just a few simple examples, I’m sure you’ll come up with many more as the need arises. I’ll be honest, this isn’t something you will need to do a great deal, but when you do you’ll appreciate knowing how.

Embedding a C# Class in your PowerShell

In this first method, we’ll define a standard C# class within a here string then add it as a new data type in PowerShell. Once it exists as a type, we can then generate new objects from it. Let’s take a look at a very simple class definition.

$code = @"
using System;

public class SchemaTable
{
  public string DatabaseName;

  public string SchemaTableName(string pSchema, string pTable)
  {
    string retVal = "";  // Setup a return variable

    retVal = pSchema + "." + pTable;

    return retVal;

  } // public SchemaTableName

  public string FullName(string pSchema, string pTable)
  {
    string retVal = "";  // Setup a return variable

    retVal = this.DatabaseName + "." + pSchema + "." + pTable;

    return retVal;

  } // public FullName

} // class SchemaTable

"@

If you’ve read this far I’m going to assume you are familiar with C#, at least the basics of it, so I’ll keep this explanation at a high level.

We start by declaring a class named SchemaTable. The next line declares a variable (which will become a property) called DatabaseName.

I then create the first of two functions (which will become our methods). The SchemaTableName simply takes the two passed in values of pSchema and pTable and concatenates them together with a period between them.

The second, FullName, takes the value in DatabaseName and concatenates them with the schema and table name parameters, again using a period as a separator in the return string.

Next, we need to add this class as a new data type in PowerShell. You are already familiar with many data types, such as int, string, and more. We simply want to add a new data type to our PowerShell environment.

To do so, we will use the Add-Type cmdlet.

Add-Type -TypeDefinition $code `
         -Language CSharp

The first parameter, TypeDefinition, takes the C# code we defined in the here string. The second, Language, is pretty obvious. We simply need to let PowerShell know what language this code was written in.

As of right now, the only supported language is C#. Because of this, if you leave off the -Language CSharp parameter, it will default to C# as the language. I included it here for completeness, but will omit it for future examples in this post.

So now we’ve defined a class in C#, and have added it as a new data type in PowerShell. How then do we create an object from it?

We’ll turn to our old friend, New-Object.

$result = New-Object -TypeName SchemaTable

That’s it, that simple one line will create our new object based on the C# code we defined in the $code variable. You can even use Get-Member to display its properties and methods like you would with any other object.

$result | Get-Member

Result:

Name            MemberType Definition
----            ---------- ----------
Equals          Method     bool Equals(System.Object obj)
FullName        Method     string FullName(string pSchema, string pTable)
GetHashCode     Method     int GetHashCode()
GetType         Method     type GetType()
SchemaTableName Method     string SchemaTableName(string pSchema, string pTable)
ToString        Method     string ToString()
DatabaseName    Property   string DatabaseName {get;set;}

It contains the standard methods and properties built into all objects, but it also has the three we defined: FullName, SchemaTableName, and DatabaseName.

We can use these properties and methods just like ones in any other object. Let’s set the DatabaseName property, then display it.

$result.DatabaseName = 'MyDB'
$result.DatabaseName

Result:

MyDB

Likewise, we can access the methods we created. Here’s the SchemaTableName method.

$result.SchemaTableName('ASchema', 'ATable')

Result:

ASchema.ATable

And for completeness, the FullName method.

$result.FullName('ASchema', 'ATable')

Result:

MyDB.ASchema.ATable

C# Classes with Static Methods

In the original post in this series on basic PowerShell classes, I mentioned the concept of static methods and properties. As static method or property is simply one that can be called without having to generate a new object.

While we’ll circle back around to discuss implementing static methods and properties in PowerShell classes in the final post in this series, it is likely you’ll encounter C# classes with static methods and properties. As such we’ll go ahead and cover them here, while we are talking C#.

In the code below, I’ve defined a class with one method, and labeled it as static. In reality you will encounter many classes that have a mix of static and non-static members, but for this post we’ll keep the example simple.

$code = @"
using System;

public class StaticSchemaTable
{
  public static string FullName(string pSchema, string pTable)
  {
    string retVal = "";

    retVal = pSchema + "." + pTable;

    return retVal;

  } // public static FullName
} // class StaticSchemaTable
"@

As you can see, I’ve simply used the static keyword as part of the FullName function declaration. I also changed the name of the class, otherwise the code is the same as the previous demo.

Now we need to add this as a new type in our current PowerShell session.

Add-Type -TypeDefinition $code

Calling our static method requires different syntax. First, it won’t be necessary to create an object from it. Second, we’ll need to use the full name of our class in brackets, followed by two colons. We then indicate the name of the static function to call, and pass in any parameters.

$result = [StaticSchemaTable]::FullName('MySchema', 'myTable')
$result

Result:

MySchema.myTable

Static methods and parameters aren’t something that’s used a great deal, but they are used so you should know how to handle them.

Creating an Object from A C# File

While it is certainly possible to embed C# code right in your PowerShell, this could lead to some issues. The moment a developer makes a change to their .cs file, you are now out of sync. You don’t want to have to keep cutting and pasting all the time.

It makes far more sense, then, to simply access the C# file with the class definition, and load it at run time.

First, you need to create a C# file with the sample code. Here is what I put in my .cs file:

using System;

public class StaticSchemaTableInFile
{
  public static string FullName(string pSchema, string pTable)
  {
    string retVal = "";

    retVal = pSchema + "." + pTable;

    return retVal;

  } // public static FullName
} // class StaticSchemaTableInFile

This is the same static class you just saw, with the minor change to the class name.

In the next sample, I simply build the path to the file name, then use the Get-Content to read it.

$csPath = 'C:\Users\arcan\OneDrive\BlogPosts\Markdown\'
$file = "$($csPath)Fun-With-PowerShell-Objects-Part 3.cs"
$code = Get-Content $file | Out-String

Get-Content will read the contents of the file. By default Get-Content reads it as an array with each line in the file being an element, so we’ll have to pipe it through the Out-String cmdlet to convert it to a single string. This string is then stored in the $code variable. Of course you’ll need to update the path and file variables you used on your computer.

Now we do just like the previous demo, call Add-Type then run it.

Add-Type -TypeDefinition $code
$result = [StaticSchemaTableInFile]::FullName('mySchema', 'myTable')
$result

Result:

mySchema.myTable

Again, I reused the example from the static demo but we could also have used the first example, or any standard C# file containing class definitions.

Other Ways To Add Types

While outside the scope of this post, I did want to mention there are two other ways you can add new data types to your PowerShell scripts. First, Add-Type will let you load types stored in an assmebly, in other words a .dll file.

Second, if you are running on a Windows computer you can add types stored in native Windows APIs. If you want to learn more about these, I’ll refer you to the Add-Type Documentation at Microsoft.

Persistance

One last thing you need to be aware of. When you add a type it does not persist between sessions. The moment you close your command window or VSCode, that type goes away. You’ll need to recreate it the next time you run your script.

This is probably a good thing, as it’s doubtful you will need to use these types on a daily basis. Should you need to, though, you’ll have to edit your PowerShell profile and have them added within it.

Conclusion

In this post we saw how to create custom objects from C# classes. They could be embedded in our PowerShell code, or stored in external files. The subject of static methods and properties were mentioned, along with a demo on how to use them.

In the next post we’ll see a very useful technique, and cover the ability to add our own custom methods and properties to existing objects that others created, including ones built right into PowerShell.

The demos in this series of blog posts were inspired by my Pluralsight course PowerShell 7 Quick Start for Developers on Linux, macOS and Windows, one of many PowerShell courses I have on Pluralsight. All of my courses are linked on my About Me page.

If you don’t have a Pluralsight subscription, just go to my list of courses on Pluralsight . At the top is a Try For Free button you can use to get a free 10 day subscription to Pluralsight, with which you can watch my courses, or any other course on the site.

Fun With PowerShell Objects – Adding Methods to PSCustomObject

Introduction

In the previous installment of this series, I covered the various ways to create objects using the PSCustomObject. We saw how to create it using the New-Object cmdlet, then how to add your custom properties to it using the Add-Member cmdlet.

In this post we’ll learn how to add our own methods to our objects using script blocks. Before we go on, just a quick reminder on vocabulary.

In object oriented terminology, objects have properties and methods. From the perspective of the script writer who uses our object, they only know of the properties and methods we expose. They don’t know, or care, how we implemented them.

From the perspective of us, the authors of the code to create the object, it’s a little different. What the end user calls properties we store in variables. We implement our objects methods using functions.

When we are talking about our code in terms of writing our object, you will frequently see the terms properties and variables used interchangeably. Likewise you’ll see the terms method and function used interchangeably.

For all of the examples we’ll display the code, then (when applicable) under it the result of our code. In this article I’ll be using PowerShell Core, 7.2.1, and VSCode. The examples should work in PowerShell 5.1 in the PowerShell IDE, although they’ve not been tested there.

Additionally, be on the lookout for the backtick ` , PowerShell’s line continuation character, at the end of many lines in the code samples. The blog formatting has a limited width, so using the line continuation character makes the examples much easier to read. My post Fun With PowerShell Pipelined Functions dedicates a section to the line continuation character if you want to learn more.

To run a snippet of code highlight the lines you want to execute, then in VSCode press F8 or in the IDE F5. You can display the contents of any variable by highlighting it and using F8/F5.

Script Blocks

Before we get started, it’s important to understand the concept of a script block. A script block is a piece of code encapsulated within squiggly braces {}. This code is meant to execute as a unit. Here’s an example you’ve probably seen before.

$x = 1
if ($x -eq 1)
{ Write-Host 'Yep its one' }

The code on the last line is the script block. This unit of code, within the squiggly braces, will execute should the if statement evaluates to true.

It’s possible to define your own script blocks, and store them in a variable.

$hw = {
        Clear-Host
        "Hello World"
      }

Here I’ve generated a simple block with two lines. The first clears the display, the second prints Hello World.

Now you have a variable, $hw, holding a script block. How can we use this?

First, we could execute the script block stored in the variable. To do so, we need to precede the name of the variable with an ampersand &. The ampersand is the PowerShell shortcut for execute the code block contained in this variable.

& $hw

Result:

Hello World

Although it’s difficult to show, the display did indeed clear before displaying our text.

Note the space between the & and the variable name is optional, this works too.

&$hw

Personally I think the space makes it a bit easier to read, not to mention it’s easier for the eye to notice the &. Whichever way you go, I suggest picking a format and sticking to it.

There are some interesting ways we can use this concept. Of course we’ll look at using script blocks to add new methods to an object in a moment, but another fun thing you can do is pass a script block into a function.

A quick note, it is generally considered poor practice to have Write-Host statements within a function. Since this is just a simple demo though, we’ll use them just to illustrate our concepts.

function Run-AScriptBlock($block)
{
  Write-Host 'About to run a script block'

  & $block

  Write-Host "Block was run"
}

Run-AScriptBlock $hw

Result:

Hello World
Block was run

The first line to display "About to run…." did execute, but it was wiped out due to the Clear-Host in the script block.

The script block then displayed Hello World, and returned control to the function. The function then displayed "Block was run" then exited.

The PowerShell testing tool, Pester, makes extensive use of this functionality to pass the code blocks being tested into Pester’s unit testing functions.

Your imagination is probably running wild at the various ways you can use this. For example, you could build a string of PowerShell code based on certain conditions, then once the string of code is complete execute it.

At this point you have a nice foundation on the concept of script blocks, so let’s move on to the main topic of this post.

Starting Point

This post picks up where the previous one left off. If you recall, our previous post built a function to generate a custom object of type PSCustomObject. If you need an explanation please go back and read part 1 of this series, but to make it easy for you I’ll reproduce the function needed to create the object we’ll be working with.

function Create-Object ($Schema, $Table, $Comment)
{
  # Build a hash table with the properties
  $properties = [ordered]@{ Schema = $Schema
                            Table = $Table
                            Comment = $Comment
                          }

  # Start by creating an object of type PSObject
  $object = New-Object –TypeName PSObject -Property $properties

  Add-Member -InputObject $object `
             -MemberType AliasProperty `
             -Name 'Description' `
             -Value 'Comment'

  # Return the newly created object
  return $object
}

$myObject = Create-Object -Schema 'MySchema' `
                          -Table 'MyTable' `
                          -Comment 'MyComment'
$myObject

Adding a Method (aka Function) to an Object

With the knowledge above, combined with what we learned in the previous post, it turns out adding a simple function to an object is easy. First, we need to define our function in a script block. This function will combine the schema name and the table name with a period to separate the two.

$block = {
           $st = "$($this.Schema).$($this.Table)"
           return $st
         }

In this example I used string interpolation to build my return string. (For more on string interpolation, see my post Fun With PowerShell Strings.)

Note my use of the $this keyword. Just like with objects generated by the more modern classes in PowerShell 5 and beyond, $this is used to represent the current instance of our custom object. Thus we’ll be getting the schema and table names for the current object, stored in $myObject, and not one in another variable that was instantiated using the same code.

If you aren’t a fan of string interpolation, you could have opted for concatenation with $st = $this.Schema + '.' + $this.Table to generate the return value, but interpolation is the generally accepted best practice for building strings.

Concatenation is generally slower and takes more processing power than interpolation. Granted in this case it is barely measurable, but done over a dataset of millions of rows you might see an impact.

With the schema-table string ($st) built it is then returned.

Now we will use the Add-Member cmdlet to add this function to our custom object. Assuming you have already run the function to create the $myObject variable, shown in the Starting Point section, you can use the following code to achieve our goal.

Add-Member -InputObject $myObject `
           -MemberType ScriptMethod `
           -Name 'SchemaTable' `
           -Value $block

I start by passing in the object I wish to add a member to, our $myObject variable.

Next I indicate what type of member we are adding. ScriptMethod is the value to pass in to MemberType to indicate the data in the variable is a script block and should be manifested as a method.

The Name is next, in other words what we want to name this method. Finally into the Value parameter we pass in the variable holding the script block.

Once you add this new member, you can simply call it using the dot notation, with one important caveat. Because this is a method, you need to add parenthesis to the name of the method.

$myObject.SchemaTable()

Result:

MySchema.MyTable

Using the parenthesis lets PowerShell make the distinction between a property and a method.

Parameters

What’s that? You in the back row raising your hand, what did you say? Parameters? You want to add parameters to your new method?

Well, OK because you asked so nice.

This turns out to be pretty easy. We just need to add a param section within our script block.

$block = {
           param ($DatabaseName)
           $dst = "$DatabaseName.$($this.Schema).$($this.Table)"
           return $dst
         }

On the first line of our script block we use the param keyword, then have a list of our parameters within parenthesis. Here we only have one, $DatabaseName, but we could have more separated by commas.

I then build a string that uses the passed in database name, with the schema and table names already in the object, and finally return it.

Next, I use Add-Member to add this function to our object just like I did with the previous example, the only difference being the name and the variable with our script block. Now we can call it.

$myObject.DatabaseSchemaTable('MyDBName')

Result:

MyDBName.MySchema.MyTable

Conclusion

This post began with an explanation of script blocks. Using this knowledge we added new methods to our existing object. One even allowed us to pass in a parameter.

In in the next post we’ll see how to create custom objects from bits of C# code. Later on we’ll see how to add our own properties and methods to an existing object created by PowerShell.

Well conclude this series by returning to our discussion of PowerShell classes by looking at some advanced features of the built in class construct.

The demos in this series of blog posts were inspired by my Pluralsight course PowerShell 7 Quick Start for Developers on Linux, macOS and Windows, one of many PowerShell courses I have on Pluralsight. All of my courses are linked on my About Me page.

If you don’t have a Pluralsight subscription, just go to my list of courses on Pluralsight . At the top is a Try For Free button you can use to get a free 10 day subscription to Pluralsight, with which you can watch my courses, or any other course on the site.

Fun With PowerShell Objects – PSCustomObject

PSCustomObject Sample

Introduction

Before the holidays I had started a series on classes and objects in PowerShell. If you haven’t read my post Fun With PowerShell Classes – The Basics you should give it a quick read. There are terms that were defined in it that we’ll be using here.

For this post I’ll begin a series on the use of PSCustomObject. Prior to the addition of classes in PowerShell 5.0, this was the technique needed to create your own customized objects. It still has a lot of validity today though, as you can use these techniques to extend the objects other people defined, including those already built into PowerShell.

In addition, understanding the use of PSCustomObject will give you a better understanding of the way classes work.

First let me mention that for all of the examples we’ll display the code, then under it the result of our code when applicable. In this article I’ll be using PowerShell Core, 7.2.1, and VSCode. The examples should work in PowerShell 5.1 in the PowerShell IDE, although they’ve not been tested there.

Second, be on the lookout for the backtick ` , PowerShell’s line continuation character, at the end of many lines in the code samples. The blog formatting has a limited width, so using the line continuation character makes the examples much easier to read. My post Fun With PowerShell Pipelined Functions dedicates a section to the line continuation character if you want to learn more.

To run a snippet of code highlight the lines you want to execute, then in VSCode press F8 or in the IDE F5. You can display the contents of any variable by highlighting it and using F8/F5.

Code to Generate Our PSCustomObject

For these demos, I’m going to wrap the creation of our objects within a function. This is a common technique which allows us to create multiple objects based on a single set of code. Note this isn’t required, you could use these techniques anywhere in your code. I just find placing it in functions makes for greater reuse.

If you need a refresher on PowerShell functions, I’ll refer you back to my posts on functions: Fun With PowerShell Basic Functions; Fun With PowerShell Advanced Functions; and Fun With PowerShell Pipelined Functions.

Let’s take a look at our first example, then break down each line.

function Create-Object ($Schema, $Table, $Comment)
{
  # Build a hash table with the properties
  $properties = [ordered]@{ Schema = $Schema
                            Table = $Table
                            Comment = $Comment
                          }

  # Start by creating an object of type PSObject
  $object = New-Object –TypeName PSObject `
                       -Property $properties

  # Return the newly created object
  return $object
}

Our first line, obviously, defines our basic function. For this example I will be creating an object that holds the schema and table names for a database. It also will allow for a comment, so these are the three parameters that are passed in.

To add a list of properties to our object, we need to use a hash table. I define the hash table with three properties, Schema, Table, and Comment, and assign the parameter variables we passed in for their respective values. And yes, I do have a post on hash tables if you wish to know more about them, Fun With PowerShell Hash Tables.

Next is where the magic occurs. I call the cmdlet New-Object. For its TypeName parameter I use the value of PSObject. This will create a variable of type PSCustomObject. I then pass in my hash table name for the Property parameter.

This is assigned to the variable $object. In the final line I return that value to the calling code.

Before someone points it out, yes I could have made the last line of the function simply New-Object –TypeName PSObject -Property $properties and not assigned it to a variable. As I explain in my previously mentioned posts on functions, not consuming the output within the function returns the value to the code that called it.

Assigning to a value within my function, then returning that value, gives me some additional flexibility. Primarily I could use the Write-Verbose and Write-Debug statements to echo additional debugging information back to the developer (or user). It also allows for easier integration with testing tools, such as Pester.

For more info on Write-Verbose and Write-Debug, see my posts Fun With PowerShell Write-Verbose and Fun With PowerShell Write-Debug.

Creating Our Custom Object

Now that we have the function created, we can call it to create our custom object. We’ll then display its properties.

$myObject = Create-Object -Schema 'MySchema' `
                          -Table 'MyTable' `
                          -Comment 'MyComment'

# Display all properties
$myObject

Result:

Schema   Table   Comment
------   -----   -------
MySchema MyTable MyComment

As you can see, simply running the name of our variable produces a table. Across the top are the names of our properties, below it are the values we passed into the function to use as values.

If we want to prove to ourselves this is indeed a PSCustomObject, we can use the GetType method.

$myObject.GetType()

Result:

IsPublic IsSerial Name            BaseType
-------- -------- ----            --------
True     False    PSCustomObject  System.Object

As you can see in the Name column, it is indeed of type PSCustomObject!

Like any object, we can assign new values by referencing the individual properties.

$myObject.Schema = 'New Schema'
$myObject.Comment = 'New Comment'
$myObject

Result:

Schema     Table   Comment
------     -----   -------
New Schema MyTable New Comment

In the output, you can see the values for Schema and Comment were updated. The original value for the Table property remained unchanged.

Adding Properties One At A Time

There is an alternate method we can use to create a custom object. We can create an empty object, then use the Add-Member cmdlet to add each property individually.

Let’s rewrite our function to use this methodology.

function Create-Object ($Schema, $Table, $Comment)
{
  # Start by creating an object of type PSObject
  $object = New-Object –TypeName PSObject

  # Add-Member by passing in input object
  Add-Member -InputObject $object `
             –MemberType NoteProperty `
             –Name Schema `
             –Value $Schema

  # Alternate syntax, pipe the object as an input to Add-Member
  $object | Add-Member –MemberType NoteProperty `
                       –Name Table `
                       –Value $Table

  $object | Add-Member -MemberType NoteProperty `
                       -Name Comment `
                       -Value $Comment

  return $object
}

The function declaration is the same as in our first example. We then create an empty object through the line $object = New-Object –TypeName PSObject. This object now exists, but has none of our custom properties. Yet!

Now we are going to call the Add-Member cmdlet. Add-Member allows us to add new properties and methods to an existing object.

The first parameter, InputObject, is used to indicate what object we want to work with.

The next parameter is MemberType. There are a variety of types we can add to a custom object. In this case we want to add a text property, so the correct value to use is NoteProperty. We’ll see examples of other member types as we progress through this series.

The next two parameters are pretty self explanatory. The Name is what we want to call this property, and Value is the value we want it to have.

We then move on to add the Table property. In this example I wanted to show the alternative format for using Add-Member. You can take the object you want to add a member to, and pipe it into the Add-Member cmdlet. I’ve done this here for the Table property, as well as for the final property Comment.

Using this function has identical results as the previous example.

$myObject = Create-Object -Schema 'MySchema' `
                          -Table 'MyTable' `
                          -Comment 'MyComment'
$myObject

Result:

Schema   Table   Comment
------   -----   -------
MySchema MyTable MyComment

So why use Add-Member? Clearly the first example where we used a hash table to declare our property list was more compact.

Think about what we did here. We added new properties to an existing object! In this case it was a custom object we created. but this could be any PowerShell object. For example, we could have a list of file system objects returned to us by the Get-ChildItem cmdlet. Using Add-Member we have the ability to add new properties (and methods) to those objects.

We’ll see an example of this very thing in a future blog post, but for now let’s move on to the final section in today’s post.

Creating Property Aliases

If you’ve been in IT for any length of time, you’ve probably encountered the situation where two different groups refer to the same property by two different names. In our example, let’s say the DBA’s refer to the comment property as Comment. They would like to use that property name when they use your script.

Your software developers though don’t think of this as the comment property, instead they call it Description. They complain that having to use the property name "Comment" is causing a lot of coding errors.

This is one of those rare times we can make everyone happy, and we do so through the use of a property alias.

We’ll start with the same $object variable we left off with in the previous example. We’ll then use Add-Member to add a new alias.

Add-Member -InputObject $myObject `
           -MemberType AliasProperty `
           -Name 'Description' `
           -Value 'Comment' `
           -PassThru

Result:

Schema     Table   Comment     Description
------     -----   -------     -----------
New Schema MyTable New Comment New Comment

The first thing to note is the MemberType. Instead of a NoteProperty, we are using the type AliasProperty. This will let the Add-Member cmdlet know we are simply adding an alternate name for an existing property.

The Name parameter is the name for the alias. The Value is the name of the already existing property.

You’ll also note I added a switch to Add-Member, PassThru. In our previous examples, leaving this off ran the code but displayed no output. If want to see the results though, you can add the PassThru switch and the new values will be displayed in the terminal, as you saw in the Result section above.

Our alias added, you can see a new column Description. The value under it is identical to the one for comment.

Let’s change the Description property and see what happens.

$myObject.Description = 'The Description'
$myObject

Result:

Schema   Table   Comment         Description
------   -----   -------         -----------
MySchema MyTable The Description The Description

As you can see, both Comment and Description hold the newly updated value. Your users can now use these property names interchangeably.

We can of course update our original function to add the alias at the time the object is created.

function Create-Object ($Schema, $Table, $Comment)
{
  # Build a hash table with the properties
  $properties = [ordered]@{ Schema = $Schema
                            Table = $Table
                            Comment = $Comment
                          }

  # Start by creating an object of type PSObject
  $object = New-Object –TypeName PSObject `
                       -Property $properties

  Add-Member -InputObject $object `
             -MemberType AliasProperty `
             -Name 'Description' `
             -Value 'Comment'

  # Return the newly created object
  return $object
}

$myObject = Create-Object -Schema 'MySchema' `
                          -Table 'MyTable' `
                          -Comment 'MyComment'
$myObject

Result:

Schema   Table   Comment   Description
------   -----   -------   -----------
MySchema MyTable MyComment MyComment

As you can see, the function generated an object that included our alias. In this example I also combined methods. I used a hash table to define our initial set of properties, then used Add-Member to add the alias. I could have also put the addition of the alias in the second version of the function, where each property was added one at a time.

Conclusion

In this post we learned how to create a basic object using PSCustomObject. We added some properties, and even created an alias for one.

Now you may be asking "what about methods? Object can have methods too!" And you would be correct. In the next post in the series we’ll see how to add custom methods to our object.

In future posts we’ll see how to create custom objects from bits of C# code. Then we’ll see how to add our own properties and methods to an existing object created by PowerShell.

We’ll then return to our discussion of PowerShell classes by looking at some advanced features of the built in PowerShell class type.

The demos in this series of blog posts was inspired by my Pluralsight course PowerShell 7 Quick Start for Developers on Linux, macOS and Windows, one of many PowerShell courses I have on Pluralsight. All of my courses are linked on my About Me page.

If you don’t have a Pluralsight subscription, just go to my list of courses on Pluralsight . At the top is a Try For Free button you can use to get a free 10 day subscription to Pluralsight, with which you can watch my courses, or any other course on the site.